gulimall技术栈笔记
项目地址:

1.项目背景
1.1电商模式
市面上有5种常见的电商模式B2B、B2C、C2B、C2C、O2O
- B2B模式
B2B(Business to Business),是指商家与商家建立的商业关系。如:阿里巴巴。
- B2C模式
B2C(Business to Consumer),就是我们经常看到的供应商直接把商品卖给用户,即“商家对客户”模式,也 就是通常说的商业零售,直接面向消费者销售产品和服务。如:苏宁易购、京东、天猫。
- C2B模式
C2B模式(Consumer to Business),即消费者对企业。先有消费者需求产生而后有企业生产,即先有消费 者提出需求,后有生产企业按需求组织生产。
- C2C模式
C2C(Customer to Consumer),客户之间自己把东西放网上去卖,如:淘宝,咸鱼。
- O2O模式
O2O(Online to Offine),将线下商务的机会与互联网结合在一起,让互联网成为线下交易的前台。线上快 速支付,线下优质服务。如:饿了么,美团。
1.2谷粒商城
谷粒商城是一个B2C模式的电商平台,类似于淘宝、京东,销售自营商品给客户。
2.项目架构图
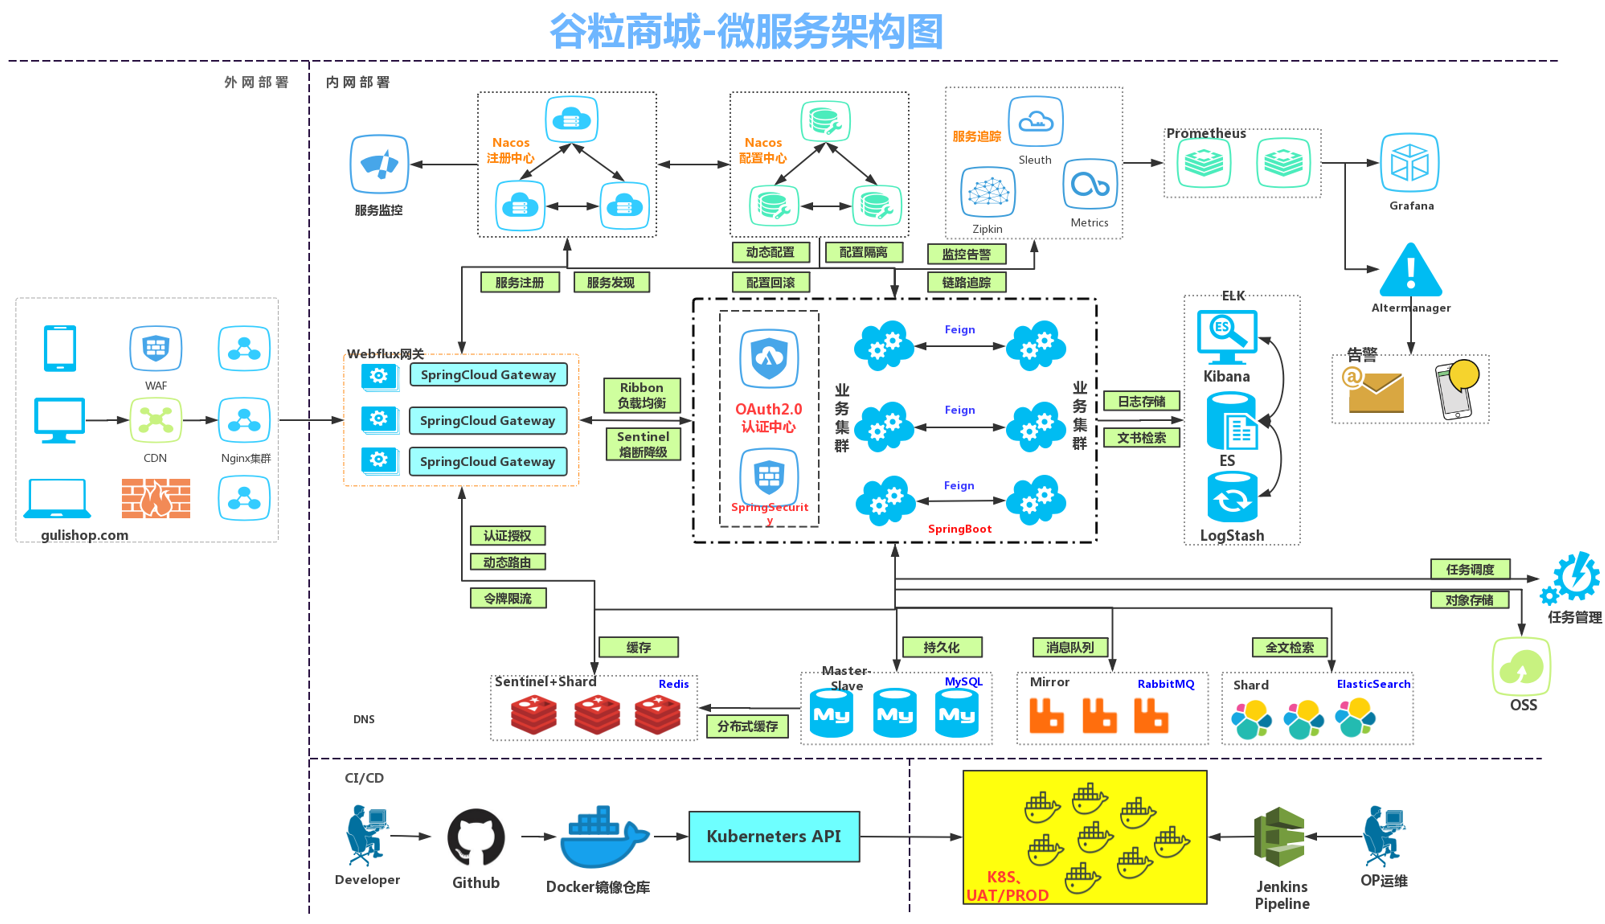
微服务架构图
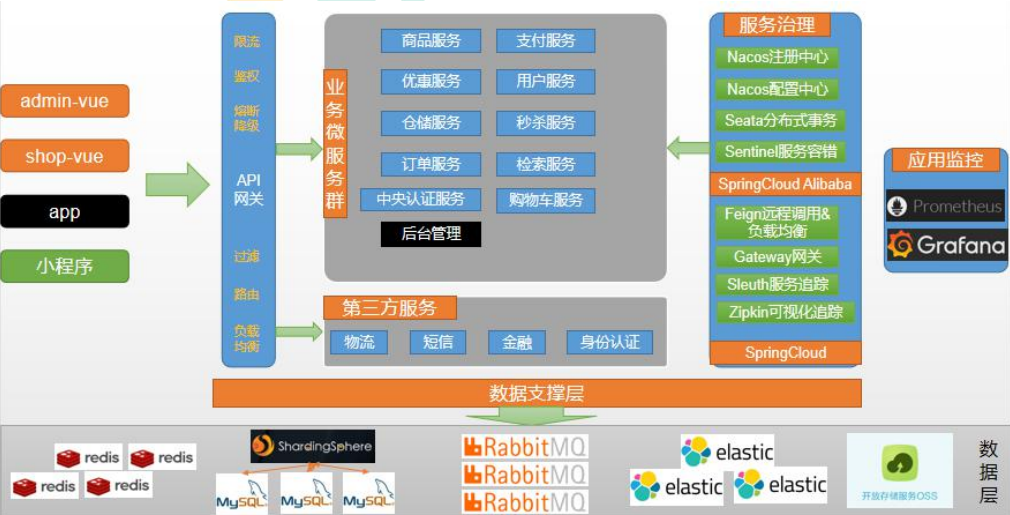
微服务划分图
3.项目技术&特色
- 前后端分离开发,并开发基于vue的后台管理系统
- SpringCloud全新的解决方案
- 全方位涉及应用监控、限流、网关、熔断降级等分布式方案
- 透彻讲解分布式事务、分布式锁等分布式系统的难点
- 分析高并发场景的编码方式,线程池,异步编排等使用
- 压力测试与性能优化
- 各种集群技术的区别即使用
- CI/CD使用
- …
4.项目前置要求
学习项目前的前置知识:建议使用win10系统进行开发
- 熟悉SpringBoot以及常见整合方案
- 了解SpringCloud
- 熟悉git、maven
- 熟悉linux,redis,docker基本操作
- 了解html,css,js,vue
- 熟练使用idea开发项目
5.分布式基础概念
5.1微服务
微服务架构风格就像是把一个单独的应用程序开发为一套小服务,每个小服务运行在自己的进程中,并使用轻量级机制通信,通常是HTTP API。这些服务围绕业务能力来构建,并通过完全自动化部署机制来独立部署。这些服务使用不同的编程语言书写,以及不同数据存储技术,并保持最低限度的集中式管理。
简而言之:==拒绝大型单体应用,基于业务边界进行服务微化拆分,各个服务独立部署运行==
5.2集群&分布式&节点
集群是个物理形态,分布式是个工作方式。
只要是一堆机器,就可以叫集群
《分布式系统原理与范型》定义
“分布式系统是若干个独立计算机的集合,这些计算机对于用户来说就像单个相关系统”
分布式系统是建立在网络之上的软件系统
分布式系统是指将不同的业务分布在不同的地方
集群指的是将几台服务器集中在一起,实现同一业务
节点:集群中的一个服务器
例如:京东是一个分布式系统,众多业务运行在不同的机器,所有业务构成一个大型的业务集群。每一个小的业务,比如用户系统,访问压力大的时候一台服务器是不够的。我们就应该将用户系统部署到多个服务器,也就是每一个业务系统也可以做集群化。
==分布式中的每一个节点,都可以做集群。而集群并不一定就是分布式的。==
5.3远程调用
在分布式系统中,各个服务可以处于不同主机,但是服务之间不可避免的需要相互调用,我们称之为远程调用。
SpringCloud中使用HTTP+JSON的方式完成远程调用

5.4负载均衡
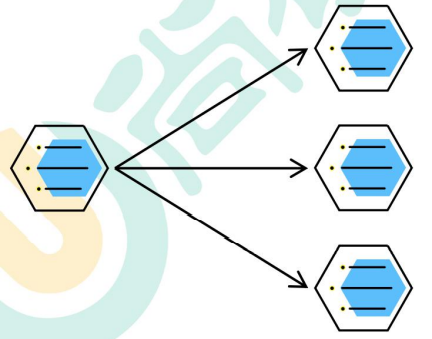
- 分布式系统中,A服务需要调用B服务,B服务在多台服务器中都存在,A调用任意一个服务器均可完成此功能。为了使每一个服务器都不要太忙或者太闲,我们可以负载均衡的调用每一个服务器,提升网站的健壮性
常见的负载均衡算法:
轮询: 为第一个请求选择健康池中的第一个后端服务器,然后按顺序往后依次选择,直到最后一个,然后循环
最小链接: 优先选择连接数最少,也就是压力最小的后端服务器,在会话较长的情况下可以考虑采取这种方式
散列: 根据请求源的ip散列(hash)来选择要转发的服务器。这种方式可以一定程度上保证特定用户能连接到相同的服务器。如果你的应用需要处理状态而要求用户能连接到和之前相同的服务器,可以考虑采取这种方式
5.5服务注册/发现&注册中心
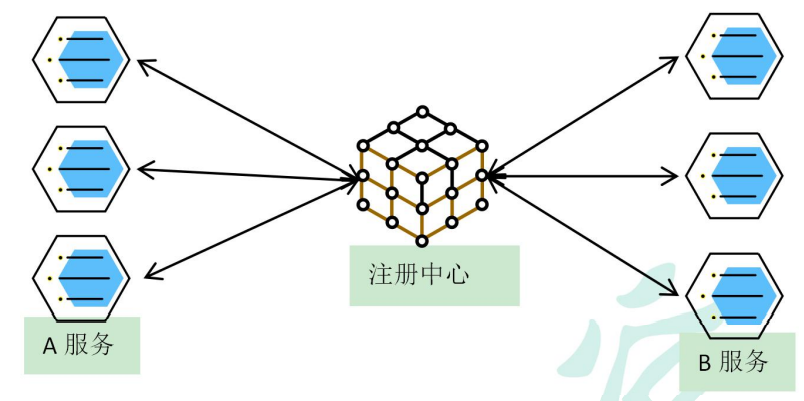
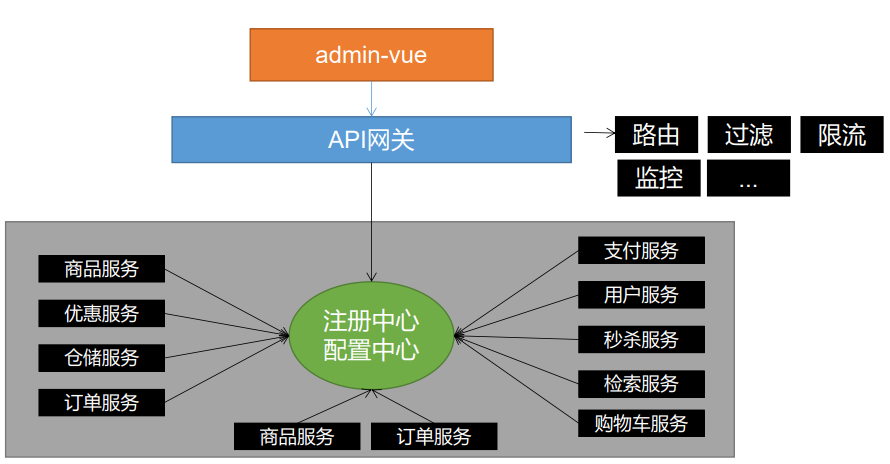
A服务调用B服务,A服务并不知道B服务当前在哪几台服务器有,那些正常的,哪些服务以及下线。解决这个问题可以引入注册中心。如果某些服务下线,我们其他人可以实时感知到其他服务的状态,从而避免调用不可用的服务
5.6配置中心
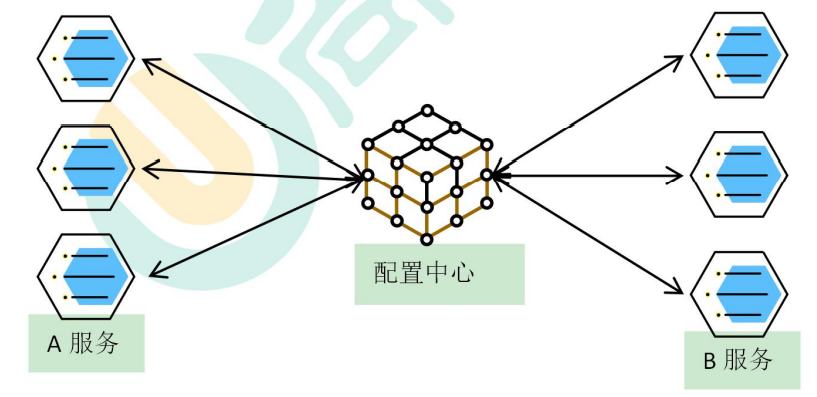
每一个服务最终都有大量的配置,并且每个服务器都可能部署在多台机器上。我们经常需要变更配置,我们可以让每个服务在配置中心获取自己的配置。
配置中心用来集中管理微服务的配置信息
5.7服务熔断&服务降级
在微服务架构中,微服务之间通过网络进行通信,存在相互依赖,当其中一个服务不可用时,有可能会造成雪崩效应。要防止这样的情况,必须要有容错机制来保护服务
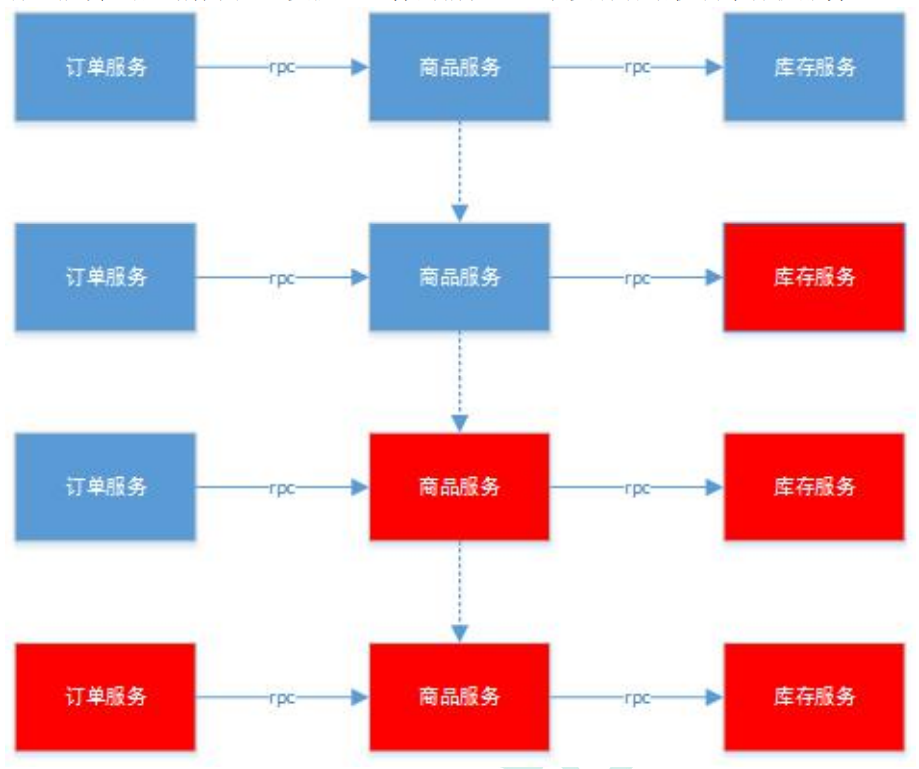
5.7.1服务熔断
设置服务的超时,当被调用的服务经常失败到达某个阈值,我们可以开启断路保护机制,后来的请求不再去调用这个服务。本地直接返回默认的数据
5.7.2服务降级
在运维期间,当系统处于高峰期,系统资源紧张,我们可以让非核心业务降级运行。
降级:某些服务不处理,或者简单处理【抛异常、返回null、调用Mock数据、调用Fallback处理逻辑】
5.8API网关
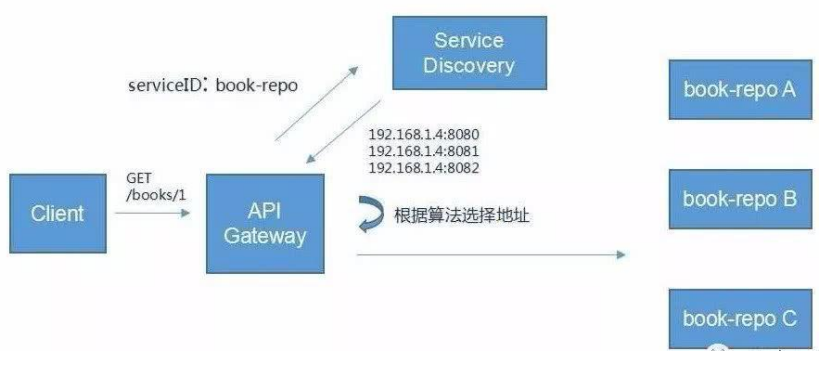
在微服务架构中,API Gateway作为整体架构的重要组件,它抽象了微服务中都需要的公共功能,同时提供了客户端负载均衡,服务自动熔断,灰度发布,统一认证,限流监控,日志统计等丰富的功能,帮助我们解决很多API管理难题。
6.虚拟机环境搭建
6.1创建虚拟机,安装docker
开始安装:
- 搭建gcc环境(gcc是编程语言译器)
yum -y install gcc
yum -y install gcc-c++- 安装需要的软件包
yum install -y yum-utils- 安装镜像仓库
官网上的是

但是因为docker的服务器是在国外,所以有时候从仓库中下载镜像的时候会连接被拒绝或者连接超时的情况,所以可以使用阿里云镜像仓库
yum-config-manager --add-repo http://mirrors.aliyun.com/docker-ce/linux/centos/docker-ce.repo- 更新yum软件包索引
yum makecache fast- 安装docker引擎
yum install docker-ce docker-ce-cli containerd.io docker-compose-plugin- 启动docker,并设置docker开机自启
systemctl start docker
systemctl enable docker- 查看docker服务

- 查看docker版本信息
docker version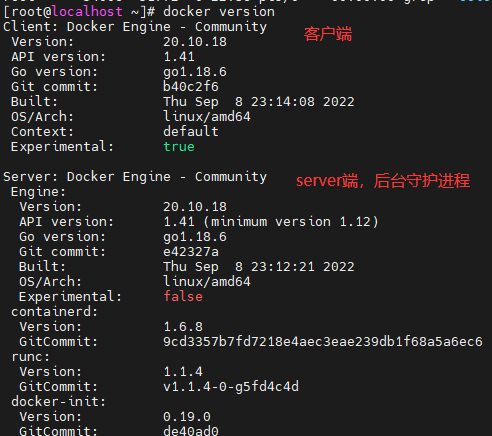
- 阿里云镜像加速配置
为了提高镜像的拉取、发布的速度,可以配置阿里云镜像加速
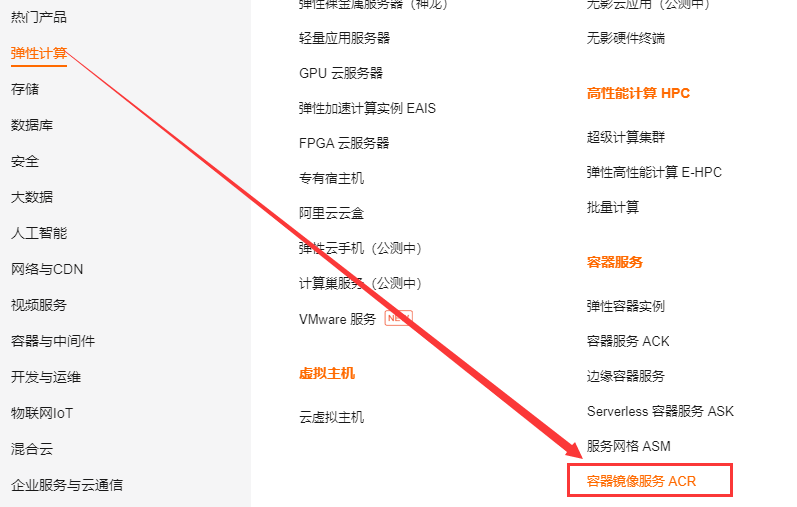
查看加速器地址

在CentOS下配置镜像加速器
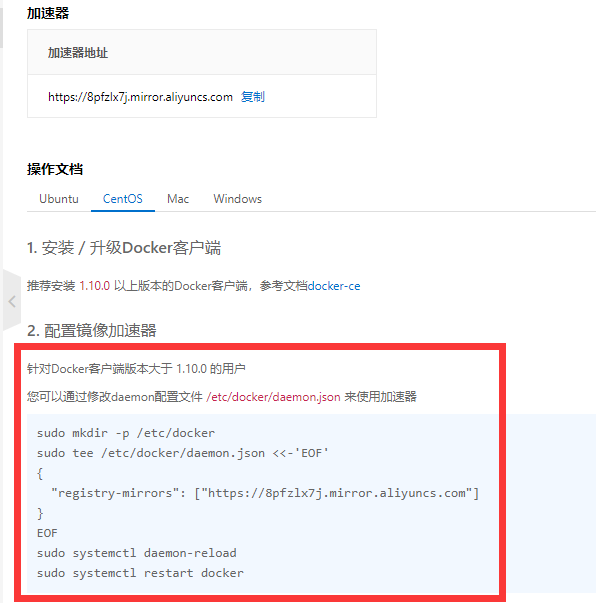
mkdir -p /etc/docker
cd /etc/docker
tee /etc/docker/daemon.json <<-'EOF'
{
  "registry-mirrors": ["https://8pfzlx7j.mirror.aliyuncs.com"]
}
EOF
systemctl daemon-reload
systemctl restart docker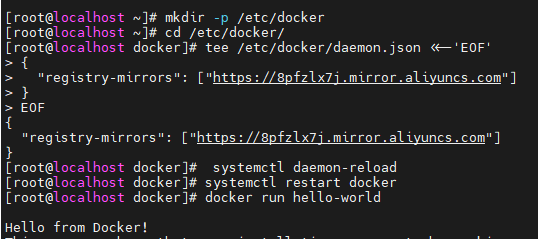
6.2docker安装mysql
- 拉取镜像
docker pull mysql:8.0.19- 创建容器实例
docker run -d -p 3306:3306 --privileged=true \
--restart=always \
-v /opt/mysql/log:/var/log/mysql \
-v /opt/mysql/data:/var/lib/mysql \
-v /opt/mysql/conf:/etc/mysql/conf.d \
-e MYSQL_ROOT_PASSWORD=root \
--name mysql \
mysql:8.0.19- 在主机的配置文件目录下新建mysql的配置文件my.cnf

设置mysql字符编码为utf-8
[client]
default_character_set=utf8
[mysqld]
collation_server = utf8_general_ci
character_set_server = utf8- 重启mysql容器实例
docker restart 容器ID6.3docker安装redis
- 拉取redis镜像
docker pull redis:6.0.8获取redis的配置文件
is配置文件官网Redis configuration | Redis
创建存放redis配置文件的目录,创建redis.conf文件,写入配置信息
mkdir -p /opt/redis
vim redis.conf
修改配置文件内容
- ==添加redis密码(requirepass)==
- ==修改bind为0.0.0.0(任何机器都能够访问)==
- ==为了避免和docker中的-d参数冲突,将后台启动设置为no(daemonize no)==
- ==关闭保护模式(protected-mode no)==
- ==开启AOF的持久化(appendonly yes)==
使用redis镜像创建容器实例
docker run -d -p 6379:6379 \
--restart=always \
--name redis --privileged=true \
-v /opt/redis/redis.conf:/etc/redis/redis.conf \
-v /opt/redis/data:/data \
redis:6.0.8

7.项目初始化
7.1初始化项目并推送到gitee
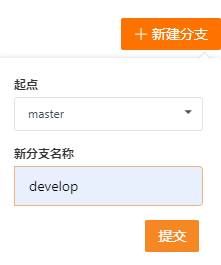
使用
spring初始化向导创建父工程将项目推送到
gitee创建新分支
develop
- 新建子模块,项目结构如下

7.2创建数据库,创建表
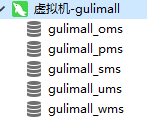
- 创建数据库,导入对应得sql文件
8.人人开源项目环境部署
- gitee搜索人人开源,将下面两个项目clone到本地
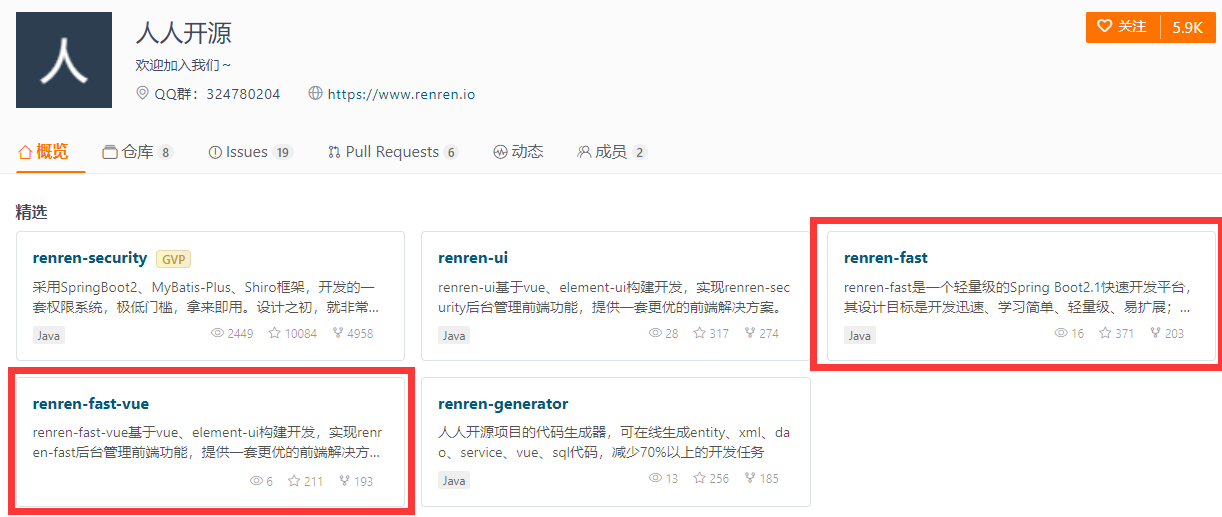

删除两个文件当中的.git文件
renren-fast放到gulimall项目当中作为一个子模块,并创建数据库,导入sql文件

- 修改配置文件,修改数据库配置信息

renren-fast-vue放到VS Code当中,并设置node.js环境
官网下载安装node.js, 并使用node -V检查版本
配置npm使用淘宝镜像
# 安装淘宝镜像
npm install -g cnpm --registry=https://registry.npm.taobao.org

cnpm install

# 启动服务
npm run dev
出现的问题:
- npm run dev后出现node-sass报错最简单解决方法:
npm install node-sass@npm:sass --ignore-scripts- cnpm : 无法加载文件 C:\Users\xxx\AppData\Roaming\npm\cnpm.ps1,因为在此系统上禁止运行脚本
原因是因为:作用域都没有权限,需要赋给权限。
win+R,打开运行,输入powershell
Set-ExecutionPolicy RemoteSigned -Scope CurrentUser, 再输入A
Get-ExecutionPolicy -List,查看权限正常
再次执行npm命令正常- 关闭高版本的node安全校验
set NODE_OPTIONS=--openssl-legacy-provider9.人人开源代码生成器部署
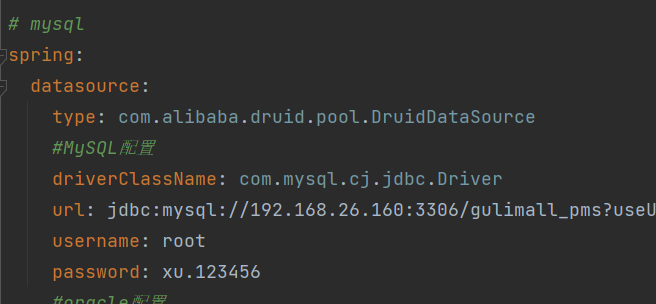
克隆项目到本地,并将其作为
gulimall的子模块修改yaml配置文件,修改数据库配置信息
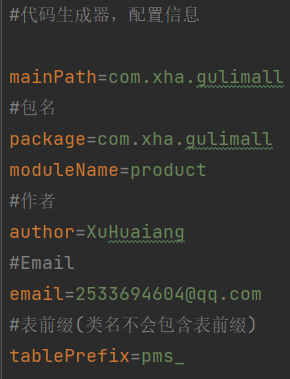
- 修改
generator.propertise文件,设置包名等等
设置包名、模块名、表前缀等等
- 启动项目,访问80端口
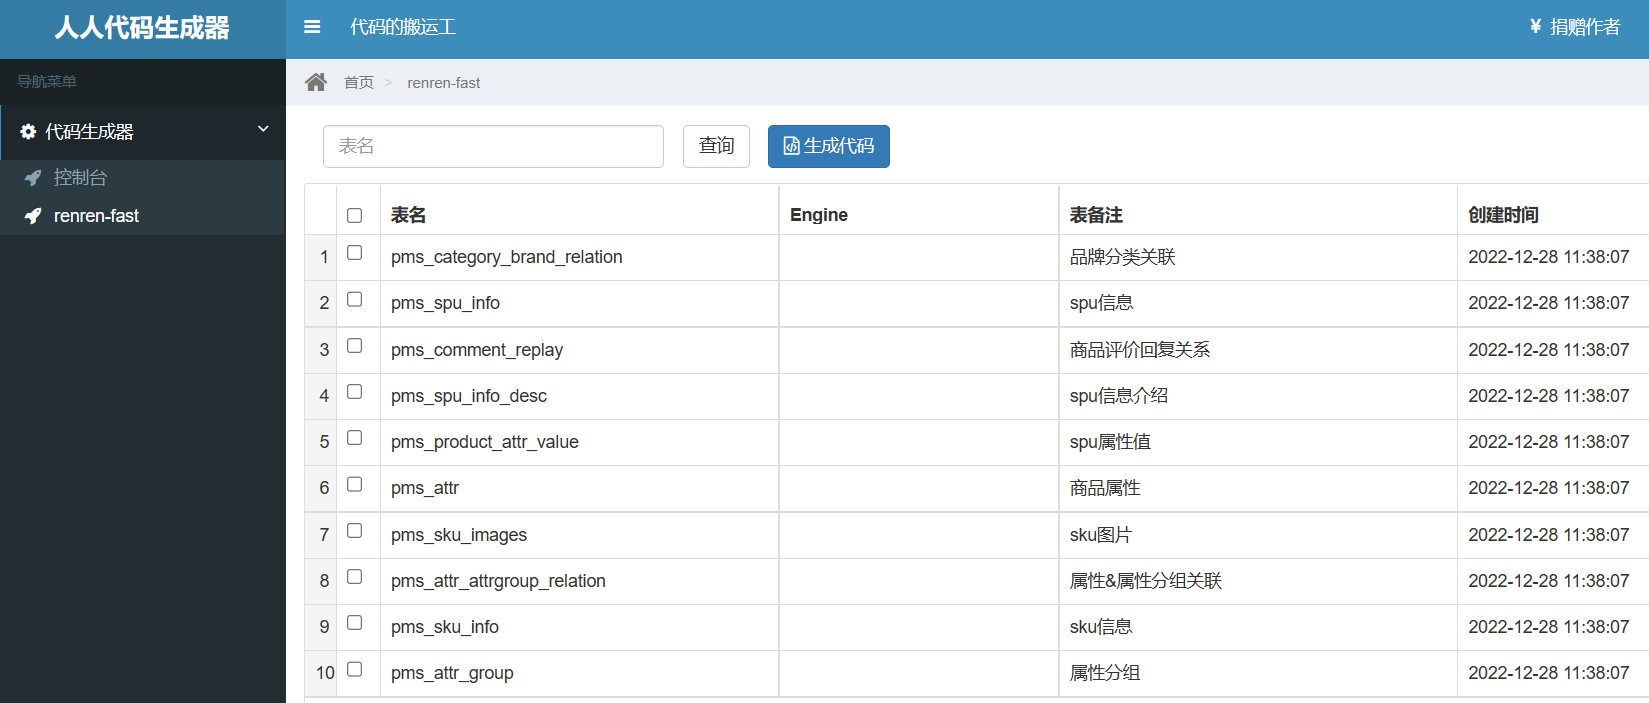
对应的数据库表名:
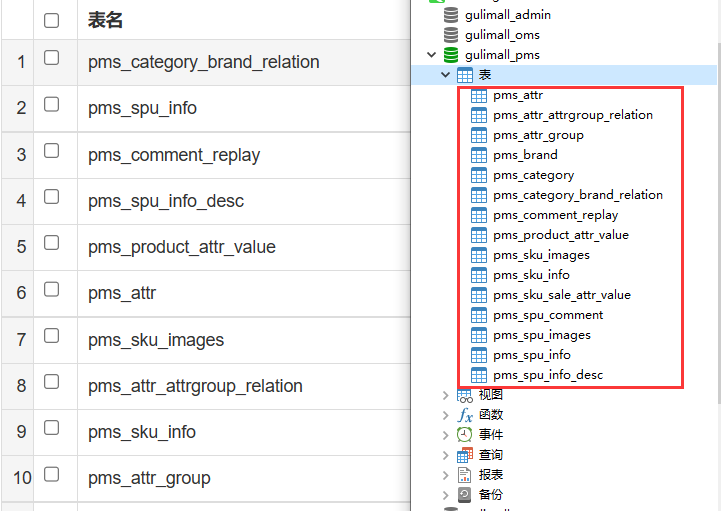
全选,生成对应业务文件,粘贴到项目中即可

10.微服务-注册中心、配置中心、网关、服务调用、分布式事务seata、服务降级熔断
10.1网关、注册中心和配置中心架构图
10.2SpringCloud、SpringCloudAlibaba、SpringBoot版本说明
详细的SpringCloud Alibabagithub官网版本说明https://github.com/alibaba/spring-cloud-alibaba/wiki/%E7%89%88%E6%9C%AC%E8%AF%B4%E6%98%8E
使用SpringCloud Alibabagithub官网的版本说明:
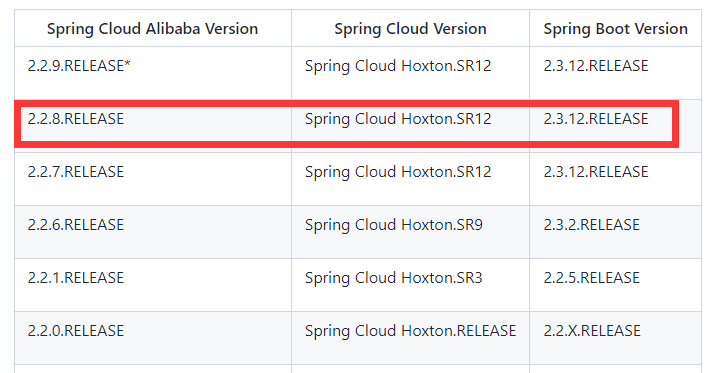
| 版本 | |
|---|---|
SpringBoot |
2.3.12.RELEASE |
SpringCloud |
Hoxton.SR12 |
SpringCloud Alibaba |
2.2.8.RELEASE |

10.3SpringCloud Alibaba和Nacos版本说明
详细的SpringCloud Alibabagithub官网版本说明https://github.com/alibaba/spring-cloud-alibaba/wiki/%E7%89%88%E6%9C%AC%E8%AF%B4%E6%98%8E
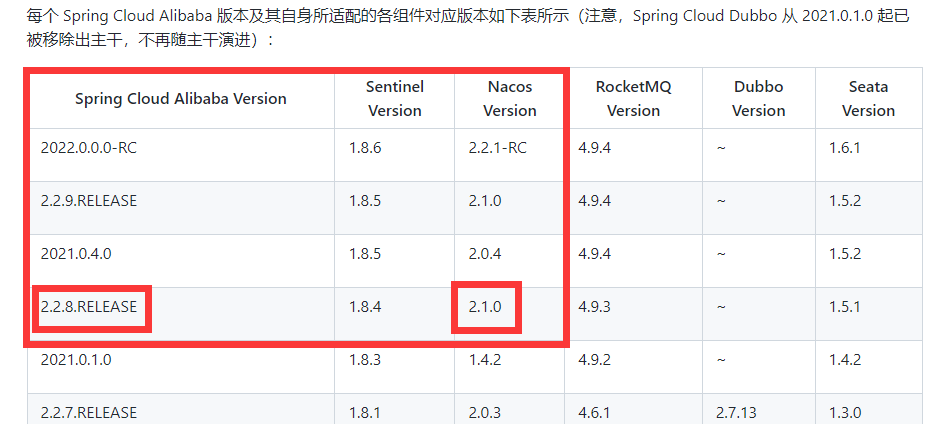
10.4Nacoc安装
- 拉取nacos镜像和MySQL镜像
docker pull nacos/nacos-server:v2.1.2
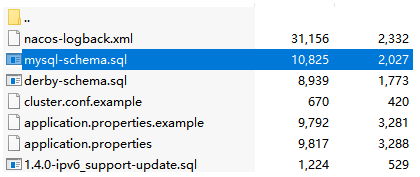
docker pull mysql:8.0.19- 在官网找到对应版本的sql文件
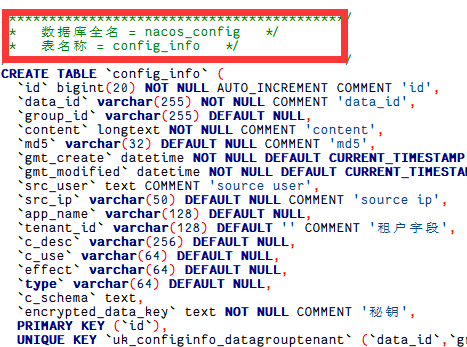
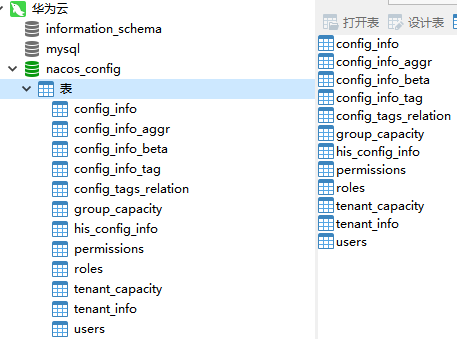
- 新建数据库
nacos_config
- 启动nacos容器实例
docker run -d -p 8848:8848 \
--restart=always \
-e MODE=standalone \
-e SPRING_DATASOURCE_PLATFORM=mysql \
-e MYSQL_SERVICE_HOST=192.168.26.160 \
-e MYSQL_SERVICE_PORT=3306 \
-e MYSQL_SERVICE_DB_NAME=nacos_config \
-e MYSQL_SERVICE_USER=root \
-e MYSQL_SERVICE_PASSWORD=xu.123456 \
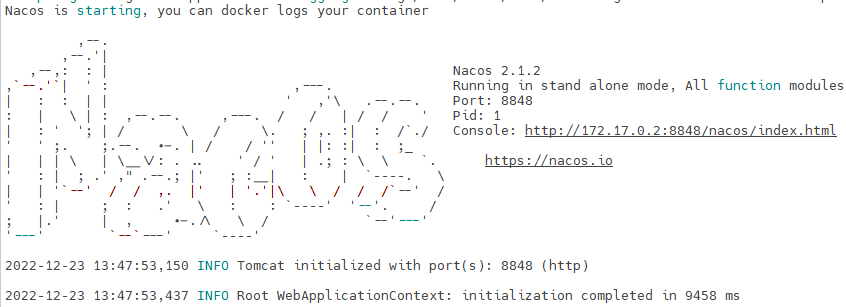
--name nacos nacos/nacos-server:v2.1.2 查看容器的日志信息:
- 开放8848端口,重启防火墙
firewall-cmd --zone=public --add-port=8848/tcp --permanent
systemctl restart firewalld.service
如果是云服务器记得开放对应的安全组规则
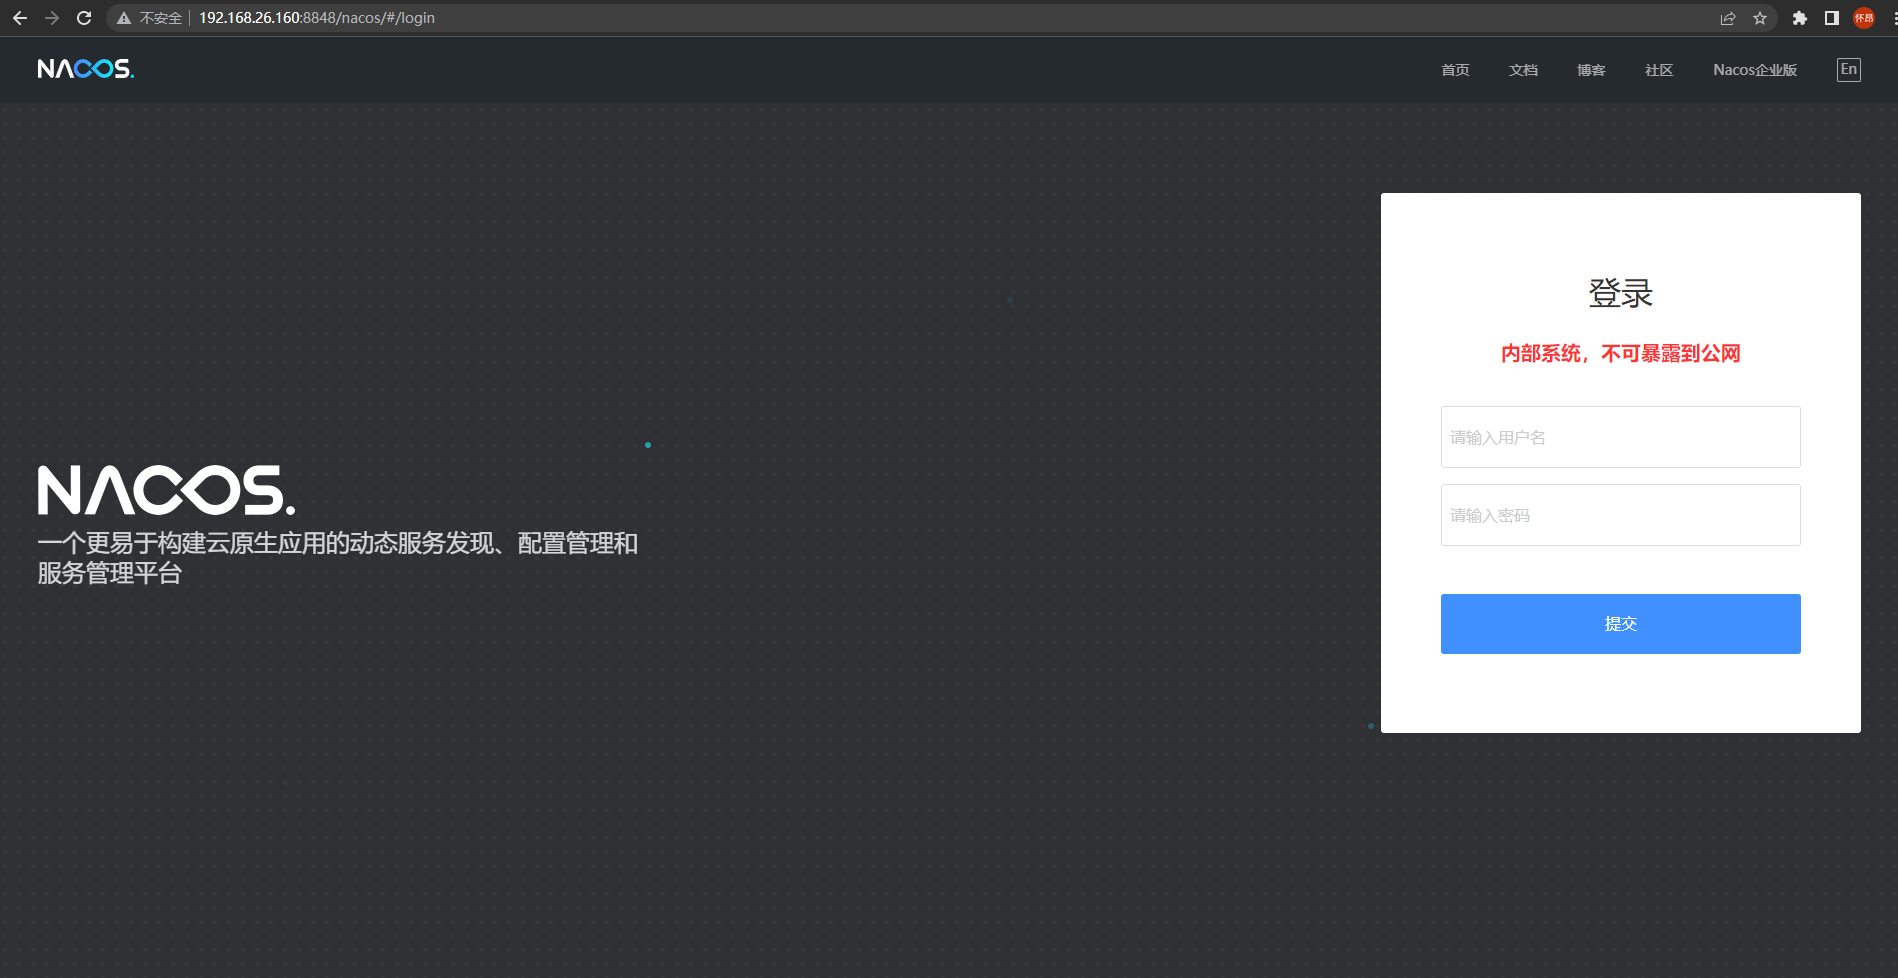
- 访问Nacos的UI界面
ip:8848/nacos
10.5Nacos注册中心
10.5.1将服务模块注册进Nacos
- 目前的配置文件内容
server:
  port: 7000
# mysql配置
spring:
  application:
    name: gulimall-coupon
  #    nacos配置
  cloud:
    nacos:
      discovery:
        server-addr: 192.168.26.160:8848
  datasource:
    driver-class-name: com.mysql.cj.jdbc.Driver
    url: jdbc:mysql://192.168.26.160:3306/gulimall_sms?useUnicode=true&characterEncoding=UTF-8&useSSL=false&serverTimezone=Asia/Shanghai
    username: root
    password: xu.123456

# mybatis-plus配置
mybatis-plus:
  #  mapper.xml文件位置
  mapper-locations: classpath:/mapper/**/*.xml
  #  id自增
  global-config:
    db-config:
      id-type: auto
- 启动服务模块,将其注册进nacos

10.6OpenFeign服务调用
10.6.1OpenFeign配置
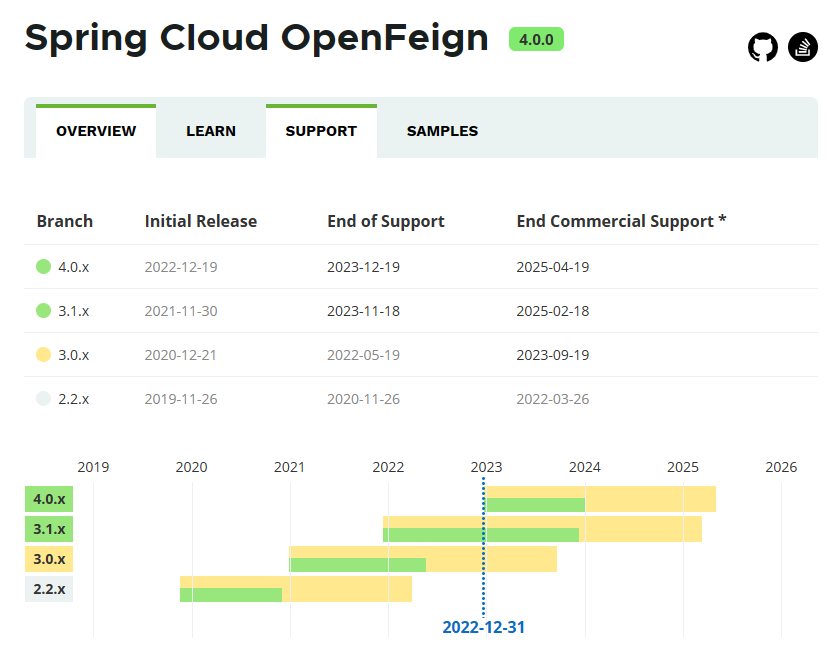
- openfeign版本支持时间
- 添加openfeign依赖
<dependency>
    <groupId>org.springframework.cloud</groupId>
    <artifactId>spring-cloud-starter-openfeign</artifactId>
    <version>3.1.4</version>
</dependency>- 在要调用其他服务的模块处添加对应的service接口调用服务
在启动类上添加@EnableFeignClients注解
使用@FeignClient注解标明要调用哪个模块
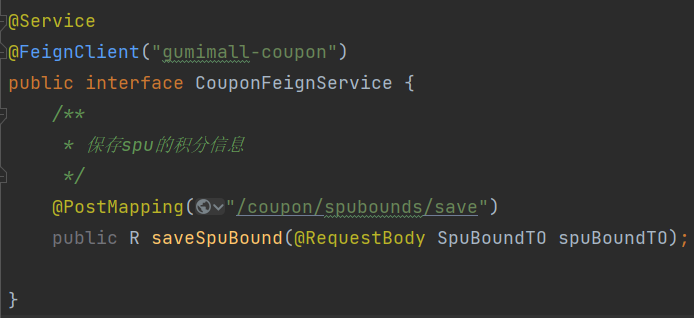
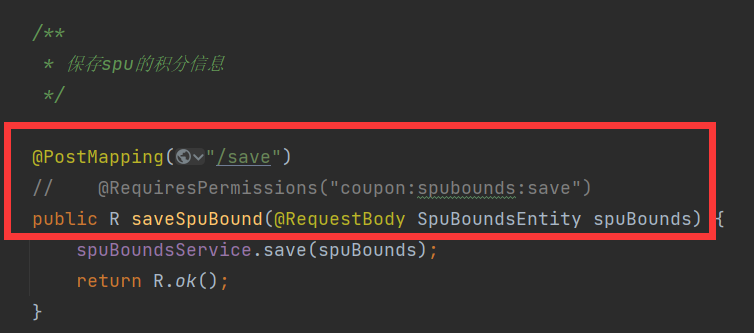
对应的被调用的服务模块接口
10.6.2OpenFeign超时控制
高版本的OpenFeign依赖的默认等待时间为60秒钟
如果有一个业务的逻辑流程过于复杂超过了60秒钟,客户端就会报错。
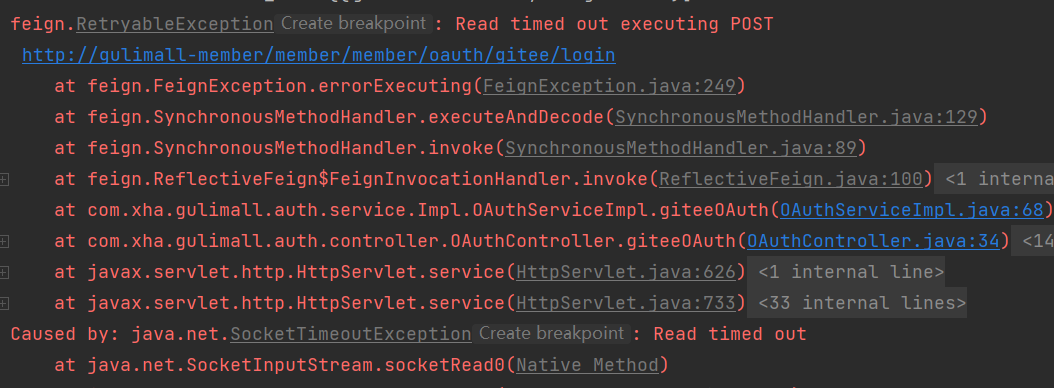
为了避免Openfeign的超时控制机制,就需要设置Fegin客户端的超时控制。
在配置文件当中进行配置:
feign:
  client:
    config:
      default:
        # 指的是建立连接所用的时间,适用于网络状态正常的情况下,两端连接所用的时间
        ConnectTimeOut: 100000
        # 指的是建立连接后从服务器读取可用资源所用的时间
        ReadTimeOut: 100000
10.6.3Nacos排除netflix-ribbon使用loadbalancer
使用netflix-ribbon出现以下错误

排除netflix-ribbon使用loadbalancer
<dependency>
    <groupId>com.alibaba.cloud</groupId>
    <artifactId>spring-cloud-starter-alibaba-nacos-discovery</artifactId>
    <exclusions>
        <exclusion>
            <groupId>org.springframework.cloud</groupId>
            <artifactId>spring-cloud-starter-netflix-ribbon</artifactId>
        </exclusion>
    </exclusions>
</dependency>
<dependency>
    <groupId>org.springframework.cloud</groupId>
    <artifactId>spring-cloud-starter-loadbalancer</artifactId>
</dependency>
配置文件中关闭ribbon
spring:
  cloud:
    loadbalancer:
      ribbon:
        enabled: false
10.7Nacos配置中心
10.7.1Nacos配置中心基础配置
- 添加nacos-config依赖(和nacos-discovery的版本相同)
<dependency>
    <groupId>com.alibaba.cloud</groupId>
    <artifactId>spring-cloud-starter-alibaba-nacos-config</artifactId>
    <version>2.1.0.RELEASE</version>
</dependency>- 添加
bootstrap.yaml文件,让其优先于application.yaml加载
bootstrap.yaml文件中主要是模块名和配置中心地址以及配置文件类型
spring:
  application:
    name: gulimall-member
#    nacos配置中心地址
  cloud:
    nacos:
      config:
        server-addr: 192.168.26.160:8848
file-extension: yaml- 配置文件的命名方式
==Nacos中的配置管理dataid的组成格式及与SpringBoot配置文件中的匹配规则一致==
${prefix}-${spring.profiles.active}.${file-extension}prefix默认为spring.application.name的值,也可以通过配置项spring.cloud.nacos.config.prefix来配置。spring.profiles.active即为当前环境对应的 profile,详情可以参考 Spring Boot文档。 注意:当spring.profiles.active为空时,对应的连接符-也将不存在,dataId 的拼接格式变成${prefix}.${file-extension}file-exetension为配置内容的数据格式,可以通过配置项spring.cloud.nacos.config.file-extension来配置。目前只支持properties和yaml类型。
这里再application.yaml文件中并没有执行环境,所以文件名就是**模块名.yaml**
- 添加配置文件
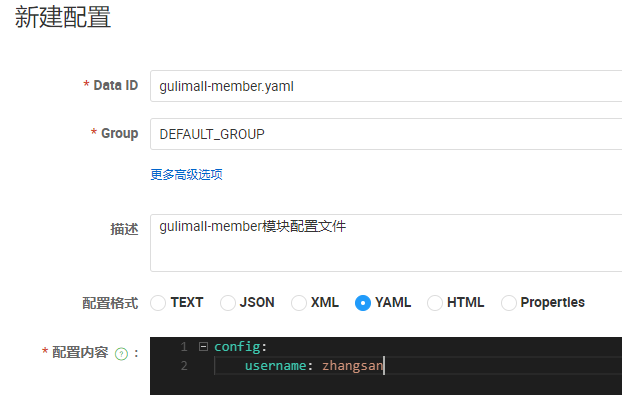
- 读取配置文件内容,并添加
@RefreshScope注解实现配置的刷新

更改配置文件的内容,直接刷新查看

10.7.2分类配置说明
10.7.2.1问题引入
问题1:
实际开发中,通常一个系统会准备
dev开发环境
test测试环境
prod生产环境。
如何保证指定环境启动时服务能正确读取到Nacos上相应环境的配置文件呢?
问题2:
一个大型分布式微服务系统会有很多微服务子项目,
每个微服务项目又都会有相应的开发环境、测试环境、预发环境、正式环境……
那怎么对这些微服务配置进行管理呢?
10.7.2.2Nacos中命名空间、Group和DataId
命名空间->组->服务->集群->实例,范围从大到小。
类似Java里面的package名和类名
最外层的namespace是可以用于区分部署环境的,Group和DataID逻辑上区分两个目标对象。
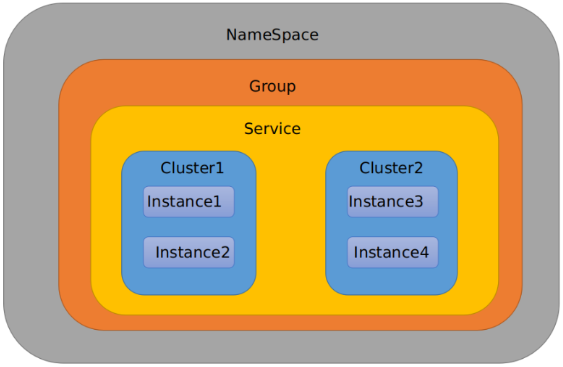
默认情况:
Namespace=public,Group=DEFAULT_GROUP, 默认Cluster是DEFAULT
- xxxxxxxxxx7 1public static void main(String[] args) {2 List
authors = getAuthors();3 authors.parallelStream()4 .map(author -> author.getAge())5 .mapToInt(age -> age + 10)6 .forEach(name -> System.out.println(name));7}java
比方说我们现在有三个环境:开发、测试、生产环境,我们就可以创建三个Namespace,不同的Namespace之间是隔离的。
- ==Group可以把不同的微服务划分到同一个分组里面去==
- ==Service就是微服务==
一个Service可以包含多个Cluster(集群),Nacos默认Cluster是DEFAULT,Cluster是对指定微服务的一个虚拟划分。
比方说为了容灾,将Service微服务分别部署在了杭州机房和广州机房,
这时就可以给杭州机房的Service微服务起一个集群名称(HZ),给广州机房的Service微服务起一个集群名称(GZ),还可以尽量让同一个机房的微服务互相调用,以提升性能。
- ==Instance,就是微服务的实例==。
10.7.2.3三种方案加载配置
- DataID(相当于配置文件名)方案
通过spring.profile.active属性就能进行多环境下配置文件的读取
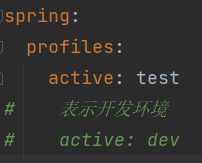
新建nacos配置:

重启模块,访问配置文件信息

- Group方案
通过Group实现环境区分
新建两个分组,但是是两个相同的文件名

在配置文件中指定分组和当前环境:
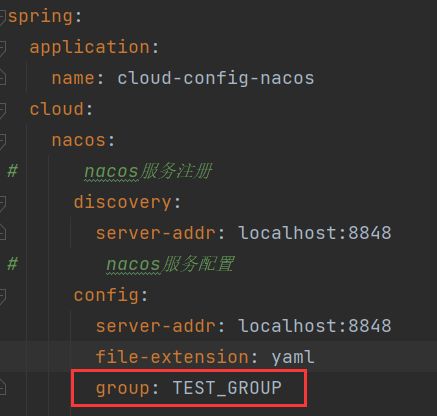
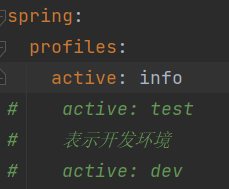
- Namespace方案
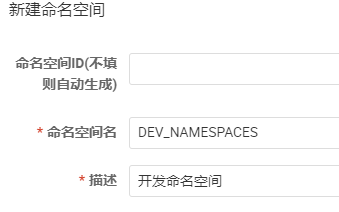
新建命名空间:

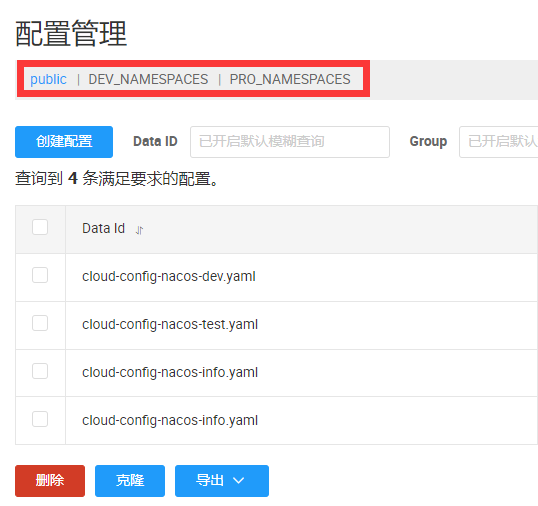
配置管理中显现的有命名空间:
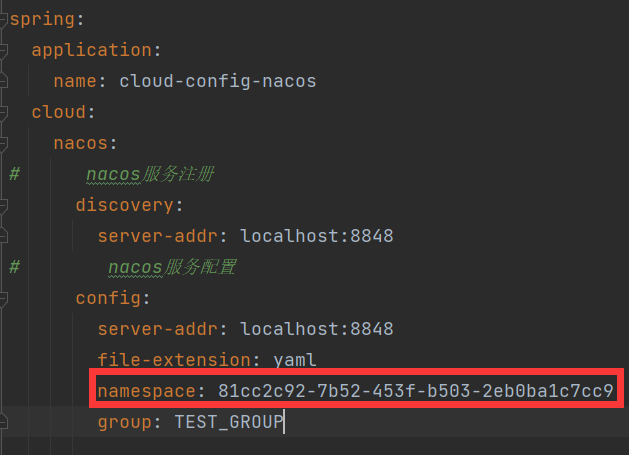
选中DEV_NAMESPACES命名空间,找到命名空间ID并配置到配置文件当中

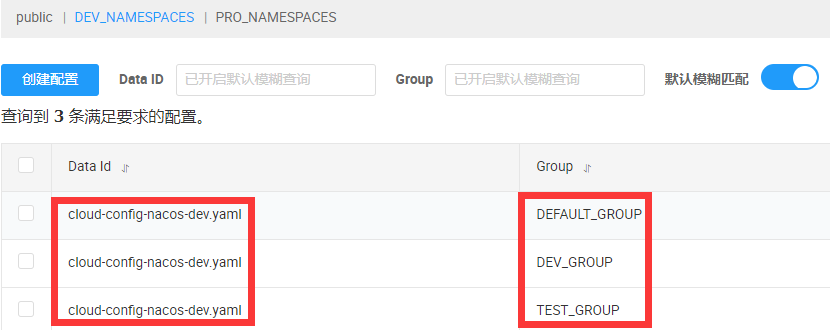
在此命名空间下创建三个配置,文件名相同,分别位于不同的组
此时的配置文件
即查找此命名空间下的位于DEV_GROUP组中的profile为dev的yaml文件

10.8SpringCloud Gateway(网关)
网关用来做统一的鉴权认证和限流工作。
10.8.1Gateway的3大核心概念
- Route(路由)
==路由是构建网关的基本模块,它由ID,目标URI,一系列的断言和过滤器组成,如果断言为true则匹配该路由==
- Predicate(断言)
参考的是Java8的java.util.function.Predicate
开发人员可以匹配HTTP请求中的所有内容(例如请求头或请求参数),==如果请求与断言相匹配则进行路由==
- Filter(过滤)
指的是Spring框架中GatewayFilter的实例,==使用过滤器,可以在请求被路由前或者之后对请求进行修改。==
10.8.2Gateway的工作流程
核心逻辑为:
路由转发+执行过滤器链
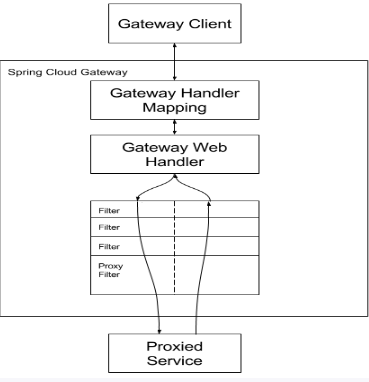
客户端向 Spring Cloud Gateway 发出请求。然后在 Gateway Handler Mapping 中找到与请求相匹配的路由,将其发送到 Gateway Web Handler。
Handler 再通过指定的过滤器链来将请求发送到我们实际的服务执行业务逻辑,然后返回。过滤器之间用虚线分开是因为过滤器可能会在发送代理请求之前(“pre”)或之后(“post”)执行业务逻辑。
Filter在“pre”类型的过滤器可以做参数校验、权限校验、流量监控、日志输出、协议转换等,在“post”类型的过滤器中可以做响应内容、响应头的修改,日志的输出,流量监控等有着非常重要的作用。
10.8.3网关配置
- 引入对应依赖
<dependency>
    <groupId>org.springframework.cloud</groupId>
    <artifactId>spring-cloud-starter-gateway</artifactId>
</dependency>- 在配置文件当中设置相应的路由规则
server:
  port: 88

spring:
  application:
    name: gulimall-gateway
  cloud:
    nacos:
      discovery:
        server-addr: 192.168.26.160:8848

    gateway:
      routes:

        #   根据Path断言,并过滤重写路径
        #          路由到gulimall-member模块
        #          http://localhost:88/api/member/** -> http://localhost:8000/member/**
        - id: member_route
          uri: lb://gulimall-member
          predicates:
            - Path=/api/member/**
          filters:
            - RewritePath=/api/?(?<segment>.*), /$\{segment}


        #          路由到gulimall-product模块
        #          http://localhost:88/api/product/** -> http://localhost:10000/product/**
        - id: product_route
          uri: lb://gulimall-product
          predicates:
            - Path=/api/product/**
          filters:
            - RewritePath=/api/?(?<segment>.*), /$\{segment}

        #          路由到gulimall-ware模块
        #          http://localhost:88/api/ware/** -> http://localhost:11000/ware/**
        - id: ware_route
          uri: lb://gulimall-ware
          predicates:
            - Path=/api/ware/**
          filters:
            - RewritePath=/api/?(?<segment>.*), /$\{segment}


        #           路由到gulimall-thirdserver 模块
        - id: thirdserver_route
          uri: lb://gulimall-thirdserver
          predicates:
            - Path=/api/thirdserver/**
          filters:
            - RewritePath=/api/?(?<segment>.*), /$\{segment}

        #           路由到gulimall-coupon模块
        #           http://localhost:88/api/coupon -> http://localhost:7000/coupon/**
        - id: coupon_route
          uri: lb://gulimall-coupon
          predicates:
            - Path=/api/coupon/**
          filters:
            - RewritePath=/api/?(?<segment>.*), /$\{segment}

        #           路由到renren-fast模块
        #           http://localhost:88/api/** -> http://localhost:8080/renren-fast/**
        - id: admin_route
          uri: lb://renren-fast
          predicates:
            - Path=/api/**
          filters:
            - RewritePath=/api/?(?<segment>.*), /renren-fast/$\{segment}


        #   根据Host断言

        #        根据Host(gulimall.com)路由到gulimall-product
        - id: gulimall_host_route
          uri: lb://gulimall-product
          predicates:
            - Host=gulimall.com,item.gulimall.com


        #        根据Host(search.gulimall.com)路由到gulimall-search
        - id: gulimall_search_route
          uri: lb://gulimall-search
          predicates:
            - Host=search.gulimall.com

        #        根据Host(auth.gulimall.com)路由到gulimall-search
        - id: gulimall_auth_route
          uri: lb://gulimall-auth-server
          predicates:
            - Host=auth.gulimall.com

        #        根据Host(cart.gulimall.com)路由到gulimall-cart
        - id: gulimall_cart_route
          uri: lb://gulimall-cart
          predicates:
            - Host=cart.gulimall.com

        #        根据Host(order.gulimall.com)路由到gulimall-order
        - id: gulimall_order_route
          uri: lb://gulimall-order
          predicates:
            - Host=order.gulimall.com

        #        根据Host(member.gulimall.com)路由到gulimall-member
        - id: gulimall_member_route
          uri: lb://gulimall-member
          predicates:
            - Host=member.gulimall.com

        #        根据Host(seckill .gulimall.com)路由到gulimall-seckill
        - id: gulimall_seckill_route
          uri: lb://gulimall-seckill
          predicates:
            - Host=seckill.gulimall.com
10.9seata处理分布式事务
10.10sentinel做服务降级、服务熔断、服务限流
10.10.1Sentinel简介
官网地址:https://sentinelguard.io/zh-cn/
Github地址:https://github.com/alibaba/Sentinel
随着微服务的流行,服务和服务之间的稳定性变得越来越重要。==Sentinel 是面向分布式、多语言异构化服务架构的流量治理组件,主要以流量为切入点,从流量路由、流量控制、流量整形、熔断降级、系统自适应过载保护、热点流量防护等多个维度来帮助开发者保障微服务的稳定性。==
即Sentinel就是面向云原生微服务的流量控制、熔断降级组件。
10.10.2Sentinel的功能
10.10.2.1流量控制
流量控制在网络传输中是一个常用的概念,它用于调整网络包的发送数据。然而,从系统稳定性角度考虑,在处理请求的速度上,也有非常多的讲究。任意时间到来的请求往往是随机不可控的,而系统的处理能力是有限的。我们需要根据系统的处理能力对流量进行控制。Sentinel 作为一个调配器,可以根据需要把随机的请求调整成合适的形状,如下图所示:
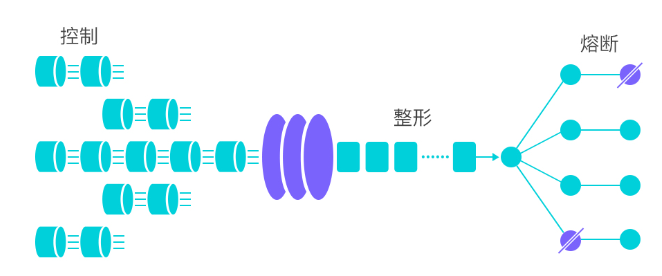
流量控制有以下几个角度:
- 资源的调用关系,例如资源的调用链路,资源和资源之间的关系;
- 运行指标,例如 QPS、线程池、系统负载等;
- 控制的效果,例如直接限流、冷启动、排队等。
Sentinel 的设计理念是让您自由选择控制的角度,并进行灵活组合,从而达到想要的效果。
10.10.2.2熔断降级
Sentinel熔断降级会在调用链路中某个资源出现不稳定状态时(例如调用超时或异常比例升高) , 对这个资源的调用进行限制让请求快速失败,避免影响到其它的资源而导致级联错误。
什么是熔断降级
除了流量控制以外,降低调用链路中的不稳定资源也是 Sentinel 的使命之一。由于调用关系的复杂性,如果调用链路中的某个资源出现了不稳定,最终会导致请求发生堆积。这个问题和 Hystrix 里面描述的问题是一样的。
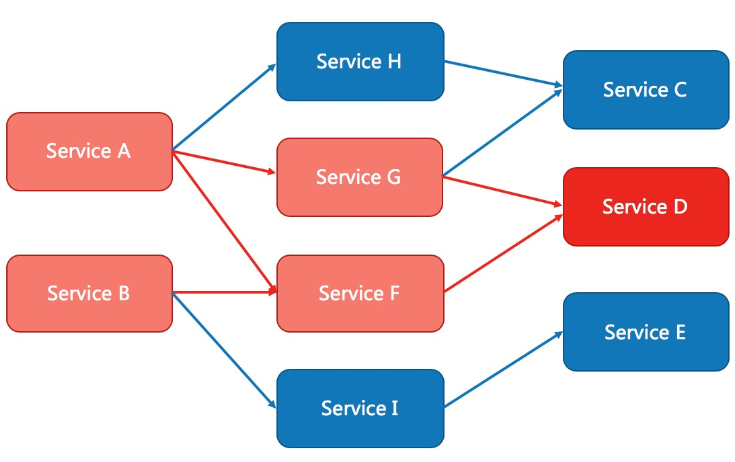
==Sentinel 和 Hystrix 的原则是一致的: 当调用链路中某个资源出现不稳定,例如,表现为 timeout,异常比例升高的时候,则对这个资源的调用进行限制,并让请求快速失败,避免影响到其它的资源,最终产生雪崩的效果。==
熔断降级设计理念
在限制的手段上,Sentinel 和 Hystrix 采取了完全不一样的方法。
Hystrix 通过线程池的方式,来对依赖(在我们的概念中对应资源)进行了隔离。这样做的好处是资源和资源之间做到了最彻底的隔离。缺点是除了增加了线程切换的成本,还需要预先给各个资源做线程池大小的分配。
Sentinel 对这个问题采取了两种手段:
- 通过并发线程数进行限制
和资源池隔离的方法不同,Sentinel 通过限制资源并发线程的数量,来减少不稳定资源对其它资源的影响。这样不但没有线程切换的损耗,也不需要您预先分配线程池的大小。当某个资源出现不稳定的情况下,例如响应时间变长,对资源的直接影响就是会造成线程数的逐步堆积。当线程数在特定资源上堆积到一定的数量之后,对该资源的新请求就会被拒绝。堆积的线程完成任务后才开始继续接收请求。
- 通过响应时间对资源进行降级
除了对并发线程数进行控制以外,Sentinel 还可以通过响应时间来快速降级不稳定的资源。当依赖的资源出现响应时间过长后,所有对该资源的访问都会被直接拒绝,直到过了指定的时间窗口之后才重新恢复。
熔断降级策略
- 慢调用比例 (
SLOW_REQUEST_RATIO):选择以慢调用比例作为阈值,需要设置允许的慢调用 RT(即最大的响应时间),请求的响应时间大于该值则统计为慢调用。当单位统计时长(statIntervalMs)内请求数目大于设置的最小请求数目,并且慢调用的比例大于阈值,则接下来的熔断时长内请求会自动被熔断。经过熔断时长后熔断器会进入探测恢复状态(HALF-OPEN 状态),若接下来的一个请求响应时间小于设置的慢调用 RT 则结束熔断,若大于设置的慢调用 RT 则会再次被熔断。 - 异常比例 (
ERROR_RATIO):当单位统计时长(statIntervalMs)内请求数目大于设置的最小请求数目,并且异常的比例大于阈值,则接下来的熔断时长内请求会自动被熔断。经过熔断时长后熔断器会进入探测恢复状态(HALF-OPEN 状态),若接下来的一个请求成功完成(没有错误)则结束熔断,否则会再次被熔断。异常比率的阈值范围是[0.0, 1.0],代表 0% - 100%。 - 异常数 (
ERROR_COUNT):当单位统计时长内的异常数目超过阈值之后会自动进行熔断。经过熔断时长后熔断器会进入探测恢复状态(HALF-OPEN 状态),若接下来的一个请求成功完成(没有错误)则结束熔断,否则会再次被熔断。
10.10.3Sentinel使用说明
Sentinel 的使用可以分为两个部分:
- 核心库(Java 客户端):不依赖任何框架/库,能够运行于 Java 8 及以上的版本的运行时环境,同时对 Dubbo / Spring Cloud 等框架也有较好的支持(见 主流框架适配)。
- 控制台(Dashboard):Dashboard 主要负责管理推送规则、监控、管理机器信息等。
10.10.4Sentinel对Endpoint 支持
在使用 Endpoint 特性之前需要在 Maven 中添加 spring-boot-starter-actuator 依赖,并在配置中允许 Endpoints 的访问。
- Spring Boot 1.x 中添加配置
management.security.enabled=false。暴露的 endpoint 路径为/sentinel - Spring Boot 2.x 中添加配置
management.endpoints.web.exposure.include=*。暴露的 endpoint 路径为/actuator/sentinel
Sentinel Endpoint 里暴露的信息非常有用。包括当前应用的所有规则信息、日志目录、当前实例的 IP,Sentinel Dashboard 地址,Block Page,应用与 Sentinel Dashboard 的心跳频率等等信息。
10.10.5docker安装Sentinel
- 来到Docker Hub查找镜像源

- 拉取镜像
docker pull bladex/sentinel-dashboard:1.7.2- 创建容器
docker run -d -p 8858:8858 --restart=always --name sentinel bladex/sentinel-dashboard:1.7.2- 开放端口,重启防火墙
firewall-cmd --zone=public --add-port=8858/tcp --permanent- 访问8858端口登录sentinel
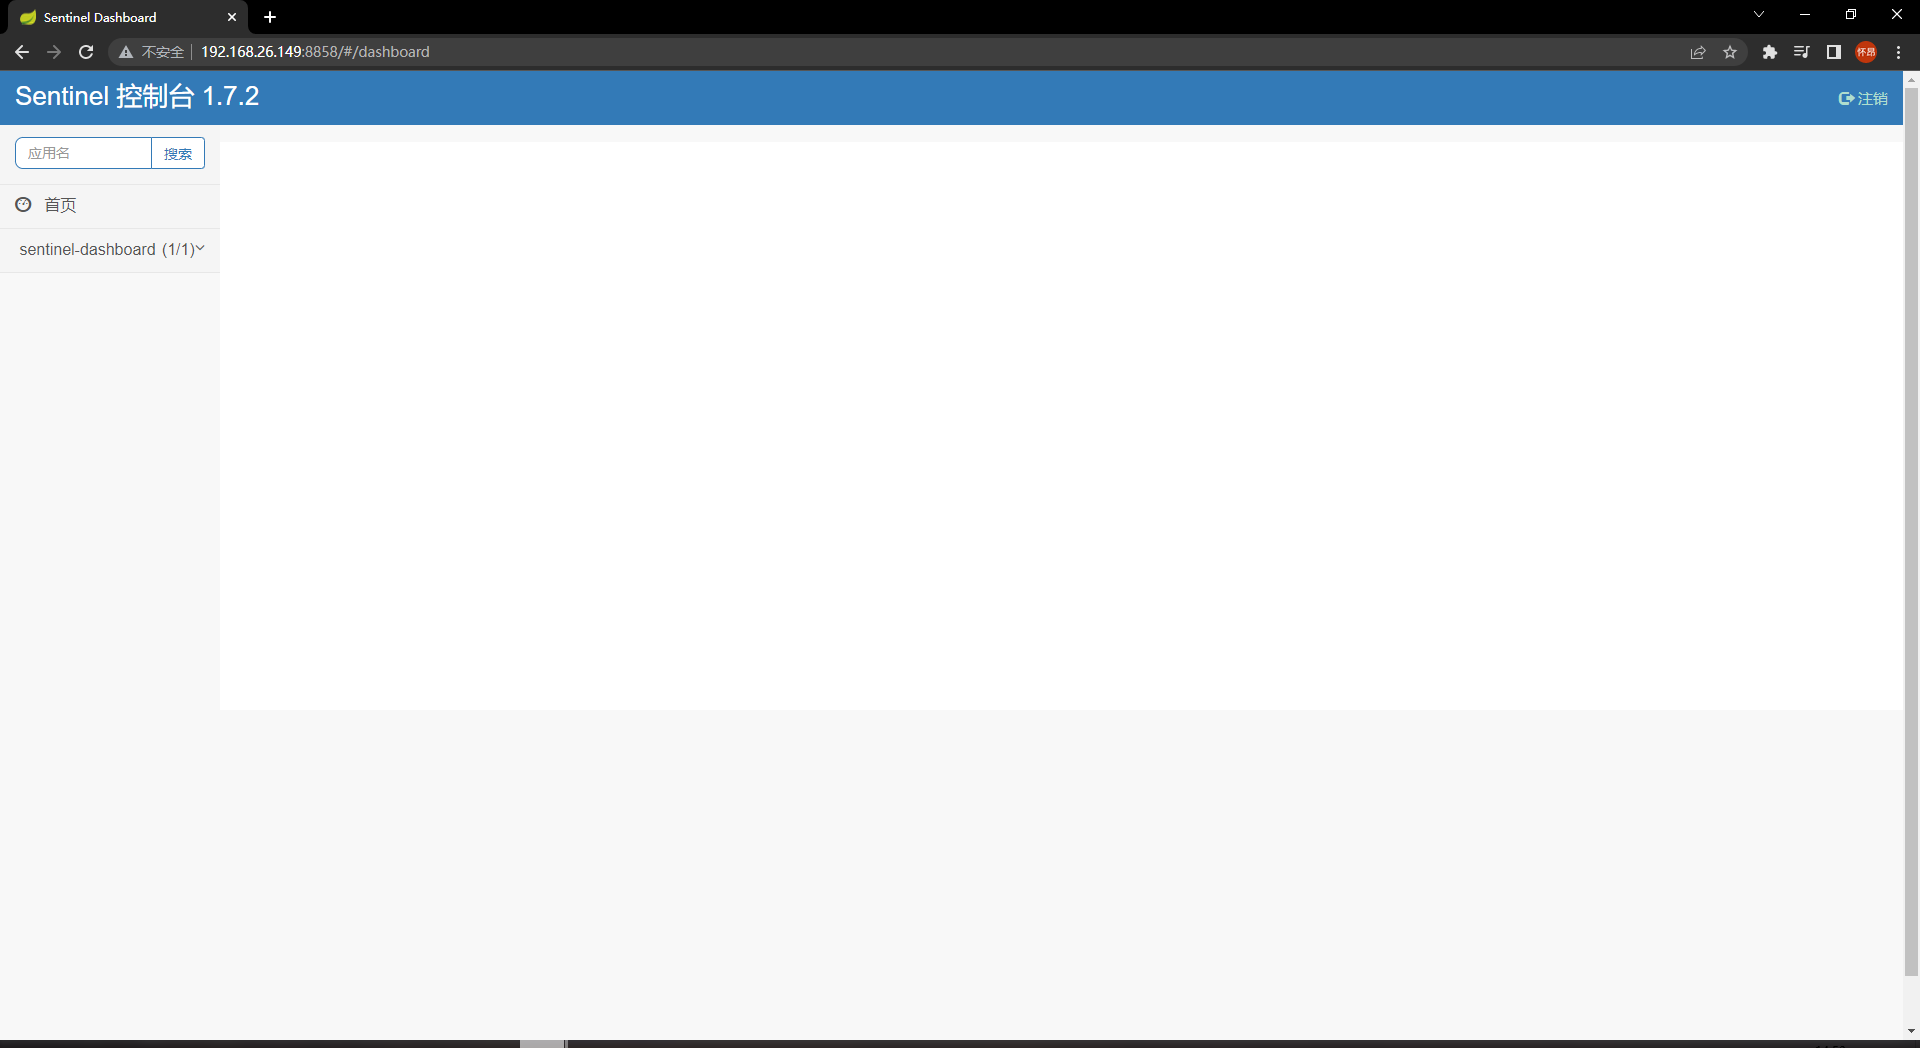
10.10.6sentinel配置
- pom文件
添加springboot的监控系统—spring-boot-starter-actuator
<dependencies>
    <!--SpringCloud ailibaba nacos -->
    <dependency>
        <groupId>com.alibaba.cloud</groupId>
        <artifactId>spring-cloud-starter-alibaba-nacos-discovery</artifactId>
    </dependency>
    <!--SpringCloud ailibaba sentinel-datasource-nacos 后续做持久化用到-->
    <dependency>
        <groupId>com.alibaba.csp</groupId>
        <artifactId>sentinel-datasource-nacos</artifactId>
    </dependency>
    <!--SpringCloud ailibaba sentinel -->
        <dependency>
            <groupId>com.alibaba.cloud</groupId>
            <artifactId>spring-cloud-starter-alibaba-sentinel</artifactId>
        </dependency>
    <!--openfeign-->
    <dependency>
        <groupId>org.springframework.cloud</groupId>
        <artifactId>spring-cloud-starter-openfeign</artifactId>
    </dependency>
    <!-- SpringBoot整合Web组件+actuator -->
    <dependency>
        <groupId>org.springframework.boot</groupId>
        <artifactId>spring-boot-starter-web</artifactId>
    </dependency>
    <dependency>
        <groupId>org.springframework.boot</groupId>
        <artifactId>spring-boot-starter-actuator</artifactId>
    </dependency>
    <dependency>
        <groupId>cn.hutool</groupId>
        <artifactId>hutool-all</artifactId>
        <version>4.6.3</version>
    </dependency>
    <dependency>
        <groupId>org.projectlombok</groupId>
        <artifactId>lombok</artifactId>
        <optional>true</optional>
    </dependency>
    <dependency>
        <groupId>org.springframework.boot</groupId>
        <artifactId>spring-boot-starter-test</artifactId>
        <scope>test</scope>
    </dependency>
</dependencies>- yaml文件
将模块注册进nacos,使用sentinel做服务降级、服务熔断和服务限流
server:
  port: 8401

spring:
  application:
    name: cloud-alibaba-sentinel
  cloud:
    nacos:
      discovery:
        #Nacos服务注册中心地址
        server-addr: 192.168.26.149:8848
    sentinel:
      transport:
        #配置Sentinel dashboard地址
        dashboard: 192.168.26.149:8858
        #sentinel监控服务,默认8719端口,假如被占用会自动从8719开始依次+1扫描,直至找到未被占用的端口
        port: 8719

management:
  endpoints:
    web:
      exposure:
        include: '*'
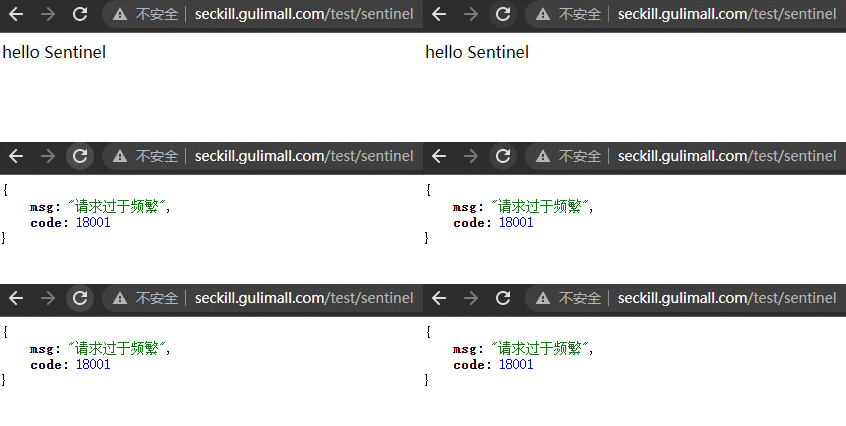
10.10.7自定义全局限流降级配置类
import cn.hutool.json.JSONUtil;
import com.alibaba.csp.sentinel.adapter.servlet.callback.UrlBlockHandler;
import com.alibaba.csp.sentinel.adapter.servlet.callback.WebCallbackManager;
import com.alibaba.csp.sentinel.slots.block.BlockException;
import com.xha.gulimall.common.enums.HttpCode;
import com.xha.gulimall.common.utils.R;
import org.springframework.context.annotation.Configuration;

import javax.servlet.http.HttpServletRequest;
import javax.servlet.http.HttpServletResponse;
import java.io.IOException;

@Configuration
public class SentinelConfig {

    public SentinelConfig(){
        WebCallbackManager.setUrlBlockHandler(new UrlBlockHandler() {
            @Override
            public void blocked(HttpServletRequest request, HttpServletResponse response, BlockException ex) throws IOException {
                R error = R.error(HttpCode.TOO_MANY_REQUEST.getCode(), HttpCode.TOO_MANY_REQUEST.getMessage());
                response.setCharacterEncoding("UTF-8");
                response.setContentType("application/json");
                response.getWriter().write(JSONUtil.toJsonStr(error));
            }
        });
    }
}
10.10.8Sentinel对Feign 支持
Sentinel 适配了 Feign 组件。如果想使用,除了引入 spring-cloud-starter-alibaba-sentinel 的依赖外还需要 2 个步骤:
- 配置文件打开 Sentinel 对 Feign 的支持:
feign.sentinel.enabled=true
#  开启sentinel对openfeign的支持
feign:
  sentinel:
enabled: true- 加入
spring-cloud-starter-openfeign依赖使 Sentinel starter 中的自动化配置类生效:
<dependency>
    <groupId>org.springframework.cloud</groupId>
    <artifactId>spring-cloud-starter-openfeign</artifactId>
</dependency>- 主启动类添加
EnableFeignClients注解 - 业务类
采用openfeign进行服务调用和服务降级
service层接口实现远程服务调用:
@FeignClient(value = "cloud-provider-alibaba-sentinel-ribbon",
        fallback = PaymentServiceImpl.class)
public interface PaymentService {

    @GetMapping("/paymenySQL/{id}")
    public CommonResult<Payment> paymentSQL(@PathVariable Long id);
}
接口实现类做服务熔断
@Component
public class PaymentServiceImpl implements PaymentService {
    @Override
    public CommonResult<Payment> paymentSQL(Long id) {
        return new CommonResult<>(444,"服务熔断返回,没有该流水信息",new Payment(id, "errorSerial......"));
    }
}
10.10.9网关流控
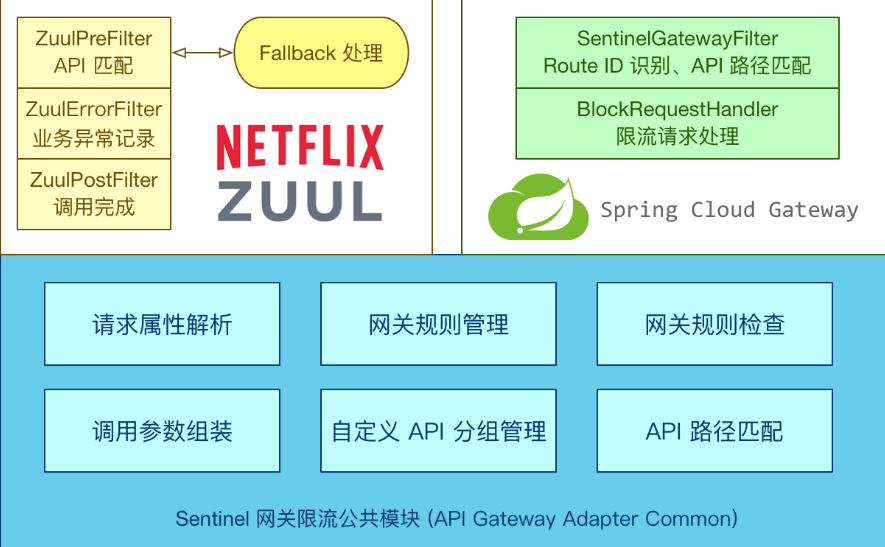
- Sentinel 支持对 Spring Cloud Gateway、Zuul 等主流的 API Gateway 进行限流。
- 添加sentinel和gateway的整合依赖
<dependency>
    <groupId>com.alibaba.cloud</groupId>
    <artifactId>spring-cloud-alibaba-sentinel-gateway</artifactId>
    <version>2.1.0.RELEASE</version>
</dependency>- 查看Sentinel控制台
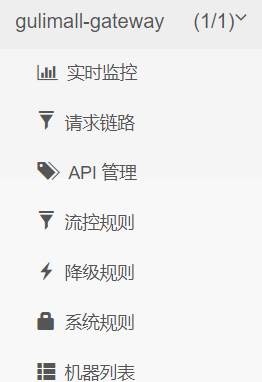
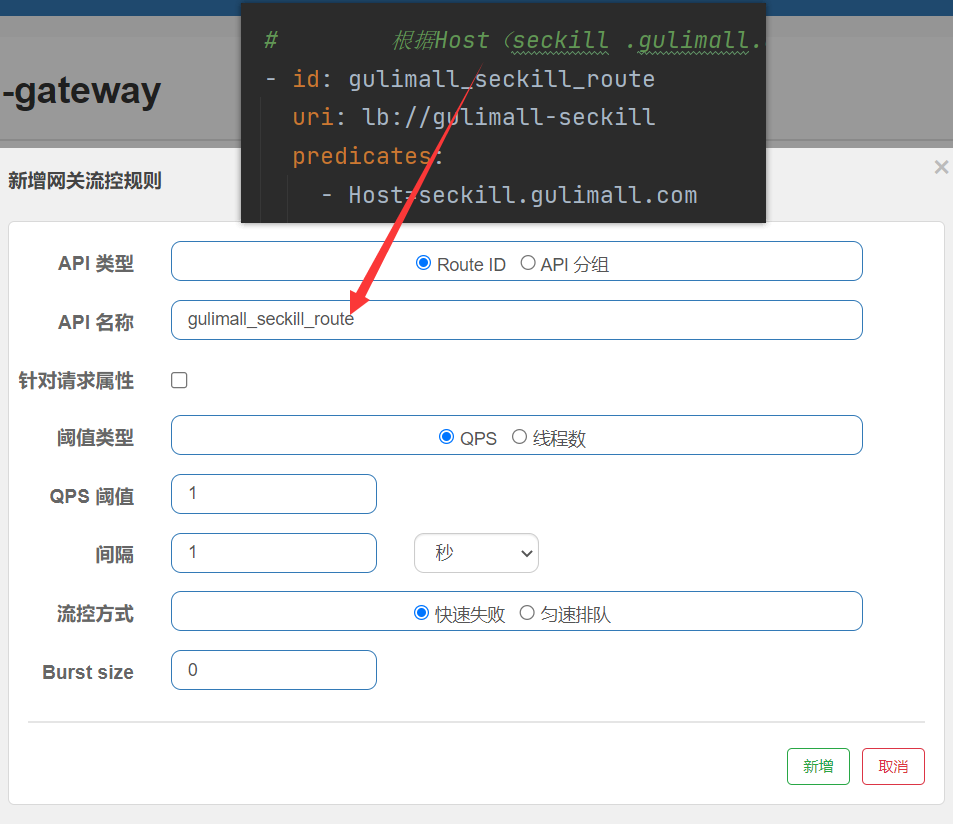
新增网关流控规则

API名称对应的就是网关断言id
10.10.10自定义网关流控返回规则
import com.alibaba.csp.sentinel.adapter.gateway.sc.callback.BlockRequestHandler;
import com.alibaba.csp.sentinel.adapter.gateway.sc.callback.GatewayCallbackManager;
import org.springframework.context.annotation.Configuration;
import org.springframework.web.reactive.function.server.ServerResponse;
import org.springframework.web.server.ServerWebExchange;
import reactor.core.publisher.Mono;

@Configuration
public class SentinelGatewayConfig {

    public SentinelGatewayConfig(){
        GatewayCallbackManager.setBlockHandler(
                new BlockRequestHandler() {
                    @Override
                    public Mono<ServerResponse> handleRequest(ServerWebExchange serverWebExchange, Throwable throwable) {
                        String response = "{\n" +
                                "\"code\":400,\n" +
                                "\"message\":\"请求过于频繁,请稍后重试\"\n" +
                                "}";
                        Mono<ServerResponse> monoResult = ServerResponse.ok().body(Mono.just(response), String.class);
                        return monoResult;
                    }
                }
        );
    }
}
10.11Sleuth+ZipKin服务链路追踪
10.11.1问题引出
==在微服务框架中,一个由客户端发起的请求在后端系统中会经过多个不同的的服务节点调用来协同产生最后的请求结果。==每一个前端请求都会形成一条复杂的分布式服务调用链路,链路中的任何一环出现高延时或错误都会引起整个请求最后的失败。
。==
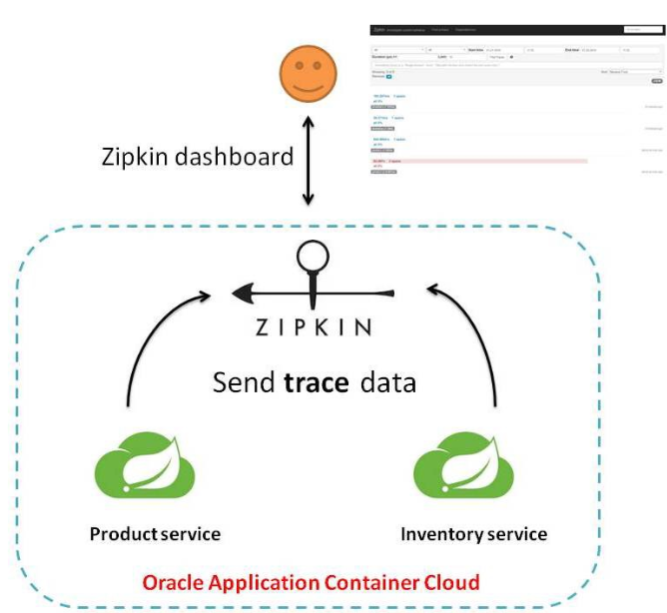
10.11.3完整调用链路
表示一请求链路,一条链路通过**Trace Id唯一标识,Span标识发起的请求信息,各span通过parent id 关联起来**
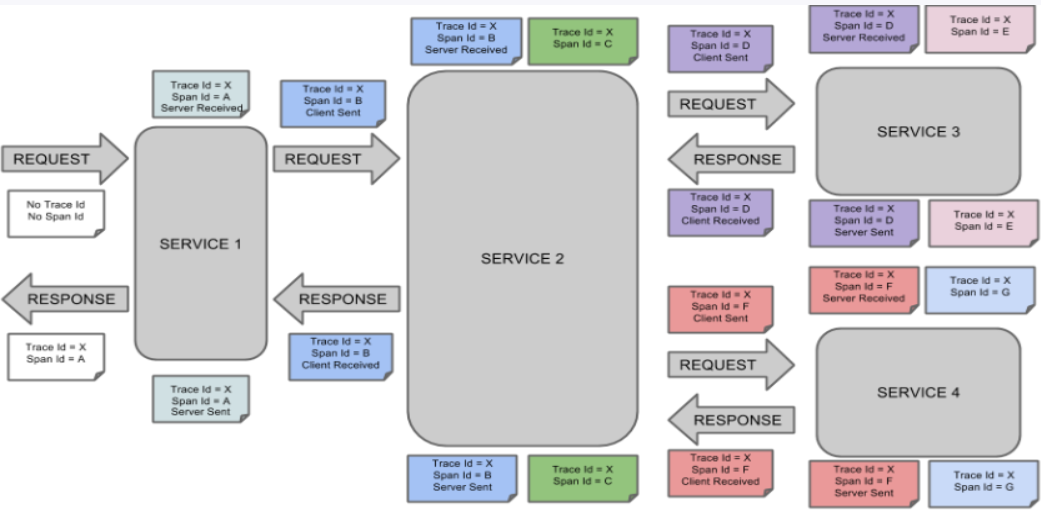


10.11.4链路追踪环境搭建
10.11.4.1本地方式启动
- 启动zipkin-server
SpingCloud从F版起已不需要自己构建ZIpkin Sever了,只需调用jar包即可
下载地址:https://repo1.maven.org/maven2/io/zipkin/zipkin-server/

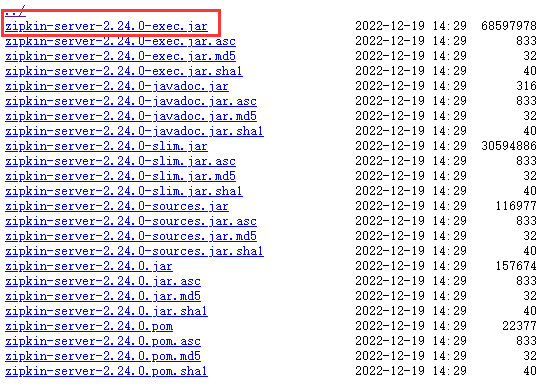

本地启动zipkin:
java -jar jar包名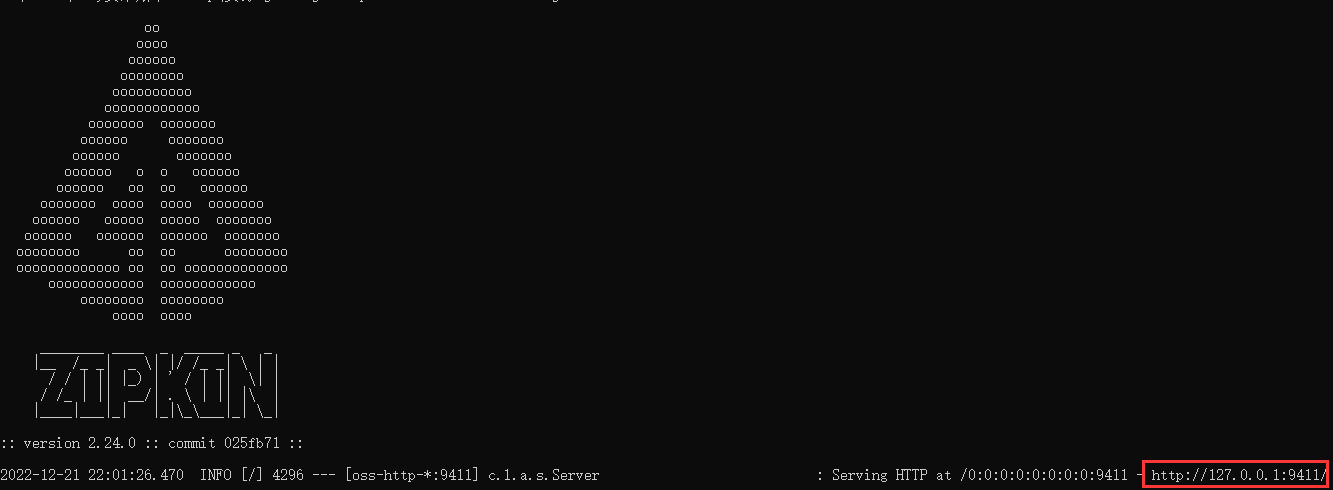
访问zipkin可视化界面
ip:9411/zipkin/
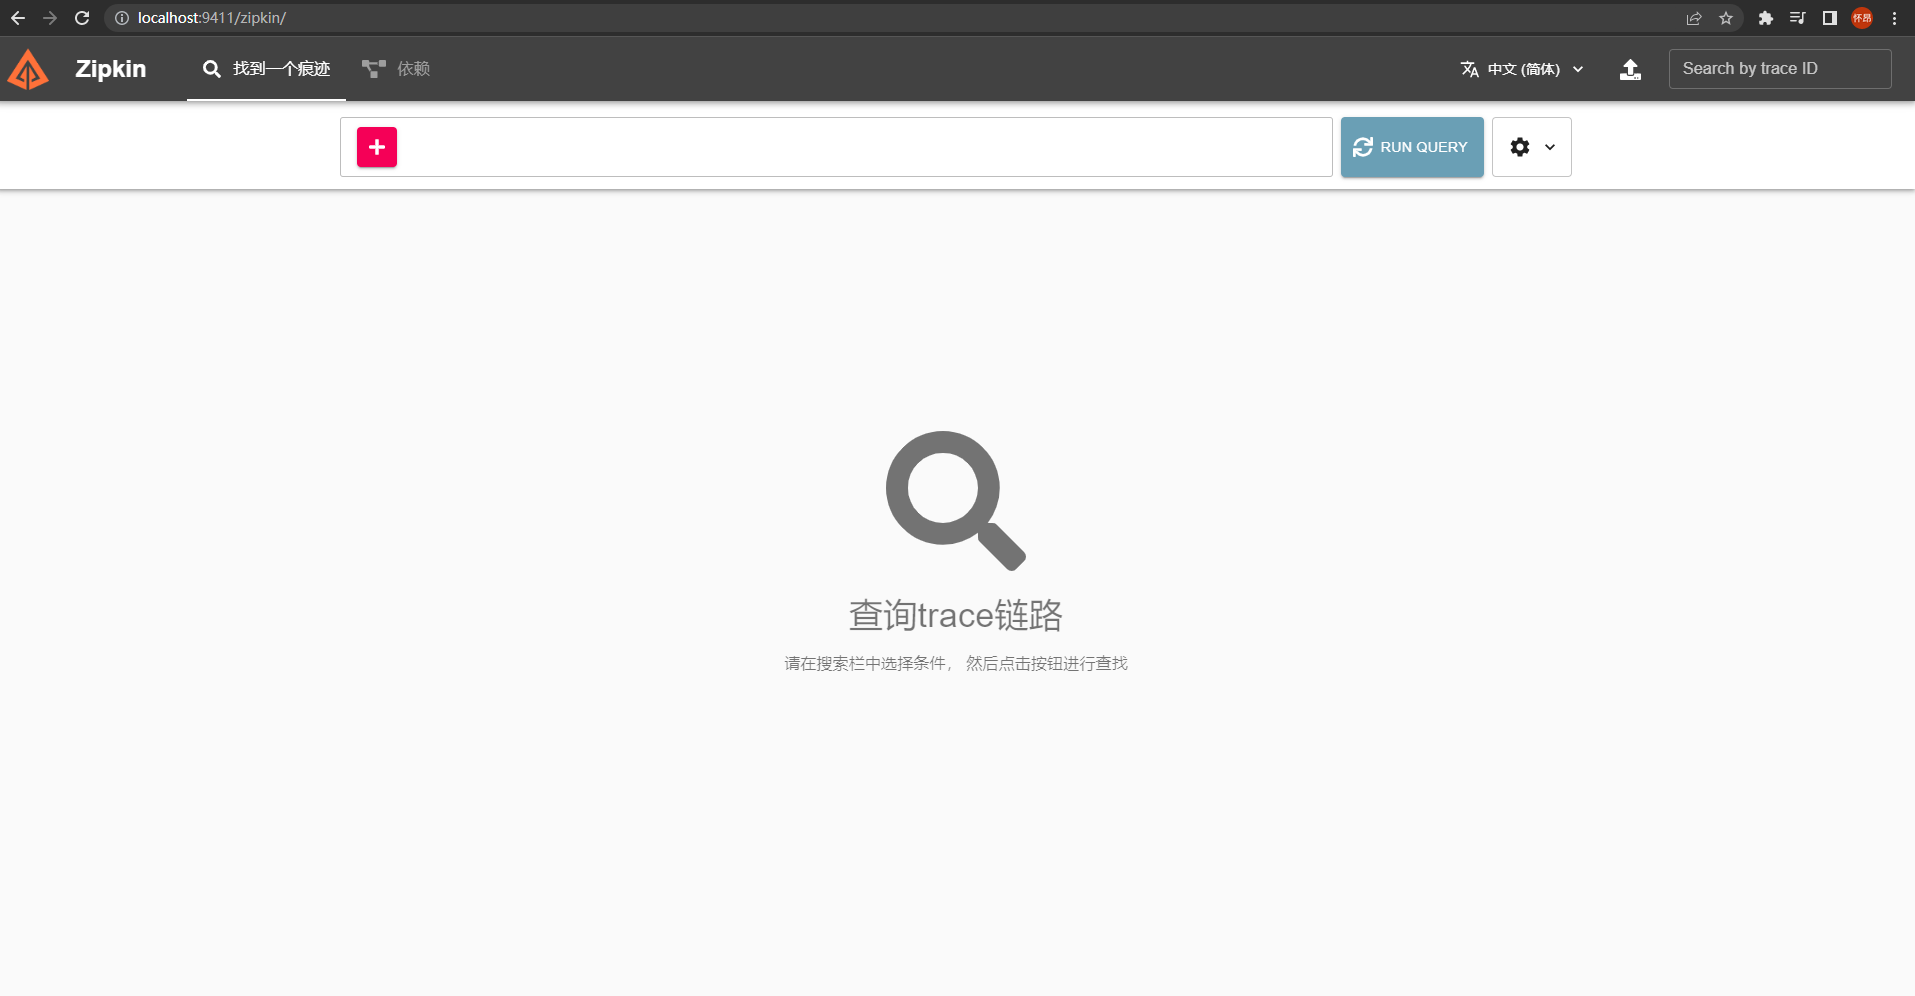
10.11.4.2docker安装zipkin
docker pull openzipkin/zipkin
docker run -d -p 9411:9411 openzipkin/zipkin
x1firewall-cmd --zone=public --add-port=8091/tcp --permanent
systemctl restart firewalld.service
10.11.5SpringCloud整合Sleuth
- 引入对应依赖
<!--包含了sleuth+zipkin-->
<dependency>
    <groupId>org.springframework.cloud</groupId>
    <artifactId>spring-cloud-starter-zipkin</artifactId>
</dependency>
- 配置文件
#    zipkin
  zipkin:
    base-url: http://192.168.26.160:9411/
    #    关闭zipkin的服务发现
    discovery-client-enabled: false
    #    以http的方式传输数据
    sender:
      type: web
#      sleuth采样器
  sleuth:
    sampler:
      probability: 1
10.11.6链路追踪效果
- 开启各个服务,进行服务之间的调用,打开zipkin地址,查看服务调用情况
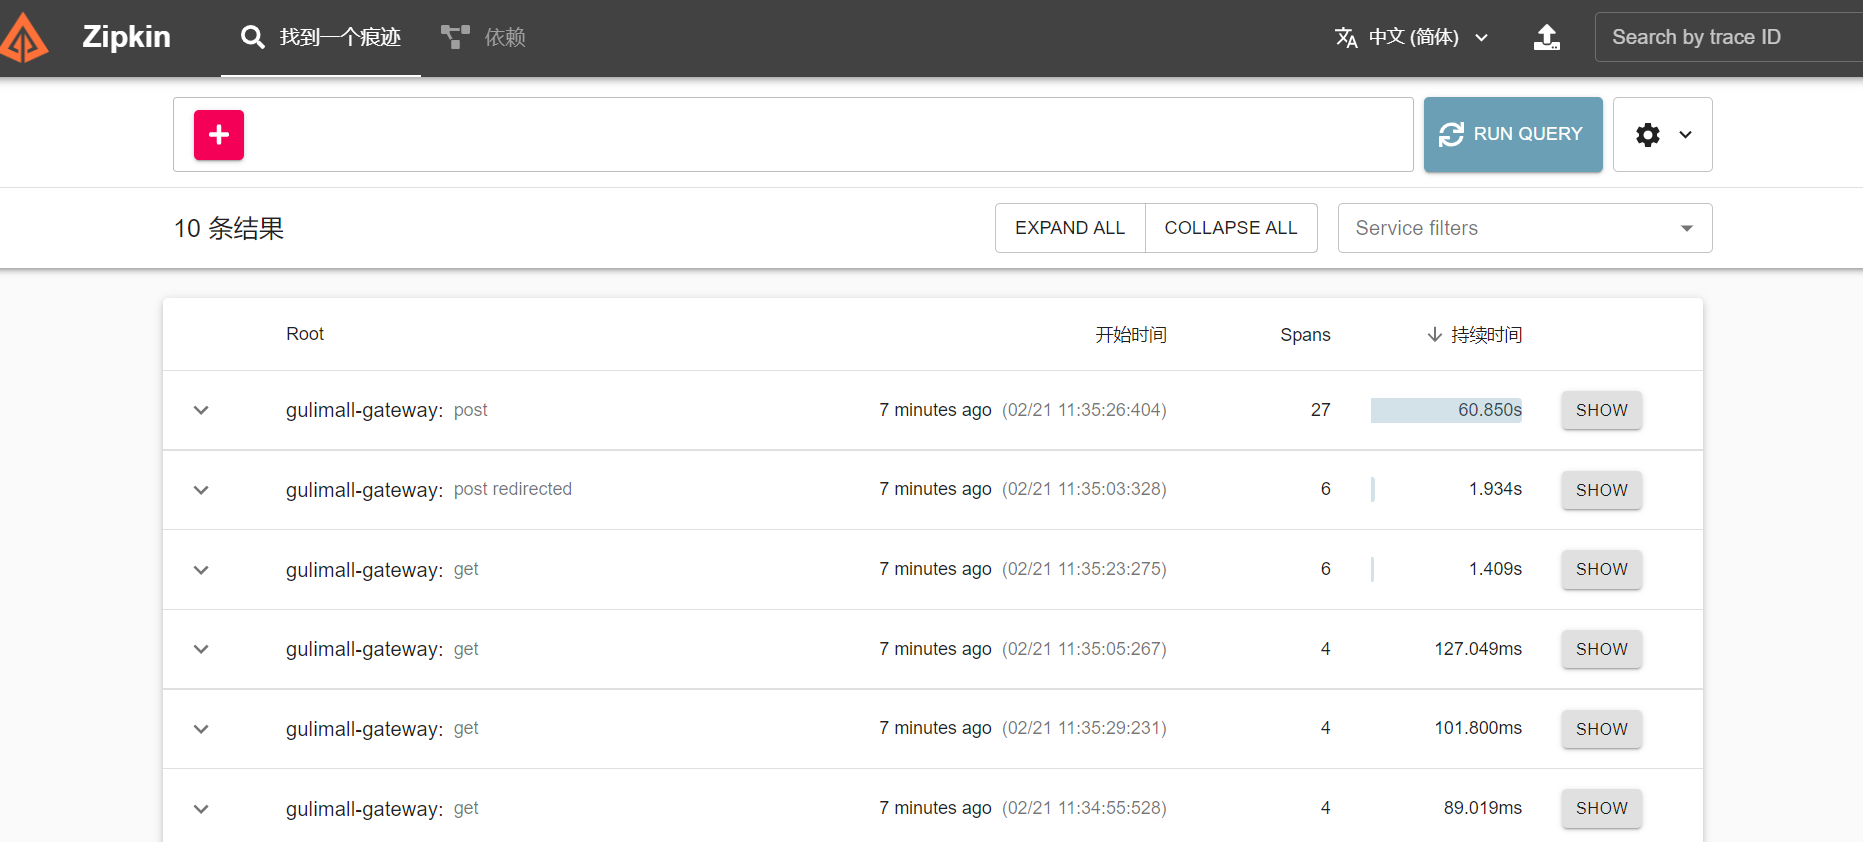
- 查看服务模块之间的依赖关系
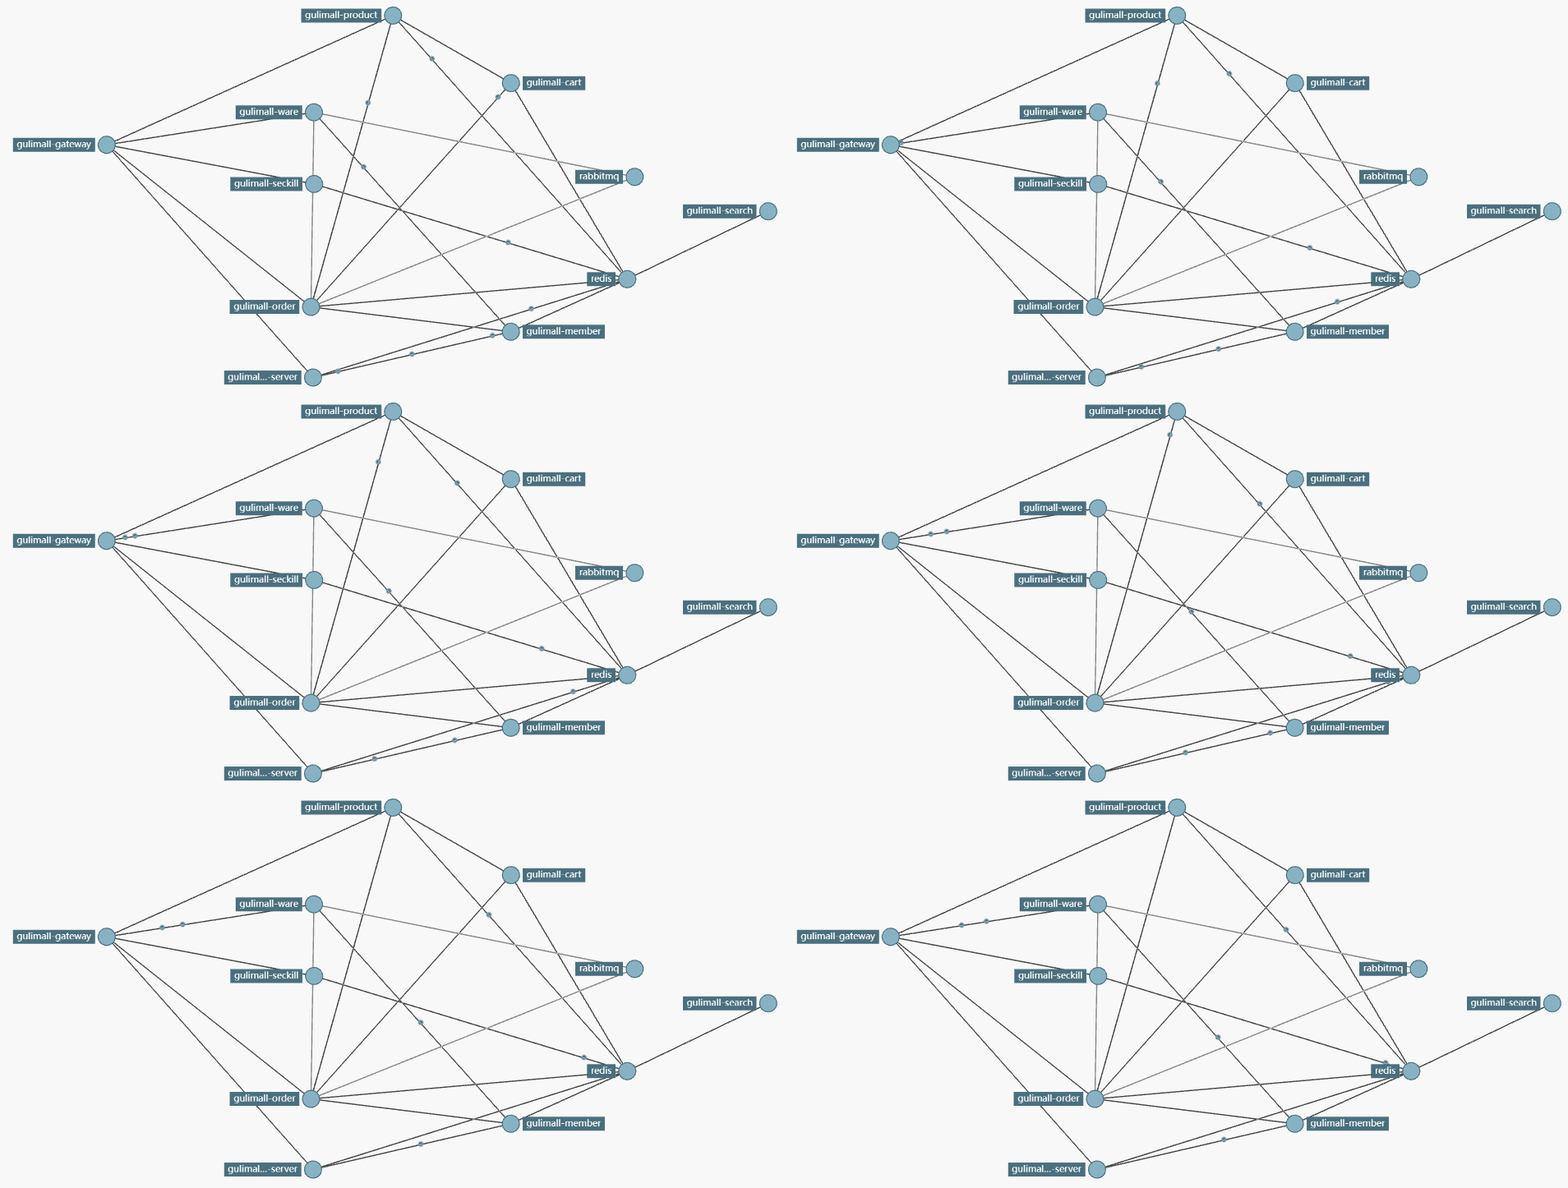
11.相关概念
11.1SPU和SKU
SPU:Standard Product Unit(标准化产品单元) ==是商品信息聚合的最小单位,是一组可复用、易检索的标准化信息的集合,该集合描述了一 个产品的特性。==
如:iphoneX 是 SPU、MI 8 是 SPU iphoneX 64G 黑曜石 是 SKU

SKU:Stock Keeping Unit(库存量单位) ==即库存进出计量的基本单元,可以是以件,盒,托盘等为单位。SKU 这是对于大型连锁超市 DC(配送中心)物流管理的一个必要的方法。现在已经被引申为产品统一编号的简称,每种产品均对应有唯一的 SKU 号。==
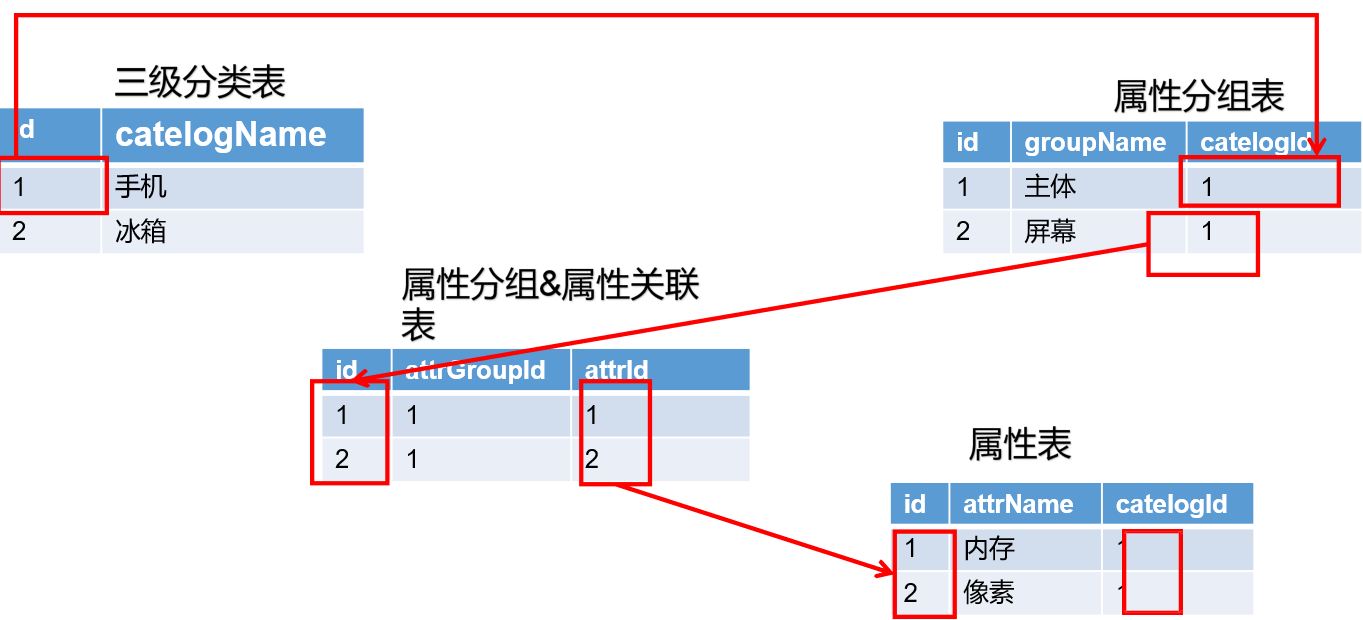
11.2SPU-SKU-属性表
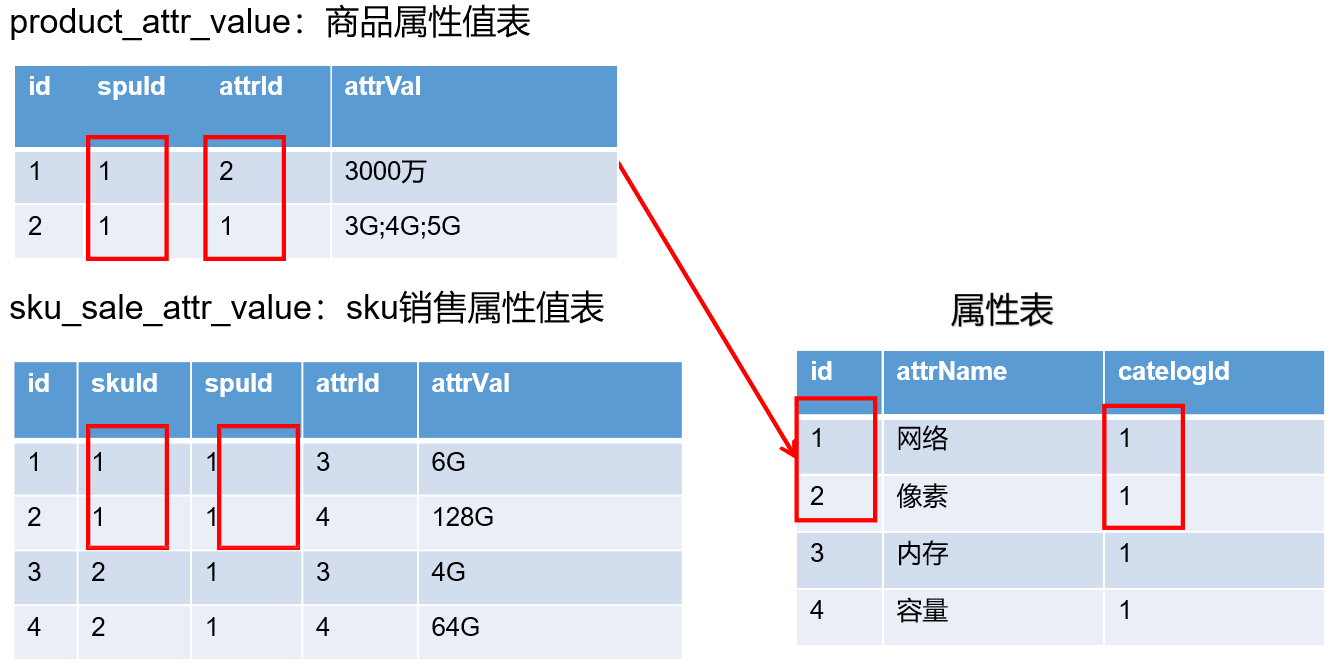
11.3基本属性与销售属性
每个分类下的商品共享规格参数,与销售属性。只是有些商品不一定要用这个分类下全部的属性;
- 属性是以三级分类组织起来的
- 规格参数中有些是可以提供检索的
- 规格参数也是基本属性,他们具有自己的分组
- 属性的分组也是以三级分类组织起来的
- 属性名确定的,但是值是每一个商品不同来决定的
11.4三级分类-属性分组-销售属性关联关系
11.5Object 划分
- PO(persistant object) 持久对象
PO 就是对应数据库中某个表中的一条记录,多个记录可以用 PO 的集合。 PO 中应该不包含任何对数据库的操作。
- DO(Domain Object)领域对象
就是从现实世界中抽象出来的有形或无形的业务实体。
- TO(Transfer Object) 数据传输对象
不同的应用程序(模块)之间传输的对象
- DTO(Data Transfer Object)数据传输对象
这个概念来源于 J2EE 的设计模式,原来的目的是为了 EJB 的分布式应用提供粗粒度的 数据实体,以减 少分布式调用的次数,从而提高分布式调用的性能和降低网络负载,但在这 里,泛指用于展示层与服务层之间的数据传输对象。
- VO(viewobject) 视图对象
通常用于业务层之间的数据传递,和 PO 一样也是仅仅包含数据而已。但应是抽象出 的业务对象 , 可以和表对应 , 也可以不 , 这根据业务的需要 。用 new 关键字创建,由 GC 回收的。 View object:视图对象; 接受页面传递来的数据,封装对象将业务处理完成的对象,封装成页面要用的数据
- BO(business object) 业务对象
从业务模型的角度看 , 见 UML 元件领域模型中的领域对象。封装业务逻辑的 java 对 象 , 通过调用 DAO方法 , 结合 PO,VO 进行业务操作。business object: 业务对象 主要作 用是把业务逻辑封装为一个对象。这个对象可以包括一个或多个其它的对象。 比如一个简 历,有教育经历、工作经历、社会关系等等。 我们可以把教育经历对应一个 PO ,工作经 历对应一个 PO ,社会关系对应一个 PO 。 建立一个对应简历的 BO 对象处理简历,每 个 BO 包含这些 PO 。 这样处理业务逻辑时,我们就可以针对 BO 去处理。
- POJO(plain ordinary java object) 简单无规则 java 对象,传统意义的 java 对象
就是说在一些 Object/Relation Mapping 工具中,能够做到维护 数据库表记录的 persisent object 完全是个符合 Java Bean 规范的纯 Java 对象,没有增 加别的属性和方法。我的理解就是最基本的 java Bean ,只有属性字段及 setter 和 getter 方法!。 POJO 是 DO/DTO/BO/VO 的统称。
- DAO(data access object) 数据访问对象
是一个 sun 的一个标准 j2ee 设计模式, 这个模式中有个接口就是 DAO ,它负持久 层的操作。为业务层提供接口。此对象用于访问数据库。通常和 PO 结合使用, DAO 中包 含了各种数据库的操作方法。通过它的方法 , 结合 PO 对数据库进行相关的操作。夹在业 务逻辑与数据库资源中间。配合 VO, 提供数据库的 CRUD 操作
11.6正向代理与反向代理
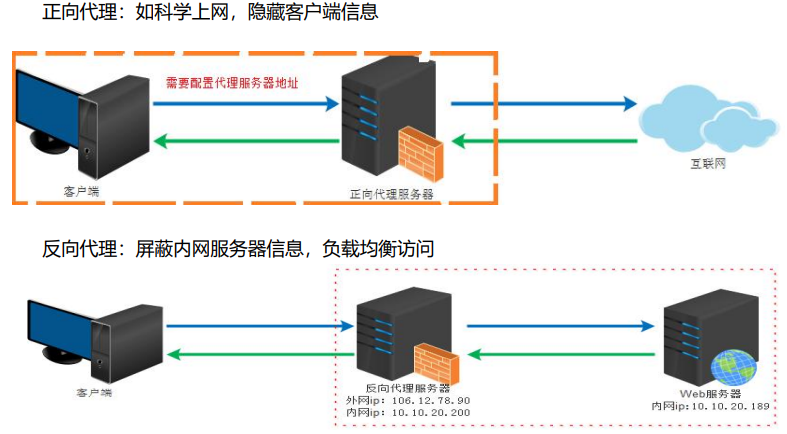
11.7Nginx配置文件

11.8Nginx动静分离
为了提供接口性能,提高响应速度,实现Nginx动静分离,Nginx直接返回静态资源:
- 将所有项目的静态资源都应该放在nginx里面
- 规则:/static/**所有请求都由nginx直接返回
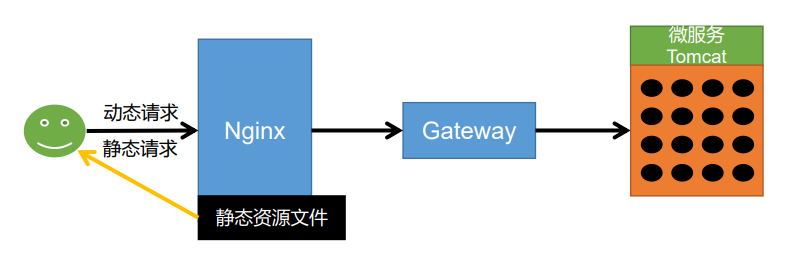

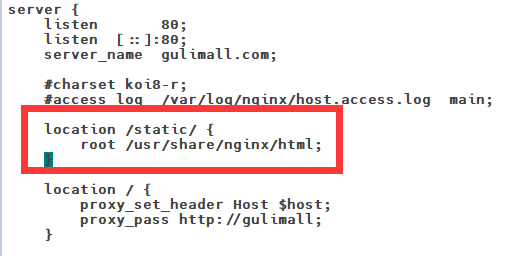
修改nginx中gulimall.conf的配置文件,添加静态资源路径:
 location /static/ {
    root /usr/share/nginx/html;
}
修改项目中静态资源的访问路径:
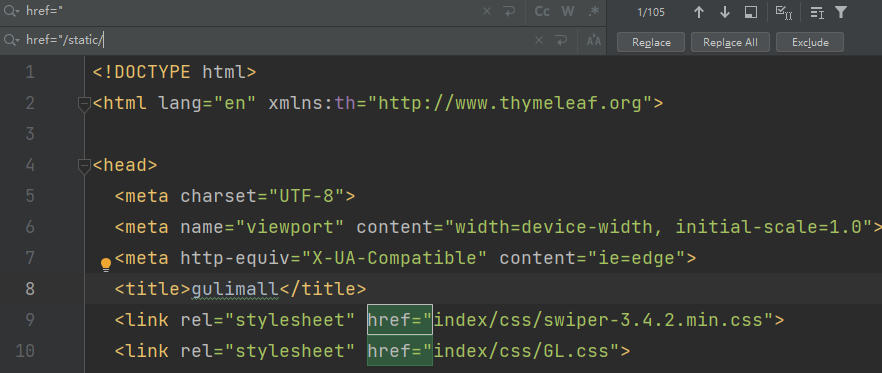
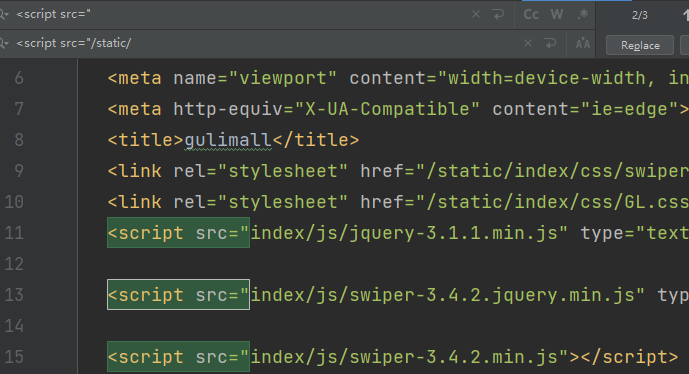
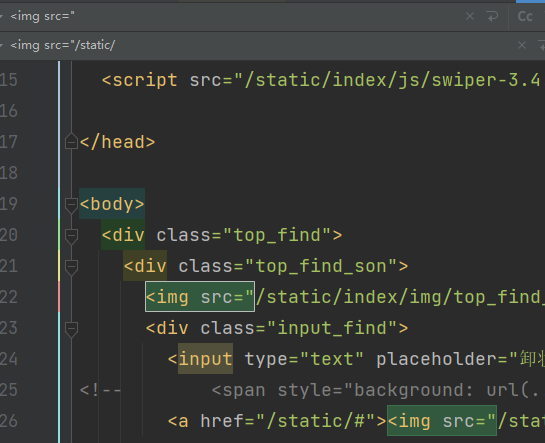
11.9性能测试指标
- 响应时间(Response Time: RT)
响应时间指用户从客户端发起一个请求开始,到客户端接收到从服务器端返回的响
应结束,整个过程所耗费的时间。 - HPS(Hits Per Second) :每秒点击次数,单位是次/秒。
- TPS(Transaction per Second):系统每秒处理交易数,单位是笔/秒。
- QPS(Query per Second):系统每秒处理查询次数,单位是次/秒。对于互联网业务中,如果某些业务有且仅有一个请求连接,那么 TPS=QPS=HPS,一般情况下用 TPS 来衡量整个业务流程,用 QPS 来衡量接口查询次数,用 HPS 来表示对服务器单击请求。
- 无论 TPS、QPS、HPS,此指标是衡量系统处理能力非常重要的指标,越大越好,根据经验,一般情况下:
金融行业:1000TPS50000TPS,不包括互联网化的活动100000TPS,不包括互联网化的活动
保险行业:100TPS
制造行业:10TPS5000TPS1000000TPS
互联网电子商务:10000TPS
互联网中型网站:1000TPS50000TPS10000TPS
互联网小型网站:500TPS - 最大响应时间(Max Response Time) 指用户发出请求或者指令到系统做出反应(响应)的最大时间。
- 最少响应时间(Mininum ResponseTime) 指用户发出请求或者指令到系统做出反应(响应)的最少时间。
- 90%响应时间(90% Response Time) 是指所有用户的响应时间进行排序,第 90%的响应时间。
- 从外部看,性能测试主要关注如下三个指标
- 吞吐量:==每秒钟系统能够处理的请求数、任务数。==
- 响应时间:==服务处理一个请求或一个任务的耗时。==
- 错误率:==一批请求中结果出错的请求所占比例。==
11.10SQL优化—添加索引
11.10.1什么是索引?
一个索引是存储的表中一个特定列的值数据结构(最常见的是B-Tree)。索引是在表的列上创建。所以,要记住的关键点是索引包含一个表中列的值,并且这些值存储在一个数据结构中。请记住记住这一点:**索引是一种数据结构 。**
11.10.2什么样的数据结构可以作为索引?
==B-Tree 是最常用的用于索引的数据结构。因为它们是时间复杂度低, 查找、删除、插入操作都可以可以在对数时间内完成。另外一个重要原因存储在B-Tree 中的数据是有序的。==数据库管理系统(RDBMS)通常决定索引应该用哪些数据结构。但是,在某些情况下,在创建索引时可以指定索引要使用的数据结构。
11.10.3索引是怎么提升性能的?
因为索引基本上是用来存储列值的数据结构,这使查找这些列值更加快速。如果索引使用最常用的数据结构-B-Tree那么其中的数据是有序的。有序的列值可以极大的提升性能。
11.11JVM
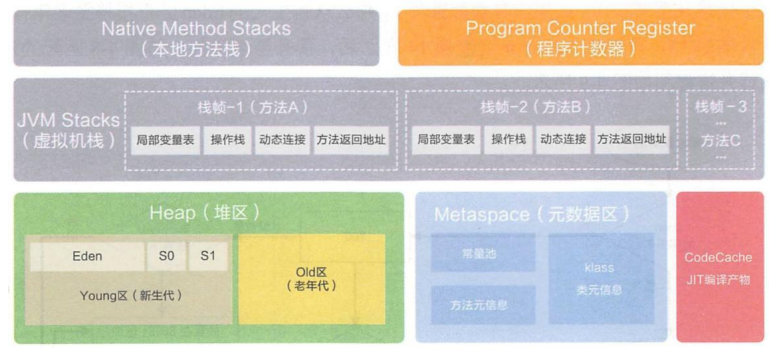
11.9.1JVM内存模型
JVM会将.java文件编译为.class文件
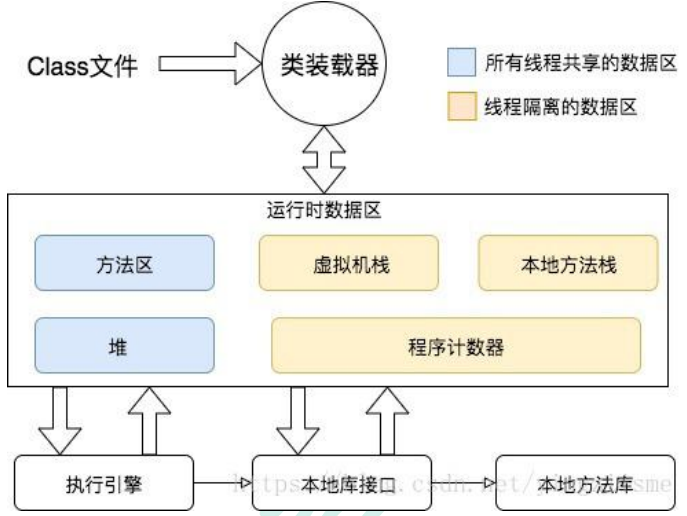
这里主要关注的**堆**
11.9.2 堆
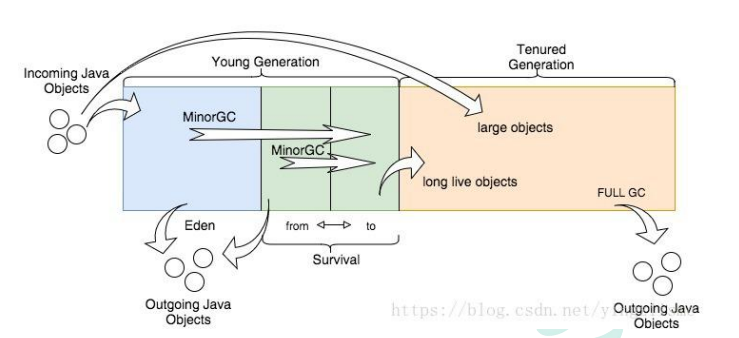
所有的对象实例以及数组都要在堆上分配。**堆是垃圾收集器管理的主要区域**,也被称为“GC 堆”;也是我们优化最多考虑的地方。
堆可以细分为:
- 新生代
- Eden 空间
- From Survivor 空间
- To Survivor 空间
- 老年代
- 永久代/元空间
- java8 以前永久代,受 jvm 管理,java8 以后元空间,直接使用物理内存。因此, 默认情况下,元空间的大小仅受本地内存限制。

11.9.3jconsole和jvisualvm
Jdk 的两个小工具 jconsole、jvisualvm(升级版的 jconsole);通过命令行启动,可监控本地和 远程应用。远程应用需要配置
jvisualvm的功能:
- 监控内存泄露,跟踪垃圾回收,执行时内存、cpu 分析,线程分析…
线程状态:

运行:正在运行的
休眠:sleep
等待:wait
驻留:线程池里面的空闲线程
监视:阻塞的线程,正在等待锁
11.12Spring Cache
11.12.1Spring Cache简介
Spring 从 3.1 开始定义了
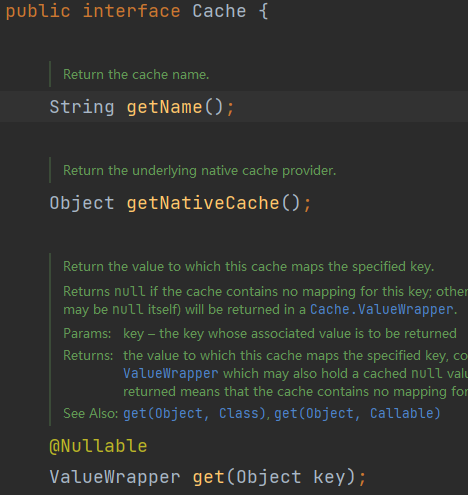
org.springframework.cache.Cache和org.springframework.cache.CacheManager接口来统一不同的缓存技术; 并支持使用 JCache(JSR-107)注解简化我们开发;
Cache接口:
CacheManager接口:
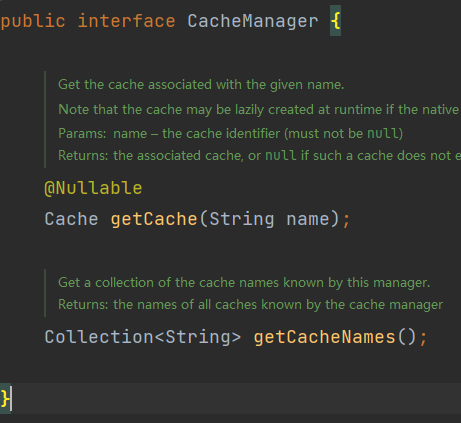
Cache 接口为缓存的组件规范定义,包含缓存的各种操作集合; Cache 接 口 下 Spring 提 供 了 各 种 xxxCache 的 实 现 ; 如 RedisCache , EhCacheCache , ConcurrentMapCache 等;
每次调用需要缓存功能的方法时,Spring 会检查指定参数的指定的目标方法是否已经被调用过;如果有就直接从缓存中获取方法调用后的结果,如果没有就调用方法并缓存结果后返回给用户。下次调用直接从缓存中获取。
使用 Spring 缓存抽象时我们需要关注以下两点;
- 确定方法需要被缓存以及他们的缓存策略
- 从缓存中读取之前缓存存储的数据
11.12.2配置Spring Cache
- 添加对应的依赖
<dependency>
    <groupId>org.springframework.boot</groupId>
    <artifactId>spring-boot-starter-data-redis</artifactId>
</dependency>
<dependency>
    <groupId>org.springframework.boot</groupId>
    <artifactId>spring-boot-starter-cache</artifactId>
</dependency>- 配置文件指定缓存类型
spring:
  cache:
type: redis- 在主启动类/配置类开启缓存功能
在启动类/配置类添加@EnableCaching注解
11.12.3Spring Cache—基于声明式注释的缓存
对于缓存声明,Spring 的缓存抽象提供了一组 Java 注释:
@Cacheable:触发保存缓存。@CacheEvict:触发删除缓存。@CachePut:在不干扰方法执行的情况下更新缓存。@Caching:重新组合要应用于方法的多个缓存操作。@CacheConfig:在类级别共享一些与缓存相关的常见设置。
11.12.3.1@Cacheable
使用@Cacheable注解缓存数据时
需要指定要放到哪个名字的缓存【缓存的分区:按照业务类型分】
@Cacheable({category})- 代表当前方法的结果需要缓存,如果缓存中已经存在,对应的方法不再调用
- 如果缓存中没有就会调用方法,最后将方法结果放入缓存
默认行为
- 如果缓存中有,方法不用调用。
- key默认自动生成,缓存的名字::SimpleKey (自主生成的key值)。
- 缓存的value的值。默认使用jdk序列化机制ObjectOutPutStream,将序列化后的数据存到redis
- 默认ttl时间-1;
因为key是SpEL表达式类型,所以需要加单引号
/**
 * 查询出所有的一级分类
 *
 * @return {@link List}<{@link CategoryEntity}>
 */
@Override
@Cacheable(value = "category",key = "'getFirstCategory'")
public List<CategoryEntity> getFirstCategory() {
    LambdaQueryWrapper<CategoryEntity> queryWrapper = new LambdaQueryWrapper<>();
    queryWrapper.eq(CategoryEntity::getParentCid, NumberConstants.TOP_LEVEL_CATEGORY);
    List<CategoryEntity> firstCategory = categoryDao.selectList(queryWrapper);
    return firstCategory;
}对于@Cacheable注解的默认行为,也可以自定义规则(自定义规则在11.12.4章节)
- 指定生成的缓存使用的key
- 将缓存数据保存为json格式
- 指定缓存数据的过期时间
11.12.3.2@CacheEvict
//按照分区名和key删除缓存
@CacheEvict(value = "category",key = "'getFirstCategory'")
//按照分区名删除该分区下的所有缓存
@CacheEvict(value = "category",allEntries = true)
11.12.4SpringCache自定义配置
- 配置文件
spring:
# spring-cache指定缓存类型
  cache:
    type: redis
#    指定缓存的过期时间
    redis:
      time-to-live: 3600000
#      如果指定了前缀,就是用配置文件中的前缀,如果没有配置前缀就是用缓存名作为前缀
      key-prefix: CACHE_
      use-key-prefix: true
#      是否缓存空值,防止缓存穿透
cache-null-values: true- 配置类
import org.springframework.boot.autoconfigure.cache.CacheProperties;
import org.springframework.boot.context.properties.EnableConfigurationProperties;
import org.springframework.cache.annotation.EnableCaching;
import org.springframework.context.annotation.Bean;
import org.springframework.context.annotation.Configuration;
import org.springframework.data.redis.cache.RedisCacheConfiguration;
import org.springframework.data.redis.serializer.GenericJackson2JsonRedisSerializer;
import org.springframework.data.redis.serializer.RedisSerializationContext;
import org.springframework.data.redis.serializer.StringRedisSerializer;

@EnableCaching
@Configuration
@EnableConfigurationProperties(CacheProperties.class)
public class SpringCacheConfig {

    @Bean
    RedisCacheConfiguration redisCacheConfiguration(CacheProperties cacheProperties){
//        1.首先创建RedisCacheConfiguration对象
        RedisCacheConfiguration cacheConfig = RedisCacheConfiguration.defaultCacheConfig();
//        2.指定key的序列化器为String类型
        cacheConfig = cacheConfig
                .serializeKeysWith(RedisSerializationContext.SerializationPair.fromSerializer(new StringRedisSerializer()));
//        3.指定value的序列化器为Json类型
        cacheConfig = cacheConfig
                .serializeValuesWith(RedisSerializationContext.SerializationPair.fromSerializer(new GenericJackson2JsonRedisSerializer()));
//        4.CacheProperties的作用就是读取配置文件中的配置,将配置文件中的所有配置都生效
        CacheProperties.Redis redisProperties = cacheProperties.getRedis();
        if (redisProperties.getTimeToLive() != null){
            cacheConfig = cacheConfig.entryTtl(redisProperties.getTimeToLive());
        }
        if (redisProperties.getKeyPrefix() != null){
            cacheConfig = cacheConfig.prefixKeysWith(redisProperties.getKeyPrefix());
        }
        if (!redisProperties.isUseKeyPrefix()){
            cacheConfig = cacheConfig.disableKeyPrefix();
        }
        if (!redisProperties.isCacheNullValues()){
            cacheConfig = cacheConfig.disableCachingNullValues();
        }

        return cacheConfig;
    }
}
11.12.5SpringCache的不足
- 读模式
- 缓存穿透:查询的是一个空数据。解决:缓存空数据:cache-null-values=true
- 缓存击穿:一个高并发访问的key失效问题。解决:加锁,默认是无锁的sync = true
- 缓存雪崩:大量的key同时过期。解决:加随机时间spring.cache.redis.time-to-live: 3600000
- 写模式
- 读写加锁
- 读多写多,直接查询数据库
11.13异步
11.13.1初始化线程的4种方式
- 继承 Thread
- 实现 Runnable 接口
- 实现 Callable 接口 + FutureTask (可以拿到返回结果,可以处理异常)
- 线程池
对于以上初始化线程的方式:
- 方式 1 和方式 2:主进程无法获取线程的运算结果。不适合当前场景
- 方式 3:主进程可以获取线程的运算结果,但是不利于控制服务器中的线程资源。可以导致服务器资源耗尽。
- 方式 4:通过如下两种方式初始化线程池
Executors.newFiexedThreadPool(3);
//或者
new ThreadPoolExecutor(corePoolSize, maximumPoolSize, keepAliveTime, TimeUnit unit, workQueue, threadFactory, handler);
11.13.2线程实现方式测试
- 继承Thread类实现
public class ThreadTest {
    public static void main(String[] args) {
        System.out.println("main starting");
        Thread01 thread01 = new Thread01();
        thread01.start();
    }

    public static class Thread01 extends Thread {
        public void run() {
            System.out.println("当前线程id是:" + Thread.currentThread().getId());
            int i = 10 / 2;
            System.out.println("计算结果为:" + i);
        }
    }
}- 实现Runnable接口实现
public class ThreadTest {
    public static void main(String[] args) {
        System.out.println("main starting");
        Runable01 runable01 = new Runable01();
        new Thread(runable01).start();
    }

    public static class Runable01 implements Runnable {
        @Override
        public void run() {
            System.out.println("当前线程id是:" + Thread.currentThread().getId());
            int i = 10 / 2;
            System.out.println("计算结果为:" + i);
        }
    }
}- 实现 Callable 接口 + FutureTask实现
public class ThreadTest {
    public static void main(String[] args) {
        System.out.println("main starting");
        FutureTask<Integer> futureTask = new FutureTask<>(new Callable01());
        new Thread(futureTask).start();
        System.out.println("main ending");
    }

    public static class Callable01 implements Callable<Integer> {
        @Override
        public Integer call() throws Exception {
            System.out.println("当前线程id是:" + Thread.currentThread().getId());
            int i = 10 / 2;
            System.out.println("计算结果为:" + i);
            return i;
        }
    }
}
对于方式1、方式2、方式3的执行结果都是相同的:
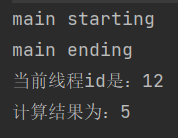
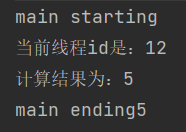
但是对于方式3,因为实现 Callable 接口 + FutureTask能够获得返回值,在获取返回值的时候,其就是一个阻塞式的线程:
public class ThreadTest {
    public static void main(String[] args) {
        System.out.println("main starting");
        FutureTask<Integer> futureTask = new FutureTask<>(new Callable01());
        new Thread(futureTask).start();
        Integer result = null;
        try {
            //获取到异步响应结果
            result = futureTask.get();
        } catch (Exception e) {
            e.printStackTrace();
        }
        System.out.println("main ending");
    }

    public static class Callable01 implements Callable<Integer> {
        @Override
        public Integer call() throws Exception {
            System.out.println("当前线程id是:" + Thread.currentThread().getId());
            int i = 10 / 2;
            System.out.println("计算结果为:" + i);
            return i;
        }
    }
}
对于以上三种创建线程的方式,我们都不采用,而是采用线程池的方式来创建线程
11.13.3线程池实现
采用Executors来创建线程池:
其中submit方法可以传Runable接口和Callable接口
public class ThreadTest {
    //        创建线程池
    private static ExecutorService executorService = Executors.newFixedThreadPool(10);
    public static void main(String[] args) {

        System.out.println("main starting");
        executorService.submit(new Runable01());
        System.out.println("main ending");
    }

    public static class Thread01 extends Thread {
        public void run() {
            System.out.println("当前线程id是:" + Thread.currentThread().getId());
            int i = 10 / 2;
            System.out.println("计算结果为:" + i);
        }
    }

    public static class Runable01 implements Runnable {
        @Override
        public void run() {
            System.out.println("当前线程id是:" + Thread.currentThread().getId());
            int i = 10 / 2;
            System.out.println("计算结果为:" + i);
        }
    }

    public static class Callable01 implements Callable<Integer> {
        @Override
        public Integer call() throws Exception {
            System.out.println("当前线程id是:" + Thread.currentThread().getId());
            int i = 10 / 2;
            System.out.println("计算结果为:" + i);
            return i;
        }
    }
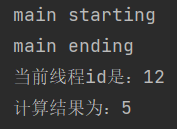
}
11.13.4线程池详解
- 创建线程池的方式
- Executors.newFiexedThreadPool(3)
- new ThreadPoolExecutor(corePoolSize, maximumPoolSize, keepAliveTime, TimeUnit unit, workQueue, threadFactory, handler);
- ThreadPoolExecutor方法的参数
public ThreadPoolExecutor(int corePoolSize,
                          int maximumPoolSize,
                          long keepAliveTime,
                          TimeUnit unit,
                          BlockingQueue<Runnable> workQueue,
                          ThreadFactory threadFactory,
                          RejectedExecutionHandler handler)
- int corePoolSize:核心线程数,线程会一直存在。
- int maximumPoolSize:最大线程数,控制资源。
- long keepAliveTime:存活时间,如果当前线程数量大于corePoolSize指定的线程数,并且已超过存活时间,就会释放除核心线程数之外的空闲线程。
- TimeUnit unit:时间单位
- BlockingQueue
workQueue:阻塞队列。该队列是当核心线程没有空闲时,再来的请求放入队列中先保存任务。 - ThreadFactory threadFactory:线程的创建工厂。
- RejectedExecutionHandler handler:如果队列满了,按照拒绝策略拒绝执行任务。
- ThreadPoolExecutor方法执行流程
- 线程池创建,准备好 core 数量的核心线程,准备接受任务。新的任务进来,用 core 准备好的空闲线程执行。
- core 满了,就将再进来的任务放入阻塞队列中。空闲的 core 就会自己去阻塞队列获取任务执行 。
- 阻塞队列满了,就直接开新线程执行,最大只能开到 max 指定的数量。
- max 都执行好了。Max-core 数量空闲的线程会在 keepAliveTime 指定的时间后自动销毁。最终保持到 core 大小。
- 如果线程数开到了 max 的数量,还有新任务进来,就会使用 reject 指定的拒绝策略进行处理。
- 所有的线程创建都是由指定的 factory 创建的。
面试题:
一个线程池 core 7,max 20 ,queue:50,100 并发进来怎么分配的
7个被核心线程数执行,50个放入阻塞队列,开启新的线程执行,到达最大线程数时执行13个,大于最大线程数的30个被拒绝策略拒绝。
- ThreadPoolExecutor线程池配置
import org.springframework.context.annotation.Bean;
import org.springframework.context.annotation.Configuration;

import java.util.concurrent.Executors;
import java.util.concurrent.LinkedBlockingDeque;
import java.util.concurrent.ThreadPoolExecutor;
import java.util.concurrent.TimeUnit;

/**
 * 线程配置
 *
 * @author Xu Huaiang
 * @date 2023/02/02
 */
@Configuration
public class ThreadConfig {

    @Bean
    public ThreadPoolExecutor threadPoolExecutor(ThreadPoolConfigProperties threadPool) {
        return new ThreadPoolExecutor(
                threadPool.getCoreSize(),
                threadPool.getMaxSize(),
                threadPool.getKeepAliveTime(),
                TimeUnit.SECONDS,
                new LinkedBlockingDeque<>(100000),
                Executors.defaultThreadFactory(),
                new ThreadPoolExecutor.AbortPolicy()
        );
    }
}
/**
* 线程池配置属性
*
* @author Xu Huaiang
* @date 2023/02/02
*/
@Data
@Component
@ConfigurationProperties(prefix = "gulimall.thread")
public class ThreadPoolConfigProperties {
private Integer coreSize;
private Integer maxSize;
private Integer keepAliveTime;
}#线程池配置
gulimall:
thread:
core-size: 20
max-size: 200
keep-alive-time: 1011.13.5常见的四种线程池
- newCachedThreadPool
创建一个可缓存线程池,如果线程池长度超过处理需要,可灵活回收空闲线程,若无可回收,则新建线程。
- newFixedThreadPool
创建一个定长线程池,可控制线程最大并发数,超出的线程会在队列中等待。
- newScheduledThreadPool
创建一个定长线程池,支持定时及周期性任务执行。
newSingleThreadExecutor
创建一个单线程化的线程池,它只会用唯一的工作线程来执行任务,保证所有任务 按照指定顺序(FIFO, LIFO, 优先级)执行。
11.13.6为什么要使用线程池
- 降低资源的消耗
通过重复利用已经创建好的线程降低线程的创建和销毁带来的损耗
- 提高响应速度
因为线程池中的线程数没有超过线程池的最大上限时,有的线程处于等待分配任务的状态,当任务来时无 需创建新的线程就能执行。
提高线程的可管理性
线程池会根据当前系统特点对池内的线程进行优化处理,减少创建和销毁线程带来 的系统开销。无限的 创建和销毁线程不仅消耗系统资源,还降低系统的稳定性,使 用线程池进行统一分配
11.14CompletableFuture异步编排
11.14.1业务场景
查询商品详情页的逻辑比较复杂,有些数据还需要远程调用,必然需要花费更多的时间。
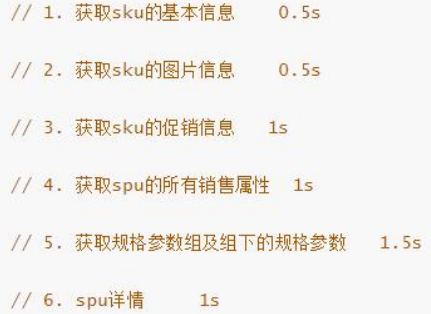
假如商品详情页的每个查询,需要如下标注的时间才能完成 那么,用户需要 5.5s 后才能看到商品详情页的内容。很显然是不能接受的。 如果有多个线程同时完成这 6 步操作,也许只需要 1.5s 即可完成响应
11.14.2CompletableFuture概述
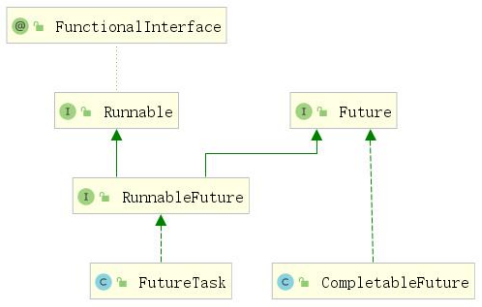
CompletableFuture,提供了非常强大的 Future 的扩展功能,可以帮助我们简化异步编程的复杂性,提供了函数式编程的能力,可以通过回调的方式处理计算结果,并且提供了转换和组合 CompletableFuture 的方法。 CompletableFuture 类实现了 Future 接口,所以你还是可以像以前一样通过get方法阻塞或 者轮询的方式获得结果,但是这种方式不推荐使用。
CompletableFuture 和 FutureTask 同属于 Future 接口的实现类,都可以获取线程的执行结果。
11.14.3创建异步对象
CompletableFuture 提供了四个静态方法来创建一个异步操作。

1、runXxxx 都是没有返回结果的,supplyXxx 都是可以获取返回结果的
2、可以传入自定义的线程池,否则就用默认的线程池;

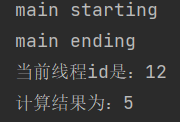
测试runAsync()
private static ExecutorService executorService = Executors.newFixedThreadPool(10);

public static void main(String[] args) throws ExecutionException, InterruptedException {

    System.out.println("main starting");

    CompletableFuture<Void> completableFuture = CompletableFuture.runAsync(() -> {
        System.out.println("当前线程id是:" + Thread.currentThread().getId());
        int i = 10 / 2;
        System.out.println("计算结果为:" + i);
    }, executorService);

    System.out.println("main ending");
}
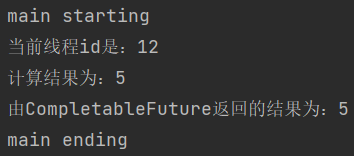
测试supplyAsync()
private static ExecutorService executorService = Executors.newFixedThreadPool(10);

public static void main(String[] args) throws ExecutionException, InterruptedException {

    System.out.println("main starting");

    CompletableFuture<Integer> completableFuture = CompletableFuture.supplyAsync(() -> {
        System.out.println("当前线程id是:" + Thread.currentThread().getId());
        int i = 10 / 2;
        System.out.println("计算结果为:" + i);
        return i;
    }, executorService);
    System.out.println("由CompletableFuture返回的结果为:" + completableFuture.get());

    System.out.println("main ending");
}
11.14.4计算完成时的回调

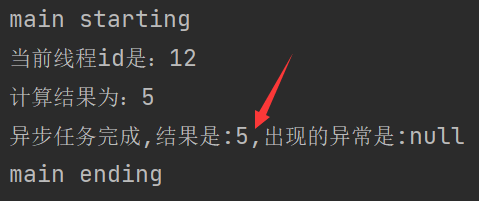
whenComplete 可以处理正常和异常的计算结果,
exceptionally 处理异常情况。
whenComplete 和 whenCompleteAsync 的区别:
- whenComplete:是执行当前任务的线程执行继续执行 whenComplete 的任务。
- whenCompleteAsync:是执行把 whenCompleteAsync 这个任务继续提交给线程池 来进行执行。
    private static ExecutorService executorService = Executors.newFixedThreadPool(10);

    public static void main(String[] args) throws ExecutionException, InterruptedException {

        System.out.println("main starting");

        CompletableFuture<Integer> completableFuture = CompletableFuture.supplyAsync(() -> {
            System.out.println("当前线程id是:" + Thread.currentThread().getId());
            int i = 10 / 2;
            System.out.println("计算结果为:" + i);
            return i;
        }, executorService).whenComplete((result,exception) -> {
//            获取到结果和异常信息
            System.out.println("异步任务完成,结果是:" + result + ",出现的异常是:" + exception);
        }).exceptionally(throwable -> {
//            感知异常,返回结果
            return 10;
        });

        System.out.println("main ending");
    }
    private static ExecutorService executorService = Executors.newFixedThreadPool(10);

    public static void main(String[] args) throws ExecutionException, InterruptedException {

        System.out.println("main starting");

        CompletableFuture<Integer> completableFuture = CompletableFuture.supplyAsync(() -> {
            System.out.println("当前线程id是:" + Thread.currentThread().getId());
            int i = 10 / 0;
            System.out.println("计算结果为:" + i);
            return i;
        }, executorService).whenComplete((result,exception) -> {
//            获取到结果和异常信息
            System.out.println("异步任务完成,结果是:" + result + ",出现的异常是:" + exception);
        }).exceptionally(throwable -> {
//            感知异常,返回结果
            return 10;
        });
        System.out.println("最终结果为:" + completableFuture.get());
        System.out.println("main ending");
    }
11.14.5Handle方法

和 complete 一样,可对结果做最后的处理(可处理异常),可改变返回值。
private static ExecutorService executorService = Executors.newFixedThreadPool(10);

public static void main(String[] args) throws ExecutionException, InterruptedException {

    System.out.println("main starting");

    CompletableFuture<Serializable> completableFuture = CompletableFuture.supplyAsync(() -> {
        System.out.println("当前线程id是:" + Thread.currentThread().getId());
        int i = 10 / 0;
        System.out.println("计算结果为:" + i);
        return i;
    }, executorService).handle((result, exception) -> {
        if (!Objects.isNull(result)) {
            return result * 2;
        }
        if (!Objects.isNull(exception)) {
            System.out.println("出现的异常是:" + exception);
        }
        return 0;
    });
    System.out.println("main ending:" + completableFuture.get());
}
11.14.6线程串行化
线程串行化就是下一个线程需要等待上一个线程的执行结果并进行处理,而将两个或多个线程串行执行。
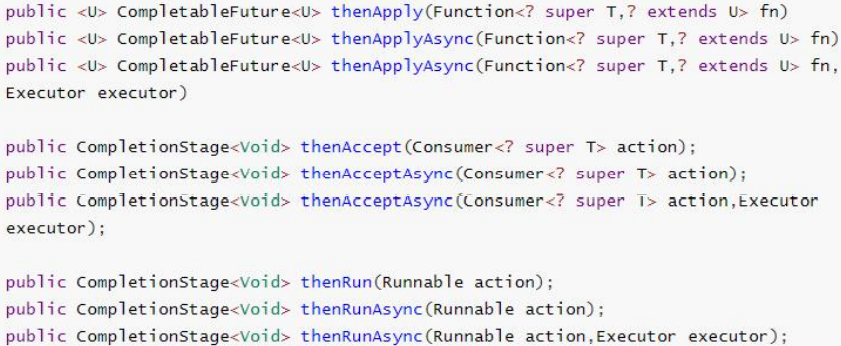
- thenApply 方法:当一个线程依赖另一个线程时,获取上一个任务返回的结果,并返回当前任务的返回值。
- thenAccept 方法:消费处理结果。接收任务的处理结果,并消费处理,无返回结果。
- thenRun 方法:只要上面的任务执行完成,就开始执行 thenRun,只是处理完任务后,执行 thenRun 的后续操作
- 带有 Async 默认是异步执行的。同之前。
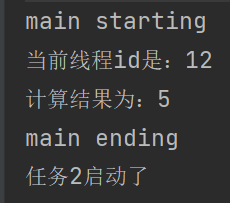
thenRunAsync不能获取执行结果
private static ExecutorService executorService = Executors.newFixedThreadPool(10);

public static void main(String[] args) throws ExecutionException, InterruptedException {

    System.out.println("main starting");

    CompletableFuture<Void> completableFuture = CompletableFuture.supplyAsync(() -> {
        System.out.println("当前线程id是:" + Thread.currentThread().getId());
        int i = 10 / 2;
        System.out.println("计算结果为:" + i);
        return i;
    }, executorService).thenRunAsync(() -> {
        System.out.println("任务2启动了");
    }, executorService);
    System.out.println("main ending");
}
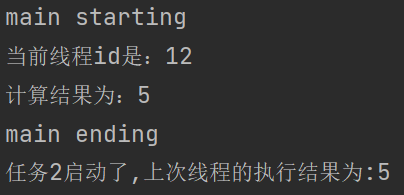
thenAcceptAsync可以获取到上一次的执行结果,但是没有返回值
private static ExecutorService executorService = Executors.newFixedThreadPool(10);

public static void main(String[] args) throws ExecutionException, InterruptedException {

    System.out.println("main starting");

    CompletableFuture<Void> completableFuture = CompletableFuture.supplyAsync(() -> {
        System.out.println("当前线程id是:" + Thread.currentThread().getId());
        int i = 10 / 2;
        System.out.println("计算结果为:" + i);
        return i;
    }, executorService).thenAcceptAsync((result) -> {
        System.out.println("任务2启动了,上次线程的执行结果为:" + result);
    }, executorService);
    System.out.println("main ending");
}
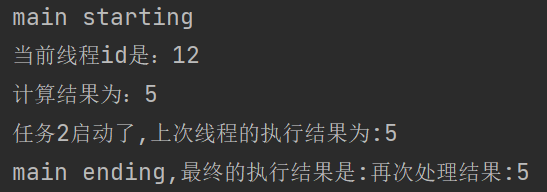
thenApplyAsync可以获取到上一次的执行结果,并且有返回值
public static void main(String[] args) throws ExecutionException, InterruptedException {

    System.out.println("main starting");

    CompletableFuture<String> completableFuture = CompletableFuture.supplyAsync(() -> {
        System.out.println("当前线程id是:" + Thread.currentThread().getId());
        int i = 10 / 2;
        System.out.println("计算结果为:" + i);
        return i;
    }, executorService).thenApplyAsync((result) -> {
        System.out.println("任务2启动了,上次线程的执行结果为:" + result);
        return "再次处理结果:" + result;
    }, executorService);
    System.out.println("main ending,最终的执行结果是:" + completableFuture.get());
}
11.14.7两两任务组合—都要完成
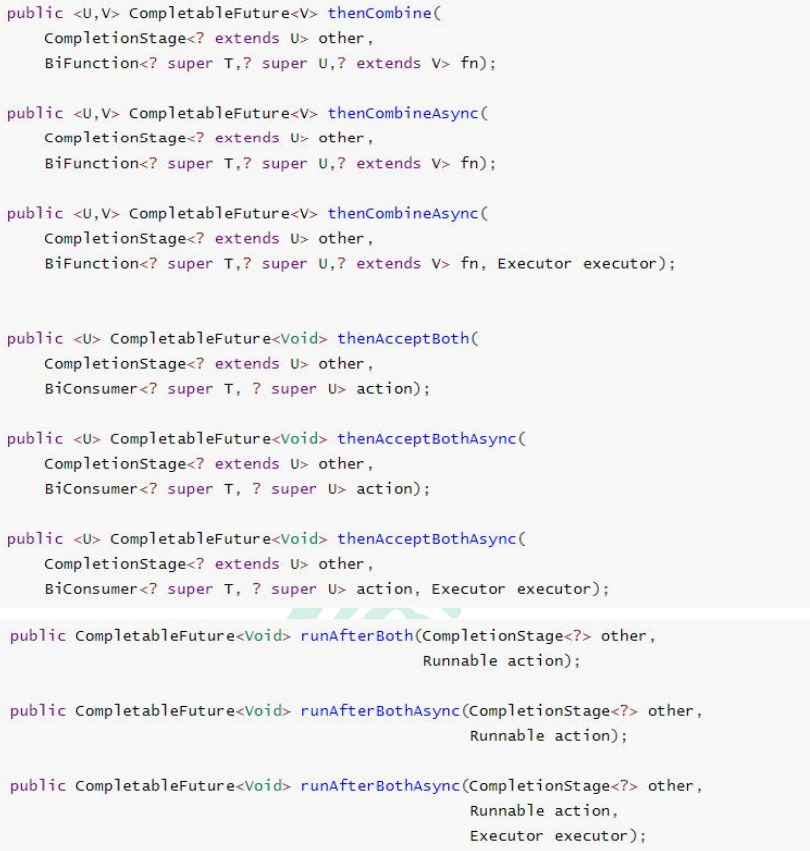
- thenCombine:组合两个 future,获取两个 future 的执行结果,并返回当前任务的返回值
- thenAcceptBoth:组合两个 future,获取两个 future 任务的执行结果,然后处理任务,没有返回值。
- runAfterBoth:组合两个 future,不需要获取 future 的结果,只需两个 future 处理完任务后, 处理该任务。
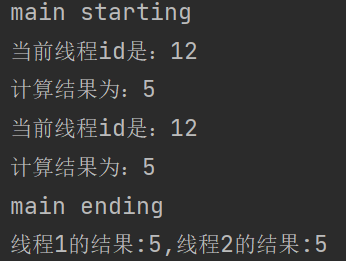
thenAcceptBothAsync(组合两个 future,获取两个 future 任务的返回结果,然后处理任务,没有返回值)
private static ExecutorService executorService = Executors.newFixedThreadPool(10);

public static void main(String[] args) throws ExecutionException, InterruptedException {

    System.out.println("main starting");
    CompletableFuture<Object> thread01 = CompletableFuture.supplyAsync(() -> {
        System.out.println("当前线程id是:" + Thread.currentThread().getId());
        int i = 10 / 2;
        System.out.println("计算结果为:" + i);
        return i;
    });
    CompletableFuture<Object> thread02 = CompletableFuture.supplyAsync(() -> {
        System.out.println("当前线程id是:" + Thread.currentThread().getId());
        int i = 10 / 2;
        System.out.println("计算结果为:" + i);
        return i;
    });

    thread01.thenAcceptBothAsync(thread02,(t1,t2) -> {
        System.out.println("线程1的结果:" + t1 + ",线程2的结果:" + t2);
    },executorService);

    System.out.println("main ending");
}
thenCombine:组合两个 future,获取两个 future 的执行结果,并返回当前任务的返回值
private static ExecutorService executorService = Executors.newFixedThreadPool(10);

public static void main(String[] args) throws ExecutionException, InterruptedException {

    System.out.println("main starting");
    CompletableFuture<Object> thread01 = CompletableFuture.supplyAsync(() -> {
        System.out.println("当前线程id是:" + Thread.currentThread().getId());
        int i = 10 / 2;
        System.out.println("计算结果为:" + i);
        return i;
    });
    CompletableFuture<Object> thread02 = CompletableFuture.supplyAsync(() -> {
        System.out.println("当前线程id是:" + Thread.currentThread().getId());
        int i = 10 / 2;
        System.out.println("计算结果为:" + i);
        return i;
    });

    CompletableFuture<String> completableFuture = thread01.thenCombineAsync(thread02, (t1, t2) -> {
        return "线程1的结果:" + t1 + ",线程2的结果:" + t2;
    }, executorService);

    System.out.println("main ending,最终的执行结果是:" + completableFuture.get());
}
11.14.8两两任务组合—一个完成
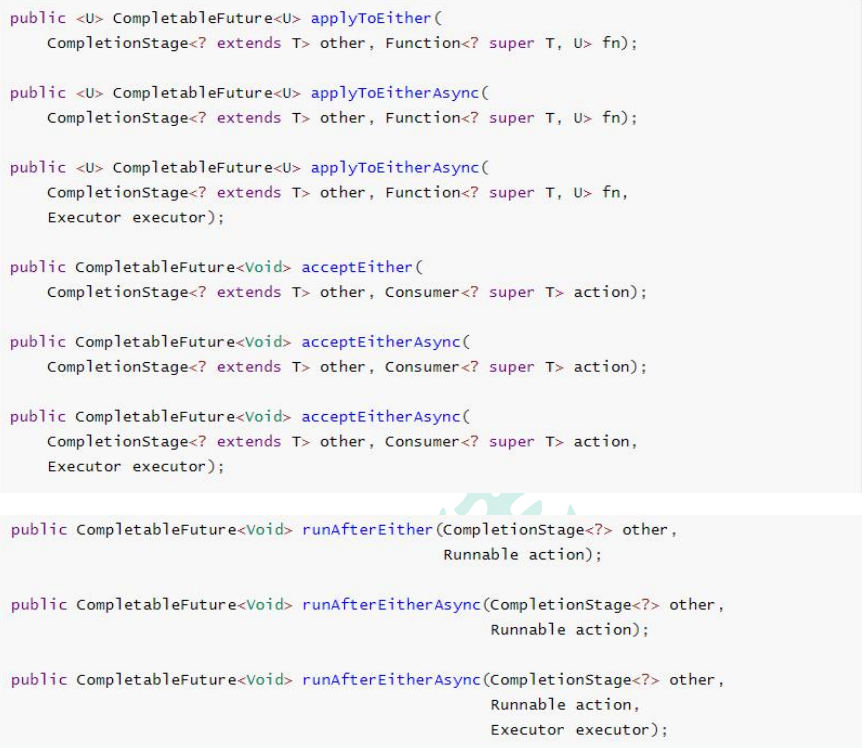
runAfterEitherAsync:不获取到上一次的执行结果,并且没有返回值acceptEitherAsync:获取到上一次的执行结果,但是没有返回值applyToEitherAsync:获取到上一次的执行结果,并且有返回值
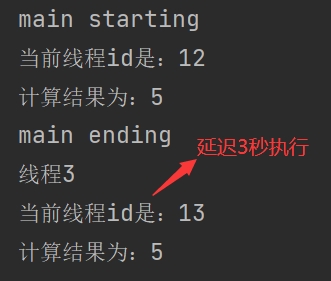
runAfterEitherAsync
private static ExecutorService executorService = Executors.newFixedThreadPool(10);

public static void main(String[] args) throws ExecutionException, InterruptedException {

    System.out.println("main starting");
    CompletableFuture<Object> thread01 = CompletableFuture.supplyAsync(() -> {
        System.out.println("当前线程id是:" + Thread.currentThread().getId());
        int i = 10 / 2;
        System.out.println("计算结果为:" + i);
        return i;
    });
    CompletableFuture<Object> thread02 = CompletableFuture.supplyAsync(() -> {
        int i = 0;
        try {
            Thread.sleep(3000);
            System.out.println("当前线程id是:" + Thread.currentThread().getId());
            i = 10 / 2;
            System.out.println("计算结果为:" + i);
        } catch (InterruptedException e) {
            e.printStackTrace();
        }
        return i;
    });

    thread01.runAfterEitherAsync(thread02,() -> {
        System.out.println("线程3");
    },executorService);

    System.out.println("main ending");
}
acceptEitherAsync
private static ExecutorService executorService = Executors.newFixedThreadPool(10);

public static void main(String[] args) throws ExecutionException, InterruptedException {

    System.out.println("main starting");
    CompletableFuture<Object> thread01 = CompletableFuture.supplyAsync(() -> {
        System.out.println("当前线程id是:" + Thread.currentThread().getId());
        int i = 10 / 2;
        System.out.println("计算结果为:" + i);
        return i;
    });
    CompletableFuture<Object> thread02 = CompletableFuture.supplyAsync(() -> {
        int i = 0;
        try {
            Thread.sleep(3000);
            System.out.println("当前线程id是:" + Thread.currentThread().getId());
            i = 10 / 2;
            System.out.println("计算结果为:" + i);
        } catch (InterruptedException e) {
            e.printStackTrace();
        }
        return i;
    });

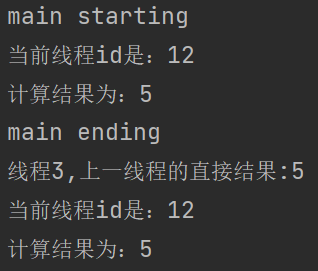
    CompletableFuture<Void> stringCompletableFuture = thread01.acceptEitherAsync(thread02, (result) -> {
        System.out.println("线程3,上一线程的直接结果:" + result);
    }, executorService);

    System.out.println("main ending");
}
applyToEitherAsync
private static ExecutorService executorService = Executors.newFixedThreadPool(10);

public static void main(String[] args) throws ExecutionException, InterruptedException {

    System.out.println("main starting");
    CompletableFuture<Object> thread01 = CompletableFuture.supplyAsync(() -> {
        System.out.println("当前线程id是:" + Thread.currentThread().getId());
        int i = 10 / 2;
        System.out.println("计算结果为:" + i);
        return i;
    });
    CompletableFuture<Object> thread02 = CompletableFuture.supplyAsync(() -> {
        int i = 0;
        try {
            Thread.sleep(3000);
            System.out.println("当前线程id是:" + Thread.currentThread().getId());
            i = 10 / 2;
            System.out.println("计算结果为:" + i);
        } catch (InterruptedException e) {
            e.printStackTrace();
        }
        return i;
    });

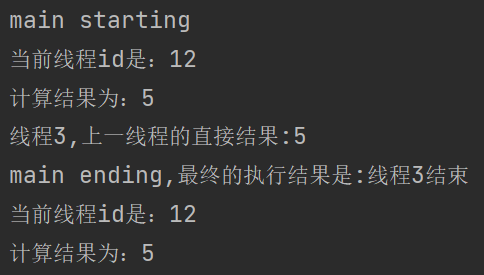
    CompletableFuture<String> stringCompletableFuture = thread01.applyToEitherAsync(thread02, (result) -> {
        System.out.println("线程3,上一线程的直接结果:" + result);
        return "线程3结束";
    }, executorService);

    System.out.println("main ending,最终的执行结果是:" + stringCompletableFuture.get());
}
11.14.9多任务组合

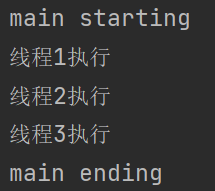
allOf:等待所有任务完成
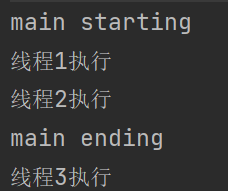
anyOf:只要有一个任务完成
private static ExecutorService executorService = Executors.newFixedThreadPool(10);

public static void main(String[] args) throws ExecutionException, InterruptedException {

    System.out.println("main starting");
    CompletableFuture<Void> thread01 = CompletableFuture.runAsync(() -> {
        System.out.println("线程1执行");
    }, executorService);
    CompletableFuture<Void> thread02 = CompletableFuture.runAsync(() -> {
        System.out.println("线程2执行");
    }, executorService);
    CompletableFuture<Void> thread03 = CompletableFuture.runAsync(() -> {
        try {
            Thread.sleep(3000);
            System.out.println("线程3执行");
        } catch (InterruptedException e) {
            e.printStackTrace();
        }
    }, executorService);
	//未等待线程完成
    CompletableFuture.anyOf(thread01, thread02, thread03).get();
    System.out.println("main ending");
}
private static ExecutorService executorService = Executors.newFixedThreadPool(10);

public static void main(String[] args) throws ExecutionException, InterruptedException {

    System.out.println("main starting");
    CompletableFuture<Void> thread01 = CompletableFuture.runAsync(() -> {
        System.out.println("线程1执行");
    }, executorService);
    CompletableFuture<Void> thread02 = CompletableFuture.runAsync(() -> {
        System.out.println("线程2执行");
    }, executorService);
    CompletableFuture<Void> thread03 = CompletableFuture.runAsync(() -> {
        try {
            Thread.sleep(3000);
            System.out.println("线程3执行");
        } catch (InterruptedException e) {
            e.printStackTrace();
        }
    }, executorService);
	//等待所有线程完成
    CompletableFuture.allOf(thread01, thread02, thread03).get();
    System.out.println("main ending");
}
11.14.10项目实战
    /**
     * 根据skuID获取到sku的详细信息
     *
     * @param skuId sku id
     * @return {@link SkuItemVO}
     */
    @Override
    public SkuItemVO getSkuItemInfo(Long skuId) throws ExecutionException, InterruptedException {
        SkuItemVO skuItemVO = new SkuItemVO();

        CompletableFuture<SkuInfoEntity> infoFuture = CompletableFuture.supplyAsync(() -> {
//        1.获取到sku的基本信息 pms_sku_info
            SkuInfoEntity skuInfo = getById(skuId);
            skuItemVO.setSkuInfoEntity(skuInfo);
            return skuInfo;
        }, threadPoolExecutor);

//        2.以下三个任务都依赖于infoFuture的执行结果

//        3.获取spu的介绍
        CompletableFuture<Void> descFuture = infoFuture.thenAcceptAsync((result) -> {
            SpuInfoDescEntity spuInfoDescEntity = spuInfoDescService.getById(result.getSpuId());
            skuItemVO.setDesp(spuInfoDescEntity);
            }, threadPoolExecutor);

//        4.获取spu的基本属性信息
        CompletableFuture<Void> baseAttrFuture = infoFuture.thenAcceptAsync((result) -> {
            List<SpuItemAttrGroupVO> spuItemAttrGroupVOS = attrGroupService
                    .getAttrGroupWithAttrsBySpuId(result.getSpuId());
            skuItemVO.setGroupVos(spuItemAttrGroupVOS);
        }, threadPoolExecutor);

//        5.获取到spu的销售属性组合
        CompletableFuture<Void> saleAttrFuture = infoFuture.thenAcceptAsync((result) -> {
            List<SkuItemSaleAttrVO> saleAttrVOS =
                    skuSaleAttrValueService.getSaleAttrBySpuId(result.getSpuId());
            skuItemVO.setSaleAttr(saleAttrVOS);
        }, threadPoolExecutor);


//        6.获取到sku的图片信息 pms_sku_images
        CompletableFuture<Void> imageFuture = CompletableFuture.runAsync(() -> {
            List<SkuImagesEntity> skuImageInfo = skuImagesService.getSkuImageInfo(skuId);
            skuItemVO.setImages(skuImageInfo);
        });

//        等待所有任务完成
        CompletableFuture
                .allOf(descFuture,baseAttrFuture,saleAttrFuture,imageFuture)
                .get();
        return skuItemVO;
    }
11.15MD5&MD5盐值加密
MD5(Message Digest algorithm 5)信息摘要算法
特点:
不可逆
压缩性:任意长度的数据,算出的MD5值长度都是固定的。
容易计算:从原数据计算出MD5值很容易。
抗修改性:对原数据进行任何改动,哪怕只修改1个字节,所得到的MD5值都有很大区别。
强抗碰撞:想找到两个不同的数据,使它们具有相同的MD5值,是非常困难的。
MD5加盐:
- 通过生成随机数与MD5生成字符串进行组合
- 数据库同时存储MD5值与salt值。验证正确性时使用salt进行MD5即可
对加过的盐值的密码进行MD5加密,将加密后的密码和盐值放入到数据库。即使破解数据库,也不能根据加密后的密码穷举出原密码,这是因为MD5的抗修改性。
11.16社交登录
11.16.1OAuth2.0
- OAuth: **OAuth(开放授权)是一个开放标准**,允许用户授权第三方网站访问他们存储在另外的服务提供者上的信息,而不需要将用户名和密码提供给第三方网站或分享他们数据的所有内容。
- OAuth2.0:对于用户相关的 OpenAPI(例如获取用户信息,动态同步,照片,日志,分 享等),为了保护用户数据的安全和隐私,第三方网站访问用户数据前都需要显式的向用户征求授权。
- 官方版流程:
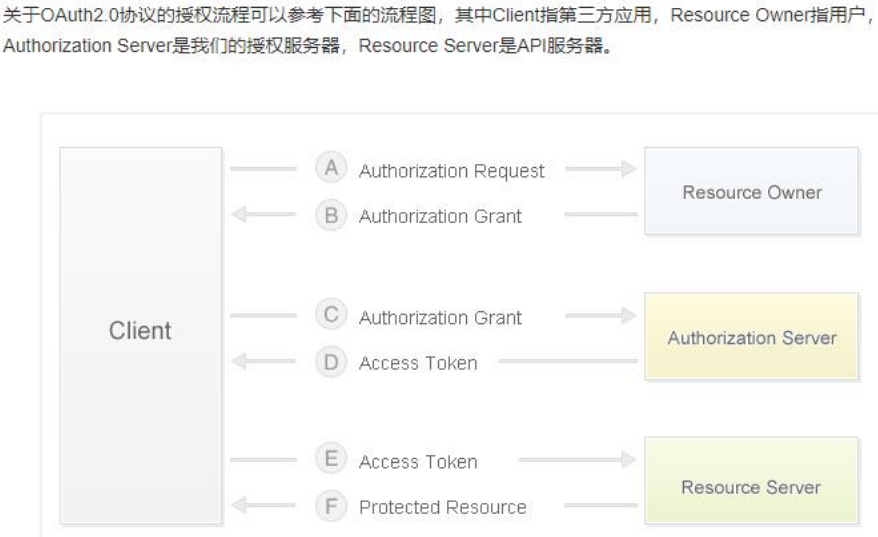
步骤如下:
(A)用户打开客户端以后,客户端要求用户给予授权。
(B)用户同意给予客户端授权。
(C)客户端使用上一步获得的授权(code码),向认证服务器申请令牌(access_token)。
(D)认证服务器对客户端进行认证以后,确认无误,同意发放令牌。
(E)客户端使用令牌,向资源服务器申请获取资源。
(F)资源服务器确认令牌无误,同意向客户端开放资源。
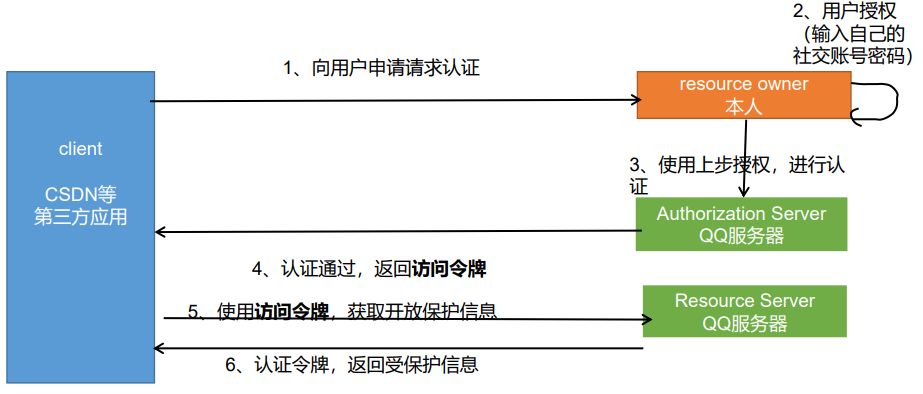
11.16.2实现gitee登录
11.16.3.1创建应用
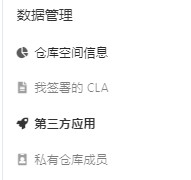
- 选择第三方应用
- 创建应用
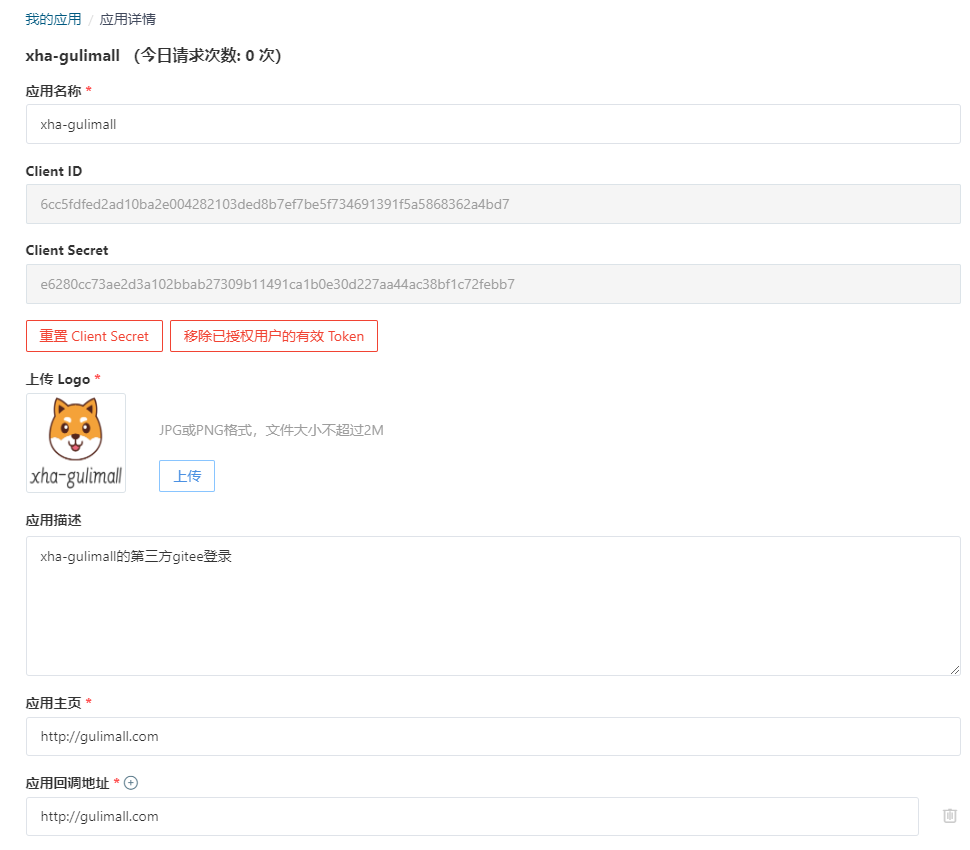
11.16.3.2查看OAuth文档说明
授权码模式
应用通过 浏览器 或 Webview 将用户引导到码云三方认证页面上( GET请求 )
https://gitee.com/oauth/authorize?client_id={client_id}&redirect_uri={redirect_uri}&response_type=code用户对应用进行授权
注意: 如果之前已经授权过的需要跳过授权页面,需要在上面第一步的 URL 加上 scope 参数,且 scope 的值需要和用户上次授权的勾选的一致。如用户在上次授权了user_info、projects以及pull_requests。则步骤A 中 GET 请求应为:https://gitee.com/oauth/authorize?client_id={client_id}&redirect_uri={redirect_uri}&response_type=code&scope=user_info%20projects%20pull_requests码云认证服务器通过回调地址{redirect_uri}将 用户授权码 传递给 应用服务器 或者直接在 Webview 中跳转到携带 用户授权码的回调地址上,Webview 直接获取code即可({redirect_uri}?code=abc&state=xyz)
应用服务器 或 Webview 使用 access_token API 向 码云认证服务器发送post请求传入 用户授权码 以及 回调地址( POST请求 )**注:请求过程建议将 client_secret 放在 Body 中传值,以保证数据安全。
https://gitee.com/oauth/token?grant_type=authorization_code&code={code}&client_id={client_id}&redirect_uri={redirect_uri}&client_secret={client_secret}码云认证服务器返回 access_token
应用通过 access_token 访问 Open API 使用用户数据。当 access_token 过期后(有效期为一天),你可以通过以下 refresh_token 方式重新获取 access_token( POST请求 )
https://gitee.com/oauth/token?grant_type=refresh_token&refresh_token={refresh_token}注意:如果获取 access_token 返回 403,可能是没有设置User-Agent的原因。
11.16.3.3步骤演示
- 登录账号,访问授权页面,获取到code码
这里采用gitee应用中的模拟请求的方式:
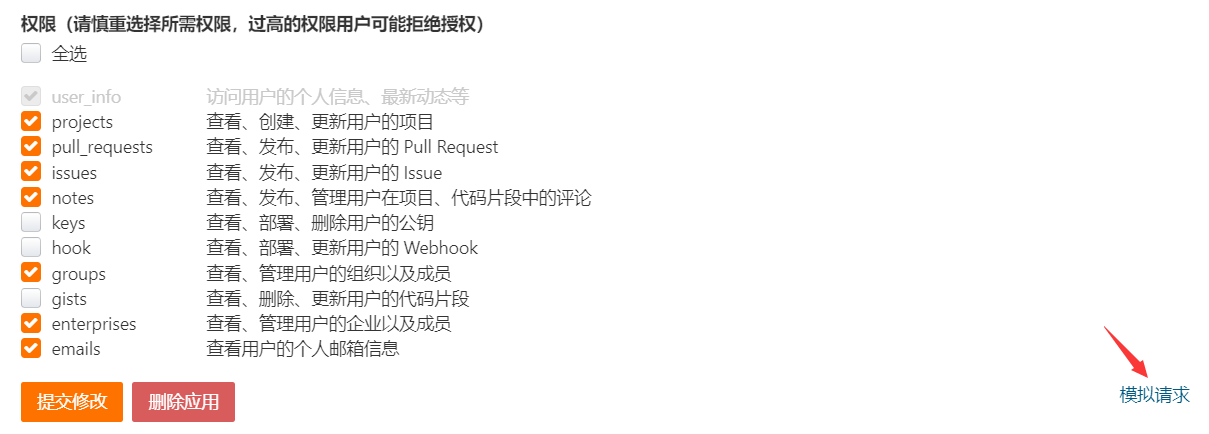
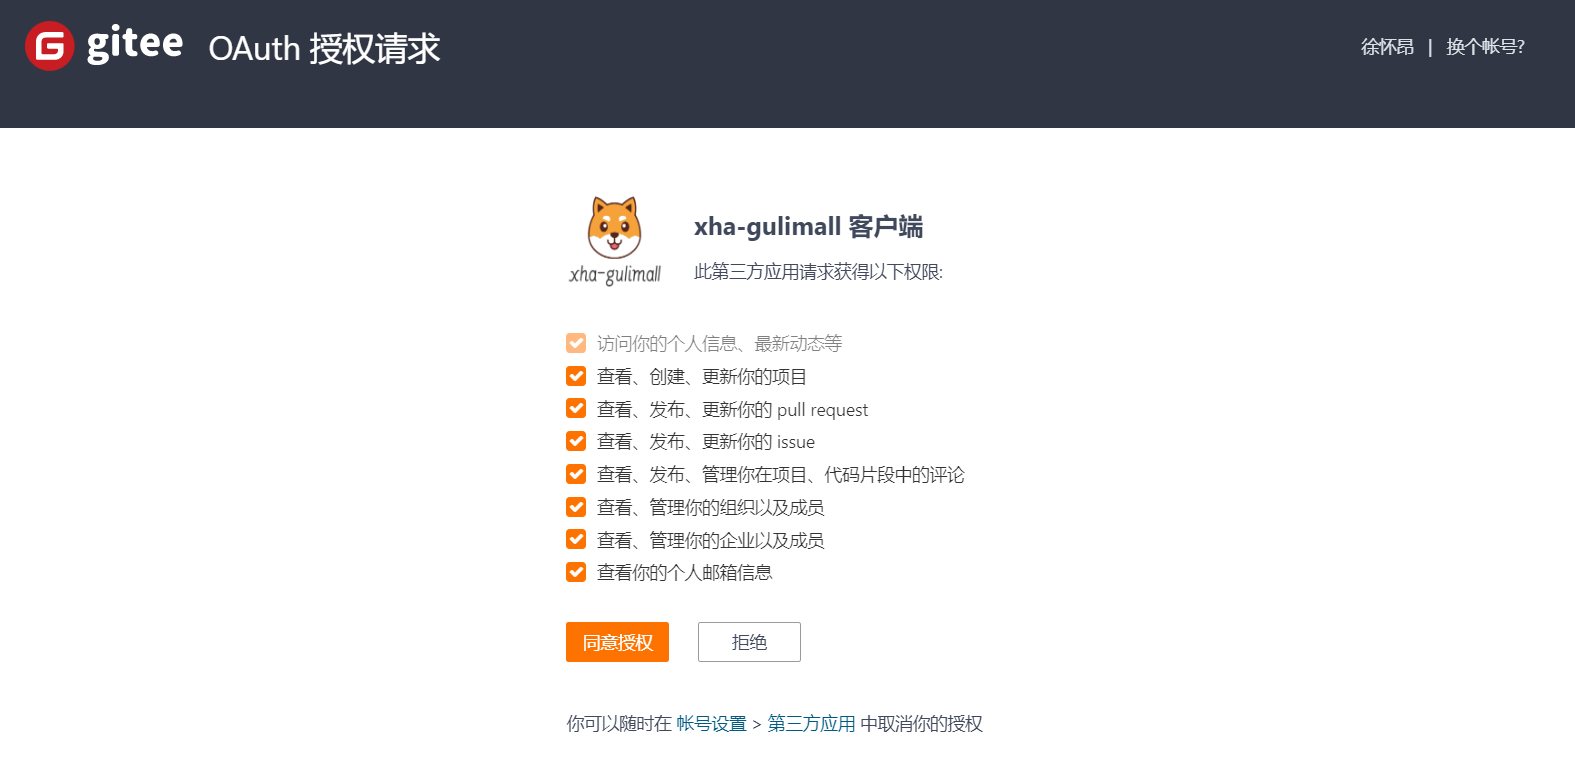
- 同意授权后,页面跳转到应用回调地址,回调地址后携带code

- 发送post请求,携带
code、client_id、redirect_url、client_secret,获取到access_token
==code码只能使用一次,使用一次后失效。而获取到的access_token的有效期为一天,当然也可以通过新的code码来获取新的access_token。==
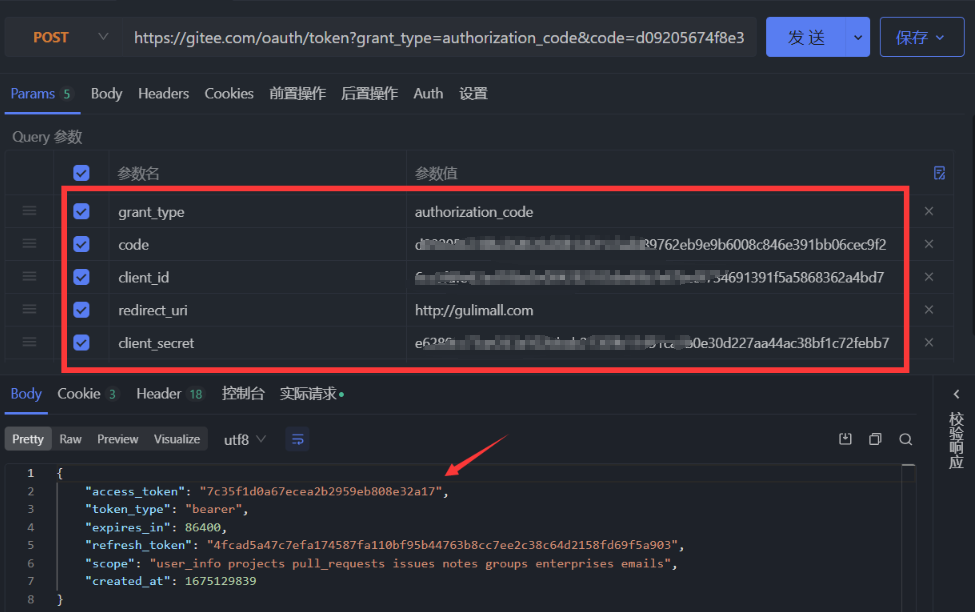
- 根据gitee的API文档找到对应请求,携带token获取到数据
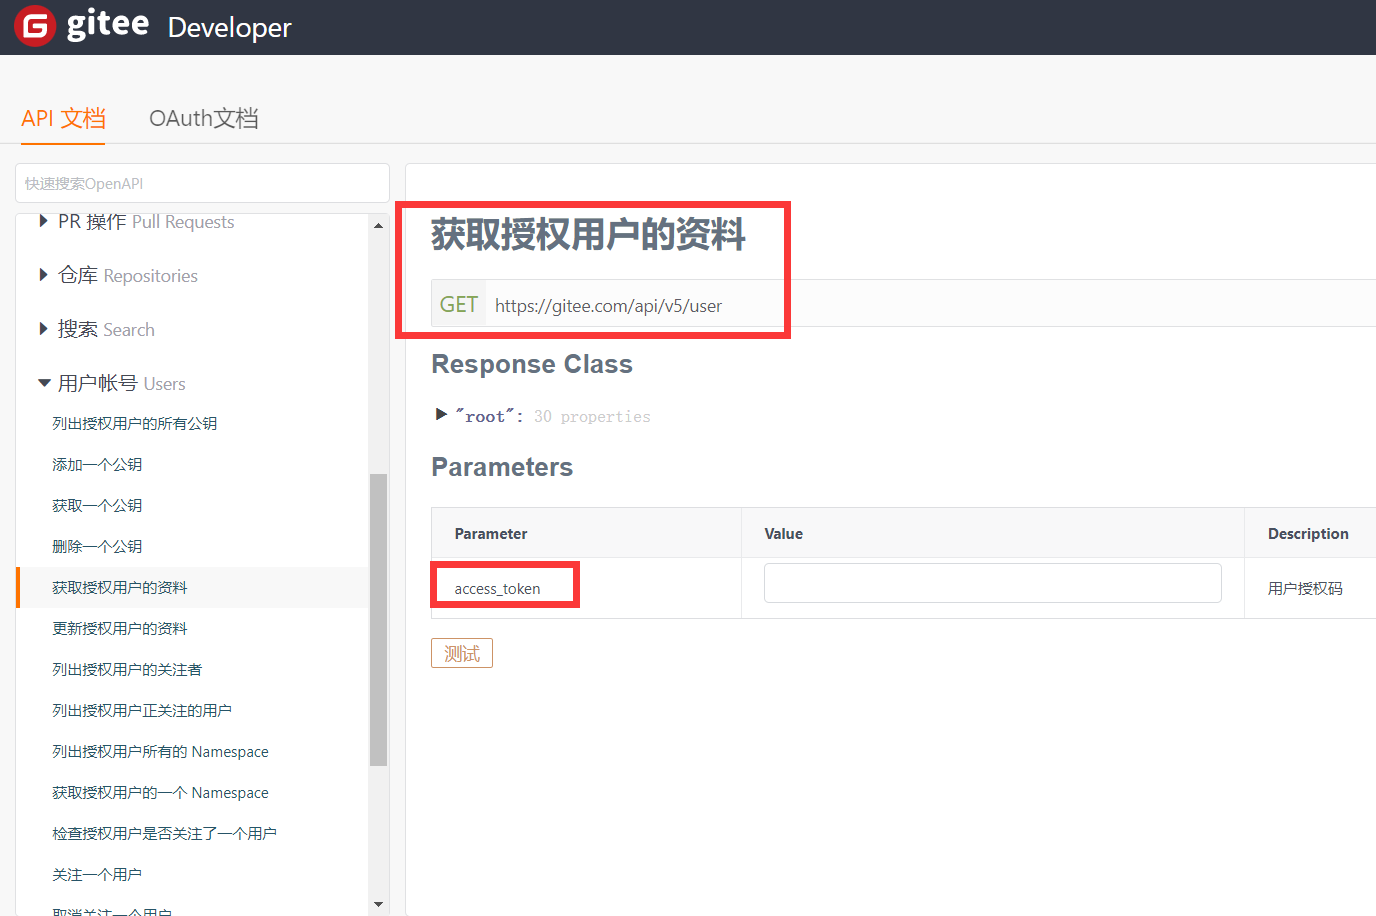
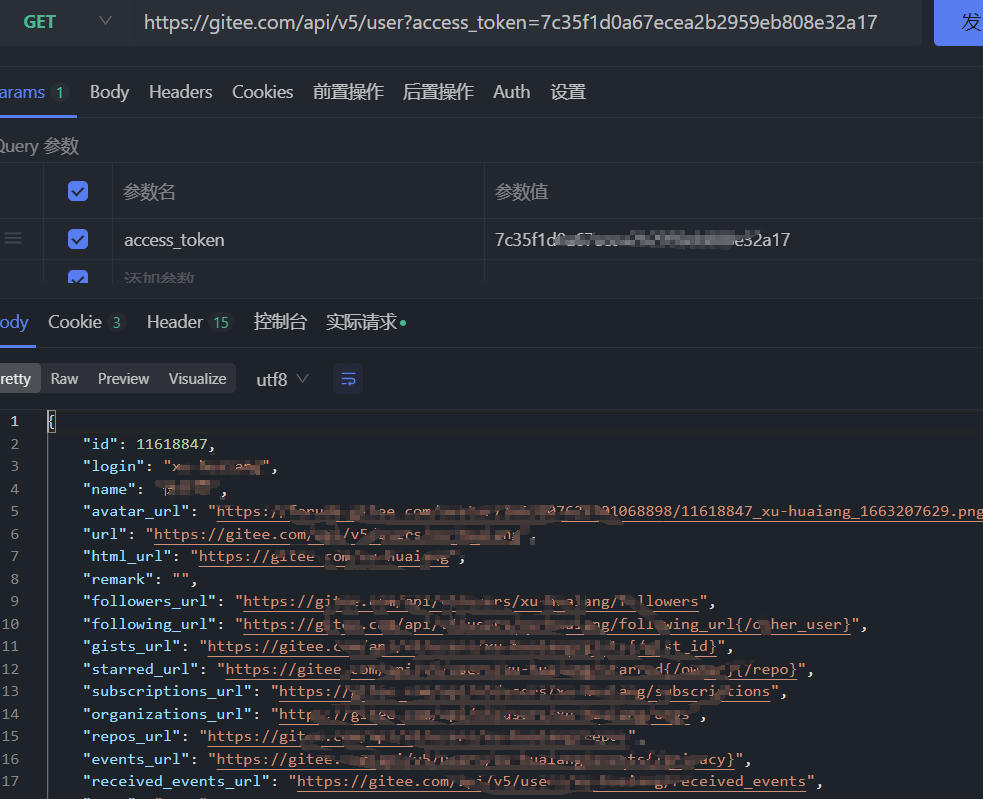
11.16.3.4具体业务实现
- gulimall-auth-server模块
在gulimall-auth-server模块当中,
首先获取到用户授权后得到的
code,然后再使用code获取到
access_token,最后再调用
gulimall-member服务完成用户注册/登录。
    /**
     * gitee oauth
     *
     * @param code 代码
     * @return {@link String}
     */
    @Override
    public String giteeOAuth(String code) {
        Map<String, String> querys = new HashMap<>();
        querys.put("grant_type", grant_type);
        querys.put("code", code);
        querys.put("client_id", client_id);
        querys.put("redirect_uri", redirect_uri);
        querys.put("client_secret", client_secret);
        try {
//            1.根据code码获取access_toekn
            HttpResponse response = HttpUtils.doPost(
                    host, path, "post", new HashMap<String, String>(), querys, new HashMap<String, String>());
            if (response.getStatusLine().getStatusCode() == HttpCode.STATUS_NORMAL.getCode()) {
//            2.获取到了access_token
//            3.通过EntityUtils将HttpEntity对象转为json数据
                String httpEntityStr = EntityUtils.toString(response.getEntity());
//            4.将json数据转为GiteeResponseEntity对象
                GiteeResponseTO giteeResponseTO = JSONUtil.toBean(httpEntityStr, GiteeResponseTO.class);
//            5.调用member服务,用户注册或者登录
                R oauthResult = memberFeign.userOAuthGiteeLogin(giteeResponseTO);
                if (oauthResult.getCode() == 0){
                    MemberTO data = oauthResult.getData(new TypeReference<MemberTO>() {
                    });
                    System.out.println(data);

//                    TODO 使用SpringSession处理数据共享问题
                }else{
//                    第三方认证登录失败
                    return "redirect:http://auth.gulimall.com/login.html";
                }

            } else {
                return "redirect:http://auth.gulimall.com/login.html";
            }

        } catch (Exception e) {
            e.printStackTrace();
        }
        return "redirect:http://gulimall.com";
}- gulimall-member模块
在gulimall-member模块当中
- 首先根据
access_toekn获取到用户的详细信息 - 根据gitee所提供的id判断当前用户是否存在
- 如果不存在就注册,将
access_token存入缓存,设置过期时间(默认为86400,即24小时) - 如果存在就更新缓存中的
access_token的过期时间
    /**
     * Gitee第三方用户登录
     *
     * @return {@link R}
     */
    @Override
    public MemberEntity userOAuthGiteeLogin(GiteeResponseTO giteeResponseTO) {
//        1.判断当前第三方用户是否已经注册过
//          1.1根据token查询用户id
        Map<String, String> querys = new HashMap<>();
        querys.put("access_token", giteeResponseTO.getAccess_token());
        MemberEntity member = null;
        try {
            HttpResponse response = HttpUtils.doGet(host, path, "get", new HashMap<String, String>(), querys);
            String userInfo = EntityUtils.toString(response.getEntity());
//            将用户信息转为GiteeUserInfo对象
            GiteeUserInfo giteeUserInfo = JSONUtil.toBean(userInfo, GiteeUserInfo.class);
//            根据gitee提供的唯一id查询当前用户是否存在
            LambdaQueryWrapper<MemberEntity> queryWrapper = new LambdaQueryWrapper<>();
            queryWrapper.eq(MemberEntity::getThirdId, giteeUserInfo.getId());
            member = getOne(queryWrapper);
            if (Objects.isNull(member)) {
//                当前用户为首次登录,先注册
                MemberEntity memberEntity = new MemberEntity();
                memberEntity.setThirdId(String.valueOf(giteeUserInfo.getId()))
                        .setSourceType(UserOriginName.GITEE)
                        .setLevelId(MemberEnums.GENERAL_MEMBER.getLevel())
                        .setUsername(giteeUserInfo.getLogin())
                        .setEmail(giteeUserInfo.getEmail())
                        .setHeader(giteeUserInfo.getAvatar_url());
                save(memberEntity);
//                将当前的access_token和expire_in存入缓存
                stringRedisTemplate.opsForValue().set(
                        CacheConstants.GITEE_LOGIN_ACCESS_TOKEN_CACHE + memberEntity.getThirdId(),
                        giteeResponseTO.getAccess_token(),
                        NumberConstants.ACCESS_TOKEN_EXPIRE_TIME,
                        TimeUnit.SECONDS);
                member = memberEntity;
            }else{
//               重制当前用户对应缓存中的access_token的超时时间
                stringRedisTemplate.opsForValue().set(
                        CacheConstants.GITEE_LOGIN_ACCESS_TOKEN_CACHE + member.getThirdId(),
                        giteeResponseTO.getAccess_token(),
                        NumberConstants.ACCESS_TOKEN_EXPIRE_TIME,
                        TimeUnit.SECONDS);
            }
        } catch (Exception e) {
            e.printStackTrace();
        }

        return member;
    }
11.17SpringSession
11.17.1四大域对象
- ApplicationContext
- PageContext
- Request
- Session
11.17.2Session工作原理
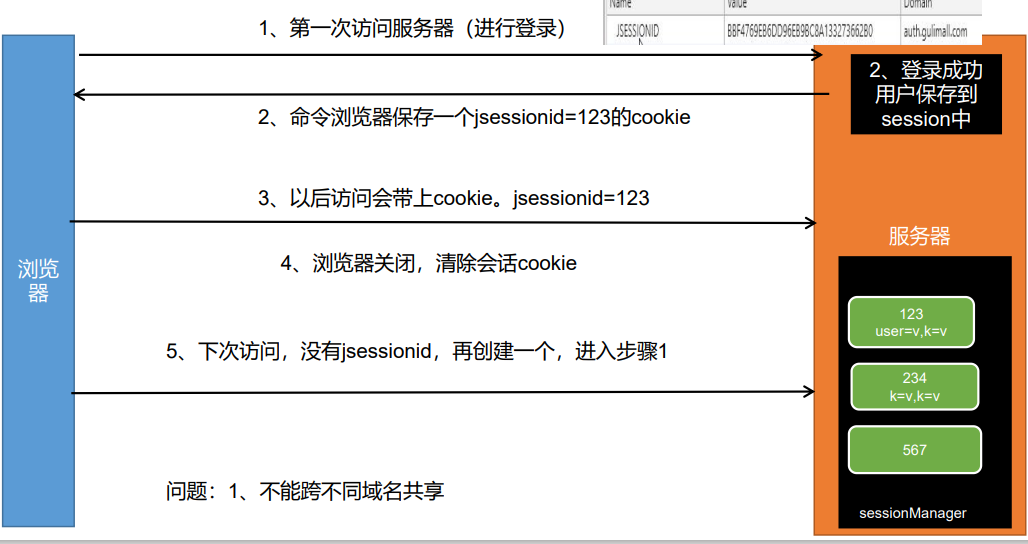
11.17.3Session共享问题—分布式下session共享问题

11.17.4Session共享问题的解决方案
11.17.4.1Session复制
优点
- web-server(Tomcat)原生支持,只需要修改配置 文件
缺点
- session同步需要数据传输,占用大量网络带宽,降 低了服务器群的业务处理能力
- 任意一台web-server保存的数据都是所有web- server的session总和,受到内存限制无法水平扩展更多的web-server
- 大型分布式集群情况下,由于所有web-server都全量保存数据,所以此方案不可取。
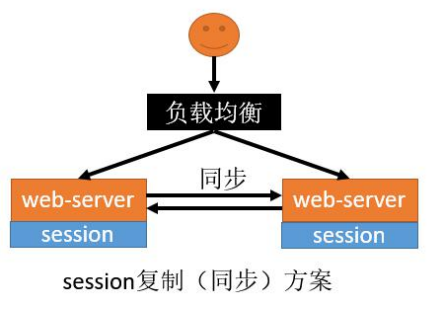
11.17.4.2客户端存储
- 优点
- 服务器不需存储session,用户保存自己的 session信息到cookie中。节省服务端资源。
- 缺点
- 每次http请求,携带用户在cookie中的完整信息, 浪费网络带宽
- session数据放在cookie中,cookie有长度限制 4K,不能保存大量信息
- session数据放在cookie中,存在泄漏、篡改、 窃取等安全隐患。
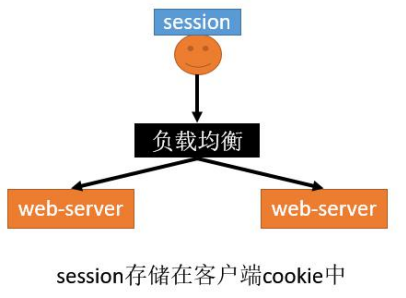
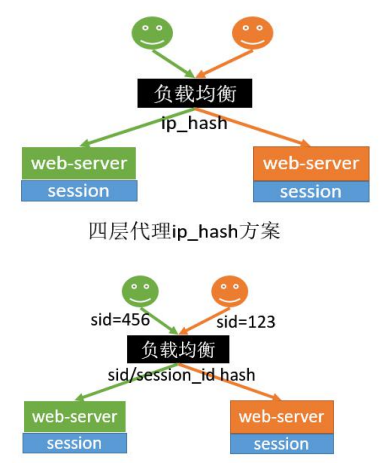
11.17.4.3Hash一致性
优点
只需要改nginx配置,不需要修改应用代码
负载均衡,只要hash属性的值分布是均匀的,多台 web-server的负载是均衡的
可以支持web-server水平扩展(session同步法是不行 的,受内存限制)
缺点
- session还是存在web-server中的,所以web-server重 启可能导致部分session丢失,影响业务,如部分用户需要重新登录
- 如果web-server水平扩展,rehash后session重新分布, 也会有一部分用户路由不到正确的session
- 但是以上缺点问题也不是很大,因为session本来都是有有 效期的。所以这两种反向代理的方式可以使用
11.17.4.4统一存储
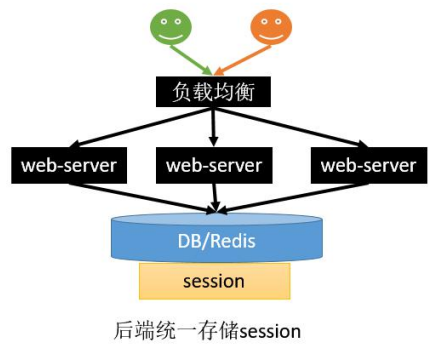
- 优点
- 没有安全隐患
- 可以水平扩展,数据库/缓存水平切分即可
- web-server重启或者扩容都不会有 session丢失
- 缺点
- 增加了一次网络调用,并且需要修改应用代码;如将所有的getSession方法替换为从Redis查数据的方式。redis获取数据比内存慢很多。
11.17.4.5子域Session共享
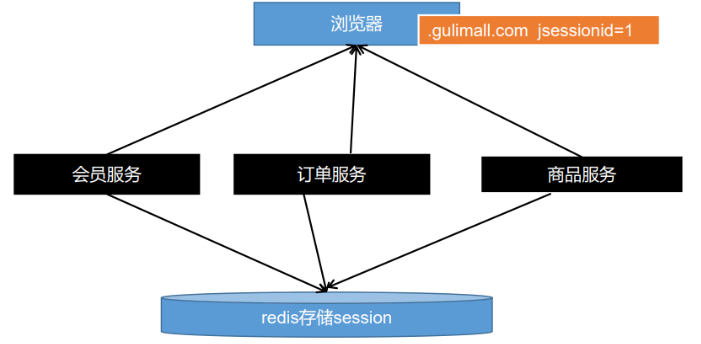
jsessionid这个cookie默认是当前系统域名的。当我们分拆服务,不同域名部署的时候,我们可以使用 如下解决方案;
11.17.5SpringSession整合
111.17.5.1将数据存入redis
- 引入对应的依赖
<dependency>
    <groupId>org.springframework.session</groupId>
    <artifactId>spring-session-data-redis</artifactId>
    <version>2.3.3.RELEASE</version>
</dependency>- 添加spring session对应的缓存配置、session的过期时间以及redis的连接信息
server:
	servlet:
    	session:
      		timeout: 30m

spring:
	session:
 	 	store-type: redis
  	redis:
    	host: 192.168.26.160
    	port: 6379
在主类上添加
@EnableRedisHttpSession注解开始SpringSession创建session对象,向session域中存放数据
注意:存入的对应不应该使用jdk默认的序列化机制ObjectOutPutStream,而是要对应的实体类实现Serializable序列化接口

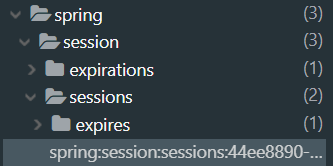
- 查看缓存数据
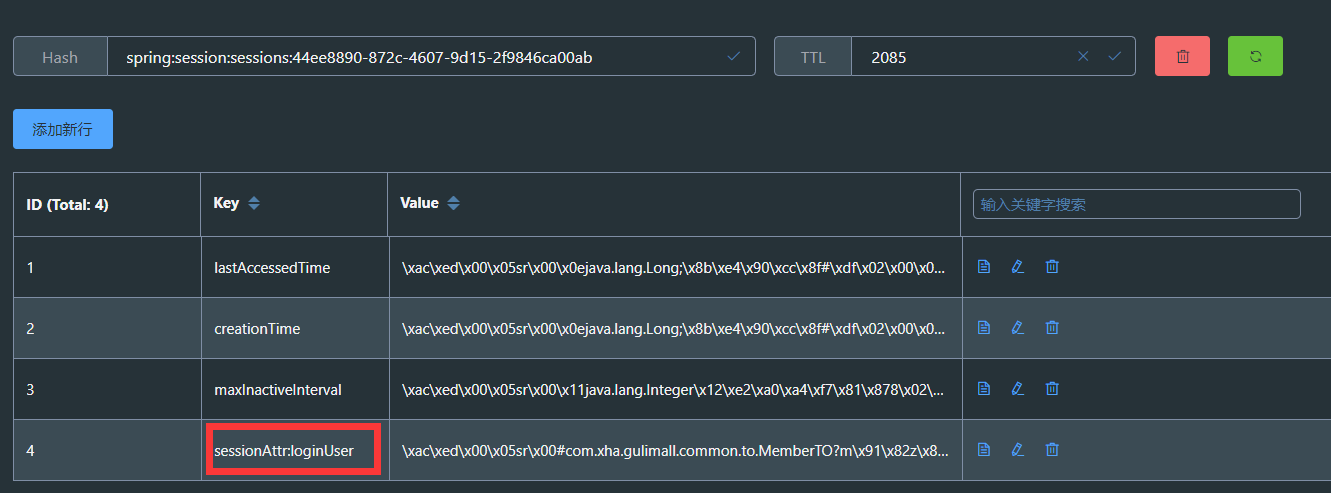
11.17.5.2实现Cookie的序列化器和Redis的序列化器
import org.springframework.context.annotation.Bean;
import org.springframework.context.annotation.Configuration;
import org.springframework.data.redis.serializer.GenericJackson2JsonRedisSerializer;
import org.springframework.data.redis.serializer.RedisSerializer;
import org.springframework.session.web.http.CookieSerializer;
import org.springframework.session.web.http.DefaultCookieSerializer;

@Configuration
public class SpringSessionConfig {

    //Cookie的序列化器
    @Bean
    public CookieSerializer cookieSerializer(){
        DefaultCookieSerializer cookieSerializer = new DefaultCookieSerializer();
//        设置Session的作用域,放大作用域到父域
        cookieSerializer.setDomainName("gulimall.com");
        return cookieSerializer;
    }

    //Redis的序列化器
    @Bean
    public RedisSerializer<Object> springSessionDefaultRedisSerializer(){
        return new GenericJackson2JsonRedisSerializer();
    }

}
测试结果:

11.18单点登录
11.18.1单点登录概述
单点登录的英文名叫做:Single Sign On(简称SSO),==指在同一帐号平台下的多个应用系统中,用户只需登录一次,即可访问所有相互信任的系统。简而言之,多个系统,统一登陆。==
为什么需要做单点登录系统呢?在一些互联网公司中,公司旗下可能会有多个子系统,每个登陆实现统一管理,多个账户信息统一管理 SSO单点登陆认证授权系统。比如阿里系的淘宝和天猫,显而易见这是两个系统,但是在使用过程中,只要你登录了淘宝,同时也意味着登录了天猫,如果每个子系统都需要登录认证,用户早就疯了,所以我们要解决的问题就是,用户只需要登录一次就可以访问所有相互信任的应用系统。
11.18.2单点登录原理
==sso需要一个独立的认证中心==,所有子系统都通过认证中心的登录入口进行登录,==登录时带上自己的地址,子系统只接受认证中心的授权,授权通过令牌(token)实现,sso认证中心验证用户的用户名密码正确,创建全局会话和token,token作为参数发送给各个子系统,子系统拿到token,即得到了授权==,可以借此创建局部会话,局部会话登录方式与单系统的登录方式相同。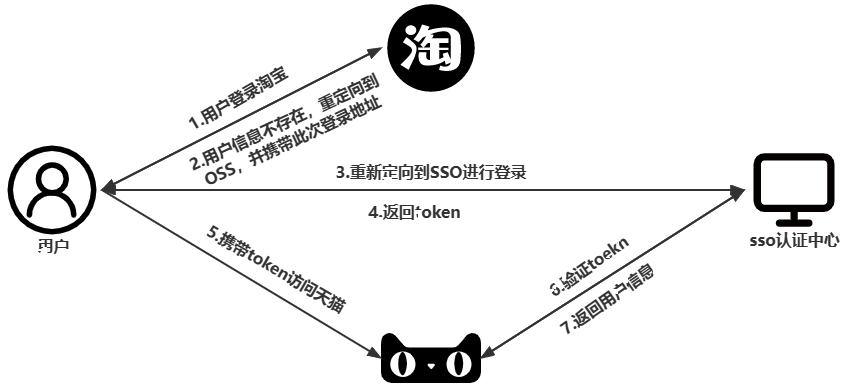
11.18.3单点登录的实现方案
Cookies,Session同步,分布式Session,目前的大型网站都是采用分布式Session的方式。
11.18.4单点登录框架—xxl-sso
11.18.4.1框架说明
gitee官网:https://gitee.com/xuxueli0323/xxl-sso?_from=gitee_search
XXL-SSO 是一个分布式单点登录框架。只需要登录一次就可以访问所有相互信任的应用系统。 拥有”轻量级、分布式、跨域、Cookie+Token均支持、Web+APP均支持”等特性。现已开放源代码,开箱即用。

11.18.4.2xxl-sso框架的使用
- 在官网克隆项目到本地
- 修改服务端配置文件信息
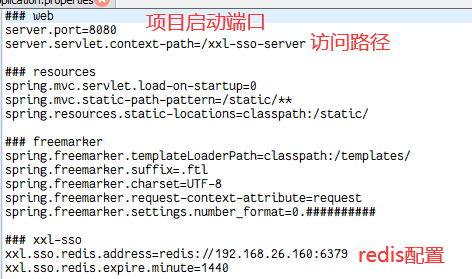
- 修改客户端的配置文件
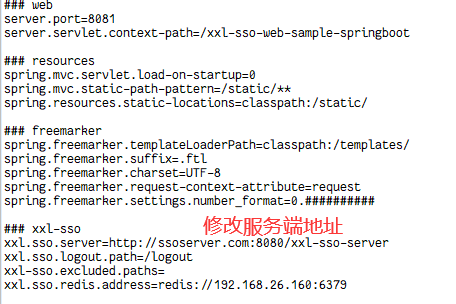
- 在项目根目录下使用maven命令打包
mvn clean package -Dmaven.skip.test=true
- 启动服务端:在xxl-sso目录下启动jar包
java -jar xxl-sso-server-1.1.1-SNAPSHOT.jar
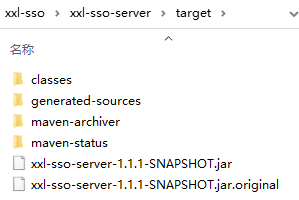
- 将域名
ssoserver.com映射到本地
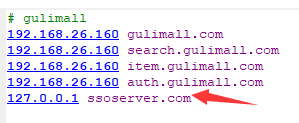
- 访问xxl-sso项目服务端地址
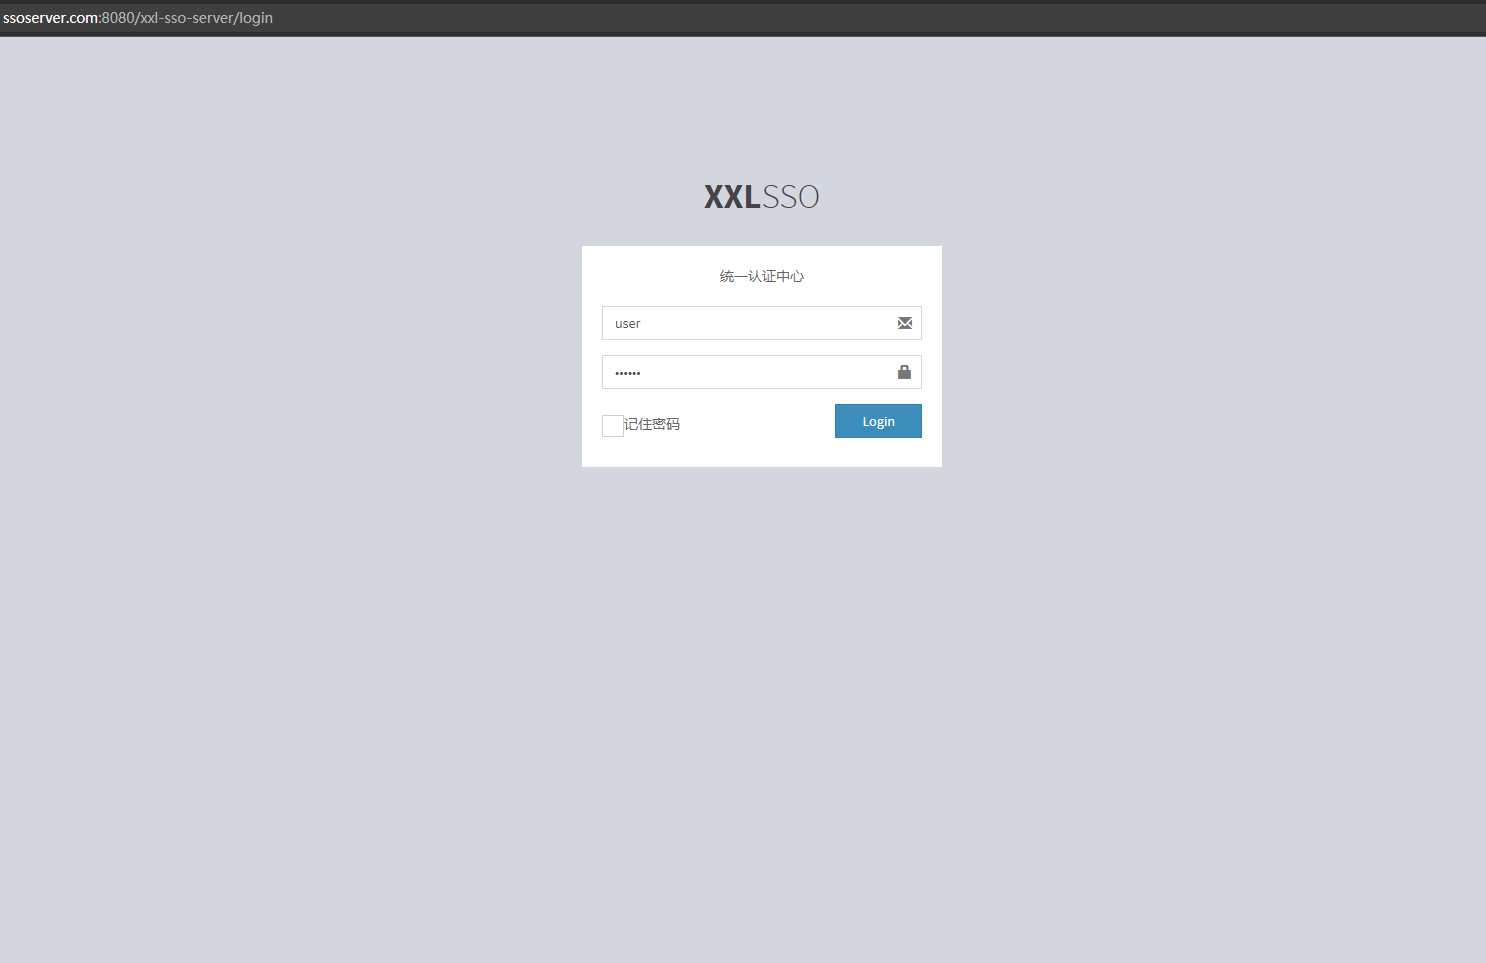
11.19购物车数据结构(Hash)
Redis hash 是一个键值对集合。
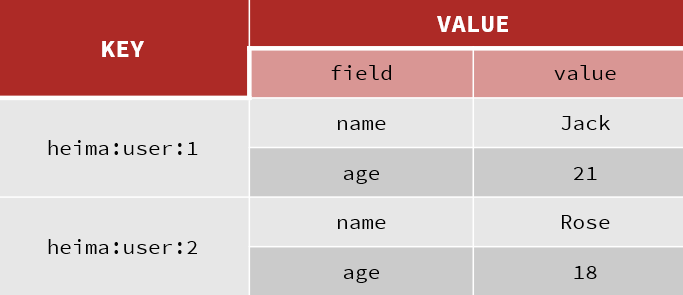
==Redis hash是一个string类型的field和value的映射表,hash特别适合用于存储对象。==
类似Java里面的Map<String,Object>
用户ID为查找的key,存储的value用户对象包含姓名,年龄,生日等信息,如果用普通的key/value结构来存储
主要有以下2种存储方式:
方式1:
每次修改用户的某个属性需要先反序列化改好后再序列化回去。开销较大。
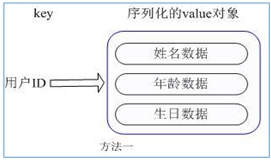
方式2:
用户ID数据冗余
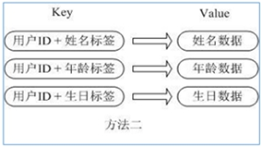
采用Hash的方式进行实现:
通过 key(用户ID) + field(属性标签) 就可以操作对应属性数据了,既不需要重复存储数据,也不会带来序列化和并发修改控制的问题
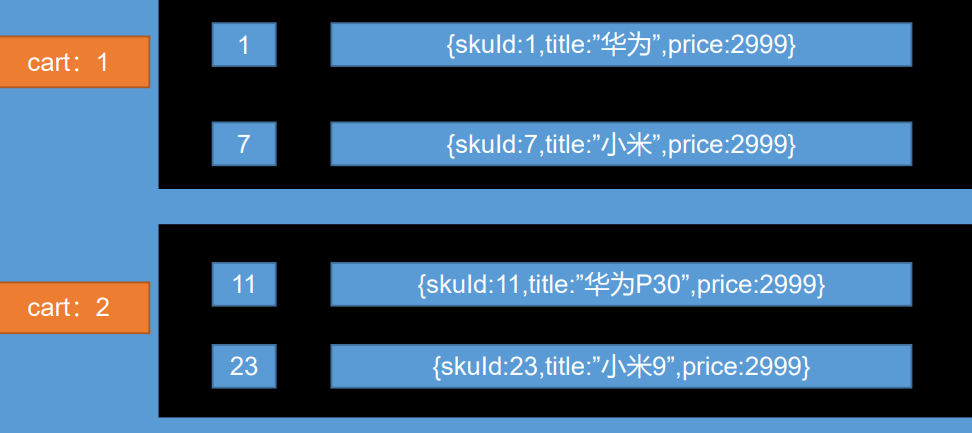
所以最终购物车的数据结构如下:
Map<String k1,Map<String k2,CartItemInfo>>
k1:标识每一个用户的购物车
k2:购物项的商品sku_id
11.20ThreadLocal
11.20.1ThreadLocal概述
**一个ThreadLocal在一个线程中是共享数据的,在不同线程之间又是隔离的**(每个线程都只能看到自己线程的值)。如下图:
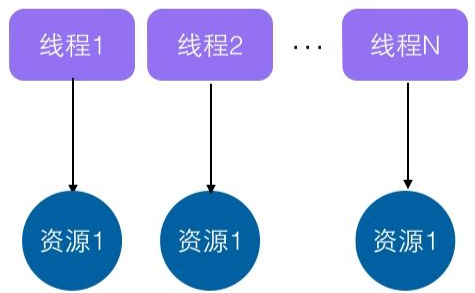
每个Thread对象都有一个ThreadLocalMap,当创建一个ThreadLocal的时候,就会将该ThreadLocal对象添加到该Map中,其中键就是ThreadLocal,值可以是任意类型。

11.20.2ThreadLocal的作用
==实现线程范围内的局部变量,即ThreadLocal在一个线程中是共享的,在不同线程之间是隔离的。==
11.20.3ThreadLocal的原理
==ThreadLocal存入值时使用当前ThreadLocal实例作为key(并不是以当前线程对象作为key),存入当前线程对象中的Map中去。==
11.20.4具体实现
业务实现逻辑:
在用户访问购物车页面时,首先经过拦截器,在拦截器中判断当前是否有登录的用户,并将信息封装为
UserInfoTO对象。在拦截器中创建
ThreadLocal,将封装好的UserInfoTo对象放入当前线程,以便供Controller获取。

11.21SpringBoot整合RabbitMQ
11.21.1添加依赖和配置
- 添加对应的依赖
<dependency>
    <groupId>org.springframework.boot</groupId>
    <artifactId>spring-boot-starter-amqp</artifactId>
    <version>${amqp-version}</version>
</dependency>- 在配置文件当中配置rabbitmq
spring:
	rabbitmq:
  		host: 192.168.26.160
  		port: 5672
  		username: guest
password: guest- 在主类上添加
@EnableRabbit注解,开启RabbitMQ的相关功能(监听消息)
11.21.2MQ的开发流程
自动配置
- RabbitAutoConfiguration
- 自动配置了连接工厂
- RabbitProperties封装RabbitMQ的配置
- RabbitTemplate用于MQ的发送和接收消息
- @EnableRabbit + @RabbitListener 结合实现监听消息队列的内容
- AmqpAdmin:RabbitMQ系统管理功能
- AmqpAdmin:创建和删除Queue, Exchange, Binding(不仅可以通过配置类的方式创建queue、exchange、binding,也可以通过AMqpAdmin类来创建)
参数介绍:
1、name: 队列的名称;
2、actualName: 队列的真实名称,默认用name参数,如果name为空,则根据规则生成一个;
3、durable: 是否持久化;
4、exclusive: 是否独享、排外的;
5、autoDelete: 是否自动删除;
6、目前存在一个问题那就是将数据存在Mq中的数据为String的时候是可以正常的进行获取,同时也可以再Mq中正常的显示,不过如果是对象就需要进行序列化,存放后可以正常的进行显示数据,不过后端获取数据后没有办法进行对应的监听反序列化为对象,需要自己进行配置,或者将对象先进行转Json字符串,然后进行获取的时候进行先Json转对象操作。
11.21.3Exchange接口
Exchange接口时创建交换机对象的接口,其实现类就就是创建对应的交换机:
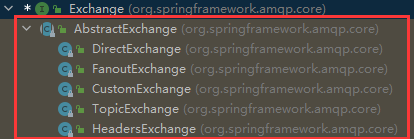
11.21.4AmqpAdmin接口
11.21.3.1AmqpAdmin概述
==AmqpAdmin是一个接口。是Rabbitmq的系统管理功能,能够创建、删除Queue, Exchange, Binding==
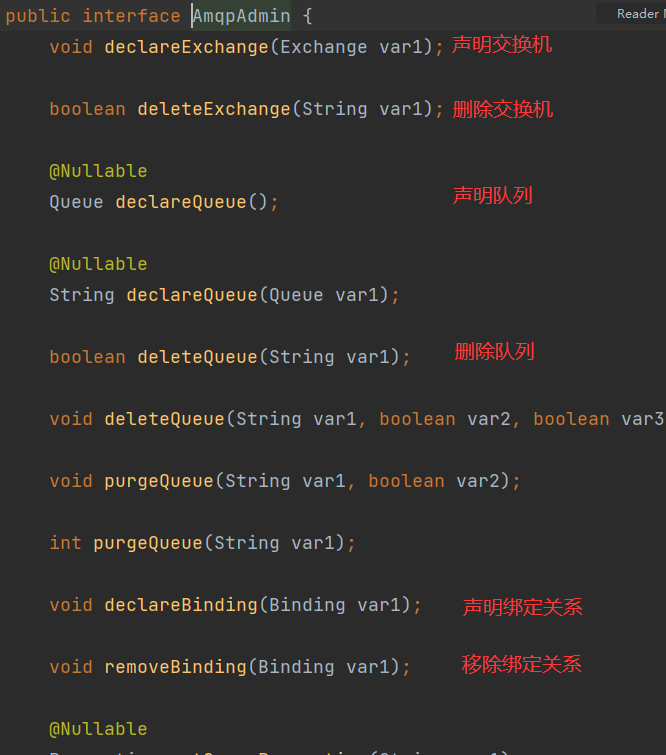
11.21.3.2声明交换机
DirectExchange参数说明:
String name:交换机名称
boolean durable:是否持久化
boolean autoDelete:是否自动删除
Map<String, Object> arguments:参数集合
/**
 * 创建交换机
 */
@Test
void createExchange() {
    DirectExchange directExchange = new DirectExchange("direct-exchange",true,false);
    amqpAdmin.declareExchange(directExchange);
}
11.21.3.3声明队列
Queue参数说明:
String name:队列名称
boolean durable:是否持久化
boolean exclusive:是否排它(true表示当前队列是一个排他队列,只能被一条被声明的连接使用,其他队列不可用。)
boolean autoDelete:是否自动删除
@Nullable Map<String, Object> arguments:参数列表
/**
 * 创建队列
 */
@Test
void createQueue(){
    Queue queue = new Queue("direct-queue",true,false,false);
    amqpAdmin.declareQueue(queue);
}
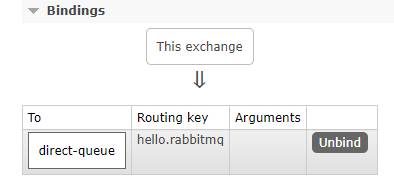
11.21.3.4创建绑定
Binding参数说明:
String destination:目的地(队列/交换机 的名称)
Binding.DestinationType destinationType:目的地类型(可以是交换机、队列)
String exchange:交换机名称
String routingKey:路由键
@Nullable Map<String, Object> arguments:参数列表
/**
 * 创建绑定
 */
@Test
void createBinding() {
    Binding binding = new Binding("direct-queue",
            Binding.DestinationType.QUEUE,
            "direct-exchange", "hello.rabbitmq",
            null);
    amqpAdmin.declareBinding(binding);
}
11.21.5RabbitTemplate
11.21.5.1RabbitTemplate简介
RabbitTemplate:==消息模板。这是spring整合rabbit提供的消息模板。是进行发送和接受消息的关键类。==
11.21.5.2convertAndSend方法
convertAndSend()和Send()的区别在于其可以发送任意类型的数据,而Send()只能接受Message类型的数据。
convertAndSend方法参数说明:
String exchange:交换机
String routingKey:路由键
Object message:发送的消息对象
MessagePostProcessor messagePostProcessor:信息处理器
@Nullable CorrelationData correlationData:相关性数据
/**
 * 发送消息
 */
@Test
void sendMessage() {
    rabbitTemplate.convertAndSend("direct-exchange",
            "hello.rabbitmq",
            "你好,RabbitMQ");
}由交换机通过routingKey向对应的队列中发送消息:
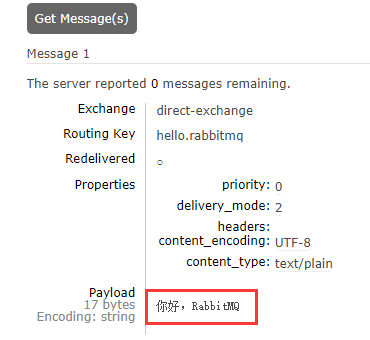
11.21.6MessageCoverter接口
在通过RabbitTemplate发送消息的时候,消息可以是实体类对象,但是需要将对象进行序列化。但是默认的是使用JDK的默认序列方式,可以通过MessageCoverter对消息对象进行序列化。
MessageCoverter接口的实现类有如下:
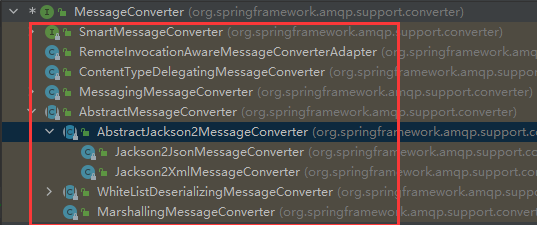
可以采用MessageConverter的实现类进行序列化和反序列化
@Configuration
public class RabbitMQMessageConfig {

    @Bean
    public MessageConverter messageConverter(){
        return new Jackson2JsonMessageConverter();
    }
}
/**
* 发送消息
*/
@Test
void sendMessage() {
OrderEntity orderEntity = new OrderEntity();
orderEntity.setMemberId(521521L);
orderEntity.setOrderSn("123456");
orderEntity.setMemberUsername("张三");
rabbitTemplate.convertAndSend("direct-exchange",
"hello.rabbitmq",
orderEntity);
}消息类型为JSON类型
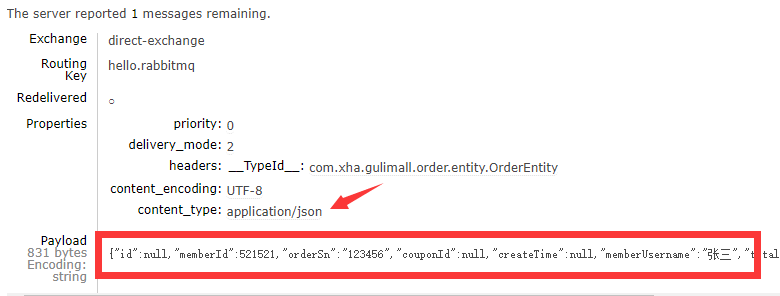
11.21.7@RabbitListener注解
==@RabbitListener注解标注在类上或方法上,作用是监听指定的队列。==其实现需要有@EnableRabbit注解提供的功能支持。
在方法上添加@RabbitListener注解,监听direct-queue队列当中的消息。
/**
 * 接收消息
 */
@RabbitListener(queues = {"direct-queue"})
public void receiveMessage(Object message, OrderEntity orderEntity, Channel channel){
    System.out.println("监听到队列中的消息是:" + message + "消息体对象:" + orderEntity);
} 在11.21.6章节的测试中,再次向direct-queue队列当中发送消息的时候,@RabbitListener会立即监听到队列中的消息。默认的消息类型是:class org.springframework.amqp.core.Message
当前方法中的参数说明:
- Object message:表示接收到的消息,消息类型为
class org.springframework.amqp.core.Message- OrderEntity orderEntity:如果是对象类型的消息体,则可以直接使用对象类型进行接收。
- Channel channel:当前信道
消息对象
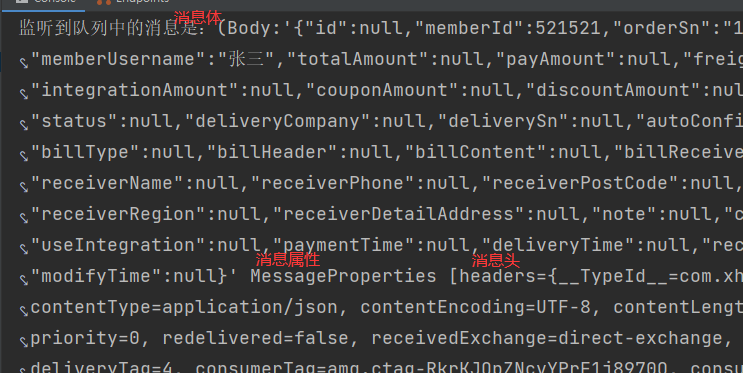
对象类型:
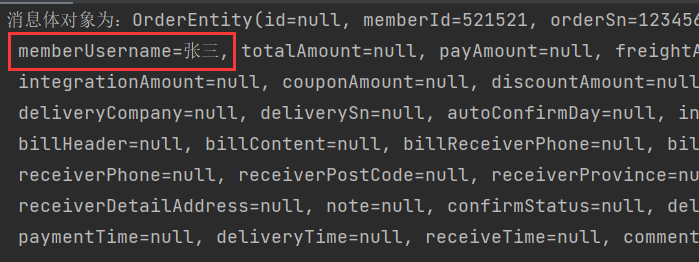
11.21.8@RabbitHandler注解
@RabbitHandler注解标注在方法上,其需要和@RabbitListener注解一起使用。
@RabbitListener注解标注在类上,表示需要监听哪些方法,
@RabbitHandler注解用于重构方法,重载区分不同的消息。
发送不同对象类型的消息
@GetMapping("/sendmessge")
public void sendMessage(){
    for (int i = 0; i < 10; i++) {
        if (i % 2 == 0){
            OrderItemEntity orderItemEntity = new OrderItemEntity();
            orderItemEntity.setSkuName("华为 Mate50 Pro -->" + i);
            rabbitTemplate.convertAndSend("direct-exchange","hello.rabbitmq",orderItemEntity);
        }else{
            OrderEntity orderEntity = new OrderEntity();
            orderEntity.setMemberUsername("张三-->" + i);
            rabbitTemplate.convertAndSend("direct-exchange","hello.rabbitmq",orderEntity);
        }

    }
}@RabbitListener注解用于监听指定队列中的消息,@RabbitHandler注解用于重构方法,接受不同对象类型的消息
@Service
@RabbitListener(queues = {"direct-queue"})
public class RabbitServiceImpl {

    /**
     * 接收消息
     */
    @RabbitHandler
    public void receiveMessage1(OrderItemEntity orderItemEntity){
        System.out.println("消息体对象:" + orderItemEntity);
    }

    /**
     * 接收消息
     */
    @RabbitHandler
    public void receiveMessage2(OrderEntity orderEntity){
        System.out.println("消息体对象:" + orderEntity);
    }
}
11.21.9消息可靠投递—生产端确认(ConfirmCallback)

11.21.9.1开启消息确认
使用ConfirmCallback回调函数来实现消息回调。
设置配置文件,在消息发送成功或消息发送失败的时候都触发回调函数
spring.rabbitmq.publisher.confirm.type的参数讲解:
- correlated:发布消息成功或失败到交换机后会触发回调方法
- none:禁止发布确定模式,是默认值
- simple:和单个发布确定的模式相同
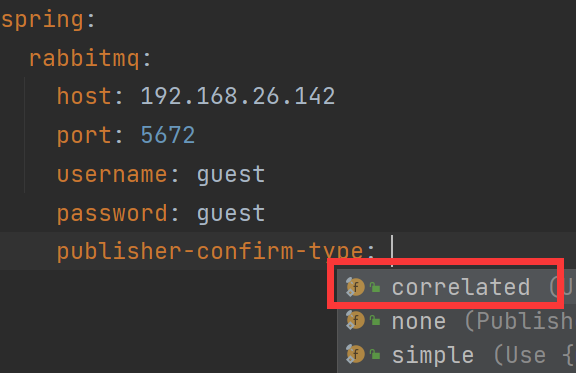
spring:
  rabbitmq:
    host: 192.168.26.142
    port: 5672
    username: guest
    password: guest
    publisher-confirm-type: correlated
11.21.9.2全局配置确认回调
当发送消息,Broker收到就会触发确认回调
import org.springframework.amqp.rabbit.connection.CorrelationData;
import org.springframework.amqp.rabbit.core.RabbitTemplate;
import org.springframework.amqp.support.converter.Jackson2JsonMessageConverter;
import org.springframework.amqp.support.converter.MessageConverter;
import org.springframework.context.annotation.Bean;
import org.springframework.context.annotation.Configuration;

import javax.annotation.PostConstruct;
import javax.annotation.Resource;

@Configuration
public class RabbitMQMessageConfig {

    @Resource
    private RabbitTemplate rabbitTemplate;

    @Bean
    public MessageConverter messageConverter() {
        return new Jackson2JsonMessageConverter();
    }

    /**
     * 设置确认回调
     *
     * @PostConstruct注解的作用是在当前对象创建完成后执行此方法
     */
    @PostConstruct
    public void setConfirmCallback() {
        rabbitTemplate.setConfirmCallback(new RabbitTemplate.ConfirmCallback() {
            /**
             * 确认
             *
             * @param correlationData 当前消息的唯一关联数据(这个消息的唯一ID)
             * @param ack             消息成功/失败
             * @param cause           原因
             */
            @Override
            public void confirm(CorrelationData correlationData, boolean ack, String cause) {
                System.out.println("correlationData:" + correlationData + ",ack:" + ack + ",cause:" + cause);
            }
        });
    }
}
发送消息测试:发送成功
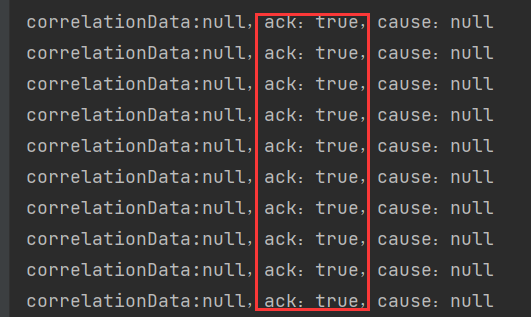
11.21.10消息可靠投递—生产端确认(ReturnCallback)

11.21.10.1开启消息确认
配置文件添加配置:
  rabbitmq:
    host: 192.168.26.160
    port: 5672
    username: guest
    password: guest
#    开启消息发送到Bocker的发布确认
    publisher-confirm-type: correlated
#    开启消息发送到队列的发布确认
    publisher-returns: true
#    只要消息到达队列,就优先回调ReturenCallback
    template:
      mandatory: true
11.21.10.2全局配置确认回调
import org.springframework.amqp.core.Message;
import org.springframework.amqp.rabbit.connection.CorrelationData;
import org.springframework.amqp.rabbit.core.RabbitTemplate;
import org.springframework.amqp.support.converter.Jackson2JsonMessageConverter;
import org.springframework.amqp.support.converter.MessageConverter;
import org.springframework.context.annotation.Bean;
import org.springframework.context.annotation.Configuration;

import javax.annotation.PostConstruct;
import javax.annotation.Resource;

@Configuration
public class RabbitMQMessageConfig {

    @Resource
    private RabbitTemplate rabbitTemplate;

    @Bean
    public MessageConverter messageConverter() {
        return new Jackson2JsonMessageConverter();
    }

    /**
     * 设置确认回调
     *
     * @PostConstruct注解的作用是在当前对象创建完成后执行此方法
     */
    @PostConstruct
    public void setConfirmCallback() {
        rabbitTemplate.setConfirmCallback(new RabbitTemplate.ConfirmCallback() {
            /**
             * 确认
             *
             * @param correlationData 当前消息的唯一关联数据(这个消息的唯一ID)
             * @param ack             消息成功/失败
             * @param cause           原因
             */
            @Override
            public void confirm(CorrelationData correlationData, boolean ack, String cause) {
                System.out.println("correlationData:" + correlationData + ",ack:" + ack + ",cause:" + cause);
            }
        });
    }

    /**
     * 设置回调
     */
    @PostConstruct
    public void setReturnCallback() {
        rabbitTemplate.setReturnCallback(new RabbitTemplate.ReturnCallback() {
            /**
             * 消息未投递给指定队列,就触发当前的失败回调
             *
             * @param message    投递失败的消息
             * @param replyCode  回复状态码
             * @param replyText  回复文本
             * @param exchange   交换机
             * @param routingKey 路由键
             */
            @Override
            public void returnedMessage(Message message, int replyCode, String replyText, String exchange, String routingKey) {
                System.out.println("Message:" + message +
                        ",replyCode:" + replyCode +
                        ",replyText:" + replyText  +
                        ",exchange:" + exchange +
                        ",routingKey:" + routingKey);
            }
        });
    }
}使用错误的routing-key,模拟消息投递失败

测试:
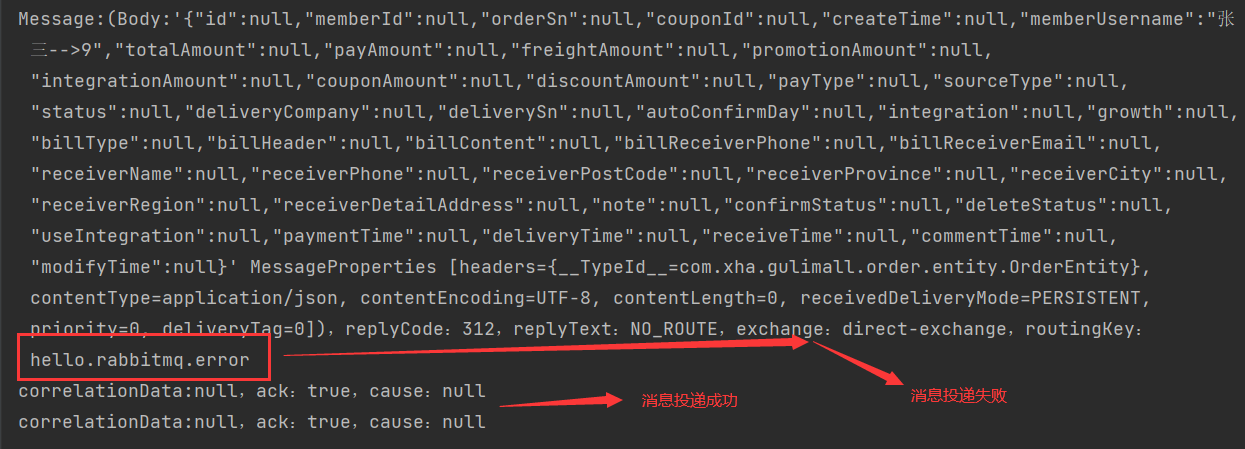
11.21.11消息可靠投递—消费端确认(Ack)
11.21.11.1消费端确认说明
Ack是默认自动确定的,只要消息接收到,客户端就会自动确定,RabbitMQ就会移除这个消息。但是如果在接收消息的时候,服务端宕机,消息就会被自动确认并删除,导致消息丢失。
11.21.11.2消费端手动确认配置
  rabbitmq:
    host: 192.168.26.160
    port: 5672
    username: guest
    password: guest
#    开启消息发送到Bocker的发布确认
    publisher-confirm-type: correlated
#    开启消息发送到队列的发布确认
    publisher-returns: true
#    只要消息到达队列,就优先回调ReturenCallback
    template:
      mandatory: true
#     消费端手动ACK
    listener:
      simple:
        acknowledge-mode: manual
11.21.11.3手动确认
手动确认模式下:当服务端发生宕机的时候,消息会从Unacked状态变为Ready状态。等待下一次的消费。
@Service
@RabbitListener(queues = {"direct-queue"})
public class RabbitServiceImpl {

    /**
     * 接收消息
     */
    @RabbitHandler
    public void receiveMessage1(Message message,OrderItemEntity orderItemEntity, Channel channel){
        System.out.println("消息体对象:OrderItemEntity");
//        deliveryTag在当前通道内是自增的
        long deliveryTag = message.getMessageProperties().getDeliveryTag();
        try {
            if (deliveryTag % 2 == 0){
                channel.basicAck(deliveryTag,false);
                System.out.println("收到了消息:" + deliveryTag);
            }else{
//                第三个为true,表示消息重新入队
                channel.basicNack(deliveryTag,false,true);
                System.out.println("收到了消息:" + deliveryTag);
            }
        } catch (IOException e) {
            e.printStackTrace();
        }
    }
    }
11.22Feign远程调用丢失请求头问题
11.22.1问题描述
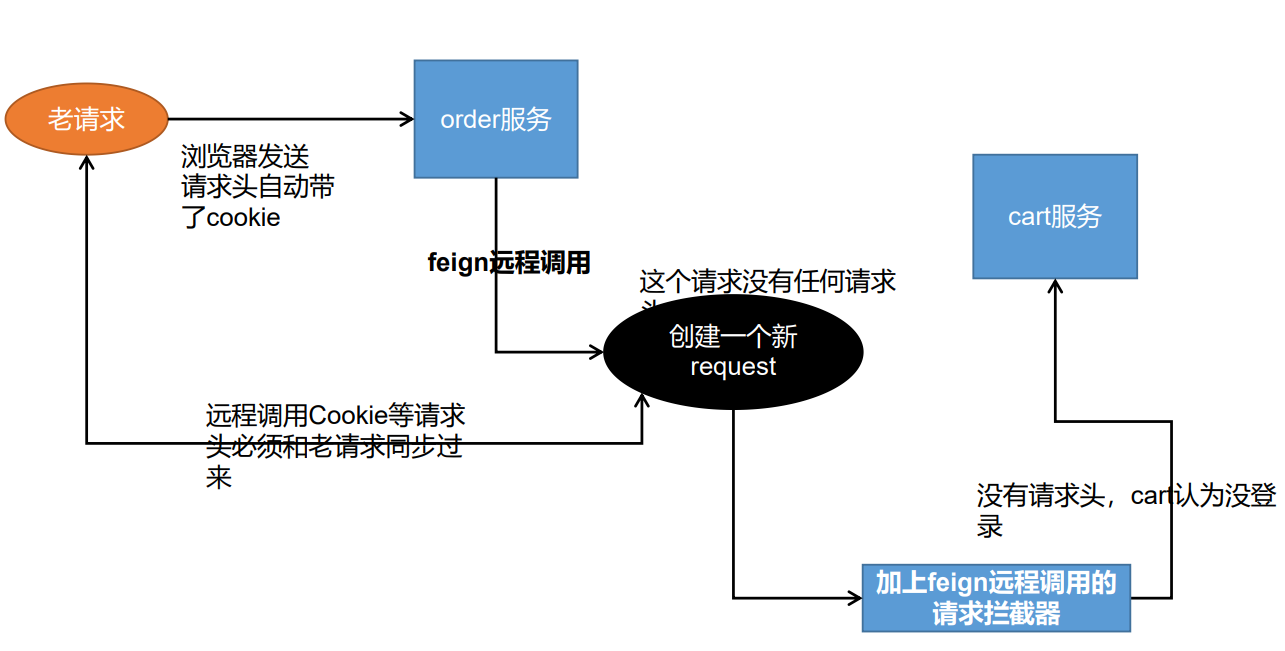
11.22.2添加feign远程调用请求拦截器
import feign.RequestInterceptor;
import feign.RequestTemplate;
import org.springframework.context.annotation.Bean;
import org.springframework.context.annotation.Configuration;
import org.springframework.web.context.request.RequestContextHolder;
import org.springframework.web.context.request.ServletRequestAttributes;

import javax.servlet.http.HttpServletRequest;

@Configuration
public class FeignConfig {

    @Bean
    public RequestInterceptor requestInterceptor() {
        return new RequestInterceptor() {
            @Override
            public void apply(RequestTemplate template) {
//                1.getRequestAttributes获取到原生请求
                ServletRequestAttributes requestAttributes = (ServletRequestAttributes) RequestContextHolder.getRequestAttributes();
                HttpServletRequest request = requestAttributes.getRequest();
//                2.同步请求头
//                  2.1在原生请求中获取到cookie
                String cookie = request.getHeader("Cookie");
//                  2.2在新请求中添加cookie
                template.header("Cookie",cookie);
            }
        };
    }
}
11.23Feign异步丢失上下文问题
11.23.1问题描述
==因为RequestContextHolder是基于ThreadLocal实现的,线程之间相互隔离,数据不能共享。所以在使用CompletableFuture实现异步编排时,新的线程并没有携带之前的请求数据。==至此Feign请求拦截器中获取HttpServletRequest对象会出现空对象。
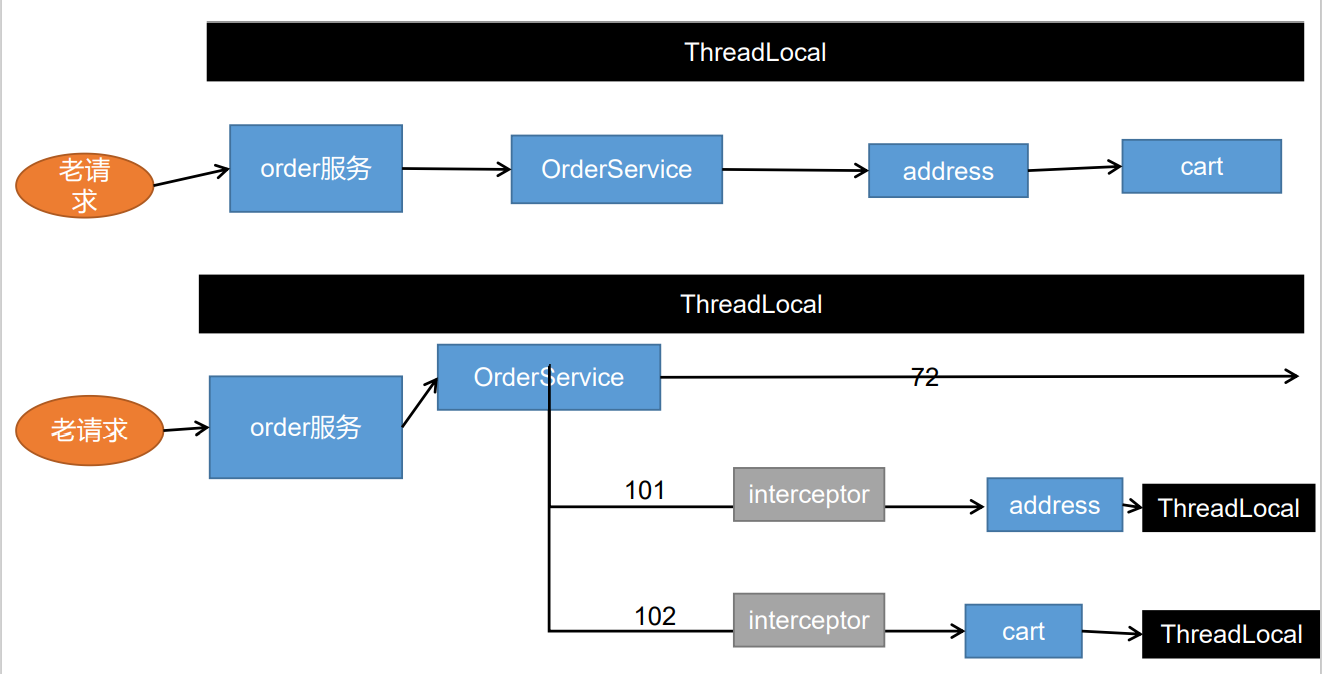
11.23.2问题解决方案
在主线程(含有请求数据的ThreadLocal)获取到请求数据,然后在新线程中再设置请求。
    /**
     * 返回确认订单页所需的数据
     *
     * @return {@link OrderConfirmVO}
     */
    @Override
    public OrderConfirmVO confirmOrder() throws ExecutionException, InterruptedException {
//        获取到当前线程的请求数据
        RequestAttributes requestAttributes = RequestContextHolder.getRequestAttributes();
        OrderConfirmVO orderConfirmVO = new OrderConfirmVO();
//        1.获取到当前登录用户的id
        MemberTO memberTO = LoginInterceptor.threadLoginUser.get();
//        2.远程调用会员服务,根据当前用户id查询用户的收货地址列表
        CompletableFuture<Void> receiveAddressFuture = CompletableFuture.runAsync(() -> {
//            新线程共享主线程的请求数据
            RequestContextHolder.setRequestAttributes(requestAttributes);
            List<ReceiveAddressTO> receiveAddressList = memberFeign.getReceiveAddressList(memberTO.getId());
            orderConfirmVO.setAddress(receiveAddressList);
        }, threadPoolExecutor);

//        3.远程调用购物车服务,得到当前的购物项
        CompletableFuture<List<OrderItemVO>> orderItemListFuture = CompletableFuture.supplyAsync(() -> {
            //            新线程共享主线程的请求数据
            RequestContextHolder.setRequestAttributes(requestAttributes);
            List<CartInfoTO> userCartItems = cartFeign.getUserCartItems();
            List<OrderItemVO> orderItemList = userCartItems.stream().map(userCartItem -> {
                OrderItemVO orderItemVO = new OrderItemVO();
                BeanUtils.copyProperties(userCartItem, orderItemVO);
                return orderItemVO;
            }).collect(Collectors.toList());
            orderConfirmVO.setItems(orderItemList);
            return orderItemList;
        }, threadPoolExecutor);

//        4.设置商品总额
        CompletableFuture<Void> skuTotalPriceFuture = orderItemListFuture.thenAcceptAsync((orderItemList) -> {
            //            新线程共享主线程的请求数据
            RequestContextHolder.setRequestAttributes(requestAttributes);
            List<BigDecimal> priceList = orderItemList.stream()
                    .map(orderItem -> {
                        return orderItem.getTotalPrice();
                    }).collect(Collectors.toList());
            BigDecimal totalPrice = new BigDecimal(0);
            for (BigDecimal price : priceList) {
                totalPrice = totalPrice.add(price);
            }
            orderConfirmVO.setTotalPrice(totalPrice);
            orderConfirmVO.setPayPrice(totalPrice);
        }, threadPoolExecutor);

//        5.设置用户积分
        orderConfirmVO.setIntegration(memberTO.getIntegration());

        CompletableFuture.allOf(receiveAddressFuture,
                orderItemListFuture,
                skuTotalPriceFuture).get();
        return orderConfirmVO;
    }
11.24接口幂等性
11.24.1什么是幂等性
接口幂等性就是用户对于同一操作发起的一次请求或者多次请求的结果是一致的,不会因为多次点击而产生了不同结果
==比如说支付场景,用户购买了商品支付扣款成功,但是返回结果的时候网络异常,此时钱已经扣了,用户再次点击按钮,此时会进行第二次扣款,返回结果成功,用户查询余额返发现多扣钱了,流水记录也变成了两条,这就没有保证接口的幂等性。==
11.24.2哪些情况下需要防止幂等性
- 用户多次点击按钮
- 用户页面回退再次提交
- 微服务互相调用,由于网络问题,导致请求失败,feign 触发重试机制
- 其他业务情况
11.24.3幂等性解决方案
11.24.3.1token机制
服务端提供了发送 token 的接口。我们在分析业务的时候,哪些业务是存在幂等问题的, 就必须在执行业务前,先去获取 token,服务器会把 token 保存到 redis 中。
然后调用业务接口请求时,把 token 携带过去,一般放在请求头部。
服务器判断 token 是否存在 redis 中,存在表示第一次请求,然后删除 token,继续执行业 务。
如果判断 token 不存在 redis 中,就表示是重复操作,直接返回重复标记给 client,这样就保证了业务代码,不被重复执行
注意点:
先删除 token 还是后删除 token
(1)先删除可能导致业务确实没有执行,重试还带上之前 token,由于防重设计导致, 请求还是不能执行。
(2)后删除可能导致,业务处理成功,但是服务闪断,出现超时,没有删除 token,别 人继续重试,导致业务被执行两边
(3)我们最好设计为先删除 token,如果业务调用失败,就重新获取 token 再次请求。
Token 获取、比较和删除必须是原子性
(1) redis.get(token) 、token.equals、redis.del(token)如果这两个操作不是原子,可能导致高并发下都 get 到同样的数据,判断都成功,继续业务并发执行
(2) 可以在 redis 使用 lua 脚本完成这个操作 if redis.call(‘get’, KEYS[1]) == ARGV[1] then return redis.call(‘del’, KEYS[1]) else return 0 end
11.24.3.2锁机制
- 数据库悲观锁
select * from xxxx where id = 1 for update; 悲观锁使用时一般伴随事务一起使用,数据锁定时间可能会很长,需要根据实际情况选用。 另外要注意的是,id 字段一定是主键或者唯一索引,不然可能造成锁表的结果,处理起来会 非常麻烦。
- 数据库乐观锁
这种方法适合在更新的场景中, update t_goods set count = count -1 , version = version + 1 where good_id=2 and version = 1 根据 version 版本,也就是在操作库存前先获取当前商品的 version 版本号,然后操作的时候 带上此 version 号。我们梳理下,我们第一次操作库存时,得到 version 为 1,调用库存服务 version 变成了 2;但返回给订单服务出现了问题,订单服务又一次发起调用库存服务,当订 单服务传如的 version 还是 1,再执行上面的 sql 语句时,就不会执行;因为 version 已经变 为 2 了,where 条件就不成立。这样就保证了不管调用几次,只会真正的处理一次。 乐观锁主要使用于处理读多写少的问题
- 业务层分布式锁
如果多个机器可能在同一时间同时处理相同的数据,比如多台机器定时任务都拿到了相同数 据处理,我们就可以加分布式锁,锁定此数据,处理完成后释放锁。获取到锁的必须先判断 这个数据是否被处理过。
11.24.3.3各种唯一约束
- 数据库唯一约束
插入数据,应该按照唯一索引进行插入,比如订单号,相同的订单就不可能有两条记录插入。 我们在数据库层面防止重复。 这个机制是利用了数据库的主键唯一约束的特性,解决了在 insert 场景时幂等问题。但主键 的要求不是自增的主键,这样就需要业务生成全局唯一的主键。 如果是分库分表场景下,路由规则要保证相同请求下,落地在同一个数据库和同一表中,要 不然数据库主键约束就不起效果了,因为是不同的数据库和表主键不相关。
- redis set 防重
很多数据需要处理,只能被处理一次,比如我们可以计算数据的 MD5 将其放入 redis 的 set, 每次处理数据,先看这个 MD5 是否已经存在,存在就不处理。
- 防重表
使用订单号 orderNo 做为去重表的唯一索引,把唯一索引插入去重表,再进行业务操作,且 他们在同一个事务中。这个保证了重复请求时,因为去重表有唯一约束,导致请求失败,避 免了幂等问题。这里要注意的是,去重表和业务表应该在同一库中,这样就保证了在同一个 事务,即使业务操作失败了,也会把去重表的数据回滚。这个很好的保证了数据一致性。 之前说的 redis 防重也算
- 全局请求唯一 id
调用接口时,生成一个唯一 id,redis 将数据保存到集合中(去重),存在即处理过。 可以使用 nginx 设置每一个请求的唯一 id; proxy_set_header X-Request-Id $request_i
11.25本地事务和分布式事务
11.25.1本地事务
11.25.1.1事务的四个特性(ACID)
**原子性(atomicity)**:==原子性表现为一个事务中涉及到的多个操作不可拆分。事务的原子性要求事务中的所有操作要么都执行,要么都不执行。==
一致性(consistency):“一致”指的是数据的一致,具体是指:所有数据都处于满足业务规则的一致性状态。一致性原则要求:一个事务中不管涉及到多少个操作,都必须保证事务执行之前数据是正确的,事务执行之后数据仍然是正确的。如果一个事务在执行的过程中,其中某一个或某几个操作失败了,则必须将其他所有操作撤销,将数据恢复到事务执行之前的状态,这就是回滚。
隔离性(isolation):在应用程序实际运行过程中,事务往往是并发执行的,所以很有可能有许多事务同时处理相同的数据,因此每个事务都应该与其他事务隔离开来,防止数据损坏。==隔离性原则要求多个事务在并发执行过程中不会互相干扰。==
持久性(durability):==持久性原则要求事务执行完成后,对数据的修改永久的保存下来==,不会因各种系统错误或其他意外情况而受到影响。通常情况下,事务对数据的修改应该被写入到持久化存储器中。
11.25.1.2事务并发出现的问题
脏读:
脏读就是指当一个事务正在访问数据,并且对数据进行了修改,而这种修改还没有提交到数据库中,这时,另外一个事务也访问这个未提交的数据,然后使用了这个数据。
例如:张三的工资为5000,事务A中把他的工资改为8000,但事务A尚未提交。与此同时,事务B正在读取张三的工资,读取到张三的工资为8000。随后,事务A发生异常,而回滚了事务。张三的工资又回滚为5000。最后,事务B读取到的张三工资为8000的数据即为脏数据,事务B做了一次脏读。
不可重复读:
(针对其他提交前后,读取数据本身的对比)
是指在一个事务内,多次读同一数据。在这个事务还没有结束时,第二个事务对数据进行修改,那么第一个事务两次读到的的数据可能是不一样的。**这样就发生了在一个事务内两次读到的数据是不一样的,因此称为是不可重复读。**
例如:在事务A中,读取到张三的工资为5000,操作没有完成,事务还没提交。与此同时,事务B把张三的工资改为8000,并提交了事务。随后,在事务A中,再次读取张三的工资,此时工资变为8000。在一个事务中前后两次读取的结果并不致,导致了不可重复读。
幻读:
(针对其他提交前后,读取数据条数的对比)
幻读是指同样一笔查询在整个事务过程中多次执行后,查询所得的**结果集**是不一样的。幻读也是指当事务不独立执行时,插入或者删除另一个事务当前影响的数据而发生的一种类似幻觉的现象。
例如:目前工资为5000的员工有10人,事务A读取所有工资为5000的人数为10人。此时,事务B插入一条工资也为5000的记录。这是,事务A再次读取工资为5000的员工,记录为11人。此时产生了幻读。
不可重复读和幻读的区别:
不可重复读和幻读的区别是:前者是指读到了已经提交的事务的更改数据(修改),后者是指读到了其他已经提交事务的新增或删除数据。
11.25.1.3事务的隔离级别
为了解决上述问题,数据库通过锁机制解决并发访问的问题。根据锁定对象不同:分为行级锁和表级锁;根据并发事务锁定的关系上看:分为共享锁定和独占锁定,共享锁定会防止独占锁定但允许其他的共享锁定。而独占锁定既防止共享锁定也防止其他独占锁定。为了更改数据,数据库必须在进行更改的行上施加行独占锁定,insert、update、delete和selsct for update语句都会隐式采用必要的行锁定。
但是直接使用锁机制管理是很复杂的,基于锁机制,数据库给用户提供了不同的事务隔离级别,只要设置了事务隔离级别,数据库就会分析事务中的sql语句然后自动选择合适的锁。
不同的隔离级别对并发问题的解决情况如下:
| 事务隔离级别 | 脏读 | 不可重复读 | 幻读 |
|---|---|---|---|
read uncommitted(0) |
允许 | 允许 | 允许 |
read committed(2) |
不允许 | 允许 | 允许 |
repeatable read(4) |
不允许 | 不允许 | 允许 |
serializable(8) |
不允许 | 不允许 | 不允许 |
隔离级别越高,性能越低。
一般情况下:脏读是不可允许的,不可重复读和幻读是可以被适当允许的。
11.25.1.4事务的传播行为
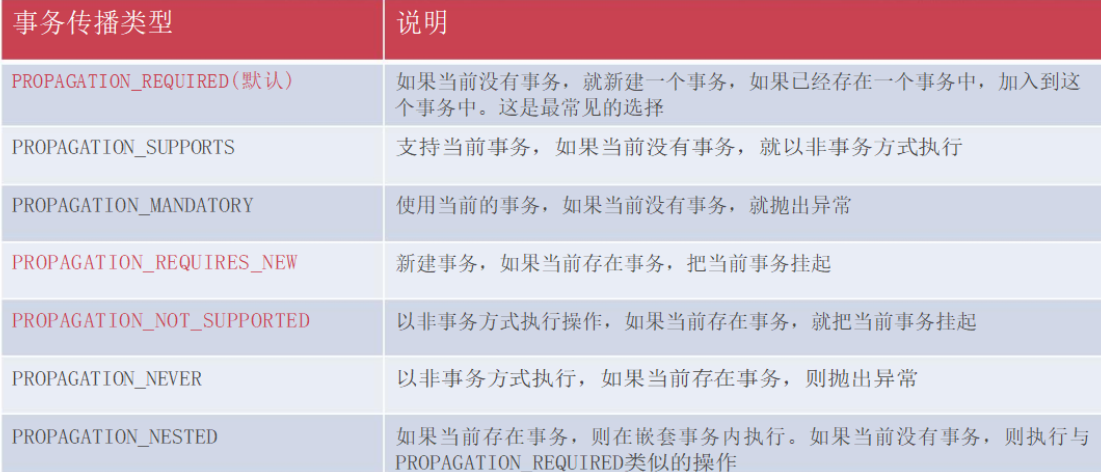
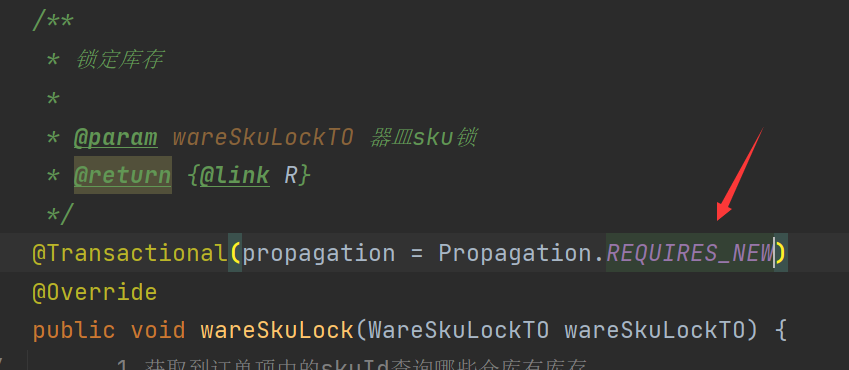
11.25.1.5本地事务失效问题
因为事务是基于代理类来实现的,同一个对象内事务方法互调默认失效,原因就是因为绕过了代理对象。
解决方案:使用代理对象来调用事务方法。
11.25.3分布式事务
数据库的 ACID 四大特性,已经无法满足我们分布式事务,这个时候又有一些新的理论。
11.25.3.1CAP理论和BASE理论
- CAP
分布式存储系统的CAP原理(分布式系统的三个指标):
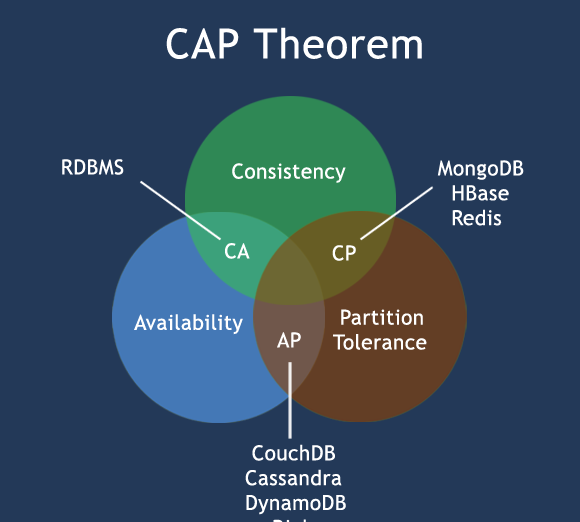
CAP理论指出在分布式系统中,一致性(Consistency)、可用性(Availability)、分区容错性(Partition Tolerance)这三个目标不可能同时得到满足,最多只能同时满足其中的两个:
- 一致性(Consistency):所有节点在同一时间看到的数据是一致的。
- 可用性(Availability):每个非故障节点都能够响应请求,即系统保持可用状态。
- 分区容错性(Partition Tolerance):系统在网络分区的情况下仍然能够正常运行。
根据 CAP 理论,当出现网络分区(即节点之间的通信失败)时,系统必须在一致性和可用性之间做出选择。因此,不同的分布式系统可能会在这三个方面进行权衡。
CA - 单点集群,满足一致性,可用性的系统,通常在可扩展性上不太强大。
CP - 满足一致性,分区容忍必的系统,通常性能不是特别高。
AP - 满足可用性,分区容忍性的系统,通常可能对一致性要求低一些。
当时分布式系统只有CP和AP,分区容错性是一定要考虑的。
- BASE理论
BASE 理论:BASE 理论是对分布式系统的一种实用性指导,相对于 ACID(原子性、一致性、隔离性、持久性)传统事务处理的严格要求。BASE 理论强调:
- 基本可用性(Basically Available):分布式系统出现故障的时候,允许损失一部分可用性。
- 软状态(Soft State):允许系统存在中间状态,这个中间状态又不会影响系统整体可用性。比如,数据库读写分离,写库同步到读库(主库同步到从库)会有一个延时,这样实际是一种柔性状态。
- 最终一致性(Eventually Consistent):系统最终会在各个节点上达到一致状态,但在一段时间内可能存在不一致的情况,最终会被修复。
BASE理论认为,在某些大规模、高可用性要求的分布式系统中,可以在一致性和可用性之间进行取舍,而不必追求严格的一致性。
11.25.3.2分布式事务的几种方案
- 二阶段提交
2PC即两阶段提交协议,是将整个事务流程分为两个阶段,准备阶段(Prepare phase)、提交阶段(commit
phase),2是指两个阶段,P是指准备阶段,C是指提交阶段。
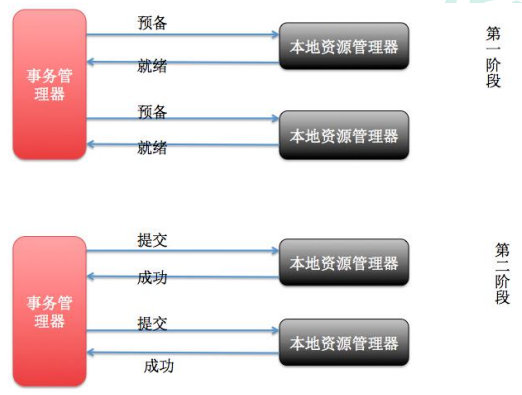
第一阶段:事务协调器要求每个涉及到事务的数据库预提交(precommit)此操作,并反映是否可以提交.
第二阶段:事务协调器要求每个数据库提交数据。
其中,如果有任何一个数据库否决此次提交,那么所有数据库都会被要求回滚它们在此事务中的那部分信息。
目前主流数据库均支持2PC【2 Phase Commit】
XA 是一个两阶段提交协议,又叫做 XA Transactions。
MySQL从5.5版本开始支持,SQL Server 2005 开始支持,Oracle 7 开始支持。
总的来说,XA协议比较简单,而且一旦商业数据库实现了XA协议,使用分布式事务的成本也比较低。**但是,XA也有致命的缺点,那就是性能不理想,特别是在交易下单链路,往往并发量很高,XA无法满足高并发场景。**
两阶段提交涉及多次节点间的网络通信,通信时间太长!
事务时间相对于变长了,锁定的资源的时间也变长了,造成资源等待时间也增加好多。
XA目前在商业数据库支持的比较理想,在mysql数据库中支持的不太理想,mysql的XA实现,没有记录prepare阶段日志,主备切换会导致主库与备库数据不一致。许多nosql也没有支持XA,这让XA的应用场景变得非常狭隘。
柔性事务— TCC补偿式事务
刚性事务:遵循 ACID 原则,强一致性。
柔性事务:遵循 BASE 理论,最终一致性;
与刚性事务不同,柔性事务允许一定时间内,不同节点的数据不一致,但要求最终一致。
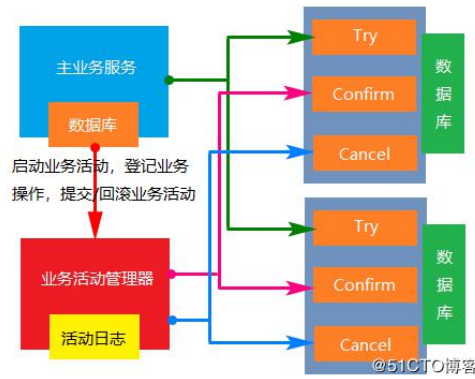
一阶段 prepare 行为:调用 自定义 的 prepare 逻辑。
二阶段 commit 行为:调用 自定义 的 commit 逻辑。
三阶段 rollback 行为:调用 自定义 的 rollback 逻辑。
所谓 TCC 模式,是指支持把 自定义 的分支事务纳入到全局事务的管理中。
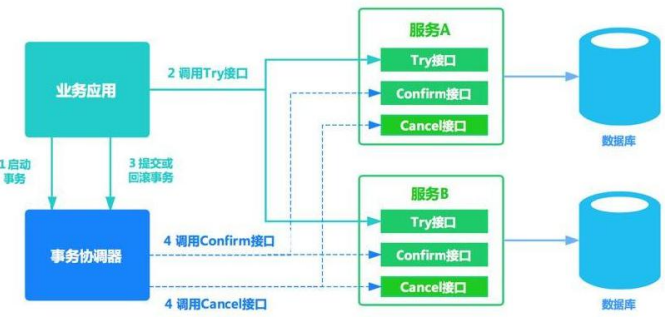
- 柔性事务—最大努力通知型方案
按规律进行通知,不保证数据一定能通知成功,但会提供可查询操作接口进行核对。这种 方案主要用在与第三方系统通讯时,比如:调用微信或支付宝支付后的支付结果通知。这种 方案也是结合 MQ 进行实现,例如:通过 MQ 发送 http 请求,设置最大通知次数。达到通 知次数后即不再通知。
案例:银行通知、商户通知等(各大交易业务平台间的商户通知:多次通知、查询校对、对 账文件),支付宝的支付成功异步回调
- 柔性事务—可靠消息+最终一致性方案(异步确保型)
实现:业务处理服务在业务事务提交之前,向实时消息服务请求发送消息,实时消息服务只 记录消息数据,而不是真正的发送。业务处理服务在业务事务提交之后,向实时消息服务确 认发送。只有在得到确认发送指令后,实时消息服务才会真正发送。
防止消息丢失:
做好消息确认机制(pulisher,consumer【手动 ack】)
每一个发送的消息都在数据库做好记录。定期将失败的消息再次发送一 遍
11.26Docker安装seata
Seata分TC、TM和RM三个角色,TC(Server端)为单独服务端部署,TM和RM(Client端)由业务系统集成。
- TC (Transaction Coordinator) - 事务协调者
维护全局和分支事务的状态,驱动全局事务提交或回滚。
- TM (Transaction Manager) - 事务管理器
定义全局事务的范围:开始全局事务、提交或回滚全局事务。
- RM (Resource Manager) - 资源管理器
管理分支事务处理的资源,与TC交谈以注册分支事务和报告分支事务的状态,并驱动分支事务提交或回滚。
搭建Server端
- 拉取seata镜像
docker pull seataio/seata-server:1.4.2- 根据镜像启动容器
docker run -d -p 8091:8091 --name seata-server seataio/seata-server:1.4.2- 创建本地文件夹,拷贝容器文件到本地文件
mkdir -p /home/dockerdata
docker cp seata-server:/seata-server /home/dockerdata/seata- 停止并删除容器
docker stop seata-server
docker rm seata-server
创建数据库,导入sql文件
创建数据库:seata
sql文件github地址
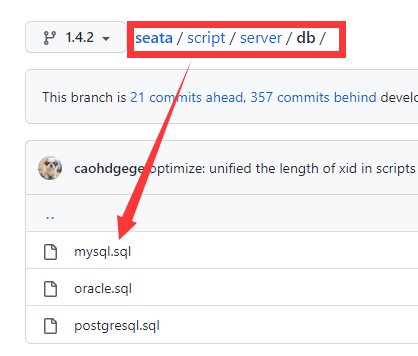
导入sql文件

在nacos中创建命名空间

- 修改file.conf文件
进入/home/dockerdata/seata/resources目录下,修改file.conf文件
- 修改mode为db
- 修改数据库的配置信息
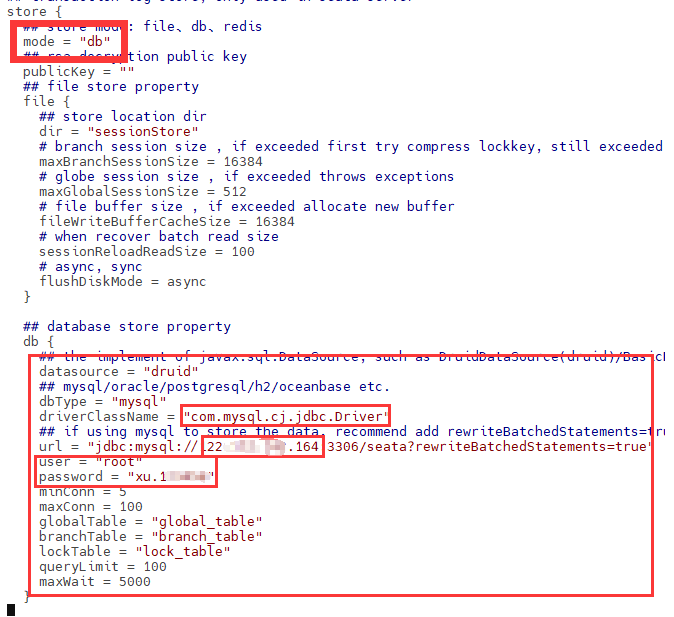
- 修改registry.conf文件
- 修改注册中心
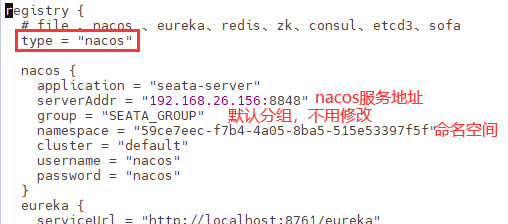
- 修改配置中心

- 下载seata-server文件
进入到/home/dockerdata/seata目录
cd /home/dockerdata/seata 在github官网上获取到对应版本的.gz文件,并传输到当前目录下
https://github.com/seata/seata/releases
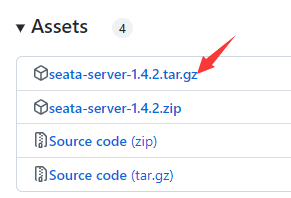
## 解压文件
tar -zxvf seata-server-1.4.2.tar.gz
#删除tar包
rm -rf seata-server-1.4.2.tar.gz- 修改seata-server中的配置文件
进入到/home/dockerdata/seata/seata/seata-server-1.4.2/conf目录下
再次修改file.conf文件和registry.conf文件。修改内容和7、8节的相同。

- 新建
config.txt文件
在/home/dockerdata/seata/seata/seata-server-1.4.2文件下创建config.txt文件,文件内容如下:
将store.mode=file 改为store.mode=db ,将数据库改为自己数据库的配置
transport.type=TCP
transport.server=NIO
transport.heartbeat=true
transport.enableClientBatchSendRequest=false
transport.threadFactory.bossThreadPrefix=NettyBoss
transport.threadFactory.workerThreadPrefix=NettyServerNIOWorker
transport.threadFactory.serverExecutorThreadPrefix=NettyServerBizHandler
transport.threadFactory.shareBossWorker=false
transport.threadFactory.clientSelectorThreadPrefix=NettyClientSelector
transport.threadFactory.clientSelectorThreadSize=1
transport.threadFactory.clientWorkerThreadPrefix=NettyClientWorkerThread
transport.threadFactory.bossThreadSize=1
transport.threadFactory.workerThreadSize=default
transport.shutdown.wait=3
service.vgroupMapping.my_test_tx_group=default
service.default.grouplist=127.0.0.1:8091
service.enableDegrade=false
service.disableGlobalTransaction=false
client.rm.asyncCommitBufferLimit=10000
client.rm.lock.retryInterval=10
client.rm.lock.retryTimes=30
client.rm.lock.retryPolicyBranchRollbackOnConflict=true
client.rm.reportRetryCount=5
client.rm.tableMetaCheckEnable=false
client.rm.sqlParserType=druid
client.rm.reportSuccessEnable=false
client.rm.sagaBranchRegisterEnable=false
client.tm.commitRetryCount=5
client.tm.rollbackRetryCount=5
store.mode=db
store.file.dir=file_store/data
store.file.maxBranchSessionSize=16384
store.file.maxGlobalSessionSize=512
store.file.fileWriteBufferCacheSize=16384
store.file.flushDiskMode=async
store.file.sessionReloadReadSize=100
store.db.datasource=druid
store.db.dbType=mysql
store.db.driverClassName=com.mysql.cj.jdbc.Driver
store.db.url=jdbc:mysql://192.168.1.7:3306/seata?useUnicode=true
store.db.user=root
store.db.password=123456
store.db.minConn=5
store.db.maxConn=30
store.db.globalTable=global_table
store.db.branchTable=branch_table
store.db.queryLimit=100
store.db.lockTable=lock_table
store.db.maxWait=5000
server.recovery.committingRetryPeriod=1000
server.recovery.asynCommittingRetryPeriod=1000
server.recovery.rollbackingRetryPeriod=1000
server.recovery.timeoutRetryPeriod=1000
server.maxCommitRetryTimeout=-1
server.maxRollbackRetryTimeout=-1
server.rollbackRetryTimeoutUnlockEnable=false
client.undo.dataValidation=true
client.undo.logSerialization=jackson
server.undo.logSaveDays=7
server.undo.logDeletePeriod=86400000
client.undo.logTable=undo_log
client.log.exceptionRate=100
transport.serialization=seata
transport.compressor=none
metrics.enabled=false
metrics.registryType=compact
metrics.exporterList=prometheus
metrics.exporterPrometheusPort=9898- 新建
script文件夹,并创建 nacos-config.sh文件
在/home/dockerdata/seata/seata/seata-server-1.4.2文件下创建script文件夹

进入script文件夹,并创建nacos-config.sh文件,文件内容为:
#!/usr/bin/env bash
# Copyright 1999-2019 Seata.io Group.
#
# Licensed under the Apache License, Version 2.0 (the "License");
# you may not use this file except in compliance with the License.
# You may obtain a copy of the License at、
#
#      http://www.apache.org/licenses/LICENSE-2.0
#
# Unless required by applicable law or agreed to in writing, software
# distributed under the License is distributed on an "AS IS" BASIS,
# WITHOUT WARRANTIES OR CONDITIONS OF ANY KIND, either express or implied.
# See the License for the specific language governing permissions and
# limitations under the License.

while getopts ":h:p:g:t:" opt
do
  case $opt in
  h)
    host=$OPTARG
    ;;
  p)
    port=$OPTARG
    ;;
  g)
    group=$OPTARG
    ;;
  t)
    tenant=$OPTARG
    ;;
  ?)
    echo " USAGE OPTION: $0 [-h host] [-p port] [-g group] [-t tenant] "
    exit 1
    ;;
  esac
done

if [[ -z ${host} ]]; then
    host=localhost
fi
if [[ -z ${port} ]]; then
    port=8848
fi
if [[ -z ${group} ]]; then
    group="SEATA_GROUP"
fi
if [[ -z ${tenant} ]]; then
    tenant=""
fi

nacosAddr=$host:$port
contentType="content-type:application/json;charset=UTF-8"

echo "set nacosAddr=$nacosAddr"
echo "set group=$group"

failCount=0
tempLog=$(mktemp -u)
function addConfig() {
  curl -X POST -H "${1}" "http://$2/nacos/v1/cs/configs?dataId=$3&group=$group&content=$4&tenant=$tenant" >"${tempLog}" 2>/dev/null
  if [[ -z $(cat "${tempLog}") ]]; then
    echo " Please check the cluster status. "
    exit 1
  fi
  if [[ $(cat "${tempLog}") =~ "true" ]]; then
    echo "Set $3=$4 successfully "
  else
    echo "Set $3=$4 failure "
    (( failCount++ ))
  fi
}

count=0
for line in $(cat $(dirname "$PWD")/config.txt | sed s/[[:space:]]//g); do
  (( count++ ))
	key=${line%%=*}
  value=${line#*=}
	addConfig "${contentType}" "${nacosAddr}" "${key}" "${value}"
done

echo "========================================================================="
echo " Complete initialization parameters,  total-count:$count ,  failure-count:$failCount "
echo "========================================================================="

if [[ ${failCount} -eq 0 ]]; then
	echo " Init nacos config finished, please start seata-server. "
else
	echo " init nacos config fail. "
fi- 修改文件权限为可执行
chmod u+x *.sh- 执行命令,将配置文件初始化到nacos配置中心
sh nacos-config.sh -h nacos的IP地址 -p 8848 -g SEATA_GROUP -t 命名空间ID 出现下面表示seata初始化nacos配置完成
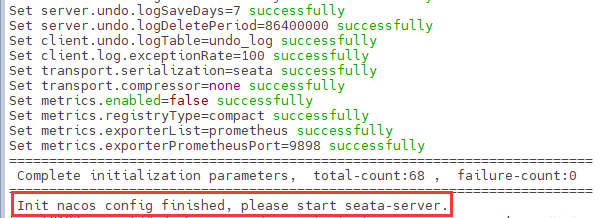
查看nacos配置中对应的命名空间下是否含有对应的配置
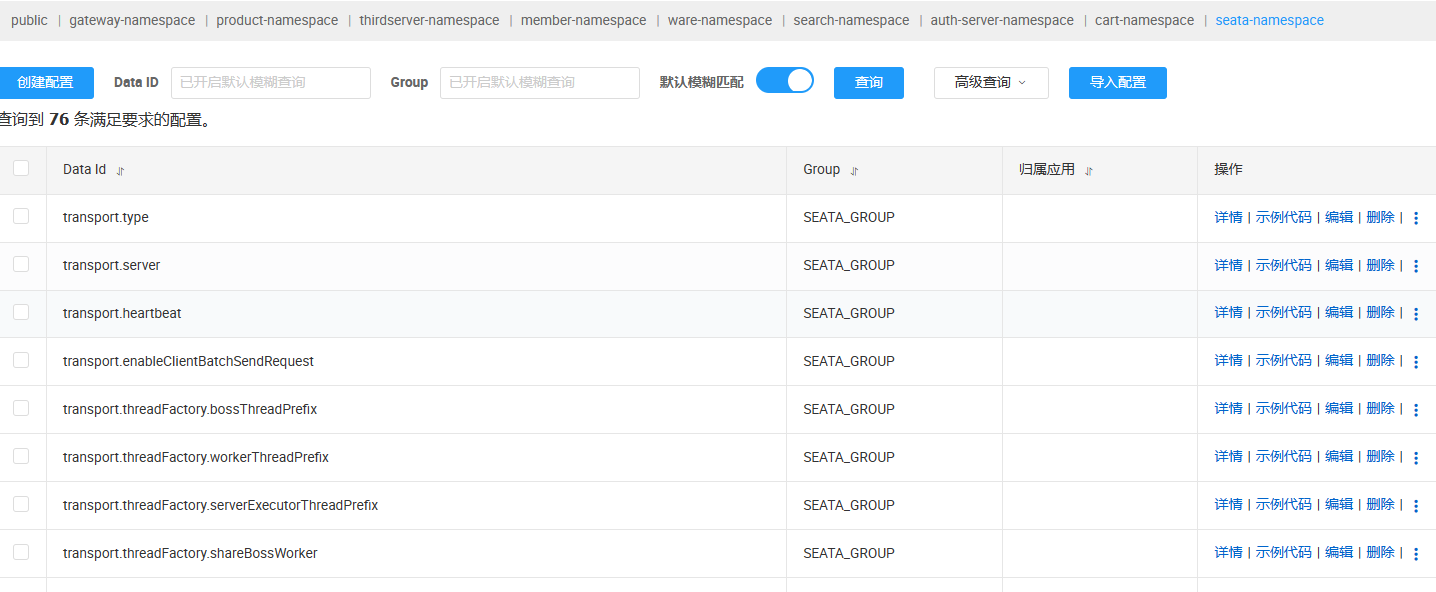
出现下面错误时,添加对应模块的配置:

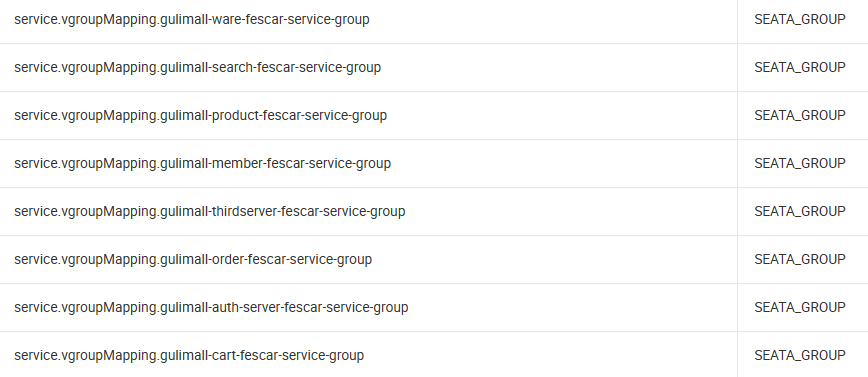
- 启动容器,并设置容器为自动重启
docker run -d -p 8091:8091 --restart=always --name seata-server -v /home/dockerdata/seata:/seata-server -e SEATA_IP=自己seata-server的IP -e SEATA_PORT=8091 seataio/seata-server:1.4.2 
- 开放对应的8091端口,并重启防火墙
firewall-cmd --zone=public --add-port=8091/tcp --permanent
systemctl restart firewalld.service- 两个文件的作用
config.txt就是seata各种详细的配置,执行 nacos-config.sh 即可将这些配置导入到nacos,这样就不需要将file.conf和registry.conf放到我们的项目中了,需要什么配置就直接从nacos中读取。
11.27seata解决分布式事务
11.27.1微服务示例
用户购买商品的业务逻辑。整个业务逻辑由3个微服务提供支持:
- 仓储服务:对给定的商品扣除仓储数量。
- 订单服务:根据采购需求创建订单。
- 帐户服务:从用户帐户中扣除余额。
这里我们会创建三个服务,一个订单服务,一个库存服务,一个账户服务。
==当用户下单时,会在订单服务中创建一个订单,然后通过远程调用库存服务来扣减下单商品的库存,再通过远程调用账户服务来扣减用户账户里面的余额,最后在订单服务中修改订单状态为已完成。==
该操作跨越三个数据库,有两次远程调用,很明显会有分布式事务问题。
架构图

11.27.2seata的分布式交易解决方案
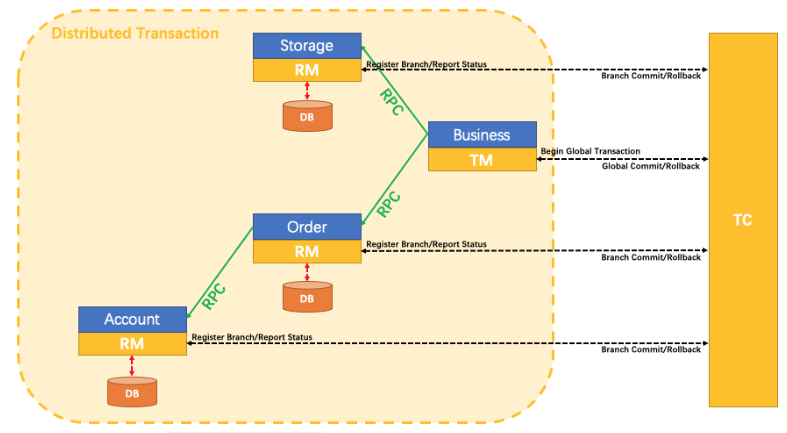
我们只需要使用一个 @GlobalTransactional 注解在业务方法上:
@GlobalTransactional
  public void purchase(String userId, String commodityCode, int orderCount) {
      ......
  }
11.27.3建立数据库和表
seata_order:存储订单的数据库
- t_order表
CREATE TABLE t_order (

  `id` BIGINT(11) NOT NULL AUTO_INCREMENT PRIMARY KEY,

  `user_id` BIGINT(11) DEFAULT NULL COMMENT '用户id',

  `product_id` BIGINT(11) DEFAULT NULL COMMENT '产品id',

  `count` INT(11) DEFAULT NULL COMMENT '数量',

  `money` DECIMAL(11,0) DEFAULT NULL COMMENT '金额',

  `status` INT(1) DEFAULT NULL COMMENT '订单状态:0:创建中;1:已完结'

) ENGINE=INNODB AUTO_INCREMENT=7 DEFAULT CHARSET=utf8;
seata_storage:存储库存的数据库
- t_storage表
CREATE TABLE t_storage (

 `id` BIGINT(11) NOT NULL AUTO_INCREMENT PRIMARY KEY,

 `product_id` BIGINT(11) DEFAULT NULL COMMENT '产品id',

 `total` INT(11) DEFAULT NULL COMMENT '总库存',

 `used` INT(11) DEFAULT NULL COMMENT '已用库存',

 `residue` INT(11) DEFAULT NULL COMMENT '剩余库存'

) ENGINE=INNODB AUTO_INCREMENT=2 DEFAULT CHARSET=utf8;


INSERT INTO seata_storage.t_storage(`id`, `product_id`, `total`, `used`, `residue`)

VALUES ('1', '1', '100', '0', '100');
seata_account:存储账户信息的数据库
- t_account表
CREATE TABLE t_account (

  `id` BIGINT(11) NOT NULL AUTO_INCREMENT PRIMARY KEY COMMENT 'id',

  `user_id` BIGINT(11) DEFAULT NULL COMMENT '用户id',

  `total` DECIMAL(10,0) DEFAULT NULL COMMENT '总额度',

  `used` DECIMAL(10,0) DEFAULT NULL COMMENT '已用余额',

  `residue` DECIMAL(10,0) DEFAULT '0' COMMENT '剩余可用额度'

) ENGINE=INNODB AUTO_INCREMENT=2 DEFAULT CHARSET=utf8;


INSERT INTO seata_account.t_account(`id`, `user_id`, `total`, `used`, `residue`) VALUES ('1', '1', '1000', '0', '1000');每个数据库下再增加**回滚日志表font>**:日志表位置
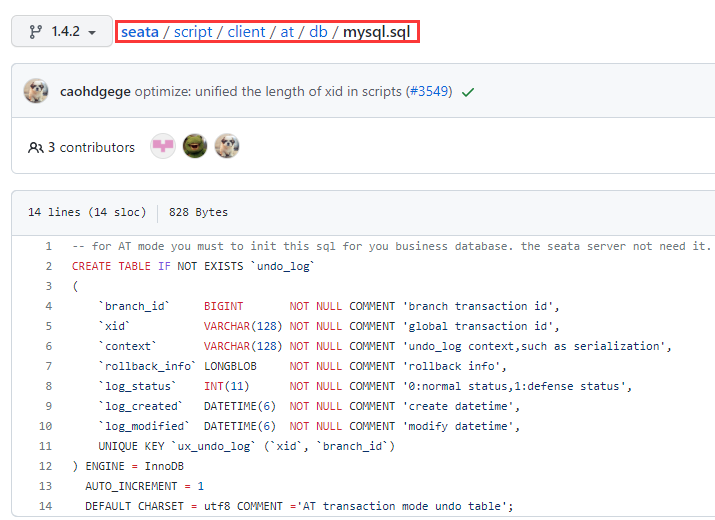
CREATE TABLE IF NOT EXISTS `undo_log`
(
    `branch_id`     BIGINT       NOT NULL COMMENT 'branch transaction id',
    `xid`           VARCHAR(128) NOT NULL COMMENT 'global transaction id',
    `context`       VARCHAR(128) NOT NULL COMMENT 'undo_log context,such as serialization',
    `rollback_info` LONGBLOB     NOT NULL COMMENT 'rollback info',
    `log_status`    INT(11)      NOT NULL COMMENT '0:normal status,1:defense status',
    `log_created`   DATETIME(6)  NOT NULL COMMENT 'create datetime',
    `log_modified`  DATETIME(6)  NOT NULL COMMENT 'modify datetime',
    UNIQUE KEY `ux_undo_log` (`xid`, `branch_id`)
) ENGINE = InnoDB
  AUTO_INCREMENT = 1
  DEFAULT CHARSET = utf8 COMMENT ='AT transaction mode undo table';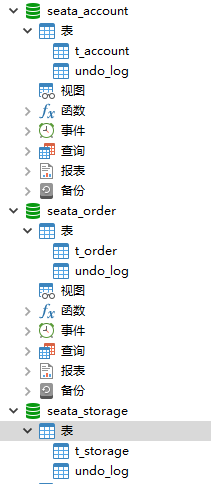
11.27.4新建库存模块
- 新建模块
- pom文件
<dependencies>
        <!--nacos-->
        <dependency>
            <groupId>com.alibaba.cloud</groupId>
            <artifactId>spring-cloud-starter-alibaba-nacos-discovery</artifactId>
        </dependency>
        <!--seata-->
        <dependency>
            <groupId>com.alibaba.cloud</groupId>
            <artifactId>spring-cloud-starter-alibaba-seata</artifactId>
            <exclusions>
                <exclusion>
                    <artifactId>seata-all</artifactId>
                    <groupId>io.seata</groupId>
                </exclusion>
            </exclusions>
        </dependency>
        <dependency>
            <groupId>io.seata</groupId>
            <artifactId>seata-all</artifactId>
            <version>1.4.2</version>
        </dependency>
        <!--feign-->
        <dependency>
            <groupId>org.springframework.cloud</groupId>
            <artifactId>spring-cloud-starter-openfeign</artifactId>
        </dependency>
        <!--web-actuator-->
        <dependency>
            <groupId>org.springframework.boot</groupId>
            <artifactId>spring-boot-starter-web</artifactId>
        </dependency>
        <dependency>
            <groupId>org.springframework.boot</groupId>
            <artifactId>spring-boot-starter-actuator</artifactId>
        </dependency>
        <!--mysql-druid-->
        <dependency>
            <groupId>mysql</groupId>
            <artifactId>mysql-connector-java</artifactId>
        </dependency>
        <dependency>
            <groupId>com.alibaba</groupId>
            <artifactId>druid-spring-boot-starter</artifactId>
        </dependency>
        <dependency>
            <groupId>org.mybatis.spring.boot</groupId>
            <artifactId>mybatis-spring-boot-starter</artifactId>
        </dependency>
        <dependency>
            <groupId>com.baomidou</groupId>
            <artifactId>mybatis-plus-boot-starter</artifactId>
        </dependency>
        <dependency>
            <groupId>org.springframework.boot</groupId>
            <artifactId>spring-boot-starter-test</artifactId>
            <scope>test</scope>
        </dependency>
        <dependency>
            <groupId>org.projectlombok</groupId>
            <artifactId>lombok</artifactId>
            <optional>true</optional>
        </dependency>
</dependencies>- yaml文件
server:
  port: 2002

spring:
  application:
    name: seata-storage-service
  cloud:
    nacos:
      discovery:
        server-addr: 192.168.26.156:8848
    alibaba:
      seata:
        #自定义事务组名称需要与seata-server中的对应
        tx-service-group: SEATA_GROUP
  datasource:
    driver-class-name: com.mysql.cj.jdbc.Driver
    url: jdbc:mysql://122.112.192.164:3306/seata_order
    username: root
    password: xu.123456

feign:
  hystrix:
    enabled: false

logging:
  level:
    io:
      seata: info

mybatis:
  mapperLocations: classpath:mapper/*.xml
在资源文件中添加
file.conf文件和registry.conf文件主启动类
@SpringBootApplication
@EnableDiscoveryClient
@EnableFeignClients
@MapperScan("com.xha.springcloud.mapper")
// 开启seata
@EnableAutoDataSourceProxy
public class SeataStorageService2002Main {
    public static void main(String[] args) {
        SpringApplication.run(SeataStorageService2002Main.class,args);
    }
}- 业务类
service层接口:
public interface StorageService extends IService<Storage> {
    /**
     * 减少存储
     *
     * @param productId 产品id
     * @param count     数
     * @return {@link CommonResult}
     */
    @PostMapping("/storage/decrease")
    CommonResult decreaseStorage(@RequestParam("productId") Long productId, @RequestParam("count") Integer count);
}
service层实现类:
@Service
public class StorageServiceImpl extends ServiceImpl<StorageMapper, Storage>
    implements StorageService{

    /**
     * 减少存储
     *
     * @param productId 产品id
     * @param count     数
     * @return {@link CommonResult}
     */
    @Override
    public CommonResult decreaseStorage(Long productId, Integer count) {
//        1.根据productId查询当前商品
        Storage storage = getById(productId);
//        2.更新商品库存
        storage = storage
                .setResidue(storage.getResidue() - count)
                .setUsed(storage.getUsed() + count);
//        3.更新商品库存信息
        updateById(storage);
        return new CommonResult(200,"更新库存完成!");
    }
}- controller层
@RestController
public class StorageController {

    @Resource
    private StorageService storageService;

    /**
     * 减少存储
     *
     * @param productId 产品id
     * @param count     数
     * @return {@link CommonResult}
     */
    @PostMapping("/storage/decrease")
    CommonResult decreaseStorage(@RequestParam("productId") Long productId, @RequestParam("count") Integer count){
        return storageService.decreaseStorage(productId,count);
    }
}
11.27.5新建账户模块
- 新建模块
- pom文件
<dependencies>
        <!--nacos-->
        <dependency>
            <groupId>com.alibaba.cloud</groupId>
            <artifactId>spring-cloud-starter-alibaba-nacos-discovery</artifactId>
        </dependency>
        <!--seata-->
        <dependency>
            <groupId>com.alibaba.cloud</groupId>
            <artifactId>spring-cloud-starter-alibaba-seata</artifactId>
            <exclusions>
                <exclusion>
                    <artifactId>seata-all</artifactId>
                    <groupId>io.seata</groupId>
                </exclusion>
            </exclusions>
        </dependency>
        <dependency>
            <groupId>io.seata</groupId>
            <artifactId>seata-all</artifactId>
            <version>1.4.2</version>
        </dependency>
        <!--feign-->
        <dependency>
            <groupId>org.springframework.cloud</groupId>
            <artifactId>spring-cloud-starter-openfeign</artifactId>
        </dependency>
        <!--web-actuator-->
        <dependency>
            <groupId>org.springframework.boot</groupId>
            <artifactId>spring-boot-starter-web</artifactId>
        </dependency>
        <dependency>
            <groupId>org.springframework.boot</groupId>
            <artifactId>spring-boot-starter-actuator</artifactId>
        </dependency>
        <!--mysql-druid-->
        <dependency>
            <groupId>mysql</groupId>
            <artifactId>mysql-connector-java</artifactId>
        </dependency>
        <dependency>
            <groupId>com.alibaba</groupId>
            <artifactId>druid-spring-boot-starter</artifactId>
        </dependency>
        <dependency>
            <groupId>org.mybatis.spring.boot</groupId>
            <artifactId>mybatis-spring-boot-starter</artifactId>
        </dependency>
        <dependency>
            <groupId>com.baomidou</groupId>
            <artifactId>mybatis-plus-boot-starter</artifactId>
        </dependency>
        <dependency>
            <groupId>org.springframework.boot</groupId>
            <artifactId>spring-boot-starter-test</artifactId>
            <scope>test</scope>
        </dependency>
        <dependency>
            <groupId>org.projectlombok</groupId>
            <artifactId>lombok</artifactId>
            <optional>true</optional>
        </dependency>
</dependencies>- yaml文件
server:
  port: 2003

spring:
  application:
    name: seata-account-service
  cloud:
    nacos:
      discovery:
        server-addr: 192.168.26.156:8848
    alibaba:
      seata:
        #自定义事务组名称需要与seata-server中的对应
        tx-service-group: SEATA_GROUP
  datasource:
    driver-class-name: com.mysql.cj.jdbc.Driver
    url: jdbc:mysql://122.112.192.164:3306/seata_order
    username: root
    password: xu.123456

feign:
  hystrix:
    enabled: false

logging:
  level:
    io:
      seata: info

mybatis:
  mapperLocations: classpath:mapper/*.xml
在资源文件中添加
file.conf文件和registry.conf文件主启动类
@SpringBootApplication
@EnableDiscoveryClient
@EnableFeignClients
@MapperScan("com.xha.springcloud.mapper")
@EnableAutoDataSourceProxy
public class SeataAccountService2003Main {
    public static void main(String[] args) {
        SpringApplication.run(SeataAccountService2003Main.class,args);
    }
}- 业务类
service层接口:
public interface AccountService extends IService<Account> {
    /**
     * 扣除余额
     *
     * @param userId 用户id
     * @param money  钱
     * @return {@link CommonResult}
     */
    @PostMapping("/account/decrease")
    CommonResult decreaseMoney(@RequestParam("userId") Long userId, @RequestParam("money") Integer money);

}
service层实现类:
@Service
public class AccountServiceImpl extends ServiceImpl<AccountMapper, Account>
    implements AccountService{

    /**
     * 扣除余额
     *
     * @param userId 用户id
     * @param money  钱
     * @return {@link CommonResult}
     */
    @Override
    public CommonResult decreaseMoney(Long userId, Integer money) {
        //        1.根据userId查询当前用户
        Account account = getById(userId);
//        2.更新商品库存
        account = account
                .setResidue(account.getResidue() - money)
                .setUsed(account.getUsed() + money);
//        3.更新商品库存信息
        updateById(account);
        return new CommonResult(200,"更新库存完成!");
    }
}
- controller层
@RestController
public class AccountController {

    @Resource
    private AccountService accountService;

    /**
     * 扣减库存
     *
     * @param userId 用户id
     * @param money  钱
     * @return {@link CommonResult}
     */
    @PostMapping("/account/decrease")
    public CommonResult decreaseMoney(@RequestParam("userId") Long userId, @RequestParam("money") Integer money){
        return accountService.decreaseMoney(userId, money);
    }
}
11.27.6新建订单模块
- 新建模块
- pom文件
<dependencies>
    <!--nacos-->
    <dependency>
        <groupId>com.alibaba.cloud</groupId>
        <artifactId>spring-cloud-starter-alibaba-nacos-discovery</artifactId>
    </dependency>
    <!--seata-->
    <dependency>
        <groupId>com.alibaba.cloud</groupId>
        <artifactId>spring-cloud-starter-alibaba-seata</artifactId>
        <exclusions>
            <exclusion>
                <artifactId>seata-all</artifactId>
                <groupId>io.seata</groupId>
            </exclusion>
        </exclusions>
    </dependency>
    <dependency>
        <groupId>io.seata</groupId>
        <artifactId>seata-all</artifactId>
        <version>1.4.2</version>
    </dependency>
    <!--feign-->
    <dependency>
        <groupId>org.springframework.cloud</groupId>
        <artifactId>spring-cloud-starter-openfeign</artifactId>
    </dependency>
    <!--web-actuator-->
    <dependency>
        <groupId>org.springframework.boot</groupId>
        <artifactId>spring-boot-starter-web</artifactId>
    </dependency>
    <dependency>
        <groupId>org.springframework.boot</groupId>
        <artifactId>spring-boot-starter-actuator</artifactId>
    </dependency>
    <!--mysql-druid-->
    <dependency>
        <groupId>mysql</groupId>
        <artifactId>mysql-connector-java</artifactId>
    </dependency>
    <dependency>
        <groupId>com.alibaba</groupId>
        <artifactId>druid-spring-boot-starter</artifactId>
    </dependency>
    <dependency>
        <groupId>org.mybatis.spring.boot</groupId>
        <artifactId>mybatis-spring-boot-starter</artifactId>
    </dependency>
    <dependency>
        <groupId>com.baomidou</groupId>
        <artifactId>mybatis-plus-boot-starter</artifactId>
    </dependency>
    <dependency>
        <groupId>org.springframework.boot</groupId>
        <artifactId>spring-boot-starter-test</artifactId>
        <scope>test</scope>
    </dependency>
    <dependency>
        <groupId>org.projectlombok</groupId>
        <artifactId>lombok</artifactId>
        <optional>true</optional>
    </dependency>
</dependencies>- yaml文件
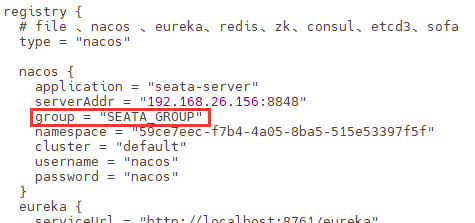
server:
  port: 2001

spring:
  application:
    name: seata-order-service
  cloud:
    nacos:
      discovery:
        server-addr: 192.168.26.156:8848
    alibaba:
      seata:
        #自定义事务组名称需要与seata-server中的对应
        tx-service-group: SEATA_GROUP
  datasource:
    driver-class-name: com.mysql.cj.jdbc.Driver
    url: jdbc:mysql://122.112.192.164:3306/seata_order
    username: root
    password: xu.123456

feign:
  hystrix:
    enabled: false

logging:
  level:
    io:
      seata: info

mybatis:
  mapperLocations: classpath:mapper/*.xml
- 在资源文件中添加
file.conf文件和registry.conf文件 - 主启动类
@SpringBootApplication
@EnableDiscoveryClient
@EnableFeignClients
@MapperScan("com.xha.springcloud.mapper")
// 开启seata
@EnableAutoDataSourceProxy
public class SeataOrderService2001Main {
    public static void main(String[] args) {
        SpringApplication.run(SeataOrderService2001Main.class,args);
    }
}
使用MybatisX逆向生成entities、mapper、mapper.xml以及service层
添加统一响应实体
import lombok.Data;
import lombok.NoArgsConstructor;

/**
 * JSON封装体CommonResult
 */
@Data
@NoArgsConstructor
public class CommonResult<T> {
    /**
     * 状态码
     */
    private Integer code;

    /**
     * 提示信息
     */
    private String message;

    /**
     * 返回的数据
     */
    private T data;

    /**
     * 不含data的有参构造
     */
    public CommonResult(Integer code, String message){
        this.code = code;
        this.message = message;
    }

    /**
     * 含有data的有参构造
     */
    public CommonResult(Integer code, String message, T data){
        this.code = code;
        this.message = message;
        this.data = data;
    }
}- service接口以及实现类
实现创建订单的业务
==使用OpenFeign实现模块之间的调用,创建库存模块和账户模块对应的接口,指定模块服务名**调用库存模块扣减库存,调用账户模块扣减余额。**==
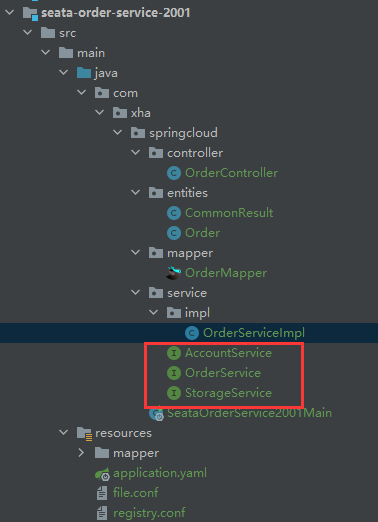
OrderService:
import com.xha.springcloud.entities.Order;
import com.baomidou.mybatisplus.extension.service.IService;

/**
 * 订单服务
 *
 * @author Xu Huaiang
 * @date 2022/12/26
 */
public interface OrderService extends IService<Order> {

    /**
     * 创建订单
     *
     * @param order 订单
     */
    public void createOrder(Order order);
}
StorageService:
@FeignClient(value = "seata-storage-service")
public interface StorageService {

    /**
     * 减少存储
     *
     * @param productId 产品id
     * @param count     数
     * @return {@link CommonResult}
     */
    @PostMapping("/storage/decrease")
    CommonResult decreaseStorage(@RequestParam("productId") Long productId,@RequestParam("count") Integer count);
}
AccountService:
@FeignClient(value = "seata-account-service")
public interface AccountService {

    /**
     * 扣除余额
     *
     * @param userId 用户id
     * @param money  钱
     * @return {@link CommonResult}
     */
    @PostMapping("/account/decrease")
    CommonResult decreaseMoney(@RequestParam("userId") Long userId, @RequestParam("money") Long money);
}
OrderServiceImpl实现类
@Slf4j
@Service
public class OrderServiceImpl extends ServiceImpl<OrderMapper, Order>
    implements OrderService{

    @Resource
    private StorageService storageService;

    @Resource
    private AccountService accountService;

    /**
     * 创建订单
     *
     * @param order 订单
     */
    @Override
    public void createOrder(Order order) {
        log.info("创建订单");
//        1.创建订单
        save(order);
        log.info("调用库存模块,扣减库存");
//        2.扣减库存
        storageService.decreaseStorage(order.getProductId(),order.getCount());
        log.info("调用账户模块,扣减余额");
//        3.账户扣减余额
        accountService.decreaseMoney(order.getUserId(),order.getMoney());
    }
}- 控制层
@RestController
public class OrderController {

    @Resource
    private OrderService orderService;

    @PostMapping("/order/create")
    public CommonResult createOrder(Order order){
        orderService.createOrder(order);
        return new CommonResult(200,"订单创建完成!");
    }
}
11.27.7测试
当库存和账户金额扣减后,订单状态并没有设置为已经完成,没有从零改为1。而且由于feign的重试机制,账户余额还有可能被多次扣减
添加分布式事务控制,当出现异常的回滚数据
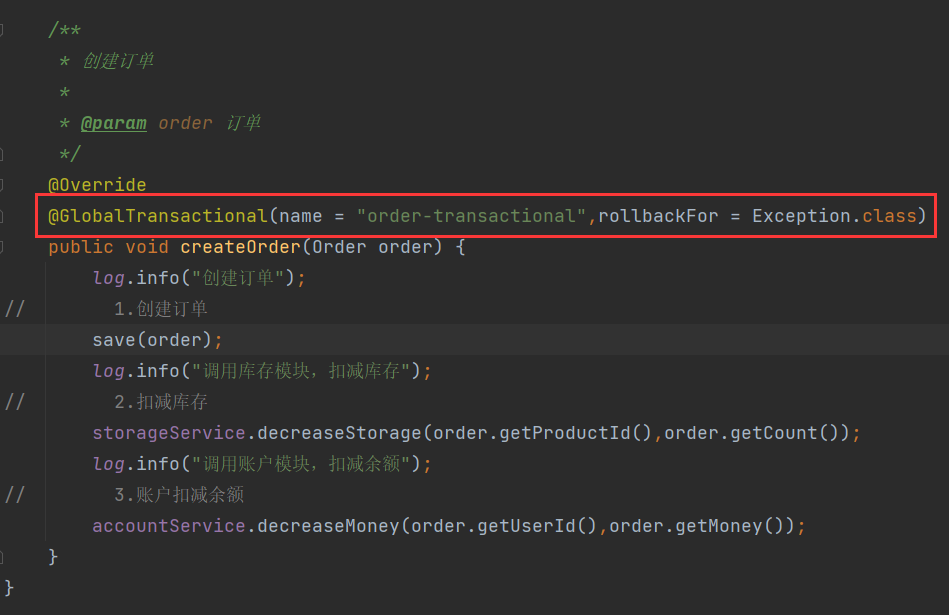
出现以下错误表示数据库字段transaction_service_group指定的长度太短,可以修改对应的字段长度。

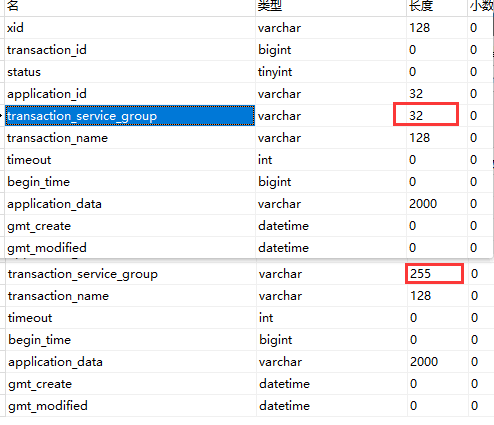
11.29加密
11.29.1对称加密
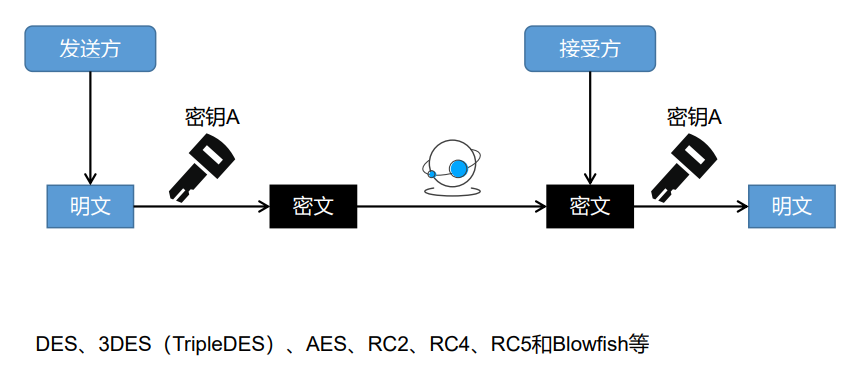
对称加密
整个加密过程中只使用一个密钥。所谓对称其实就是使用一把密钥加密,并使用同一把密钥进行解密。对称加密由于加解和解密使用的是同一个密钥算法,故而在加解密的过程中速度比较快,适合于数据量比较大的加解密。
对称加密的优点:
算法公开、计算量小、由于使用统一密钥算法所以加密解密速度比较快,适合于数据量比较大的加解密。
对称加密的缺点:
密钥的管理与分配存在风险,一旦泄露,密文内容就会被外人破解;另外,用户每次使用对称加密算法时,都需要使用其他人不知道的独一密钥,这会使得收、发双方所拥有的钥匙数量巨大,密钥管理成为双方的负担。
常用的对称加密算法:
DES、3DES、AES、TDEA、Blowfish、RC2、RC4 和 RC5 等
对称算法适用场景:
鉴于其具有更快的运算速度,对称加密在现代计算机系统中被广泛用于保护信息。例如,美国政府使用高级加密标准(AES)来加密和分类和感信息。AES取代了之前的数据加密标准(DES)。
11.29.2非对称加密
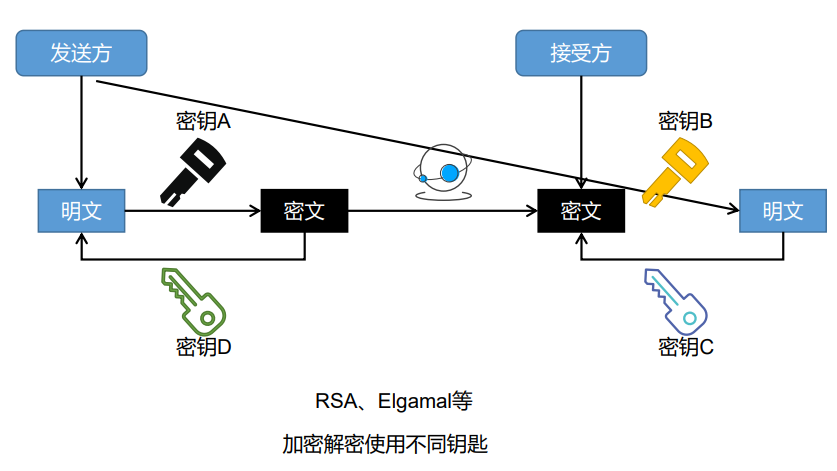
非对称加密:
在加密过程中,使用密钥对(分别是私钥和公钥。公钥可以对外发布,人人可见。而私钥则自己保管,不外泄)中的一个密钥进行加密,另一个密钥进行解密。比如用公钥加密,那么用私钥解密;用私钥加密,就用公钥来解密。由于加密和解密使用了两个不同的密钥,这就是非对称加密“非对称”的原因。
非对称加密优点:
安全性高,解决了对称加密中密钥管理和分发可能存在不安全的问题。
非对称加密缺点:
加密和解密花费时间长、速度慢,并且由于它们的密钥长度非常长,因此需要更多的计算资源,只适合对少量数据进行加密。
常用的非对称加密算法:
RSA、Elgamal、Rabin、D-H、ECC(椭圆曲线加密算法)等
非对称加密适用场景:
非对称加密通常用于大量用户需要同时加密和解密消息或数据的系统中,尤其是在运算速度和计算资源充足的情况下。该系统的一个常用案例就是加密电子邮件,其中公钥可以用于加密消息,私钥可以用于解密。
问题:为什么私钥可以解密被公钥加密的数据?
答:欧拉函数 欧拉定理 互为质数。具体的咱也不懂。需要注意的是,在许多应用中,对称和非对称加密会一起使用。这种混合系统的典型案例是安全套接字层(SSL)和传输层安全(TLS)加密协议,该协议被用于在因特网内提供安全通信。SSL协议现在被认为是不安全的,应该停止使用。相比之下,TLS协议目前被认为是安全的,并且已被主流的Web浏览器所广泛使用。
11.29.3公钥&私钥&加密&签名&验签
- 公钥&私钥
公钥和私钥是一个相对概念 它们的公私性是相对于生成者来说的。
一对密钥生成后,保存在生成者手里的就是私钥, 生成者发布出去大家用的就是公钥。
- 加密
加密是指:我们使用一对公私钥中的一个密钥来对数据进行加密,而使用另一个密钥来进行解密的技术。
公钥和私钥都可以用来加密,也都可以用来解密。 但这个加解密必须是一对密钥之间的互相加解密,否则不能成功。
加密的目的是: 为了确保数据传输过程中的不可读性,就是不想让别人看到。
- 签名
给我们将要发送的数据,做上一个唯一签名(类似于指纹),用来互相验证接收方和发送方的身份;
在验证身份的基础上再验证一下传递的数据是否被篡改过。因此使用数字签名可以用来达到数据的明文传输。
- 验签
支付宝为了验证请求的数据是否商户本人发的, 商户为了验证响应的数据是否支付宝发的。
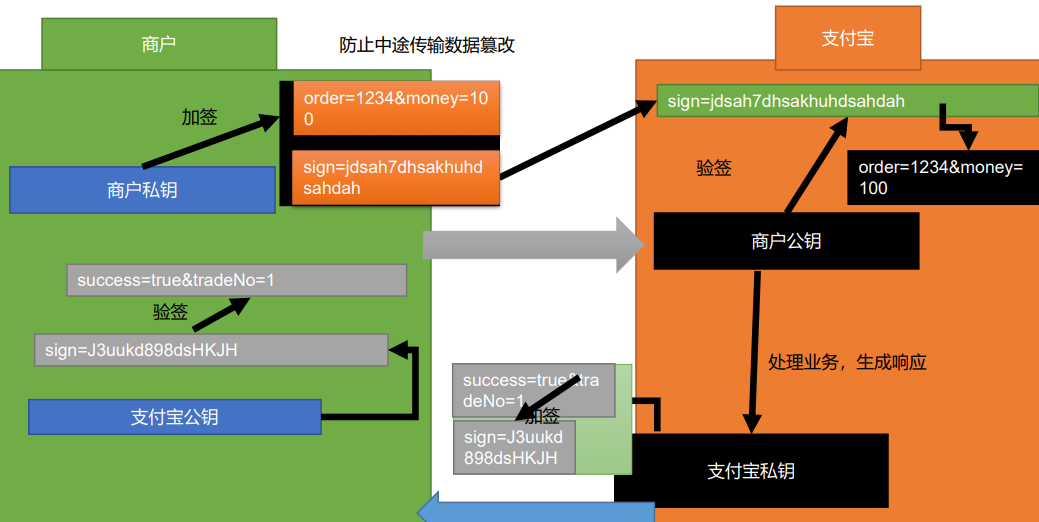
11.30支付宝沙箱环境
沙箱环境是支付宝开放平台为开发者提供的与生产环境完全隔离的联调测试环境,开发者在沙箱环境中完成的接口调用不会对生产环境中的数据造成任何影响。
沙箱为开放的产品提供有限功能范围的支持,可以覆盖产品的绝大部分核心链路和对接逻辑,便于开发者快速学习/尝试/开发/调试。
沙箱环境会自动完成或忽略一些场景的业务门槛,例如:开发者无需等待产品开通,即可直接在沙箱环境调用接口,使得开发集成工作可以与业务流程并行,从而提高项目整体的交付效率。
注意:
- 由于沙箱环境并非 100% 与生产环境一致,接口的实际响应逻辑请以生产环境为准,沙箱环境开发调试完成后,仍然需要在生产环境进行测试验收。
- 沙箱环境拥有完全独立的数据体系,沙箱环境下返回的数据(例如用户 ID 等)在生产环境中都是不存在的,开发者不可将沙箱环境返回的数据与生产环境中的数据混淆
沙箱应用:https://openhome.alipay.com/develop/sandbox/app
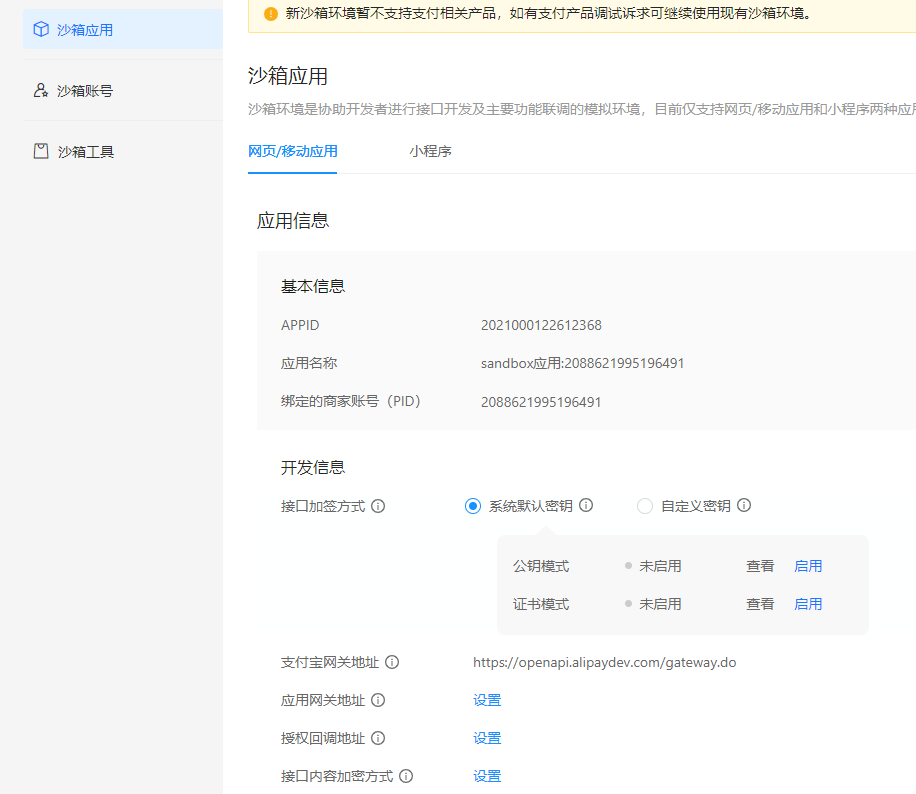
11.31内网穿透
11.31.1内网穿透概念
内网,就是在公司或者家庭内部,建立的局域网络,可以实现多台电脑之间的资源共享,包括设备、资料、数据等。而外网则是通过一个网关与其它的网络系统连接,相对于内网而言,这种网络系统称之为外部网络,常见的就是我们日常使用的互联网。
一般而言,在没有固定公网IP的情况下,外网设备无法直接访问内网设备。而内网穿透技术,顾名思义就是能让外网的设备找到处于内网的设备,从而实现数据通信。
11.31.2内网穿透的原理
内网穿透,又称为NAT穿透。NAT背后的设备,它们的主要特点是 ,可以访问外网,但不能被外网设备有效访问。基于这一特点,NAT穿透技术是让NAT背后的设备,先访问指定的外网服务器,由指定的外网服务器搭建桥梁,打通内、外网设备的访问通道,实现外网设备访问到内网设备。
该技术除了可以访问隐藏在NAT后的设备,同样可以穿透防火墙。这是因为防火墙一般只拦截了入站没有拦截出站,所以也可以让防火墙内的设备对外提供服务。
由于内网设备并不是与外网设备直接相连,所以在安全性上是毋庸置疑的,内网穿透可以说是安全与效率兼得。

11.31.3内网穿透的应用场景
- 开发测试(微信、支付宝)
- 智慧互联
- 远程控制
- 私有云
11.31.4测试使用cpolar实现内网穿透
cpolar官网
下载
cpolar客户端,登录并创建隧道本地地址就表示当前映射的为127.0.0.1:8080,本机的项目地址需要运行在当前路径下
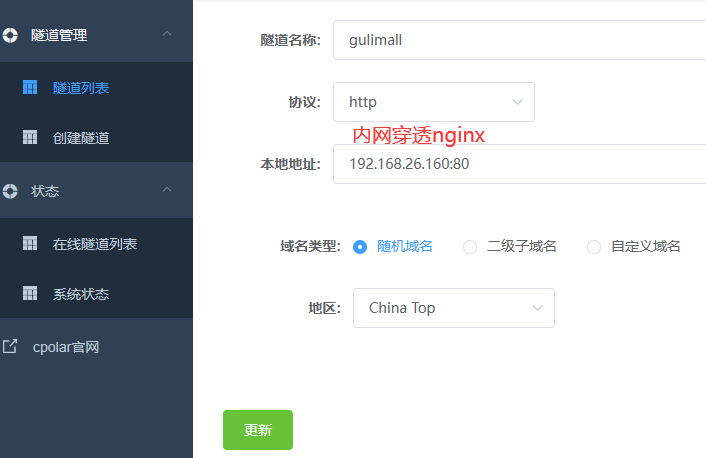
生成的隧道:

- 如果使用的是支付宝的支付成功跳转页面,就将生成的公网地址添加到SDK的配置当中当中
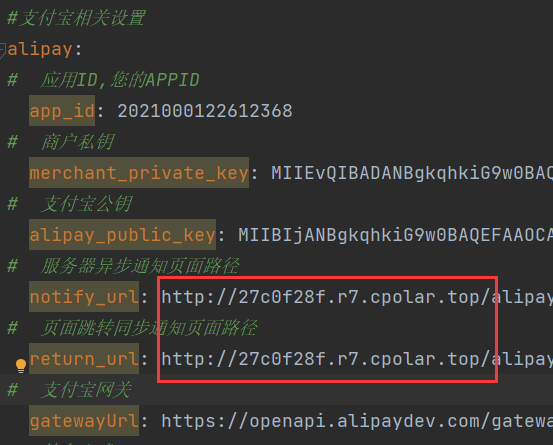
11.31.5内网穿透联调
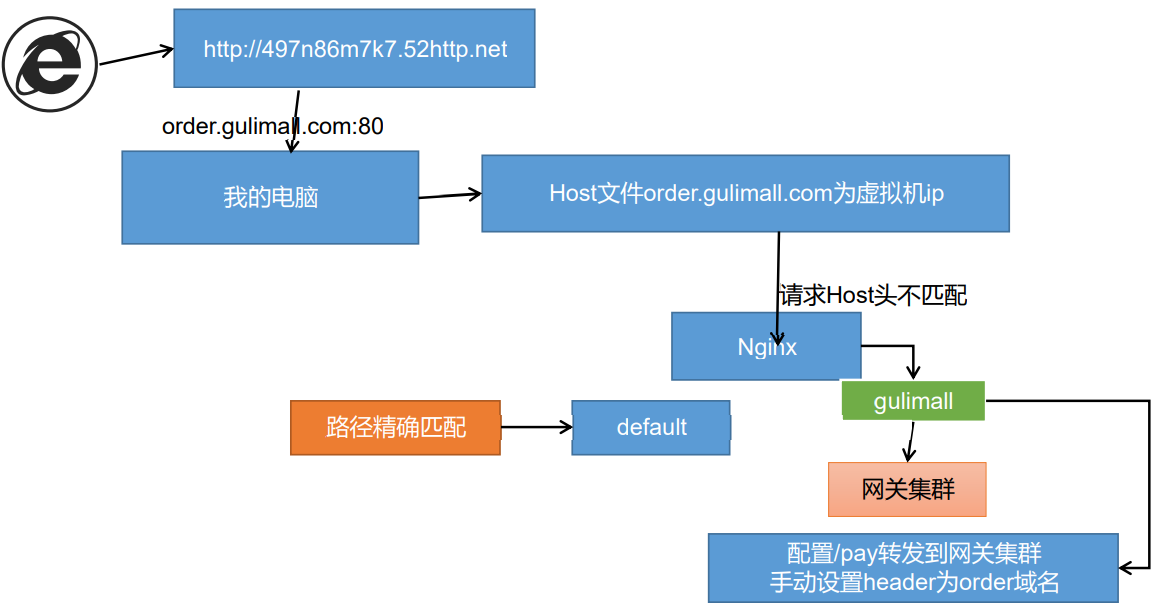
由于nginx做反向代理的时候是需要获取到请求的Host地址的,以此来反向代理给网关:
下面就是浏览器请求头中携带Host,反向代理给网关

但是通过内网穿透请求并不会携带Host,造成请求Host头不匹配,所以就需要进行内网穿透联调
所有携带/payed/notify的请求都会使用指定的Host,反向代理到网关。

同时server_name中需要添加内网穿透提供的域名,即寻找域名下的/payed/notify
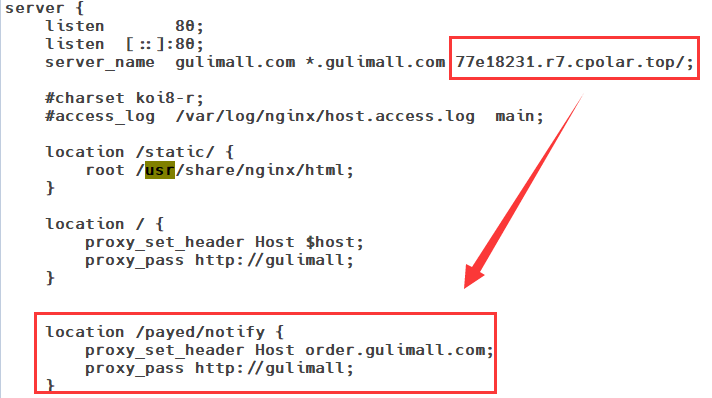
整体思路就是,将nginx的80端口做内网穿透,生成对应的域名。然后在nginx当中将域名为服务名,并监听对应域名下的/payed/notify请求,对该请求指定对应的Host,通过网关发送到对应的服务。
11.32支付宝支付
前提说明:使用支付宝支付提供的支付成功跳转页面,和支付宝异步通知需要进行内网穿透,因为支付宝的服务器异步通知页面路径和页面跳转同步通知页面路径必须外网可以正常访问

11.32.1配置说明
- 进入支付宝开放平台
- 找到对应的API
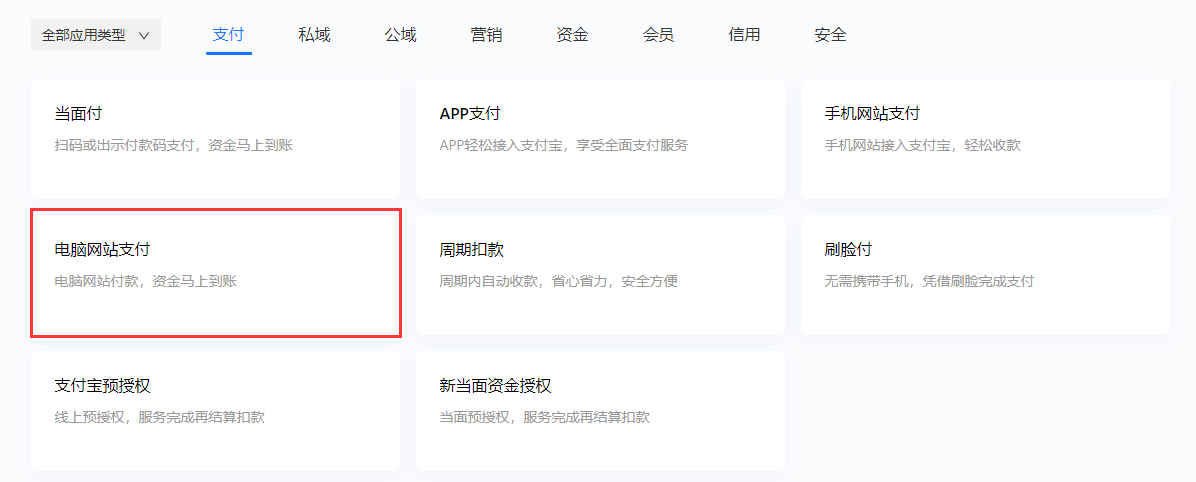
- 获取到对应的SDK和Demo
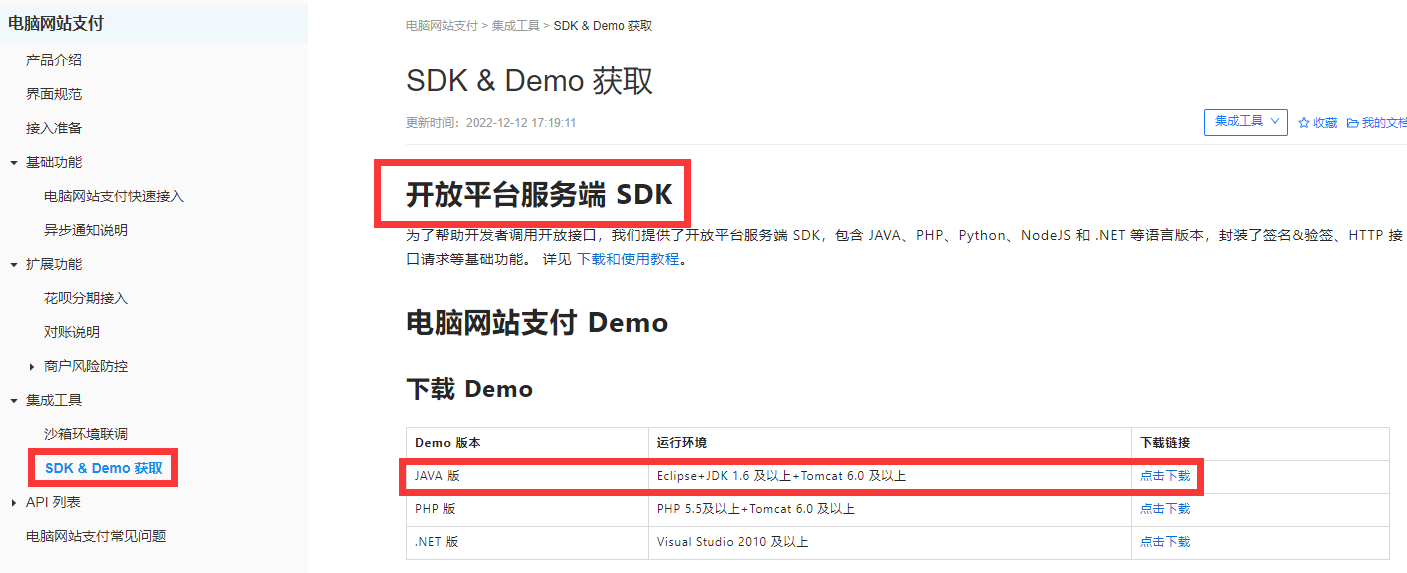
- 下载密钥工具,生成公钥、私钥
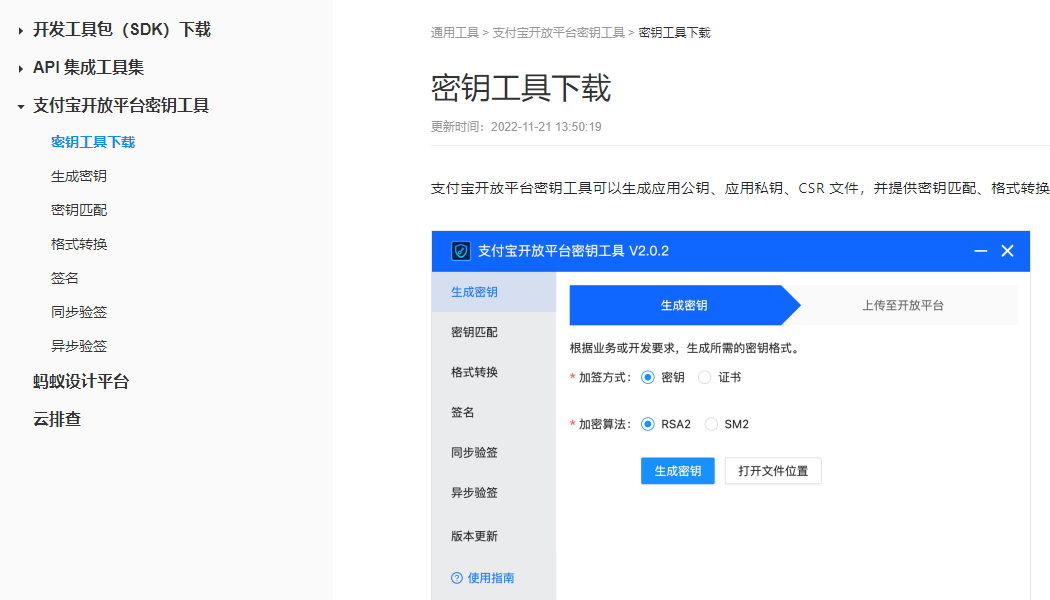
- 将私钥放入到Demo中的
AlipayConfig中
- 将公钥放入到沙箱应用当中
选择接口加签方式未自定义密钥
填写公钥
- 填写公钥后生成对应的支付宝公钥
- 将支付宝公钥放入Demo
商户私钥和公钥:私钥在Demo中,公钥在沙箱应用中生成对应的支付宝公钥。
支付宝私钥和公钥:公钥由商户的公钥生成,私钥由支付宝管理。
11.32.2业务搭建
- 使用支付宝支付对应的api
https://opendocs.alipay.com/open/54/103419
- 引入对应的依赖
<dependency>
  <groupId>com.alipay.sdk</groupId>
  <artifactId>alipay-sdk-java</artifactId>
  <version>4.35.45.ALL</version>
</dependency>- 引入支付数据VO
/**
 * 支付数据VO
 *
 * @author Xu Huaiang
 * @date 2023/02/11
 */
@Data
@Accessors(chain = true)
public class PayVO {

    private String out_trade_no; // 商户订单号 必填
    private String subject; // 订单名称 必填
    private String total_amount;  // 付款金额 必填
    private String body; // 商品描述 可空
    private String timeout; //支付超时时间
}- 抽取支付宝支付类
抽取的方法都是从支付页面来的

import com.alipay.api.AlipayApiException;
import com.alipay.api.AlipayClient;
import com.alipay.api.DefaultAlipayClient;
import com.alipay.api.request.AlipayTradePagePayRequest;
import com.xha.gulimall.order.vo.PayVO;
import lombok.Data;
import org.springframework.boot.context.properties.ConfigurationProperties;
import org.springframework.stereotype.Component;

@ConfigurationProperties(prefix = "alipay")
@Component
@Data
public class AlipayTemplate {

    // 应用ID,您的APPID,收款账号既是您的APPID对应支付宝账号
    public String app_id;

    // 商户私钥,您的PKCS8格式RSA2私钥
    public String merchant_private_key;

    // 支付宝公钥,查看地址:https://openhome.alipay.com/platform/keyManage.htm 对应APPID下的支付宝公钥。
    public String alipay_public_key;

    // 服务器[异步通知]页面路径  需http://格式的完整路径,不能加?id=123这类自定义参数,必须外网可以正常访问
    // 支付宝会悄悄的给我们发送一个请求,告诉我们支付成功的信息
    public String notify_url;

    // 页面跳转同步通知页面路径 需http://格式的完整路径,不能加?id=123这类自定义参数,必须外网可以正常访问
    //同步通知,支付成功,一般跳转到成功页
    public String return_url;

    // 签名方式
    private String sign_type;

    // 字符编码格式
    private String charset;

    // 支付宝网关; https://openapi.alipaydev.com/gateway.do
    public String gatewayUrl;

    public String pay(PayVO vo) throws AlipayApiException {

        //AlipayClient alipayClient = new DefaultAlipayClient(AlipayTemplate.gatewayUrl, AlipayTemplate.app_id, AlipayTemplate.merchant_private_key, "json", AlipayTemplate.charset, AlipayTemplate.alipay_public_key, AlipayTemplate.sign_type);
        //1、根据支付宝的配置生成一个支付客户端
        AlipayClient alipayClient = new DefaultAlipayClient(gatewayUrl,
                app_id, merchant_private_key, "json",
                charset, alipay_public_key, sign_type);

        //2、创建一个支付请求 //设置请求参数
        AlipayTradePagePayRequest alipayRequest = new AlipayTradePagePayRequest();
        alipayRequest.setReturnUrl(return_url);
        alipayRequest.setNotifyUrl(notify_url);

        //商户订单号,商户网站订单系统中唯一订单号,必填
        String out_trade_no = vo.getOut_trade_no();
        //付款金额,必填
        String total_amount = vo.getTotal_amount();
        //订单名称,必填
        String subject = vo.getSubject();
        //商品描述,可空
        String body = vo.getBody();
        //支付超时时间
        String timeout = vo.getTimeout();

        alipayRequest.setBizContent("{\"out_trade_no\":\"" + out_trade_no + "\","
                + "\"total_amount\":\"" + total_amount + "\","
                + "\"subject\":\"" + subject + "\","
                + "\"body\":\"" + body + "\","
                + "\"timeout_express\":\"" + timeout + "\","
                + "\"product_code\":\"FAST_INSTANT_TRADE_PAY\"}");

        String result = alipayClient.pageExecute(alipayRequest).getBody();

        //会收到支付宝的响应,响应的是一个页面,只要浏览器显示这个页面,就会自动来到支付宝的收银台页面
        System.out.println("支付宝的响应:" + result);

        return result;

    }
}
对应的配置信息在配置文件中
#支付宝相关设置
alipay:
#  应用ID,您的APPID
  app_id: 2021000122612368
#  商户私钥
  merchant_private_key:
#  支付宝公钥
  alipay_public_key:
#  服务器异步通知页面路径
  notify_url: http://77e18231.r7.cpolar.top/payed/notify
#  页面跳转同步通知页面路径
  return_url: http://order.gulimall.com/orderlist.html
#  支付宝网关
  gatewayUrl: https://openapi.alipaydev.com/gateway.do
#  签名方式
  sign_type: RSA2
#  字符编码格式
charset: utf-8- 控制器
import com.alipay.api.AlipayApiException;
import com.xha.gulimall.common.to.order.OrderTO;
import com.xha.gulimall.order.config.AlipayTemplate;
import com.xha.gulimall.order.entity.OrderItemEntity;
import com.xha.gulimall.order.service.OrderItemService;
import com.xha.gulimall.order.service.OrderService;
import com.xha.gulimall.order.vo.PayVO;
import org.springframework.http.MediaType;
import org.springframework.stereotype.Controller;
import org.springframework.web.bind.annotation.GetMapping;
import org.springframework.web.bind.annotation.RequestParam;
import org.springframework.web.bind.annotation.ResponseBody;

import javax.annotation.Resource;
import java.math.BigDecimal;

@Controller
public class PayController {

    @Resource
    private AlipayTemplate alipayTemplate;

    @Resource
    private OrderService orderService;

    @Resource
    private OrderItemService orderItemService;

    @ResponseBody
    @GetMapping(value = "/aliPayOrder",produces = MediaType.TEXT_HTML_VALUE)
    public String payOrder(@RequestParam("orderSn") String orderSn) throws AlipayApiException {
//        1.根据订单号获取到当前订单信息
        OrderTO order = orderService.getOrderById(orderSn);
//        2.查询订单项信息
        OrderItemEntity orderItem = orderItemService.getOrderItemById(orderSn);
        PayVO payVO = new PayVO();
        payVO.setOut_trade_no(orderSn)
                .setTotal_amount(order.getPayAmount().setScale(2, BigDecimal.ROUND_UP).toString())
                .setSubject(orderItem.getSkuName())
                .setBody(orderItem.getSkuAttrsVals());
                .setTimeout("1m");
        String pay = alipayTemplate.pay(payVO);
        return pay;
    }
}
11.32.3测试
- 点击支付宝支付跳转到支付宝登录页面

- 使用沙箱账号进行登录
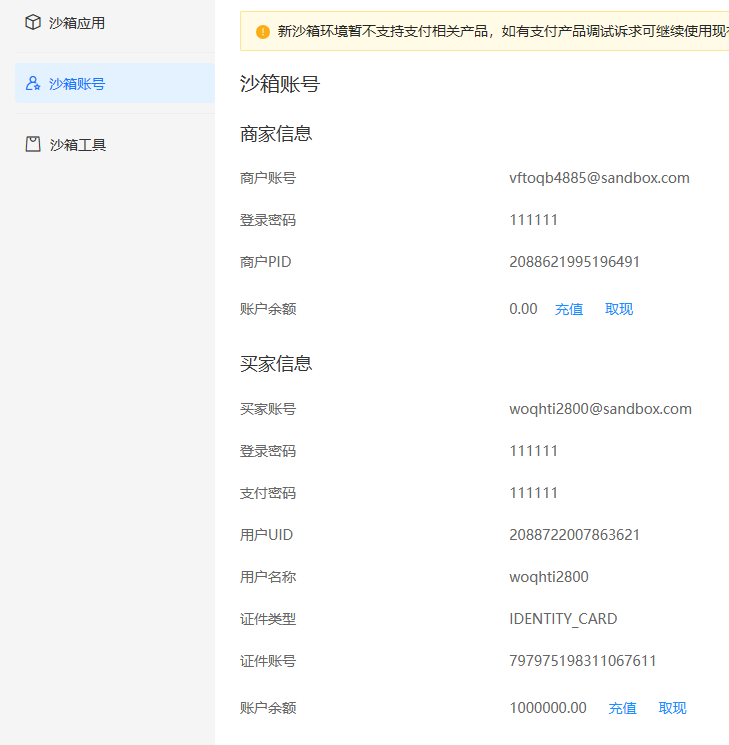
- 跳转到付款页面
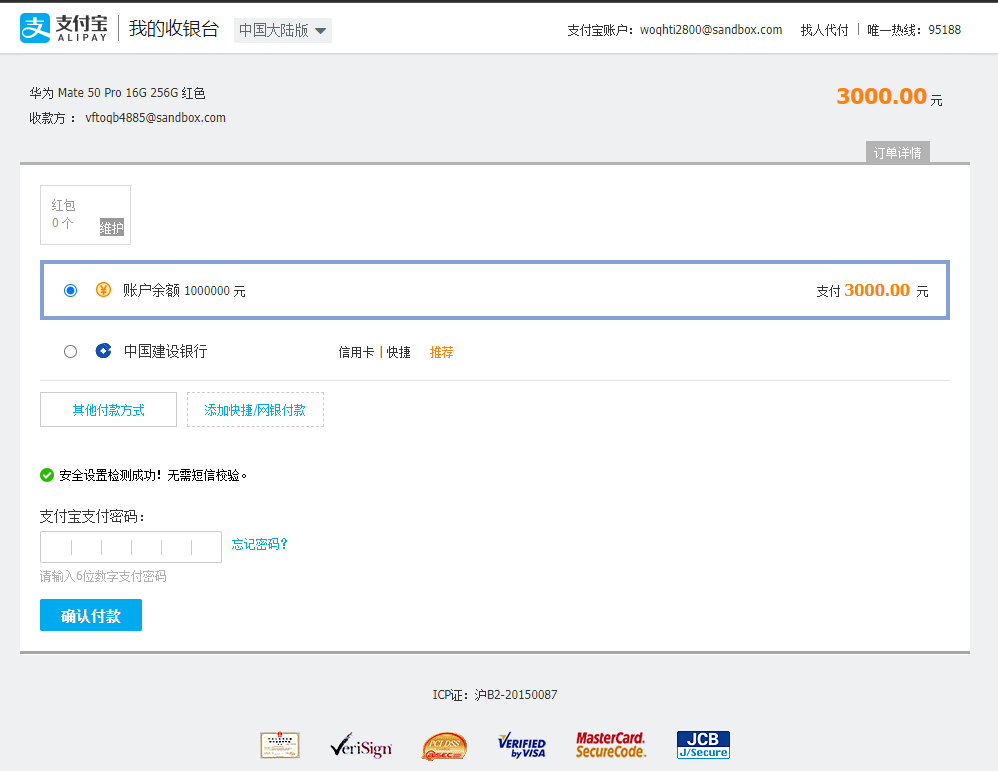
- 支付成功,跳转到指定的同步通知页面

- 沙箱账号余额改变
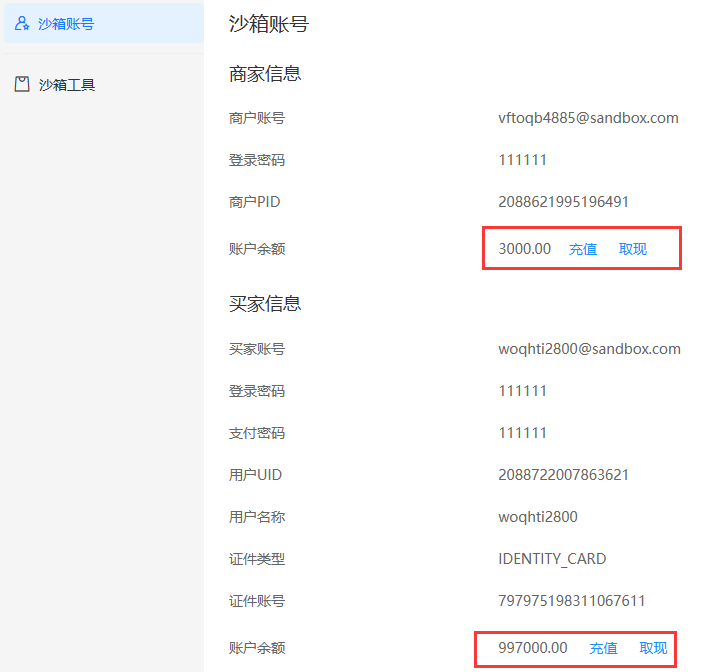
11.32.4支付宝异步通知和验签
https://opendocs.alipay.com/open/270/105902#%E5%BC%82%E6%AD%A5%E9%80%9A%E7%9F%A5%E5%8F%82%E6%95%B0
- 异步通知说明
对于 PC 网站支付的交易,在用户支付完成之后,支付宝会根据 API 中商家传入的 notify_url,通过 POST 请求的形式将支付结果作为参数通知到商家系统。
- 异步通知特性
在进行异步通知交互时,如果支付宝收到的应答不是 success ,支付宝会认为通知失败,会通过一定的策略定期重新发起通知。重试逻辑为:当未收到 success 时 立即尝试重发 3 次通知,若 3 次仍不成功,则后续通知的间隔频率为:4m、10m、10m、1h、2h、6h、15h。
商家设置的异步地址(notify_url)需保证无任何字符,如空格、HTML 标签,且不能重定向。(如果重定向,支付宝会收不到 success 字符,会被支付宝服务器判定为该页面程序运行出现异常,而重发处理结果通知)
支付宝是用 POST 方式发送通知信息,商户获取参数的方式如下:request.Form("out_trade_no")、$_POST['out_trade_no']。
支付宝针对同一条异步通知重试时,异步通知参数中的 notify_id 是不变的。
- 异步通知返回的参数信息
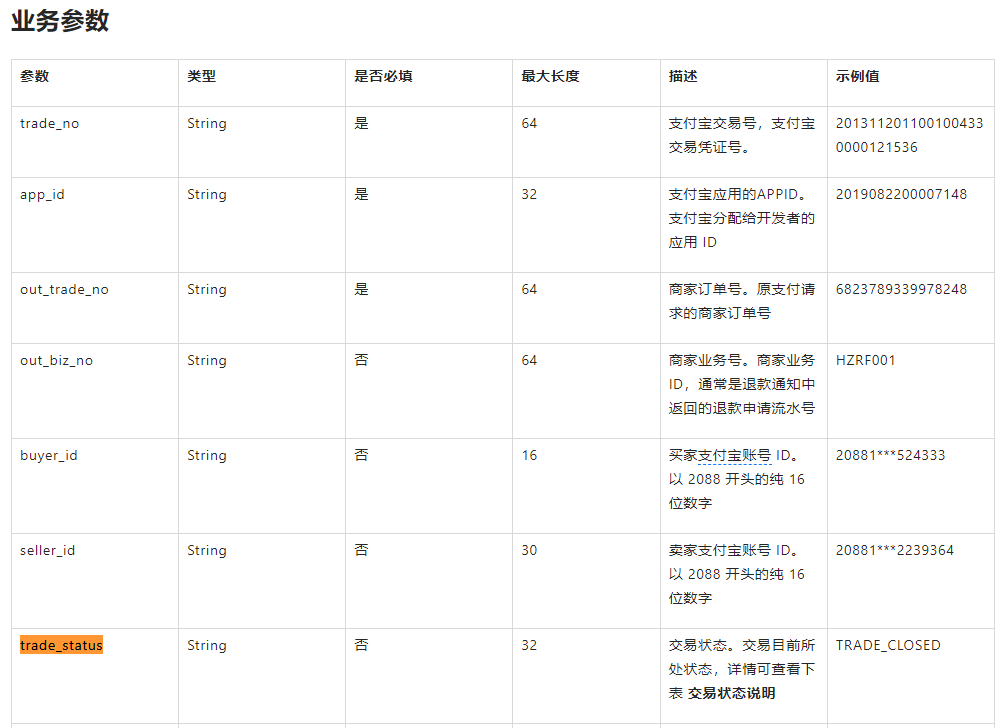
- 配置好异步通知请求路径,返回success

import org.springframework.web.bind.annotation.PostMapping;
import org.springframework.web.bind.annotation.RestController;

import javax.servlet.http.HttpServletRequest;
import java.util.Map;

@RestController
public class OrderPayedListener {

    /**
     * 支付异步通知
     * 对于 PC 网站支付的交易,在用户支付完成之后,
     * 支付宝会根据 API 中商家传入的 notify_url,
     * 通过 POST 请求的形式将支付结果作为参数通知到商家系统。
     *
     * @param request 请求
     * @return {@link String}
     */
    @PostMapping("/payed/notify")
    public String handleAlipayed(HttpServletRequest request){
        Map<String, String[]> parameterMap = request.getParameterMap();
        for (String key : parameterMap.keySet()) {
            String value = request.getParameter(key);
            System.out.println("参数名:" + key + ",参数值:" + value);
        }
        return "success";
    }
}
查看支付宝返回的参数
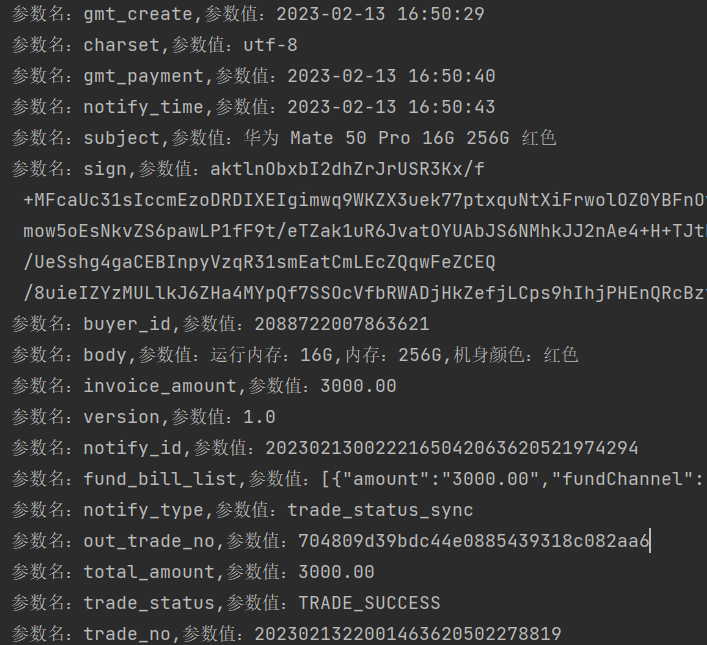
- 封装支付宝异步通知的返回对象
import lombok.Data;

import java.util.Date;

@Data
public class AliPayAsyncNotifyVO {
    private String gmt_create;
    private String charset;
    private String gmt_payment;
    @DateTimeFormat(pattern = "yyyy-MM-dd HH:mm:ss")
    private Date notify_time;
    private String subject;
    private String sign;
    private String buyer_id;//支付者的id
    private String body;//订单的信息
    private String invoice_amount;//支付金额
    private String version;
    private String notify_id;//通知id
    private String fund_bill_list;
    private String notify_type;//通知类型; trade_status_sync
    private String out_trade_no;//订单号
    private String total_amount;//支付的总额
    private String trade_status;//交易状态  TRADE_SUCCESS
    private String trade_no;//流水号
    private String auth_app_id;//
    private String receipt_amount;//商家收到的款
    private String point_amount;//
    private String app_id;//应用id
    private String buyer_pay_amount;//最终支付的金额
    private String sign_type;//签名类型
    private String seller_id;//商家的id
}- 支付宝异步响应验签业务代码
在demo中的notify_url.jsp当中
其中的AlipayConfig已经被我封装为Alipaytemplate
//获取支付宝POST过来反馈信息
Map<String,String> params = new HashMap<String,String>();
Map<String,String[]> requestParams = request.getParameterMap();
for (Iterator<String> iter = requestParams.keySet().iterator(); iter.hasNext();) {
   String name = (String) iter.next();
   String[] values = (String[]) requestParams.get(name);
   String valueStr = "";
   for (int i = 0; i < values.length; i++) {
      valueStr = (i == values.length - 1) ? valueStr + values[i]
            : valueStr + values[i] + ",";
   }
   //乱码解决,这段代码在出现乱码时使用
   valueStr = new String(valueStr.getBytes("ISO-8859-1"), "utf-8");
   params.put(name, valueStr);
}

boolean signVerified = AlipaySignature.rsaCheckV1(params, AlipayConfig.alipay_public_key, AlipayConfig.charset, AlipayConfig.sign_type); //调用SDK验证签名
修改后的异步通知控制类:
import com.alipay.api.AlipayApiException;
import com.alipay.api.internal.util.AlipaySignature;
import com.xha.gulimall.order.config.AlipayTemplate;
import com.xha.gulimall.order.service.OrderService;
import com.xha.gulimall.order.vo.AliPayAsyncNotifyVO;
import org.springframework.web.bind.annotation.PostMapping;
import org.springframework.web.bind.annotation.RestController;

import javax.annotation.Resource;
import javax.servlet.http.HttpServletRequest;
import java.io.UnsupportedEncodingException;
import java.util.HashMap;
import java.util.Iterator;
import java.util.Map;

@RestController
public class OrderPayedListener {

    @Resource
    private OrderService orderService;

    @Resource
    private AlipayTemplate alipayTemplate;

    /**
     * 处理支付异步通知
     * 对于 PC 网站支付的交易,在用户支付完成之后,
     * 支付宝会根据 API 中商家传入的 notify_url,
     * 通过 POST 请求的形式将支付结果作为参数通知到商家系统。
     *
     * @return {@link String}
     */
    @PostMapping("/payed/notify")
    public String handleAliPayAsyncNotifyResponse(AliPayAsyncNotifyVO aliPayAsyncNotifyVO, HttpServletRequest request) throws AlipayApiException, UnsupportedEncodingException {
//获取支付宝POST过来反馈信息
        Map<String, String> params = new HashMap<String, String>();
        Map<String, String[]> requestParams = request.getParameterMap();
        for (Iterator<String> iter = requestParams.keySet().iterator(); iter.hasNext(); ) {
            String name = (String) iter.next();
            String[] values = (String[]) requestParams.get(name);
            String valueStr = "";
            for (int i = 0; i < values.length; i++) {
                valueStr = (i == values.length - 1) ? valueStr + values[i]
                        : valueStr + values[i] + ",";
            }
            //乱码解决,这段代码在出现乱码时使用
            valueStr = new String(valueStr.getBytes("ISO-8859-1"), "utf-8");
            params.put(name, valueStr);
        }

        boolean signVerified = AlipaySignature.rsaCheckV1(params, alipayTemplate.getAlipay_public_key(),
                alipayTemplate.getCharset(),
                alipayTemplate.getSign_type()); //调用SDK验证签名
         if (signVerified){
//             验证签名成功
             return orderService.handleAliPayAsyncNotifyResponse(aliPayAsyncNotifyVO);
         }else{
             return "error";
         }
    }
}
异步通知业务逻辑类:
    /**
     * 处理支付宝支付异步通知响应
     *
     * @param aliPayAsyncNotifyVO 请求
     * @return {@link String}
     */
    @Override
    public String handleAliPayAsyncNotifyResponse(AliPayAsyncNotifyVO aliPayAsyncNotifyVO) {
//        1.保存交易流水
        PaymentInfoEntity paymentInfoEntity = new PaymentInfoEntity();
        paymentInfoEntity.setOrderSn(aliPayAsyncNotifyVO.getOut_trade_no())
                .setAlipayTradeNo(aliPayAsyncNotifyVO.getTrade_no())
                .setPaymentStatus(aliPayAsyncNotifyVO.getTrade_status())
                .setCallbackTime(aliPayAsyncNotifyVO.getNotify_time());
        paymentInfoService.save(paymentInfoEntity);
        if (aliPayAsyncNotifyVO.getTrade_status().equals("TRADE_SUCCESS") ||
                aliPayAsyncNotifyVO.getTrade_status().equals("TRADE_FINISHED")) {
//        2.支付成功,修改订单状态
            LambdaUpdateWrapper<OrderEntity> updateWrapper = new LambdaUpdateWrapper<>();
            updateWrapper.eq(OrderEntity::getOrderSn, aliPayAsyncNotifyVO.getOut_trade_no())
                    .set(OrderEntity::getStatus, OrderStatusEnum.PAYED.getCode());
            orderService.update(updateWrapper);
        }
        return "success";
    }
11.32.5支付宝收单问题
订单在支付页,不支付,一直刷新,订单过期了才支付,订单状态改为已支付了,但是库存释放了。
使用支付宝自动收单功能解决。只要一段时间不支付,就不能支付了。

由于时延等问题。订单解锁完成,正在解锁库存的时候,异步通知才到
订单解锁,手动调用收单
网络阻塞问题,订单支付成功的异步通知一直不到达
查询订单列表时,ajax获取当前未支付的订单状态,查询订单状态时,再获取一下支付宝 此订单的状态
其他各种问题
每天晚上闲时下载支付宝对账单,一一进行对账
11.33定时任务
11.33.1Cron表达式
cron 表达式语法
cron表达式是用来设置定时任务执行时间的表达式。
很多情况下我们可以用 : 在线Cron表达式生成器 来帮助我们理解cron表达式和书写cron表达式。

如 0/5 * * * * ? *,cron表达式由七部分组成,中间由空格分隔,这七部分从左往右依次是:
- 秒(0~59)
- 分钟(0~59)
- 小时(0~23)
- 日期(1~月的最后一天)
- 月份(1~12)
- 星期(1~7)
- 年份(一般不设置)
通用特殊字符:, - * / (可以在任意部分使用)
*:星号表示任意值,例如
* * * * * ?表示 “ 每年每月每天每时每分每秒 ” 。
, :逗号表示枚举,可以用来定义列表,例如 :
1,2,3 * * * * ?表示 “ 每年每月每天每时每分的每个第1秒,第2秒,第3秒 ” 。
-:定义范围,例如:
1-3 * * * * ?表示 “ 每年每月每天每时每分的第1秒至第3秒 ”。
/:步长,每隔多少,例如
5/10 * * * * ?表示 “ 每年每月每天每时每分,从第5秒开始,每10秒一次 ” 。即 “ / ” 的左侧是开始值,右侧是间隔。如果是从 “ 0 ” 开始的话,也可以简写成 “ /10 ”
日期部分还可允许特殊字符: ? L W
星期部分还可允许的特殊字符: ? L #
?:只可用在日期和星期部分。表示没有具体的值,使用?要注意冲突。日期和星期两个部分如果其中一个部分设置了值,则另一个必须设置为 “ ? ”。
例如:
0\* * * 2 * ?
 和
0\* * * ? * 2
同时使用?和同时不使用?都是不对的
例如下面写法就是错的
* * * 2 * 2
 和
* * * ? * ?
W(Work Day):只能用在日期中,表示当月中最接近某天的工作日
0 0 0 31W * ?表示最接近31号的工作日,如果31号是星期六,则表示30号,即星期五,如果31号是星期天,则表示29号,即星期五。如果31号是星期三,则表示31号本身,即星期三。
L:表示最后(Last),只能用在日期和星期中
在日期中表示每月最后一天,在一月份中表示31号,在六月份中表示30号
也可以表示每月倒是第N天。例如: L-2表示每个月的倒数第2天
0 0 0 LW * ?
LW可以连起来用,表示每月最后一个工作日,即每月最后一个星期五在星期中表示7即星期六
0 0 0 ? * L
表示每个星期六
0 0 0 ? * 6L
若前面有其他值的话,则表示最后一个星期几,即每月的最后一个星期五
‘#’:只能用在星期中,表示第几个星期几
0 0 0 ? * 6#3
表示每个月的第三个星期五。
11.33.2开启定时任务(Spring定时任务)
- 在启动类上添加
@EnableScheduling注解 - 在定时任务方法上添加
@Scheduled注解,需要填写@Scheduled注解的属性cron表达式
需要注意:Spring的cron表达式不同
1.Spring的定时任务cron只允许有6位,没有年
2.Spring的定时任务cron第六位的周从周一到周天依次是1-7
3.定时任务不应该被阻塞,默认是可以被阻塞的,
解决方案:
1.采用异步编排CompletableFuture的方式多线程执行定时任务。
2.采用@EnableAsync +@Async实现异步任务
测试:定时任务+异步任务实现定时任务不阻塞
@Component
@Slf4j
@EnableScheduling
@EnableAsync
public class HelloSchedule {

    @Async
    @Scheduled(cron = "* * * * * ?")
    public void hello() throws InterruptedException {
        log.info("开始执行定时任务");
        Thread.sleep(3000);
    }
}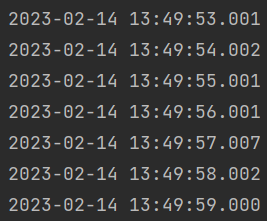
11.33.3分布式下的定时任务问题
采用分布式锁来处理集群模式下的定时任务问题
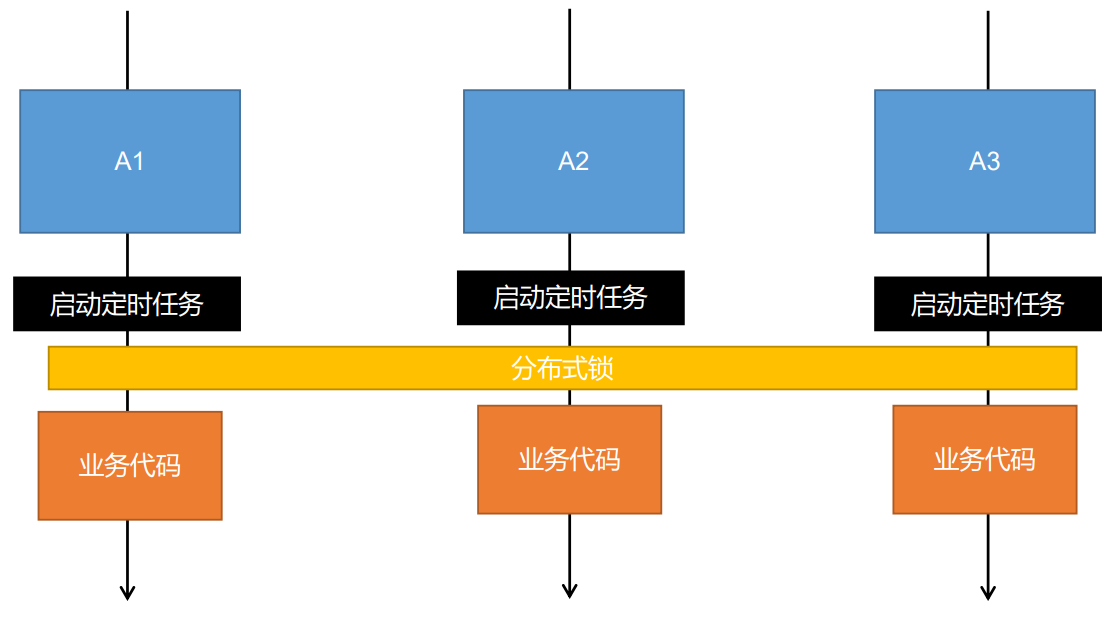
在上架商品之前,获取到分布式锁,并判断缓存是否存在,不存在则重建缓存。
import com.xha.gulimall.seckill.constants.CommonConstants;
import com.xha.gulimall.seckill.service.SeckillScheduledService;
import lombok.extern.slf4j.Slf4j;
import org.redisson.api.RLock;
import org.redisson.api.RedissonClient;
import org.springframework.scheduling.annotation.EnableScheduling;
import org.springframework.scheduling.annotation.Scheduled;
import org.springframework.stereotype.Service;

import javax.annotation.Resource;
import java.util.concurrent.TimeUnit;

@Slf4j
@Service
@EnableScheduling
public class SeckillScheduled {

    @Resource
    private SeckillScheduledService seckillScheduledService;

    @Resource
    private RedissonClient redissonClient;

    /**
     * 上架秒杀商品定时任务
     */
    @Scheduled(cron = "*/3 * * * * *")
    private void uploadSeckillProduct() {
        log.info("开始上架秒杀商品");
//        1.创建分布式锁()
        RLock up_lock = redissonClient.getLock(CommonConstants.UPLOAD_LOCK);
        try {
//        2.获取锁
            up_lock.lock(CommonConstants.LOCK_MAX_TIME, TimeUnit.SECONDS);
            seckillScheduledService.uploadSeckillScheduled();
        } finally {
//        3.释放锁
            up_lock.unlock();
        }
    }

}
11.34分布式唯一ID(雪花算法)
idworker 是一个基于zookeeper和snowflake算法的分布式统一ID生成工具,通过zookeeper自动注册机器(最多1024台),无需手动指定workerId和dataCenterId。
12.具体的业务功能
12.1树形结构的构建
- 数据库设置
==表中设置的有parentId字段,如果一条数据的parentId字段指向除其他数据的id字段,则表明当前数据就是此数据的子数据。==
如果一条数据的parentId不指向任意一个数据的id,则表明此数据为根数据。
- 业务代码
==构建树形结构的关键:使用递归的思想,查找到当前数据的所有子数据以及所有子数据的子数据。==
    /**
     * 得到产品类别树形结构
     *
     * @return {@link List}<{@link CategoryEntity}>
     */
    @Override
    public List<CategoryEntity> getProductCategoryListTree() {
//        1.查询到所有分类列表
        List<CategoryEntity> categorys = categoryDao.selectList(null);
//        2.将所有分类组装为树形结构
//          2.1获取到所有一级分类
        List<CategoryEntity> levelOneCategorys = categorys.stream()
                .filter(category -> category.getParentCid() == NumberConstants.TOP_LEVEL_CATEGORY)
                .collect(Collectors.toList());
//          2.2根据一级分类获取到其子分类
        List<CategoryEntity> productCategoryListTree = levelOneCategorys.stream()
                .map((levelOneCategory) -> {
                    levelOneCategory.setChildren(getChildrenCategory(levelOneCategory, categorys));
                    return levelOneCategory;
                })
//        3.对一级分类进行排序
                .sorted((levelOneCategory1, levelOneCategory2)
                        -> (levelOneCategory1.getSort() == null ? 0 : levelOneCategory1.getSort())
                        - (levelOneCategory2.getSort() == null ? 0 : levelOneCategory2.getSort()))
//        4.将流对象转换为List集合
                .collect(Collectors.toList());
        return productCategoryListTree;
    }

    /**
     * 根据一级分类获取到其子分类
     *
     * @param category     类别
     * @param categoryList 类别列表
     * @return {@link List}<{@link CategoryEntity}>
     */
    public List<CategoryEntity> getChildrenCategory(CategoryEntity category, List<CategoryEntity> categoryList) {
//        1.获取到当前一级分类的子分类
        List<CategoryEntity> childrenCategoryList = categoryList.stream()
                .filter(categorys -> categorys.getParentCid() == category.getCatId())
//        2.递归查询子分类的子分类
                .map((categorys) -> {
                    categorys.setChildren(getChildrenCategory(categorys, categoryList));
                    return categorys;
                })
//        3.对子分类进行排序
                .sorted((category1, category2)
                        -> (category1.getSort()) == null ? 0 : category1.getSort()
                        - (category2.getSort() == null ? 0 : category2.getSort()))
                .collect(Collectors.toList());
        return childrenCategoryList;
    }
测试:
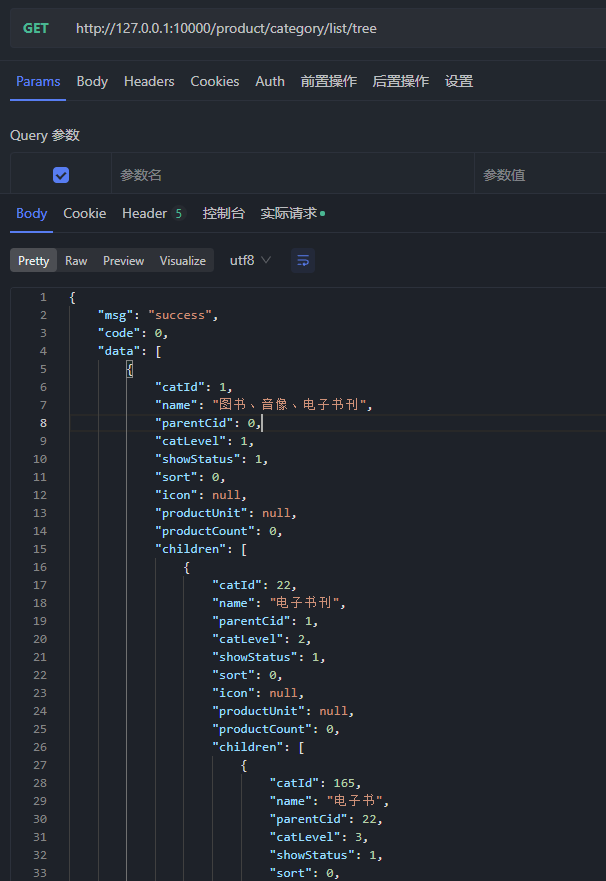
12.2循环查库优化
将在循环中多次操作数据库的操作变成查询数据库一次
将在stream流中操作的循环查库的方式抽取成方法
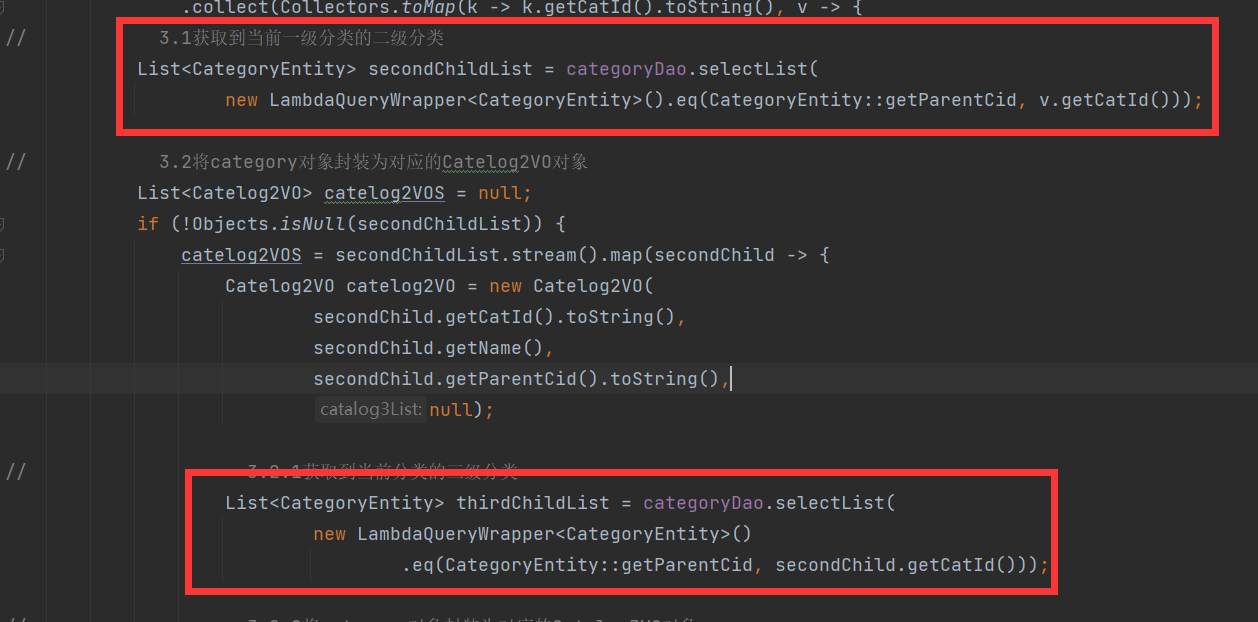
优化前:
    /**
     * 获取到分类的JSON数据
     *
     * @return {@link Map}<{@link String}, {@link Object}>
     */
    @Override
    public Map<String, List<Catelog2VO>> getCatalogJson() {
//        1.查询到所有分类列表
        List<CategoryEntity> categorys = categoryDao.selectList(null);

//        2.获取到所有一级分类
        List<CategoryEntity> levelOneCategorys = categorys.stream()
                .filter(category -> category.getParentCid() == NumberConstants.TOP_LEVEL_CATEGORY)
                .collect(Collectors.toList());

//        3.遍历一级分类,获取到当前一级分类的子分类
        Map<String, List<Catelog2VO>> categoryList = levelOneCategorys
                .stream()
                .collect(Collectors.toMap(k -> k.getCatId().toString(), v -> {
//            3.1获取到当前一级分类的二级分类
            List<CategoryEntity> secondChildList = categoryDao.selectList(
                    new LambdaQueryWrapper<CategoryEntity>().eq(CategoryEntity::getParentCid, v.getCatId()));

//            3.2将category对象封装为对应的Catelog2VO对象
            List<Catelog2VO> catelog2VOS = null;
            if (!Objects.isNull(secondChildList)) {
                catelog2VOS = secondChildList.stream().map(secondChild -> {
                    Catelog2VO catelog2VO = new Catelog2VO(
                            secondChild.getCatId().toString(),
                            secondChild.getName(),
                            secondChild.getParentCid().toString(),
                            null);

//                    3.2.1获取到当前分类的三级分类
                    List<CategoryEntity> thirdChildList = categoryDao.selectList(
                            new LambdaQueryWrapper<CategoryEntity>()
                                    .eq(CategoryEntity::getParentCid, secondChild.getCatId()));

//                    3.2.2将category对象封装为对应的Catelog3VO对象
                    if (!Objects.isNull(thirdChildList)) {
                        List<Catelog2VO.Catelog3VO> catelog3VOS = thirdChildList.stream().map(thirdChild -> {
                            return new Catelog2VO.Catelog3VO(
                                    secondChild.getCatId().toString(),
                                    thirdChild.getCatId().toString(),
                                    thirdChild.getName());
                        }).collect(Collectors.toList());
                        catelog2VO.setCatalog3List(catelog3VOS);
                    }
                    return catelog2VO;
                }).collect(Collectors.toList());
            }
            return catelog2VOS;
        }));

        return categoryList;
    }
优化后:
    /**
     * 获取到分类的JSON数据
     *
     * @return {@link Map}<{@link String}, {@link Object}>
     */
    @Override
    public Map<String, List<Catelog2VO>> getCatalogJson() {
//        1.查询到所有分类列表
        List<CategoryEntity> categorys = categoryDao.selectList(null);

//        2.获取到所有一级分类
        List<CategoryEntity> levelOneCategorys = getChildCategoryList(categorys, Long.valueOf(NumberConstants.TOP_LEVEL_CATEGORY));

//        3.遍历一级分类,获取到当前一级分类的子分类
        Map<String, List<Catelog2VO>> categoryList = levelOneCategorys
                .stream()
                .collect(Collectors.toMap(k -> k.getCatId().toString(), v -> {
//            3.1获取到当前一级分类的二级分类
                    List<CategoryEntity> secondChildList = getChildCategoryList(categorys, v.getCatId());

//            3.2将category对象封装为对应的Catelog2VO对象
                    List<Catelog2VO> catelog2VOS = null;
                    if (!Objects.isNull(secondChildList)) {
                        catelog2VOS = secondChildList.stream().map(secondChild -> {
                            Catelog2VO catelog2VO = new Catelog2VO(
                                    secondChild.getCatId().toString(),
                                    secondChild.getName(),
                                    secondChild.getParentCid().toString(),
                                    null);

//                    3.2.1获取到当前分类的三级分类
                            List<CategoryEntity> thirdChildList = getChildCategoryList(categorys,secondChild.getCatId());

//                    3.2.2将category对象封装为对应的Catelog3VO对象
                            if (!Objects.isNull(thirdChildList)) {
                                List<Catelog2VO.Catelog3VO> catelog3VOS = thirdChildList.stream().map(thirdChild -> {
                                    return new Catelog2VO.Catelog3VO(
                                            secondChild.getCatId().toString(),
                                            thirdChild.getCatId().toString(),
                                            thirdChild.getName());
                                }).collect(Collectors.toList());
                                catelog2VO.setCatalog3List(catelog3VOS);
                            }
                            return catelog2VO;
                        }).collect(Collectors.toList());
                    }
                    return catelog2VOS;
                }));

        return categoryList;
    }

    /**
     * 获取到子分类列表
     *
     * @param categorys
     * @param parentId  父id
     * @return {@link List}<{@link CategoryEntity}>
     */
    private List<CategoryEntity> getChildCategoryList(List<CategoryEntity> categorys, Long parentId) {
        return categorys.stream().filter(category -> {
            return category.getParentCid() == parentId;
        }).collect(Collectors.toList());
    }
优化前:

优化后:

12.3购物车业务
- 业务思路:
==如果当前没有用户登录,就会添加一个临时用户。当临时用户向购物车中添加商品时,就会添加到临时购物车当中。当有用户登录时,临时购物车中的数据就会添加当当前登录用户的购物车当中去。==
- 业务实现步骤:
- 判断当前是登录用户还是临时用户(从session中获取用户),如果没有用户登录就创建cookie,使用临时用户。
- 如果有用户登录,就获取到当前用户的购物车和临时购物车中的数据,判断临时购物车中是否有数据,如果有就再判断用户购物车是否有数据,如果有就合并购物车,如果用户购物车没有,就直接返回临时购物车数据。如果临时购物车中没有数据,再判断用户购物车是否有数据,如果有就直接返回,没有就返回空对象。
- 如果没有用户登录,判断临时购物车是否有数据,如果有就直接返回,没有就返回空对象。
- 代码实现:
    /**
     * 获取到购物车
     *
     * @return {@link CartVO}
     */
    @Override
    public CartVO getCart() throws ExecutionException, InterruptedException {
        CartVO cartVO = new CartVO();
        UserInfoTO userInfoTO = CartInterceptor.threadLocal.get();
//        1.调用getBoundHashOps方法,判断当前是登录用户还是临时用户
        String key = getBoundHashOps().getKey();
//          1.1当前是登录用户
        if (key.equals(CacheConstants.CART_CACHE + userInfoTO.getUserId())) {
//        2.获取到当前登录用户的购物车数据
            List<Object> currentUserCartOrigin = getBoundHashOps().values();

//        3.获取到当前临时用户的购物车数据
            List<Object> temporaryCartListOrigin = stringRedisTemplate.opsForHash().getOperations().boundHashOps(CacheConstants.CART_CACHE + userInfoTO.getUserKey()).values();

            List<CartInfoVO> temporaryCartList = null;
//        4.如果临时购物车的数据不为空,合并购物车
            if (!CollectionUtils.isEmpty(temporaryCartListOrigin)) {
                temporaryCartList = typeSwitch(temporaryCartListOrigin);
//          4.1删除临时购物车缓存
                stringRedisTemplate.delete(CacheConstants.CART_CACHE + userInfoTO.getUserKey());

//        5.如果当前用户的购物车有数据
                if (!CollectionUtils.isEmpty(currentUserCartOrigin)) {
                    List<CartInfoVO> cartInfoList = typeSwitch(currentUserCartOrigin);
//          5.1合并用户购物车和临时购物车
                    for (CartInfoVO cartInfoVO : temporaryCartList) {
                        addToCart(cartInfoVO.getSkuId().toString(), cartInfoVO.getCount());
                    }

                    cartInfoList.addAll(temporaryCartList);
//          5.2得到商品总数量
                    Integer productNums = getProductTotalNum(cartInfoList);
//          5.3得到商品总价格
                    BigDecimal totalPrices = getProductTotalPrice(cartInfoList);
                    cartVO.setItems(cartInfoList)
                            .setProductNum(productNums)
                            .setProductTypeNum(cartInfoList.size())
                            .setTotalAmountPrice(totalPrices);
                } else {
//        6.当前登录的用户首次并没有添加商品到购物车,所以只将临时购物的商品添加进去
                    for (CartInfoVO cartInfoVO : temporaryCartList) {
                        addToCart(cartInfoVO.getSkuId().toString(), cartInfoVO.getCount());
                    }
//          6.1得到商品总数量
                    Integer productNums = getProductTotalNum(temporaryCartList);
//          6.2得到商品总价格
                    BigDecimal totalPrices = getProductTotalPrice(temporaryCartList);
                    cartVO.setItems(temporaryCartList)
                            .setProductNum(productNums)
                            .setProductTypeNum(temporaryCartList.size())
                            .setTotalAmountPrice(totalPrices);
                }
            } else {
//        7.临时购物车的数据为空,当前用户的购物车有数据
                if (!CollectionUtils.isEmpty(currentUserCartOrigin)) {
                    List<CartInfoVO> cartInfoList = typeSwitch(currentUserCartOrigin);
//          7.1得到商品总数量
                    Integer productNums = getProductTotalNum(cartInfoList);
//          7.2得到商品总价格
                    BigDecimal totalPrices = getProductTotalPrice(cartInfoList);
                    cartVO.setItems(cartInfoList)
                            .setProductNum(productNums)
                            .setProductTypeNum(cartInfoList.size())
                            .setTotalAmountPrice(totalPrices);
                }
            }
        } else {
//          1.2当前是临时用户,获取到临时用的购物车列表
            List<Object> temporaryUserCart = getBoundHashOps().values();
            if (!CollectionUtils.isEmpty(temporaryUserCart)) {
                List<CartInfoVO> temporaryUserCartList = typeSwitch(temporaryUserCart);
//          等到商品总数量
                Integer productNums = getProductTotalNum(temporaryUserCartList);
//          得到商品总价格
                BigDecimal totalPrices = getProductTotalPrice(temporaryUserCartList);

                cartVO.setItems(temporaryUserCartList)
                        .setProductNum(productNums)
                        .setProductTypeNum(temporaryUserCart.size())
                        .setTotalAmountPrice(totalPrices);
            }
        }
        return cartVO;
    }

    /**
     * 添加到购物车
     *
     * @param skuId
     * @param num
     * @return {@link CartInfoVO}
     */
    @Override
    public CartInfoVO addToCart(String skuId, Integer num) throws ExecutionException, InterruptedException {

//        1.首先查询缓存中是否存在当前商品
        Object cacheSkuInfo = getBoundHashOps().get(skuId);
//          1.1没有当前商品
        CartInfoVO cartInfoVO = null;
        if (Objects.isNull(cacheSkuInfo)) {
//          1.2获取到商品信息并存入缓存
            cartInfoVO = getCartInfoVO(skuId, num);
        } else {
//          1.3有当前商品:增加商品数量,修改总价格
            cartInfoVO = JSONUtil.toBean(JSONUtil.toJsonStr(cacheSkuInfo), CartInfoVO.class);
            cartInfoVO
                    .setCount(cartInfoVO.getCount() + num)
                    .setTotalPrice(
                            cartInfoVO
                                    .getTotalPrice()
                                    .add(cartInfoVO.getPrice()
                                            .multiply(BigDecimal.valueOf(num))));
//          2.4更新缓存
            getBoundHashOps().put(skuId, JSONUtil.toJsonStr(cartInfoVO));
        }
        return cartInfoVO;
    }

    /**
     * 判断当前用户的登录状态
     * 判断hash结构的key
     *
     * @return {@link String}
     */
    private BoundHashOperations<String, Object, Object> getBoundHashOps() {
        //          1.1判断用户的登录状态,组装key
        String cartStr = "";
        UserInfoTO userInfoTO = CartInterceptor.threadLocal.get();
        if (!Objects.isNull(userInfoTO.getUserId())) {
            cartStr = CacheConstants.CART_CACHE + userInfoTO.getUserId();
        } else {
//          5.2临时用户
            cartStr = CacheConstants.CART_CACHE + userInfoTO.getUserKey();
        }
        return stringRedisTemplate.boundHashOps(cartStr);
    }

    /**
     * 类型转换:将List<Object>转换为List<CartInfoVO>
     *
     * @param ObjCartInfoVO obj购物车信息签证官
     * @return {@link List}<{@link CartInfoVO}>
     */
    private List<CartInfoVO> typeSwitch(List<Object> ObjCartInfoVO) {
        List<CartInfoVO> cartInfoVOList = ObjCartInfoVO.stream().map(userCart -> {
            CartInfoVO cartInfoVO = JSONUtil.toBean
                    (JSONUtil.toJsonStr(userCart), CartInfoVO.class);
            return cartInfoVO;
        }).collect(Collectors.toList());
        return cartInfoVOList;
    }


    /**
     * 得到产品总价格
     *
     * @param temporaryUserCartList 临时用户购物车列表
     * @return {@link BigDecimal}
     */
    private BigDecimal getProductTotalPrice(List<CartInfoVO> temporaryUserCartList) {
        //                1.2.3获取到商品总价格列表
        List<BigDecimal> productPriceList = temporaryUserCartList.stream().map(userCart -> {
            return userCart.getTotalPrice();
        }).collect(Collectors.toList());

//                1.2.4对商品价格列表求和
        BigDecimal totalPrices = new BigDecimal(0);
        for (BigDecimal productPrice : productPriceList) {
            totalPrices = totalPrices.add(productPrice);
        }
        return totalPrices;
    }

    /**
     * 得到商品总数量
     *
     * @param temporaryUserCartList 临时用户购物车列表
     * @return {@link Integer}
     */
    private Integer getProductTotalNum(List<CartInfoVO> temporaryUserCartList) {
        //                1.2.1获取到商品数量列表
        List<Integer> productNumList = temporaryUserCartList.stream().map(userCart -> {
            return userCart.getCount();
        }).collect(Collectors.toList());

//                1.2.2对商品列表求和
        Integer productNums = 0;
        for (Integer productNum : productNumList) {
            productNums += productNum;
        }
        return productNums;
    }
12.4订单业务
12.4.1订单的构成
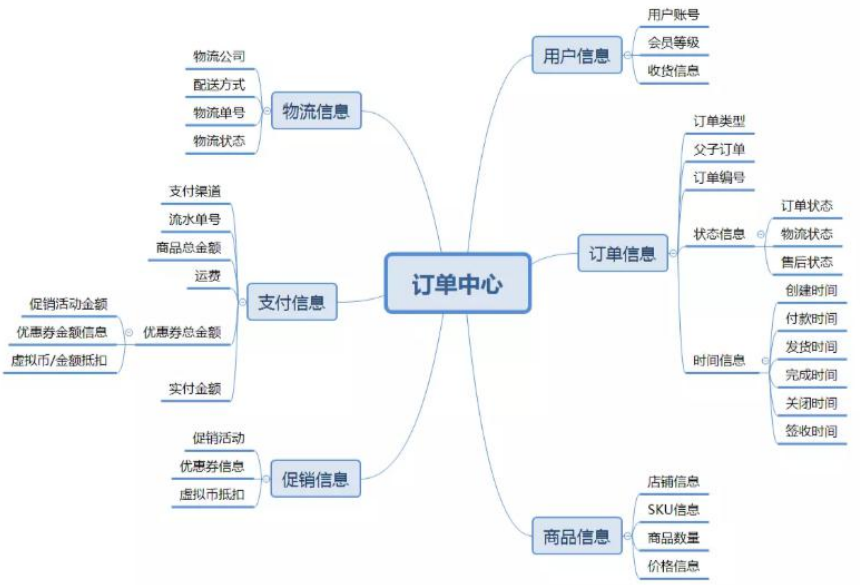
12.4.2订单流程
订单流程是指从订单产生到完成整个流转的过程,从而行程了一套标准流程规则。而不同的产品类型或业务类型在系统中的流程会千差万别,比如上面提到的线上实物订单和虚拟订单的流程,线上实物订单与 O2O 订单等,所以需要根据不同的类型进行构建订单流程。 不管类型如何订单都包括正向流程和逆向流程,对应的场景就是购买商品和退换货流程,正 向流程就是一个正常的网购步骤:订单生成–>支付订单–>卖家发货–>确认收货–>交易成功。 而每个步骤的背后,订单是如何在多系统之间交互流转的,可概括如下图
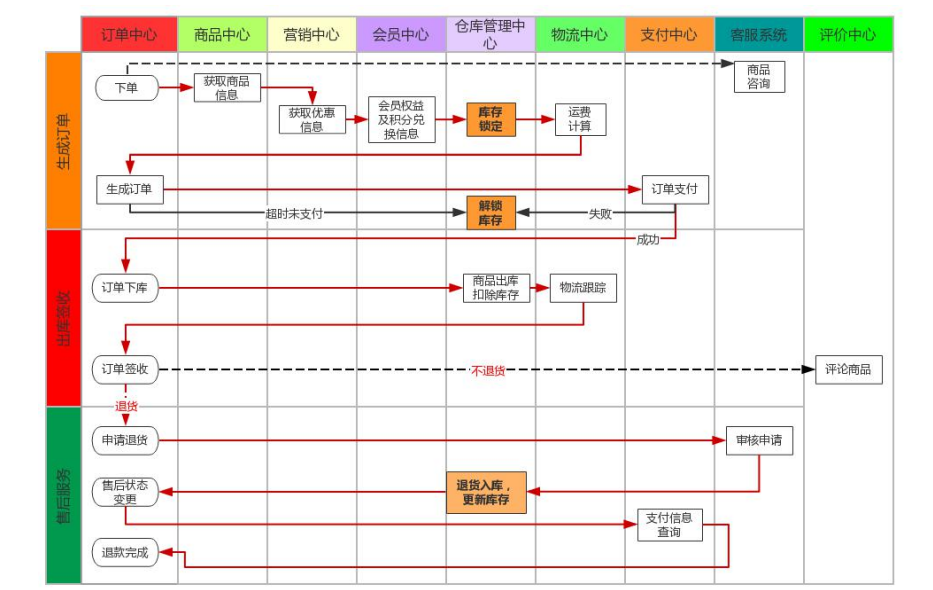
12.4.3基于RabbitMQ的消息TTL和延迟队列来解决订单库存问题
12.4.3.1问题描述
当用户下单后,如果用户未在指定的时间内付款。那么系统将会自动取消订单并且释放库存。
对于以上问题,可以采用Spring的定时任务—schedule来轮询数据库,但是当有大量数据时,每隔一段时间来轮询数据库,就会给数据库造成很大的压力。
所以可以采用RabbitMQ的消息TTL和延迟队列来解决订单问题。
12.4.3.2延迟队列的使用场景
- 订单在十分钟之内未支付则自动取消
- 新创建的店铺,如果在十天内都没有上传过商品,则自动发送消息提醒。
- 用户注册成功后,如果三天内没有登陆则进行短信提醒。
- 用户发起退款,如果三天内没有得到处理则通知相关运营人员。
- 预定会议后,需要在预定的时间点前十分钟通知各个与会人员参加会议
这些场景都有一个特点,需要在某个事件发生之后或者之前的指定时间点完成某一项任务,如: 发生订单生成事件,在十分钟之后检查该订单支付状态,然后将未支付的订单进行关闭;看起来似乎 使用定时任务,一直轮询数据,每秒查一次,取出需要被处理的数据,然后处理不就完事了吗?如果 数据量比较少,确实可以这样做,比如:对于“如果账单一周内未支付则进行自动结算”这样的需求, 如果对于时间不是严格限制,而是宽松意义上的一周,那么每天晚上跑个定时任务检查一下所有未支付的账单,确实也是一个可行的方案。但对于数据量比较大,并且时效性较强的场景,如:“订单十 分钟内未支付则关闭“,短期内未支付的订单数据可能会有很多,活动期间甚至会达到百万甚至千万 级别,对这么庞大的数据量仍旧使用轮询的方式显然是不可取的,很可能在一秒内无法完成所有订单的检查,同时会给数据库带来很大压力,无法满足业务要求而且性能低下。
12.4.3.3订单业务延时队列实现方案

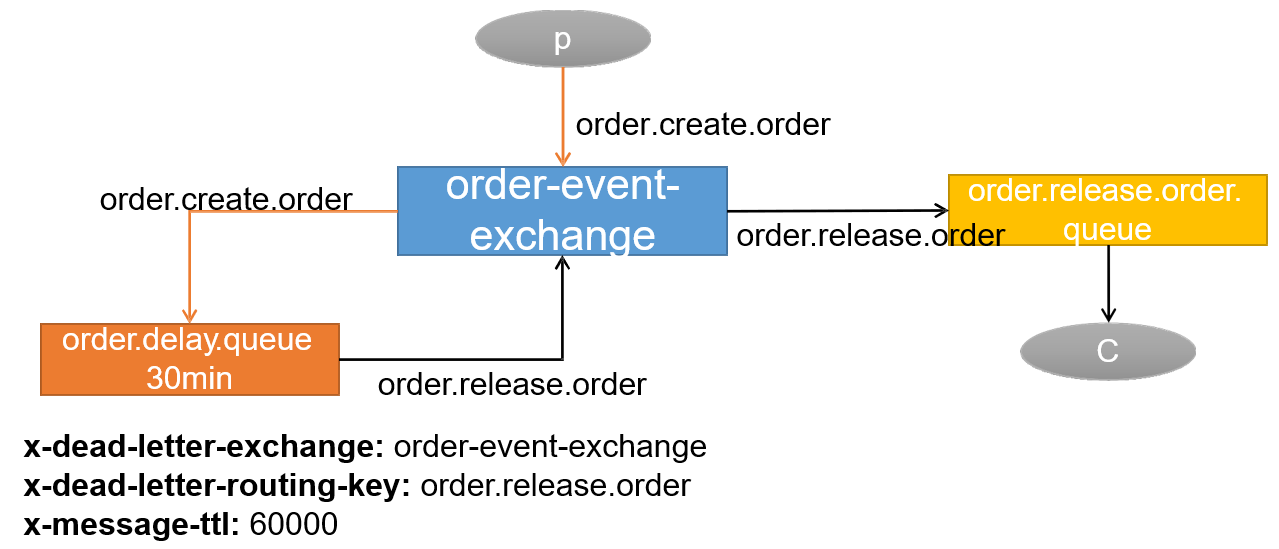
12.4.3.4通过配置类的方式来创建queue、exchange、binding
import org.springframework.amqp.core.Binding;
import org.springframework.amqp.core.Exchange;
import org.springframework.amqp.core.Queue;
import org.springframework.amqp.core.TopicExchange;
import org.springframework.context.annotation.Bean;
import org.springframework.context.annotation.Configuration;

import java.util.HashMap;
import java.util.Map;

/**
 * RabbitMQ创建queue、exchange、binding
 *
 * @author Xu Huaiang
 * @date 2023/02/10
 */
@Configuration
public class RabbitMQConfig {

    @Bean
    public Queue orderDelayQueue() {
        Map<String, Object> arguments = new HashMap<>();
        arguments.put("x-dead-letter-exchange","order-event-exchange");
        arguments.put("x-dead-letter-routing-key","order.release.order");
        arguments.put("x-message-ttl","60000");
        return new Queue("order.delay.queue",
                true,
                false,
                false,
                arguments);
    }

    @Bean
    public Queue orderReleaseOrderQueue() {
        return new Queue("order.release.order.queue",
                true,
                false,
                false);
    }

    @Bean
    public Exchange orderEventExchange() {
        return new TopicExchange("order.event.exchange",
                true,
                false);
    }

    @Bean
    public Binding orderCreateOrderBinding(){
        return new Binding("order.delay.queue",
                Binding.DestinationType.QUEUE,
                "order.event.exchange",
                "order.create.order",
                null);
    }

    @Bean
    public Binding orderReleaseOrderBinding(){
        return new Binding("order.release.order.queue",
                Binding.DestinationType.QUEUE,
                "order.event.exchange",
                "order.release.order",
                null);
    }
}
12.4.3.5基于死信队列更改订单-库存业务
思路:==在订单系统中,不使用分布式事务,而使用本地事务。当出现异常的时候就订单和订单项回滚,而库存服务中,锁定库存成功,并将锁定的订单信息持久化,并由生产者通过rabbitmq发送锁定的订单消息到延时队列当中,通过队列进行库存释放。==

- 在库存服务中添加对应的queue、exchange和binding
import com.xha.gulimall.ware.constants.RabbitMQConstants;
import org.springframework.amqp.core.Binding;
import org.springframework.amqp.core.Exchange;
import org.springframework.amqp.core.Queue;
import org.springframework.amqp.core.TopicExchange;
import org.springframework.context.annotation.Bean;
import org.springframework.context.annotation.Configuration;

import java.util.HashMap;
import java.util.Map;

/**
 * RabbitMQ创建queue、exchange、binding
 *
 * @author Xu Huaiang
 * @date 2023/02/10
 */
@Configuration
public class RabbitMQConfig {


    @Bean
    public Exchange stockEventExchange() {
        return new TopicExchange(RabbitMQConstants.STOCK_EVENT_EXCHANGE,
                true,
                false);
    }

    @Bean
    public Queue stockDelayQueue() {
        Map<String, Object> arguments = new HashMap<>();
        arguments.put("x-dead-letter-exchange", RabbitMQConstants.STOCK_EVENT_EXCHANGE);
        arguments.put("x-dead-letter-routing-key", RabbitMQConstants.STOCK_RELEASE_DEAD_BINDING);
        arguments.put("x-message-ttl", 6000);
        return new Queue(RabbitMQConstants.STOCK_DELAY_QUEUE,
                true,
                false,
                false,
                arguments);
    }

    @Bean
    public Queue stockReleaseStockQueue() {
        return new Queue(RabbitMQConstants.STOCK_RELEASE_STOCK_QUEUE,
                true,
                false,
                false);
    }

    @Bean
    public Binding stockLockedBinding() {
        return new Binding(RabbitMQConstants.STOCK_DELAY_QUEUE,
                Binding.DestinationType.QUEUE,
                RabbitMQConstants.STOCK_EVENT_EXCHANGE,
                RabbitMQConstants.STOCK_LOCKED_BINDING,
                null);
    }

    @Bean
    public Binding stockReleaseBinding() {
        return new Binding(RabbitMQConstants.STOCK_RELEASE_STOCK_QUEUE,
                Binding.DestinationType.QUEUE,
                RabbitMQConstants.STOCK_EVENT_EXCHANGE,
                RabbitMQConstants.STOCK_RELEASE_BINDING,
                null);
    }

}- 具体业务:生产者
    /**
     * 锁定库存
     *
     * @param wareSkuLockTO 器皿sku锁
     * @return {@link R}
     * 库存解锁的场景
     * 1.下单成功,但是订单过期被系统自动取消,或被用户手动取消
     * 2.下单成功,库存锁定成功,但是接下来的业务调用失败,导致订单回滚
     */
    @GlobalTransactional
    @Override
    public void wareSkuLock(WareSkuLockTO wareSkuLockTO) {
//        1.获取到订单项中的skuId查询哪些仓库有库存
        List<SkuWareIdList> skuWareIdLists = wareSkuLockTO.getOrderItemTOS().stream().map(orderItemTO -> {
            SkuWareIdList skuWareIdList = new SkuWareIdList();
            Long skuId = orderItemTO.getSkuId();
            Integer count = orderItemTO.getCount();
            List<Long> wareIds = wareSkuDao.wareListToHasStock(skuId, count);
            skuWareIdList.setSkuId(skuId)
                    .setCount(orderItemTO.getCount())
                    .setWareId(wareIds);
            return skuWareIdList;
        }).collect(Collectors.toList());

        for (SkuWareIdList skuWareId : skuWareIdLists) {
//        2.当前sku没有足够的库存
            if (CollectionUtils.isEmpty(skuWareId.getWareId())) {
                throw new UnEnoughStockException(skuWareId.getSkuId());
            }
//        3.锁定库存
            wareSkuDao.lockWare(skuWareId.getSkuId(), skuWareId.getWareId().get(0), skuWareId.getCount());

//        4.创建库存工作单对象
            WareOrderTaskEntity wareOrderTaskEntity = new WareOrderTaskEntity();
            wareOrderTaskEntity.setOrderSn(wareSkuLockTO.getOrderSn());
            wareOrderTaskService.save(wareOrderTaskEntity);

//        5.创建库存工作单详情对象
            WareOrderTaskDetailEntity wareOrderTaskDetailEntity = new WareOrderTaskDetailEntity();
            wareOrderTaskDetailEntity.setSkuId(skuWareId.getSkuId())
                    .setWareId(skuWareId.getWareId().get(0))
                    .setSkuNum(skuWareId.getCount()).setLockStatus(1)
                    .setTaskId(wareOrderTaskEntity.getId());
            wareOrderTaskDetailService.save(wareOrderTaskDetailEntity);

            StockDetailTO stockDetailTO = new StockDetailTO();
            BeanUtils.copyProperties(wareOrderTaskDetailEntity, stockDetailTO);
            StockLockedTO stockLockedTO = new StockLockedTO(wareOrderTaskEntity.getId(), stockDetailTO);

//         6.rabbitmq发送消息—当前一条库存锁定成功
            rabbitTemplate.convertAndSend(RabbitMQConstants.STOCK_EVENT_EXCHANGE,
                    RabbitMQConstants.STOCK_LOCKED_BINDING,
                    stockLockedTO
            );
        }
}- 运行测试,出现by zero 异常,order数据库回滚成功,ware数据库扣减库存,产生库存工作单和库存工作单详情,查看队列中的消息。
延迟队列中有两条消息:

- 具体业务:消费者监听消息
import com.rabbitmq.client.Channel;
import com.xha.gulimall.common.to.rabbitmq.StockLockedTO;
import com.xha.gulimall.ware.service.WareSkuService;
import org.springframework.amqp.core.Message;
import org.springframework.amqp.rabbit.annotation.RabbitListener;
import org.springframework.stereotype.Service;

import javax.annotation.Resource;
import java.io.IOException;

@Service
public class handleStockLockedRelease {

    @Resource
    private WareSkuService wareSkuService;

    /**
     * 释放库存
     * 1.判断库存工作单是否存在
     *      存在:
     *          2.根据工作单中的订单id查询订单
     *              存在:
     *                  3.判断订单状态
     *                      订单取消:释放库存
     *                      未取消:不需要释放
     *              不存在:
     *                  释放库存
     *      不存在:
     *          锁定库存业务失败,数据回滚,不需要释放库存
     *
     * @param stockLockedTO 股票锁定
     */

    @RabbitListener(queues = {"stock.release.stock.queue"})
    public void handleStockLockedRelease(StockLockedTO stockLockedTO, Message message, Channel channel) throws IOException {

        try {
            wareSkuService. unlockedStock(stockLockedTO);
            //                释放库存后手动Ack
            channel.basicAck(message.getMessageProperties().getDeliveryTag(), false);
        } catch (Exception e) {
//                释放库存后手动Ack
            channel.basicReject(message.getMessageProperties().getDeliveryTag(), true);
        }
    }
}
12.5秒杀业务
12.5.1秒杀业务的特点和限流
秒杀具有瞬间高并发的特点,针对这一特点,必须要做限流 + 异步 + 缓存(页面静态化) + 独立部署。
限流方式:
- 前端限流,一些高并发的网站直接在前端页面开始限流,例如:小米的验证码设计
- nginx 限流,直接负载部分请求到错误的静态页面:令牌算法 漏斗算法
- 网关限流,限流的过滤器
- 代码中使用分布式信号量
- rabbitmq 限流(能者多劳:chanel.basicQos(1)),保证发挥所有服务器的性能。
12.5.2秒杀商品定时上架
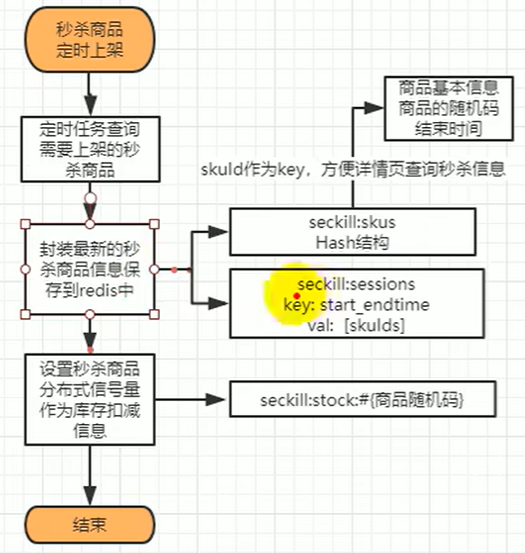
12.5.3秒杀商品定时上架业务代码
定时任务:
采用分布式锁处理分布式定时任务问题,采用分布式信号量来作为库存。
import com.xha.gulimall.seckill.constants.CommonConstants;
import com.xha.gulimall.seckill.service.SeckillScheduledService;
import lombok.extern.slf4j.Slf4j;
import org.redisson.api.RLock;
import org.redisson.api.RedissonClient;
import org.springframework.scheduling.annotation.EnableScheduling;
import org.springframework.scheduling.annotation.Scheduled;
import org.springframework.stereotype.Service;

import javax.annotation.Resource;
import java.util.concurrent.TimeUnit;

@Slf4j
@Service
@EnableScheduling
public class SeckillScheduled {

    @Resource
    private SeckillScheduledService seckillScheduledService;

    @Resource
    private RedissonClient redissonClient;

    /**
     * 上架秒杀商品定时任务
     */
    @Scheduled(cron = "*/3 * * * * *")
    private void uploadSeckillProduct() {
        log.info("开始上架秒杀商品");
//        1.创建分布式锁()
        RLock up_lock = redissonClient.getLock(CommonConstants.UPLOAD_LOCK);
        try {
//        2.获取锁
            up_lock.lock(CommonConstants.LOCK_MAX_TIME, TimeUnit.SECONDS);
            seckillScheduledService.uploadSeckillScheduled();
        } finally {
//        3.释放锁
            up_lock.unlock();
        }
    }

}
@Resource
private CouponFeignService couponFeignService;
@Resource
private StringRedisTemplate stringRedisTemplate;
@Resource
private ProductFeignService productFeignService;
@Resource
private RedissonClient redissonClient;
/**
* 上传秒杀商品
*/
@Override
public void uploadSeckillScheduled() {
// 1.获取到最近3天需要参加秒杀的活动
List<SeckillSessionTO> seckillSessionList = couponFeignService.getSeckillSession();
if (!CollectionUtils.isEmpty(seckillSessionList)) {
// 2.缓存秒杀活动信息
saveSessionInfo(seckillSessionList);
// 3.缓存秒杀活动关联的商品信息
saveSessionSkuInfo(seckillSessionList);
}
}
/**
* 缓存秒杀活动信息
*
* @param seckillSessionList 秒杀会话列表
*/
private void saveSessionInfo(List<SeckillSessionTO> seckillSessionList) {
seckillSessionList.stream().forEach(seckillSessionTO -> {
// 1.将开始时间和结束时间作为key
Long startTime = seckillSessionTO.getStartTime().getTime();
Long endTime = seckillSessionTO.getEndTime().getTime();
String key = CacheConstants.SECKILL_SESSION_CACHE + startTime + "_" + endTime;
if (!stringRedisTemplate.hasKey(key)) {
// 2.将sessionId和skuId作为value
List<SeckillSkuRelationTO> relationSkuList = seckillSessionTO.getRelationSkus();
List<String> session_sku_id = relationSkuList.stream()
.map(seckillSkuRelationTO -> {
return seckillSkuRelationTO.getPromotionSessionId() + "_" +
seckillSkuRelationTO.getSkuId();
})
.collect(Collectors.toList());
// 3.缓存秒杀活动
stringRedisTemplate
.opsForList()
.leftPushAll(key, JSONUtil.toJsonStr(session_sku_id));
}
});
}
/**
* 缓存秒杀活动关联的商品信息
*
* @param seckillSessionList 秒杀会话列表
*/
private void saveSessionSkuInfo(List<SeckillSessionTO> seckillSessionList) {
// 1.远程查询出所有的sku信息
List<SkuInfoTO> allSkuInfoList = productFeignService.getAllSkuInfoList();
// 2.查询封装SeckillSkuRelationTO对象
seckillSessionList.stream().forEach(seckillSessionTO -> {
List<SeckillSkuRelationTO> relationSkuList = seckillSessionTO.getRelationSkus();
List<SeckillSkuRelationTO> seckillSkuRelationTOS = relationSkuList.stream().map(seckillSkuRelationTO -> {
return addSkuDetailInfo(allSkuInfoList, seckillSkuRelationTO);
}).collect(Collectors.toList());
// 3.缓存秒杀活动关联的商品信息
// 3.1生成随机码
String token = IdUtil.simpleUUID();
seckillSkuRelationTOS.stream().forEach(seckillSkuRelationTO -> {
seckillSkuRelationTO.setStartTime(seckillSessionTO.getStartTime())
.setEndTime(seckillSessionTO.getEndTime())
.setRandomCode(token);
String session_sku_key = seckillSkuRelationTO.getPromotionSessionId() + "_" + seckillSkuRelationTO.getSkuId();
if (!stringRedisTemplate.boundHashOps(CacheConstants.SECKILL_SKU_CACHE)
.hasKey(seckillSkuRelationTO.getPromotionSessionId() + "_" +
seckillSkuRelationTO.getSkuId())) {
String seckillSkuInfo = JSONUtil.toJsonStr(seckillSkuRelationTO);
stringRedisTemplate.boundHashOps(CacheConstants.SECKILL_SKU_CACHE)
.put(seckillSkuRelationTO.getPromotionSessionId() + "_" +
seckillSkuRelationTO.getSkuId(), seckillSkuInfo);
// 3.2创建信号量,信号量名位随机码,信号量初始大小为秒杀商品数量(相当于商品库存)
Integer seckillCount = seckillSkuRelationTO.getSeckillCount();
System.out.println(seckillCount);
redissonClient.getSemaphore(CommonConstants.SECKILL_TOKEN + token)
.trySetPermits(seckillSkuRelationTO.getSeckillCount());
}
});
});
}
/**
* 添加sku详细信息
*
* @return {@link SeckillSkuRelationTO}
*/
public SeckillSkuRelationTO addSkuDetailInfo(List<SkuInfoTO> allSkuInfoList, SeckillSkuRelationTO seckillSkuRelationTO) {
allSkuInfoList.stream().forEach(skuInfoTO -> {
if (skuInfoTO.getSkuId().equals(seckillSkuRelationTO.getSkuId())) {
seckillSkuRelationTO.setSkuInfoTO(skuInfoTO);
}
});
return seckillSkuRelationTO;
}12.5.4秒杀(高并发)系统关注的问题
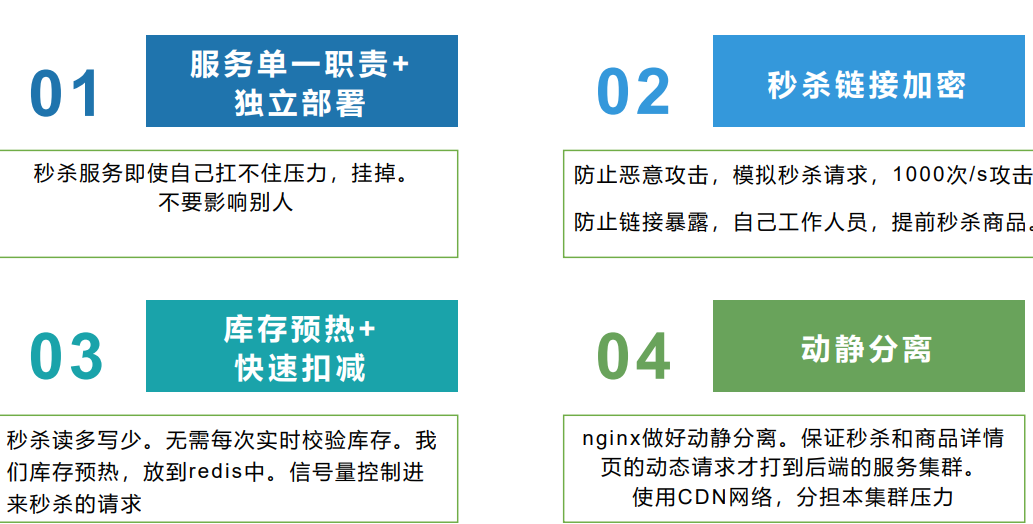
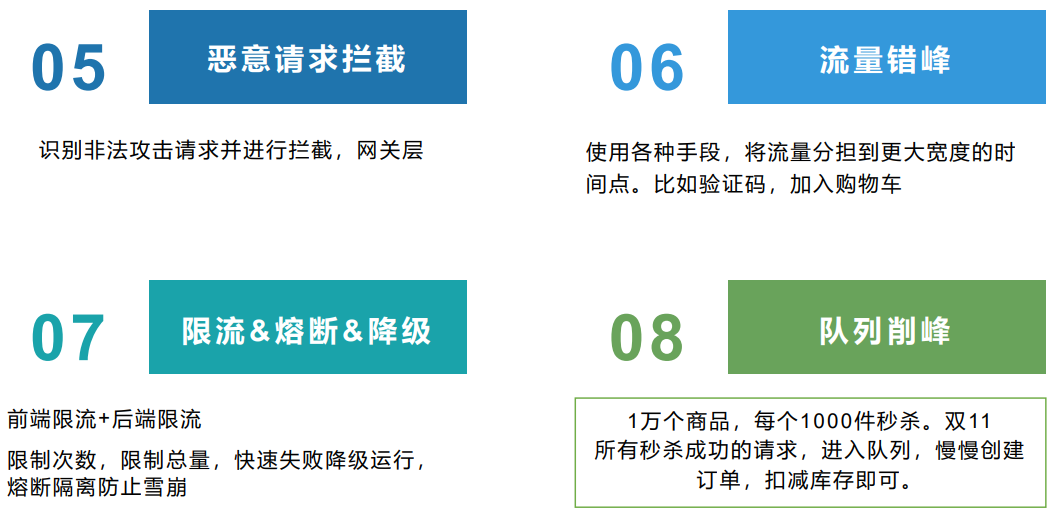
业务流程图:
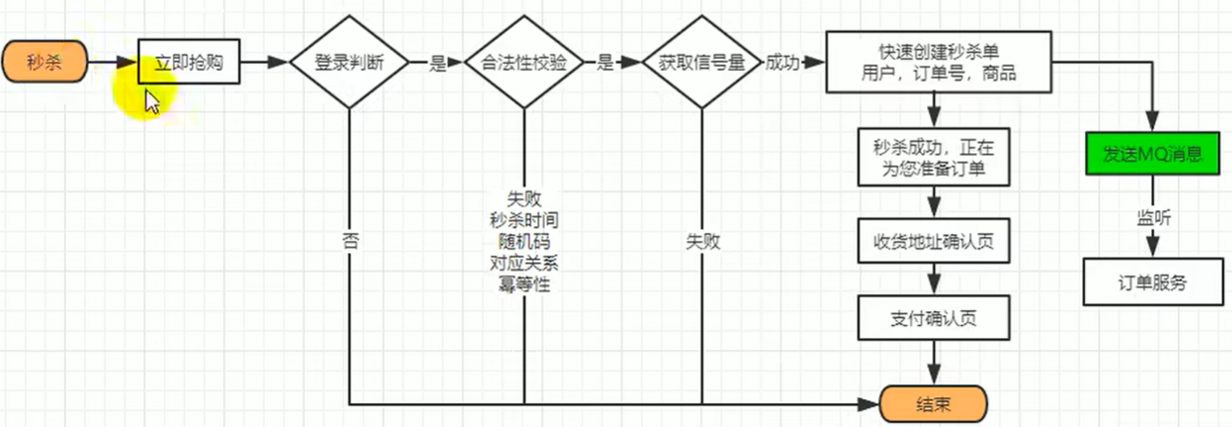
12.5.5秒杀流量削峰

13.配置
13.1MyBatis-Plus实现逻辑删除
在数据库表中有一字段表示逻辑删除字段,在这里**1表示显示,0表示逻辑删除**
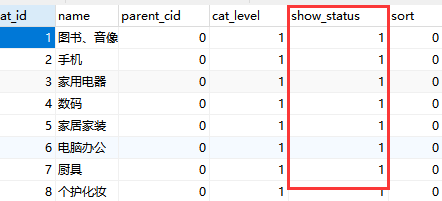
mybatis-plus官网的逻辑删除配置规则:
步骤 1: 配置com.baomidou.mybatisplus.core.config.GlobalConfig$DbConfig
- 例: application.yml
mybatis-plus:
  global-config:
    db-config:
      logic-delete-field: flag # 全局逻辑删除的实体字段名(since 3.3.0,配置后可以忽略不配置步骤2)
      logic-delete-value: 1 # 逻辑已删除值(默认为 1)
      logic-not-delete-value: 0 # 逻辑未删除值(默认为 0)
步骤 2: 实体类字段上加上@TableLogic注解
@TableLogic
private Integer deleted;
常见问题
- 如何 insert ?
- 字段在数据库定义默认值(推荐)
- insert 前自己 set 值
- 使用 自动填充功能
- 删除接口自动填充功能失效
- 使用
deleteById方法(推荐)- 使用
update方法并:UpdateWrapper.set(column, value)(推荐)- 使用
update方法并:UpdateWrapper.setSql("column=value")- 使用 Sql 注入器 注入
com.baomidou.mybatisplus.extension.injector.methods.LogicDeleteByIdWithFill并使用(3.5.0版本已废弃,推荐使用deleteById)
13.2前端配置发送请求到网关
==由于后台模块众多,不同的模块处于不同的端口,所以应该配置网关,让请求直接发送到网关。==
将
renren-fast模块添加到nacos服务中心当中
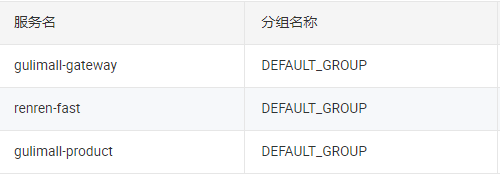
- 网关配置路由规制
server:
  port: 88

spring:
  application:
    name: gulimall-gateway
  cloud:
    nacos:
      discovery:
        server-addr: 192.168.26.160:8848

#           路由到renren-fast模块
#           http://localhost:88/api/** -> http://localhost:8080/renren-fast/**
    gateway:
      routes:
        - id: admin_route
          uri: lb://renren-fast
          predicates:
            - Path=/api/**
          filters:
          //路径重写
- RewritePath=/api/?(?<segment>.*), /renren-fast/$\{segment}- 修改请求地址
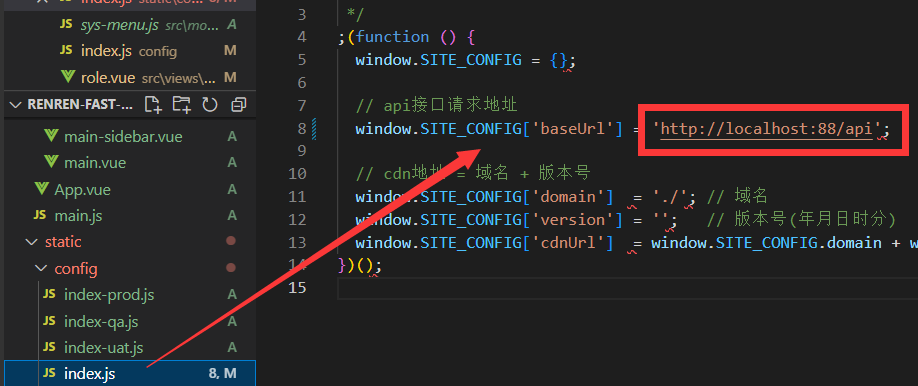
即上述请求会发送到:
http://localhost:88/api/**请求被网关拦截,在配置文件中匹配路由规则
配置断言规则,路径重写,将原来的
/api替换为/renren-fast路由到指定的
uri(模块),并做负载均衡
配置成功,查看登录页验证码发送的请求
即http://localhost:88/api->http://localhost:8080/renren-fast

但是出现跨配配置错误,前端http://localhost:8001/#/login发送请求到http://localhost:88/api/sys/login出现跨域

13.3跨域配置
13.3.1跨域概述
- 跨域:指的是浏览器不能执行其他网站的脚本。它是由浏览器的同源策略造成的,是浏览器对javascript施加的安全限制。
- 同源策略:**是指协议,域名,端口都要相同**,其中有一一个不同都会产生跨域。
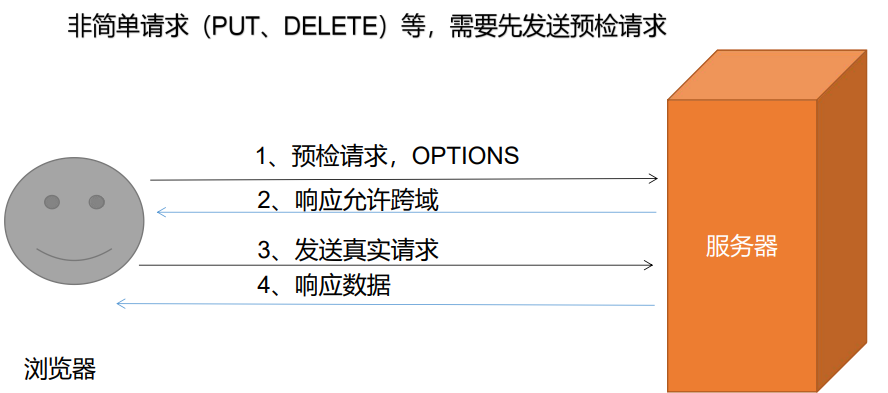
https://developer.mozilla.org/zh-CN/docs/Web/HTTP/Access_control_CORS
13.3.2跨域解决方案
- 使用Nginx配置反向代理
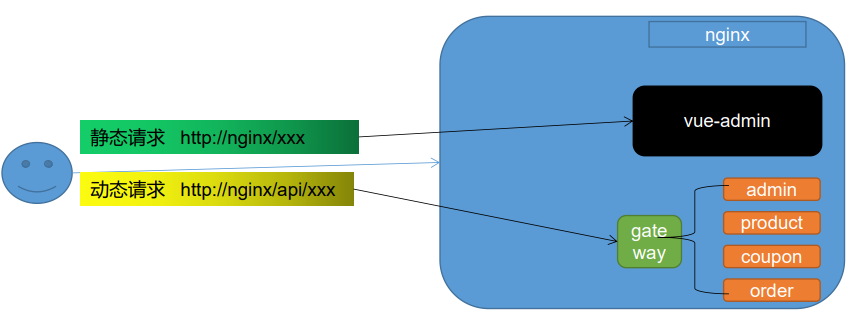
- 配置当次请求允许跨域
添加响应头
Access-Control-Allow-Origin:支持哪些来源的请求跨域Access-Control-Allow-Methods:支持哪些方法跨域Access-Control-Allow-Credentials:跨域请求默认不包含cookie,设置为true可以包含 cookieAccess-Control-Expose-Headers:跨域请求暴露的字段- CORS请求时,XMLHttpRequest对象的getResponseHeader()方法只能拿到6个基本字段: Cache-Control、Content-Language、Content-Type、Expires、Last-Modified、Pragma。如 果想拿到其他字段,就必须在Access-Control-Expose-Headers里面指定。
Access-Control-Max-Age:表明该响应的有效时间为多少秒。在有效时间内,浏览器无 须为同一请求再次发起预检请求。请注意,浏览器自身维护了一个最大有效时间,如果 该首部字段的值超过了最大有效时间,将不会生效。
13.3.3网关配置跨域
- 添加跨域配置类
import org.springframework.context.annotation.Bean;
import org.springframework.context.annotation.Configuration;
import org.springframework.web.cors.CorsConfiguration;
import org.springframework.web.cors.reactive.CorsWebFilter;
import org.springframework.web.cors.reactive.UrlBasedCorsConfigurationSource;

@Configuration
public class CorsConfig {

    @Bean
    public CorsWebFilter corsWebFilter() {
        UrlBasedCorsConfigurationSource corsConfig = new UrlBasedCorsConfigurationSource();
        CorsConfiguration corsConfiguration = new CorsConfiguration();

        // 1.允许任何跨域请求的域名
        corsConfiguration.addAllowedOrigin("*");
        // 2.允许任何请求方法
        corsConfiguration.addAllowedMethod("*");
        // 3.允许任何请求头
        corsConfiguration.addAllowedHeader("*");
        // 4.允许携带cookie
        corsConfiguration.setAllowCredentials(true);

        corsConfig.registerCorsConfiguration("/**", corsConfiguration);
        return new CorsWebFilter(corsConfig);
    }

}
13.4OSS
13.4.1概述
对象存储服务(Object Storage Service,OSS)是一种海量、安全、低成本、高可靠的云存储服务,适合存放任意类型的文件。容量和处理能力弹性扩展,多种存储类型供选择,全面优化存储成本。
13.4.2对象存储上传方式
- 普通上传方式
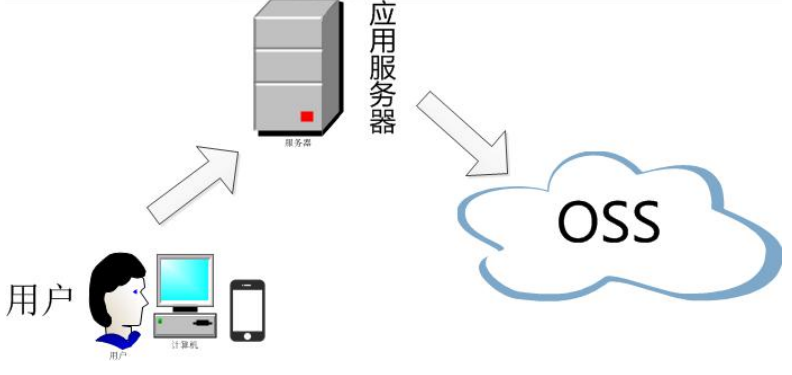
- 服务端签名后直传方式
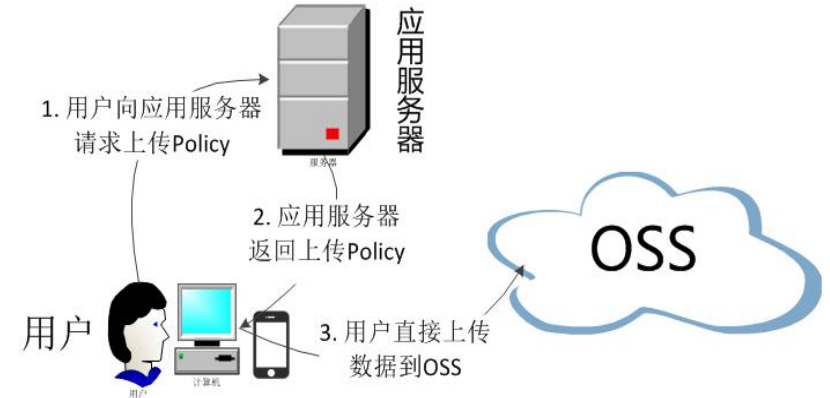
阿里云提供的服务端签名后直传方式
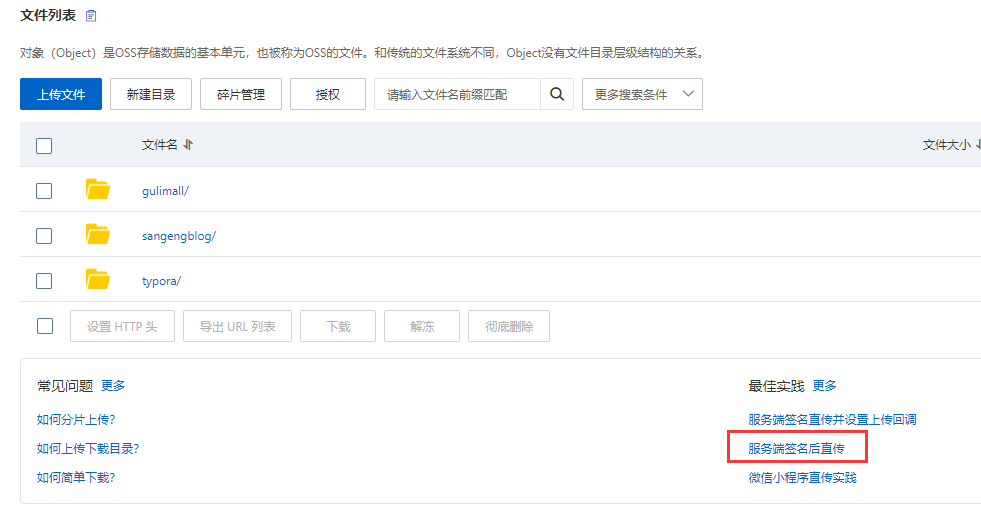
13.4.3服务端签名直传实现方案
采用SpringCloud Alibaba的阿里云对象存储服务进行数据云存储
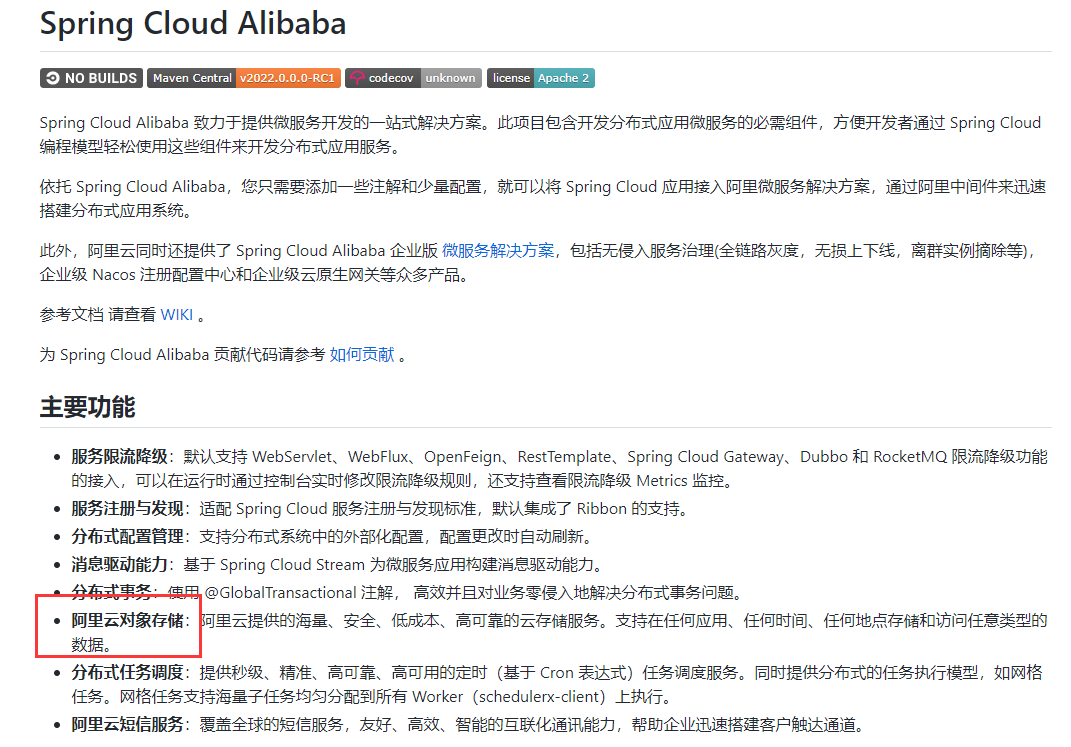
GitHub官网Aliyun Spring Boot OSS Simplehttps://github.com/alibaba/aliyun-spring-boot/tree/master/aliyun-spring-boot-samples/aliyun-oss-spring-boot-sample
创建第三方服务模块
引入对应依赖
<dependency>
    <groupId>com.alibaba.cloud</groupId>
    <artifactId>spring-cloud-starter-alicloud-oss</artifactId>
</dependency>- 在nacos配置中心添加对象存储的配置
上传文件到指定目录下:
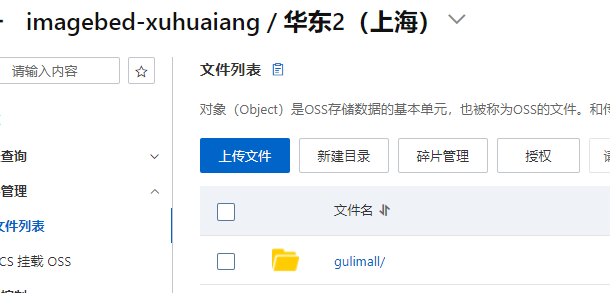
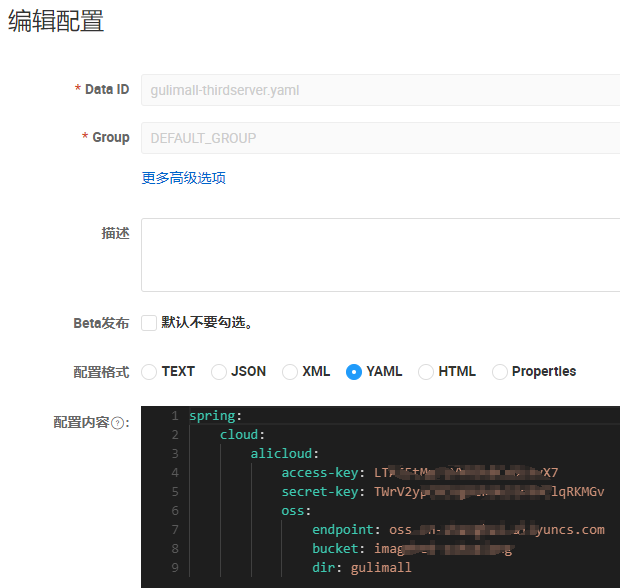
- 对应的控制层,用以获取到对应的服务端签名等信息
import com.aliyun.oss.OSSClient;
import com.aliyun.oss.common.utils.BinaryUtil;
import com.aliyun.oss.model.MatchMode;
import com.aliyun.oss.model.PolicyConditions;
import com.xha.gulimall.common.utils.R;
import org.springframework.beans.factory.annotation.Value;
import org.springframework.cloud.context.config.annotation.RefreshScope;
import org.springframework.web.bind.annotation.RequestMapping;
import org.springframework.web.bind.annotation.RestController;

import javax.annotation.Resource;
import java.text.SimpleDateFormat;
import java.util.Date;
import java.util.LinkedHashMap;
import java.util.Map;

@RestController
@RefreshScope
public class OssController {

    @Resource
    private OSSClient ossClient;

    @Value("${spring.cloud.alicloud.access-key}")
    private String accessId;

    @Value("${spring.cloud.alicloud.oss.endpoint}")
    private String endpoint;

    @Value("${spring.cloud.alicloud.oss.bucket}")
    private String bucket;

    @Value("${spring.cloud.alicloud.oss.dir}")
    private String dir;


    @RequestMapping("/oss/policy")
    public R policy() {
        // 填写Host地址,格式为https://bucketname.endpoint。
        //https://gulimall.oss-cn-shanghai.aliyuncs.com
        String host = "https://"+ bucket + "." + endpoint;

        // 设置上传回调URL,即回调服务器地址,用于处理应用服务器与OSS之间的通信。OSS会在文件上传完成后,把文件上传信息通过此回调URL发送给应用服务器。
        // String callbackUrl = "https://192.168.0.0:8888";
        // 设置上传到OSS文件的前缀,可置空此项。置空后,文件将上传至Bucket的根目录下。
//        String dir = new SimpleDateFormat("yyyy-MM-dd").format(new Date());

        Map<String, String> respMap = null;
        try {
            long expireTime = 30;
            long expireEndTime = System.currentTimeMillis() + expireTime * 1000;
            Date expiration = new Date(expireEndTime);
            PolicyConditions policyConds = new PolicyConditions();
            policyConds.addConditionItem(PolicyConditions.COND_CONTENT_LENGTH_RANGE, 0, 1048576000);
            policyConds.addConditionItem(MatchMode.StartWith, PolicyConditions.COND_KEY, dir);

            String postPolicy = ossClient.generatePostPolicy(expiration, policyConds);
            byte[] binaryData = postPolicy.getBytes("utf-8");
            String encodedPolicy = BinaryUtil.toBase64String(binaryData);
            String postSignature = ossClient.calculatePostSignature(postPolicy);

            respMap = new LinkedHashMap<String, String>();
            respMap.put("accessId", accessId);
            respMap.put("policy", encodedPolicy);
            respMap.put("signature", postSignature);
            respMap.put("dir", dir);
            respMap.put("host", host);
            respMap.put("expire", String.valueOf(expireEndTime / 1000));

        } catch (Exception e) {
            // Assert.fail(e.getMessage());
            System.out.println(e.getMessage());
        }

        return R.ok().put("data",respMap);
    }
}

- 阿里云OSS配置前端文件上传跨域问题
数据安全->跨域设置
测试阶段来源设置为*,等项目上线后修改为后端的地址
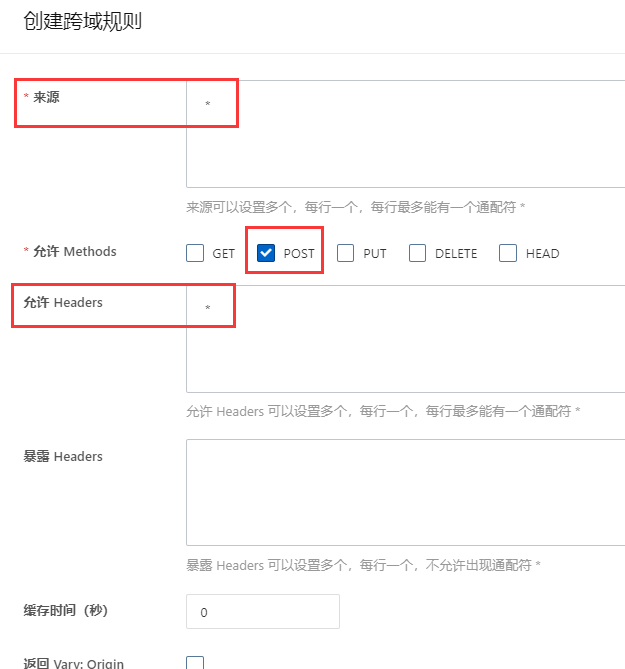
13.5JSR303数据校验
13.5.1概述
JSR是Java Specification Requests的缩写,意思是Java 规范提案
JSR-303 是JAVA EE 6 中的一项子规范,叫做Bean Validation,即,JSR 303,Bean Validation规范 ,为Bean验证定义了元数据模型和API.。默认的元数据模型是通过Annotations来描述的,但是也可以使用XML来重载或者扩展。
使用的依赖:
<dependency>
    <groupId>org.springframework.boot</groupId>
    <artifactId>spring-boot-starter-validation</artifactId>
</dependency>
13.5.2常用的校验注解
其中:
@NotNull能够处理任意类型@NotEmpty能够处理字符串、集合类型@NotBlank能够处理任意类型,且不能为空格
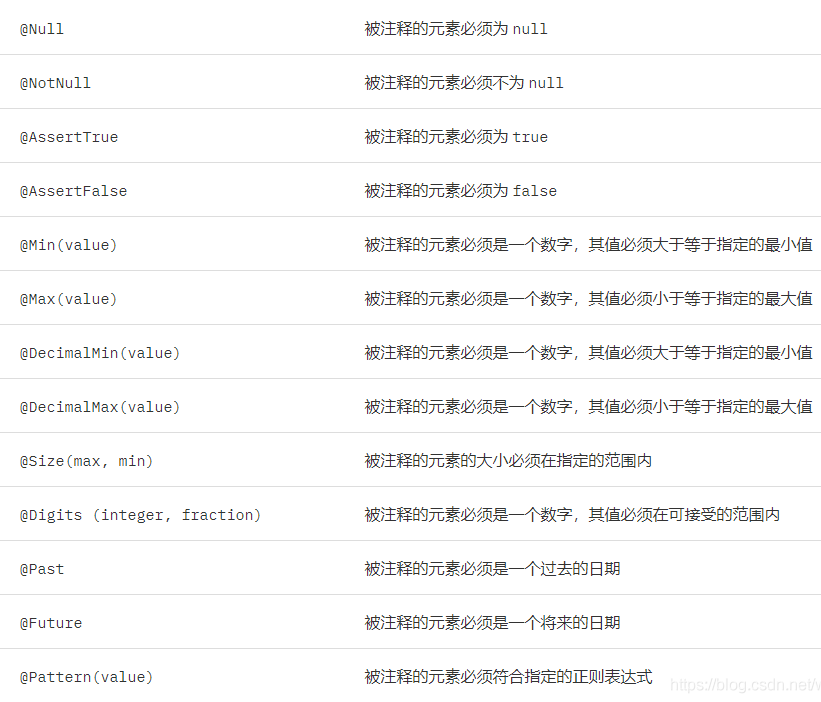
JSR303是一种规范,而Hibernate 对其做了实现
Hibernate 中填充一部分
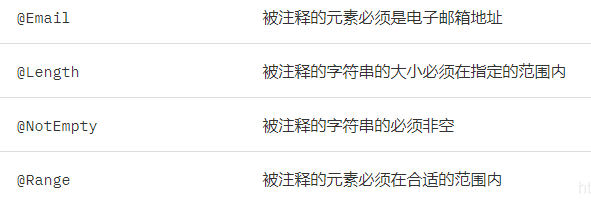
13.5.3JSR303数据校验使用方式
- 在对应的实体类上添加对应的注解规则
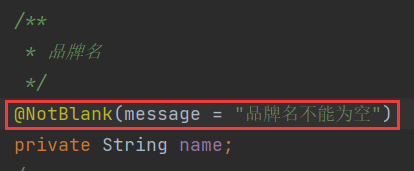
- 在控制层对应的方法参数中添加
@Valid校验注解
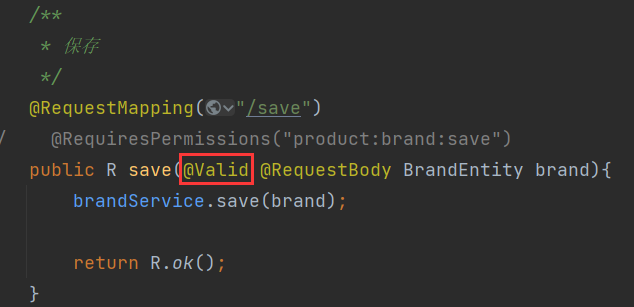
- 使用apifox进行空数据测试
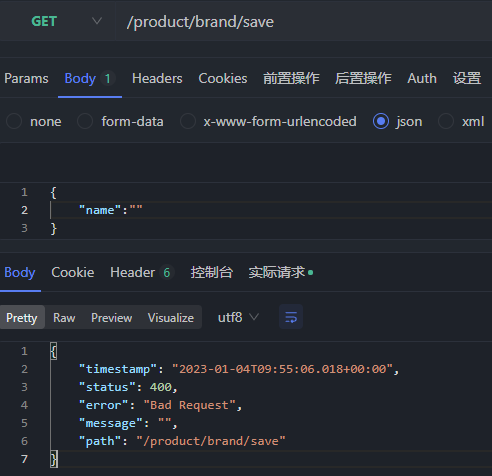
- 控制台信息

13.5.4统一异常处理
13.5.4.1响应码枚举创建
错误码和错误信息定义类
错误码定义规则为 5 为数字
前两位表示业务场景,最后三位表示错误码
例如:100001。
- 10:通用
- 000:系统未知异常
维护错误码后需要维护错误描述,将他们定义为**枚举形式**
错误码列表:
- 10: 通用
- 001:参数格式校验
- 11: 商品
- 12: 订单
- 13: 购物车
- 14: 物流
对于以上创建对应的枚举方法:
@Getter
@AllArgsConstructor
public enum HttpCode {
    UNKNOW_EXCEPTION(10001,"系统未知异常"),
    VALID_EXCEPTION(10001,"参数格式校验失败");

    private int code;
    private String message;

    HttpCode(int code,String message){
        this.code = code;
        this.message = message;
    }

}
13.5.4.2数据校验异常和全局异常处理
import com.xha.gulimall.common.constants.HttpCode;
import com.xha.gulimall.common.utils.R;
import lombok.extern.slf4j.Slf4j;
import org.springframework.validation.BindingResult;
import org.springframework.web.bind.MethodArgumentNotValidException;
import org.springframework.web.bind.annotation.ExceptionHandler;
import org.springframework.web.bind.annotation.RestControllerAdvice;
import java.util.HashMap;
import java.util.Map;

/**
 * 全局异常处理类
 *
 * @author Xu Huaiang
 * @date 2023/01/04
 */
@Slf4j
//指定要处理那些包下的异常
@RestControllerAdvice(basePackages = "com.xha.gulimall.product.controller")
public class GlobalExceptionHandler {

    /**
     * 数据校验异常处理
     *
     * @param e e
     * @return {@link R}
     *///    使用@ExceptionHandler指定要处理哪些异常
    @ExceptionHandler(value = MethodArgumentNotValidException.class)
    public R handleValidException(MethodArgumentNotValidException e){
        log.error("数据校验出现问题:" + e.getMessage() + "异常类型是:" + e.getClass());
//        得到数据校验的错误结果
        BindingResult bindingResult = e.getBindingResult();
        Map<String,String> errorMap = new HashMap<>();
        bindingResult.getFieldErrors().forEach((fieldError -> {
            errorMap.put(fieldError.getField(),fieldError.getDefaultMessage());
        }));
        return R.error(HttpCode.VALID_EXCEPTION.getCode(), HttpCode.VALID_EXCEPTION.getMessage()).put("data",errorMap);
    }

    /**
     * 全局异常处理
     *
     * @return {@link R}
     */
    @ExceptionHandler(value = Throwable.class)
    public R handlerException(){
        return R.error(HttpCode.UNKNOW_EXCEPTION.getCode(), HttpCode.UNKNOW_EXCEPTION.getMessage());
    }

}
对应的实体类以及配置的数据校验规则
@Data
@TableName("pms_brand")
public class BrandEntity implements Serializable {
   private static final long serialVersionUID = 1L;

   /**
    * 品牌id
    */
   @NotNull(message = "id不能为空")
   @TableId
   private Long brandId;
   /**
    * 品牌名
    */
   @NotBlank(message = "品牌名不能为空")
   private String name;
   /**
    * 品牌logo地址
    */
   @NotEmpty
   @URL(message = "logo必须是一个正确的url地址")
   private String logo;
   /**
    * 介绍
    */
   private String descript;
   /**
    * 显示状态[0-不显示;1-显示]
    */
   private Integer showStatus;
   /**
    * 检索首字母
    */
   @NotNull
   @Pattern(regexp = "/^[a-zA-Z]$/",message = "检索首字母必须是一个字母")
   private String firstLetter;
   /**
    * 排序
    */
   @NotNull
   @Min(value = 0,message = "排序必须大于等于0")
   private Integer sort;

}
发送请求测试:
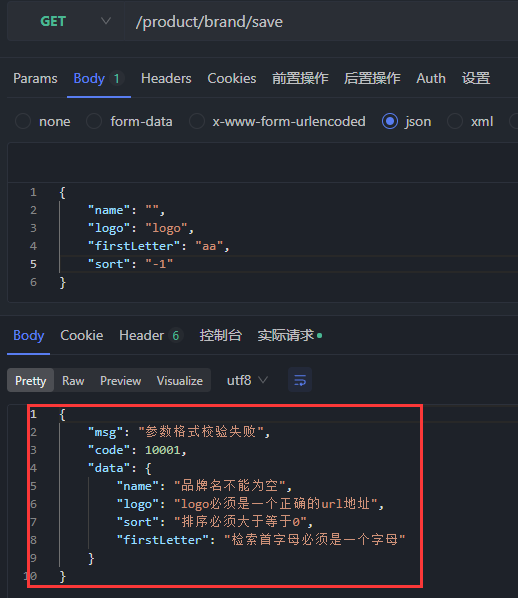
13.5.5JSR303分组校验
- 问题:当新增一条数据的时候主键是不能为空的,而当修改数据时主键为空(如下图所示),这个时候就可以使用JSR303的分组校验功能
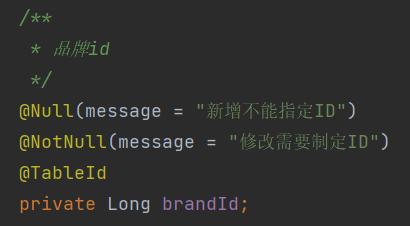
- 创建检验分组(是接口)

在对应的实体类上添加分组校验规则
将
@Valid注解修改为@Validated注解(由Spring提供),@Validated注解可以指定一个或者多个校验分组

- 为实体类添加分组校验规则(**在分组校验情况下,默认没有指定分组的校验注解不会生效**)
@Data
@TableName("pms_brand")
public class BrandEntity implements Serializable {
   private static final long serialVersionUID = 1L;

   /**
    * 品牌id
    */
   @Null(message = "添加数据时不需要id",groups = AddGroup.class)
   @NotNull(message = "修改数据时需要指定id",groups = UpdateGroup.class)
   @TableId
   private Long brandId;
   /**
    * 品牌名
    */
   @NotBlank(message = "品牌名不能为空",groups = {AddGroup.class,UpdateGroup.class})
   private String name;
   /**
    * 品牌logo地址
    */
   @NotEmpty
   @URL(message = "logo必须是一个正确的url地址")
   private String logo;
   /**
    * 介绍
    */
   private String descript;
   /**
    * 显示状态[0-不显示;1-显示]
    */
   private Integer showStatus;
   /**
    * 检索首字母
    */
   @NotNull
   @Pattern(regexp = "/^[a-zA-Z]$/",message = "检索首字母必须是一个字母")
   private String firstLetter;
   /**
    * 排序
    */
   @NotNull
   @Min(value = 0,message = "排序必须大于等于0")
   private Integer sort;

}
测试:
因为logo字段没有指定分组校验规则,所以配置的数据校验规则不会生效
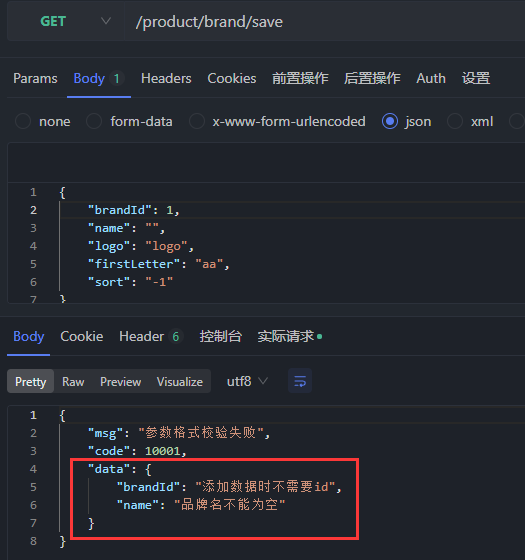
@Data
@TableName("pms_brand")
public class BrandEntity implements Serializable {
   private static final long serialVersionUID = 1L;

   /**
    * 品牌id
    */
   @Null(message = "添加数据时不需要id",groups = AddGroup.class)
   @NotNull(message = "修改数据时需要指定id",groups = UpdateGroup.class)
   @TableId
   private Long brandId;
   /**
    * 品牌名
    */
   @NotBlank(message = "品牌名不能为空",groups = {AddGroup.class,UpdateGroup.class})
   private String name;
   /**
    * 品牌logo地址
    */
   @NotEmpty
   @URL(message = "logo必须是一个正确的url地址",groups = {AddGroup.class,UpdateGroup.class})
   private String logo;
   /**
    * 介绍
    */
   private String descript;
   /**
    * 显示状态[0-不显示;1-显示]
    */
   private Integer showStatus;
   /**
    * 检索首字母
    */
   @NotNull
   @Pattern(regexp = "/^[a-zA-Z]$/",message = "检索首字母必须是一个字母",groups = {AddGroup.class,UpdateGroup.class})
   private String firstLetter;
   /**
    * 排序
    */
   @NotNull
   @Min(value = 0,message = "排序必须大于等于0",groups = {AddGroup.class,UpdateGroup.class})
   private Integer sort;

}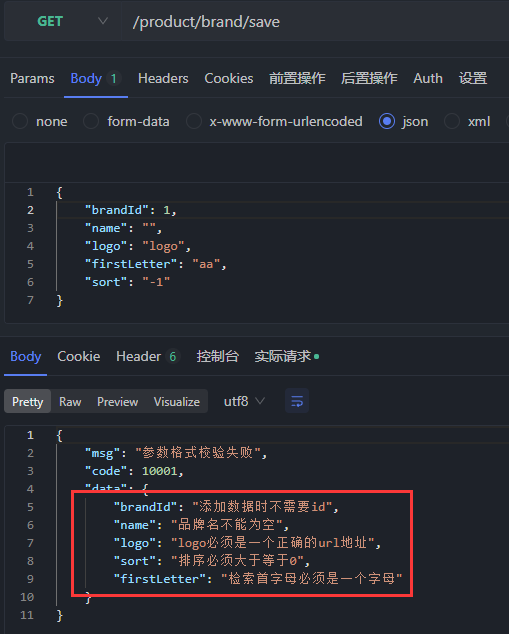
13.5.6JSR303自定义校验
实现步骤:
- 创建一个自定义校验注解
- 创建一个自定义校验器
- 使校验器去校验校验注解标注的字段
- 实现自定义校验注解
@Documented
@Constraint(validatedBy = { })
@Target({ METHOD, FIELD, ANNOTATION_TYPE, CONSTRUCTOR, PARAMETER, TYPE_USE })
@Retention(RUNTIME)
public @interface ListValue {
    //错误消息
    String message() default "{javax.validation.constraints.ListValue.message}";
	//支持校验分组
    Class<?>[] groups() default { };

    Class<? extends Payload>[] payload() default { };
	//指定属性,为一个数组
    int[] value() default { };

}- 创建错误信息配置文件
ValidationMessages.properties(文件名就是javax.validation.constraints的配置文件)指定错误信息

- 实现自定义校验器
import com.xha.gulimall.common.validator.annotation.ListValue;

import javax.validation.ConstraintValidator;
import javax.validation.ConstraintValidatorContext;
import java.util.HashSet;
import java.util.Set;

public class ListValueValidator implements ConstraintValidator<ListValue,Integer> {

    private Set<Integer> set = new HashSet<>();

//    初始化方法
    @Override
    public void initialize(ListValue constraintAnnotation) {
        int[] value = constraintAnnotation.value();
        for (int val:value){
            set.add(val);
        }
    }

    /**
     * 是有效
     *
     * @param value   需要校验的值
     * @param context 上下文
     * @return boolean
     *///    判断是否校验成功
    @Override
    public boolean isValid(Integer value, ConstraintValidatorContext context) {
        return set.contains(value);
    }
}- 将自定义校验器和自定义校验注解进行绑定

- 实体类对应字段配置
@Data
@TableName("pms_brand")
public class BrandEntity implements Serializable {
    private static final long serialVersionUID = 1L;

    /**
     * 品牌id
     */
    @Null(message = "添加数据时不需要id", groups = AddGroup.class)
    @NotNull(message = "修改数据时需要指定id", groups = UpdateGroup.class)
    @TableId
    private Long brandId;
    /**
     * 品牌名
     */
    @NotBlank(message = "品牌名不能为空", groups = {AddGroup.class, UpdateGroup.class})
    private String name;
    /**
     * 品牌logo地址
     */
    @NotEmpty
    @URL(message = "logo必须是一个正确的url地址", groups = {AddGroup.class, UpdateGroup.class})
    private String logo;
    /**
     * 介绍
     */
    private String descript;
    /**
     * 显示状态[0-不显示;1-显示]
     */
    @ListValue(value = {0, 1},groups = {AddGroup.class,UpdateGroup.class})
    private Integer showStatus;
    /**
     * 检索首字母
     */
    @NotNull
    @Pattern(regexp = "^[a-zA-Z]$", message = "检索首字母必须是一个字母", groups = {AddGroup.class, UpdateGroup.class})
    private String firstLetter;
    /**
     * 排序
     */
    @NotNull
    @Min(value = 0, message = "排序必须大于等于0", groups = {AddGroup.class, UpdateGroup.class})
    private Integer sort;

}- 测试
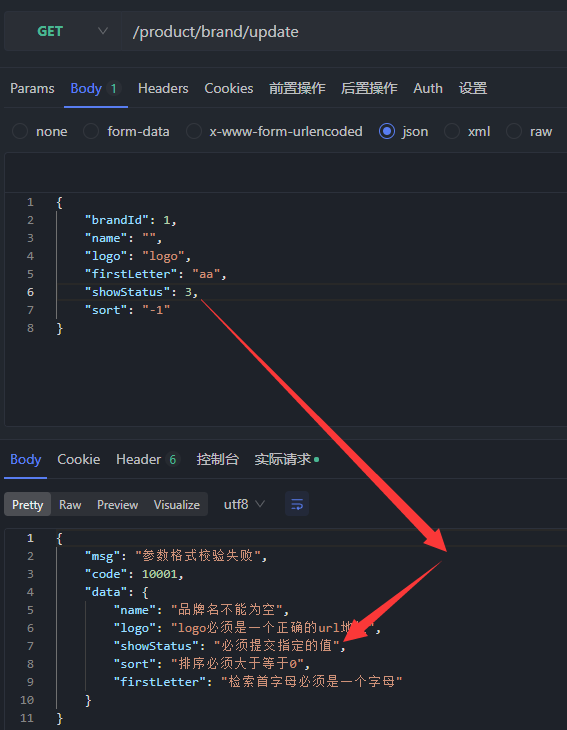
13.6@JsonInclude注解
@JsonInclude注解是jackSon中最常用的注解之一,是为实体类在接口序列化返回值时增加规则的注解
例如,一个接口需要过滤掉返回值为null的字段,即值为null的字段不返回,可以在实体类中增加如下注解
@JsonInclude(JsonInclude.Include.NON_NULL)@JsonInclude注解中的规则有:
- ALWAYS
==ALWAYS为默认值,表示全部序列化,即默认返回全部字段,例:==
@JsonInclude(JsonInclude.Include.ALWAYS)- NON_NULL
==NON_NULL表示值为null就不序列化,即值为null的字段不返回,例:==
@JsonInclude(JsonInclude.Include.NON_NULL)- NON_ABSENT
==NON_ABSENT可在实例对象中有Optional或AtomicReference类型的成员变量时,如果Optional或AtomicReference引用的实例为null时,也可使该字段不做序列化,同时可以排除值为null的字段,例:==
@JsonInclude(JsonInclude.Include.NON_ABSENT)- NON_EMPTY
==NON_EMPTY排除字段值为null、空字符串、空集合、空数组、Optional类型引用为空,AtomicReference类型引用为空,例:==
@JsonInclude(JsonInclude.Include.NON_EMPTY)- NON_DEFAULT
==NON_DEFAULT没有更改的字段不序列化,即未变动的字段不返回,例:==
@JsonInclude(JsonInclude.Include.NON_DEFAULT)对于当查询树形结构时,由于对应的实体类有children字段,所以最后一级节点返回数据时会携带一个空的children。前端填充数据时就会出现空数据。可以采用
@JsonInclude(JsonInclude.Include.NON_EMPTY)
来避免空数组的情况
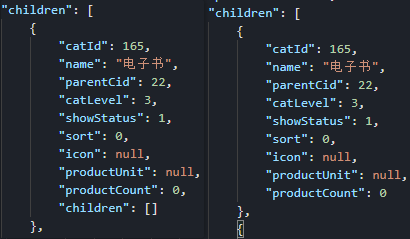
13.7Mybatis-Plus分页插件配置
/**
 * mybatis-plus分页插件配置
 */
@Configuration
public class MybatisPlusConfig {
    @Bean
    public MybatisPlusInterceptor mybatisPlusInterceptor(){
        MybatisPlusInterceptor interceptor = new MybatisPlusInterceptor();
//      DbType表示数据库类型
        interceptor.addInnerInterceptor(new PaginationInnerInterceptor(DbType.MYSQL));
        return interceptor;
    }
}
13.8全局异常处理
import com.xha.gulimall.common.enums.HttpCode;
import com.xha.gulimall.common.utils.R;
import lombok.extern.slf4j.Slf4j;
import org.springframework.validation.BindingResult;
import org.springframework.web.bind.MethodArgumentNotValidException;
import org.springframework.web.bind.annotation.ExceptionHandler;
import org.springframework.web.bind.annotation.RestControllerAdvice;
import java.util.HashMap;
import java.util.Map;

/**
 * 全局异常处理类
 *
 * @author Xu Huaiang
 * @date 2023/01/04
 */
@Slf4j
//指定要处理那些包下的异常
@RestControllerAdvice(basePackages = "com.xha.gulimall.product")
public class GlobalExceptionHandler {

    /**
     * 数据校验异常处理
     *
     * @param e e
     * @return {@link R}
     *///    使用@ExceptionHandler指定要处理哪些异常
    @ExceptionHandler(value = MethodArgumentNotValidException.class)
    public R handleValidException(MethodArgumentNotValidException e){
        log.error("数据校验出现问题:" + e.getMessage() + "异常类型是:" + e.getClass());
//        得到数据校验的错误结果
        BindingResult bindingResult = e.getBindingResult();
        Map<String,String> errorMap = new HashMap<>();
        bindingResult.getFieldErrors().forEach((fieldError -> {
            errorMap.put(fieldError.getField(),fieldError.getDefaultMessage());
        }));
        return R.error(HttpCode.VALID_EXCEPTION.getCode(), HttpCode.VALID_EXCEPTION.getMessage()).put("data",errorMap);
    }

    /**
     * 全局异常处理
     *
     * @return {@link R}
     */
    @ExceptionHandler(value = Throwable.class)
    public R handlerException(Throwable e){
        log.error("出现全局异常:" + e.getMessage() + "异常类型是:" + e.getClass());
        return R.error(HttpCode.UNKNOW_EXCEPTION.getCode(), HttpCode.UNKNOW_EXCEPTION.getMessage());
    }

}
13.8Jackson实现datatime类型格式化
可以使用@JsonFormat注解标注在字段上对数据库中的datatime字段进行格式化
@JsonFormat(pattern = “yyyy-MM-dd HH:mm:ss”,timezone = “GMT+8”)
也可以使用spring提供的jackson在配置文件当中进行全局处理
spring:
	jackson:
  		date-format: yyyy-MM-dd HH:mm:ss
  		time-zone: GMT+8
13.9Elasticsearch配置
Elasticsearch Clients官网地址:Elasticsearch Clients | Elastic
这里使用Java Rest Clients的elasticsearch-rest-high-level-client(RHLC)来操作ES
文档说明:[Index API | Java REST Client 7.17] | Elastic
<dependency>
    <groupId>org.elasticsearch</groupId>
    <artifactId>elasticsearch</artifactId>
    <version>7.4.2</version>
</dependency>
<dependency>
    <groupId>org.elasticsearch.client</groupId>
    <artifactId>elasticsearch-rest-high-level-client</artifactId>
    <version>7.4.2</version>
</dependency>
添加RHLC配置类
import org.apache.http.HttpHost;
import org.elasticsearch.client.RequestOptions;
import org.elasticsearch.client.RestClient;
import org.elasticsearch.client.RestHighLevelClient;
import org.springframework.context.annotation.Bean;
import org.springframework.context.annotation.Configuration;

@Configuration
public class ElasticsearchConfig {

//    通用设置项
    public static final RequestOptions COMMON_OPTIONS;
    static {
        RequestOptions.Builder builder = RequestOptions.DEFAULT.toBuilder();
        COMMON_OPTIONS = builder.build();
    }

    @Bean
    public RestHighLevelClient esRestClient() {
        RestHighLevelClient restHighLevelClient = new RestHighLevelClient(
                RestClient.builder(
                        new HttpHost("192.168.26.160", 9200, "http")
                )
        );
        return restHighLevelClient;
    }
}
13.10添加商品的mapping规则
说明:
index: 默认 true,如果为 false,==表示该字段不会被索引==,但是检索结果里面有,但字段本身不能当做检索条件。
doc_values: 默认 true,设置为 false,==表示不可以做排序、聚合以及脚本操作,这样更节省磁盘空间==。 还可以通过设定 doc_values 为 true,index 为 false 来让字段不能被搜索但可以用于排序、聚合以及脚本操作:
nested:**如果数据是数组类型的,在es中会被扁平化处理**,扁平化处理的数据,检索会出现以下问题:
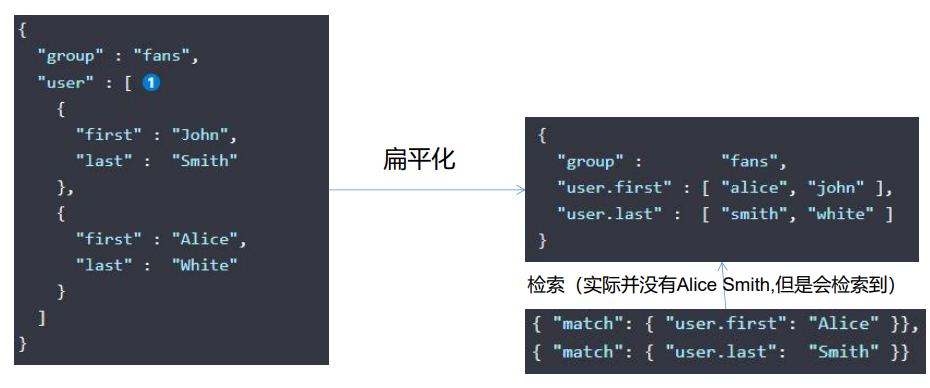
而可以使用nested表示该数据是嵌入式的,可以避免扁平化数据检索问题
PUT /gulimall_product
{
  "mappings": {
    "properties": {
      "skuId": {
        "type": "long"
      },
      "spuId": {
        "type": "keyword"
      },
      "skuTitle": {
        "type": "text",
        "analyzer": "ik_smart"
      },
      "skuPrice": {
        "type": "double"
      },
      "skuImg": {
        "type": "keyword"
      },
      "saleCount": {
        "type": "long"
      },
      "hasStock": {
        "type": "boolean"
      },
      "hotScore": {
        "type": "long"
      },
      "brandId": {
        "type": "long"
      },
      "catalogId": {
        "type": "long"
      },
      "brandName": {
        "type": "keyword"
      },
      "brandImg": {
        "type": "keyword"
      },
      "catalogName": {
        "type": "keyword"
      },
      "attrs": {
        "type": "nested",
        "properties": {
          "attrId": {
            "type": "long"
          },
          "attrName": {
            "type": "keyword"
          },
          "attrValue": {
            "type": "keyword"
          }
        }
      }
    }
  }
}
13.11上传数据到ES
    /**
     * 上传sku信息
     *
     * @param upProducts 了产品
     * @return {@link R}
     */
    @Override
    public boolean upProduct(List<SkuInfoES> upProducts) throws IOException {
        BulkRequest bulkRequest = new BulkRequest();
        for (SkuInfoES product : upProducts) {
            IndexRequest indexRequest = new IndexRequest();
//            指定索引
            indexRequest.index(EsConstants.PRODUCT_INDEX);
//            指定id
            indexRequest.id(product.getSkuId().toString());
//            将上传的对象转换为JSON数据
            String upProductsString = new ObjectMapper().writeValueAsString(product);
//            指定source,并且为JSON类型
            indexRequest.source(upProductsString, XContentType.JSON);
            bulkRequest.add(indexRequest);
        }
        BulkResponse bulk = restHighLevelClient.bulk(bulkRequest, ElasticsearchConfig.COMMON_OPTIONS);

        boolean result = bulk.hasFailures();
        return result;
    }
13.12Nginx配置反向代理
13.12.1在本机电脑做ip-域名映射:
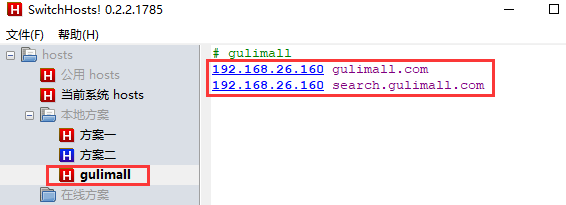
13.12.2Nginx配置反向代理到本机地址
当在nginx.conf文件中未找到server块时,根据提示是在conf.d文件夹下,该文件夹下默认有一个default.conf文件,可以复制该文件。
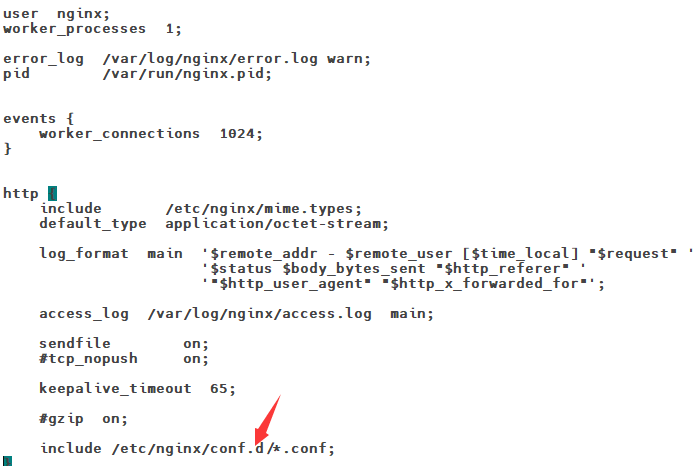
在server中配置,当访问gulimall.com域名时,就反向代理到本机的10000端口
这里的ip地址可以配置为本机的ip地址,也可以是虚拟网卡地址
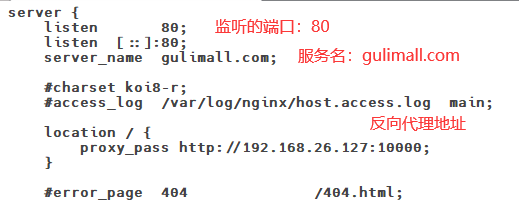
13.12.3Nginx配置反向代理到网关
代理步骤:==nginx首先做好负载均衡(upstream)和反向代理(proxy)。然后发送请求到nginx,nginx根据反向代理规则反向代理到网关,网关根据断言规则转到对应的服务。==
在nginx.conf文件中添加upstream块,gulimall是upstream名,server配置的是本机网关地址
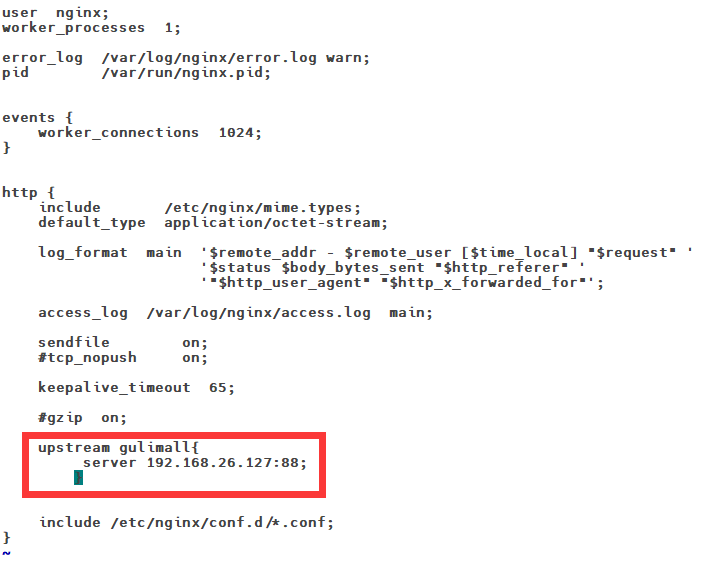
在conf.d文件夹下修改对应文件的server块,配置反向代理到网关
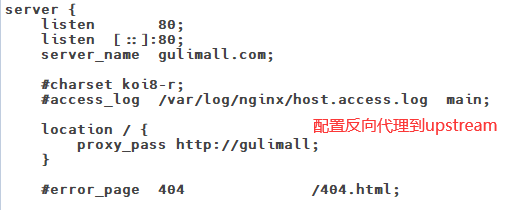
在网关模块添加新的配置,
#        根据Host(gulimall.com)路由到gulimall-product
- id: gulimall_host_route
  uri: lb://gulimall-product
  predicates:
    - Host=gulimall.com
但是nginx代理给网关的时候会丢失请求的host信息
对于以上问题,就需要在nginx配置文件中添加配置,设置代理时携带请求头:Host
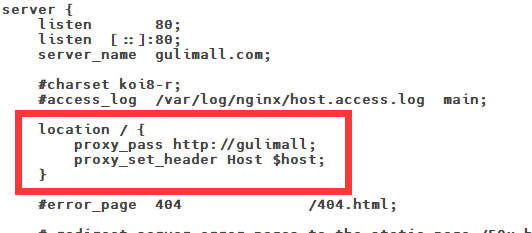
添加另一个服务进Nginx

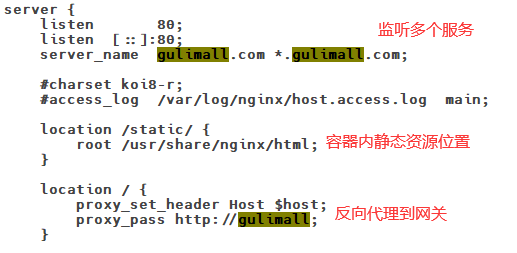
13.13Redisson配置
- 添加maven坐标
<dependency>
    <groupId>org.redisson</groupId>
    <artifactId>redisson</artifactId>
    <version>${redisson-version}</version>
</dependency>- 添加redisson配置类
import org.redisson.Redisson;
import org.redisson.api.RedissonClient;
import org.redisson.config.Config;
import org.springframework.context.annotation.Bean;
import org.springframework.context.annotation.Configuration;

@Configuration
public class RedissonConfig {

    @Bean
    public RedissonClient redissonClient() {
        Config config = new Config();
        config.useSingleServer().setAddress("redis://192.168.26.160:6379");
        return Redisson.create(config);

    }
}
13.14项目缓存的解决方案
- 缓存的所有数据都有过期时间,数据过期下一次查询触发主动更新
- 使用Redisson的分布式锁的读写锁来解决分布式系统下高并发访问问题。
13.15ES检索和响应结果处理
@Service
public class MallSearchServiceImpl implements MallSearchService {

    @Resource
    private RestHighLevelClient restHighLevelClient;

    @Override
    public SearchResponseVO searchProducts(ParamDTO paramDTO) {
//        1.创建检索请求
        SearchRequest searchRequest = buildSearchRequest(paramDTO);
        SearchResponseVO searchResponseVO = null;
        try {
//        2.执行检索
            SearchResponse searchResponse = restHighLevelClient.search(searchRequest, ElasticsearchConfig.COMMON_OPTIONS);
//        3.处理请求响应结果
            searchResponseVO = handlerResponse(searchResponse, paramDTO);
        } catch (IOException e) {
            e.printStackTrace();
        }
        return searchResponseVO;
    }


    /**
     * 创建检索请求
     *
     * @param paramDTO param dto
     * @return {@link SearchRequest}
     */
    private SearchRequest buildSearchRequest(ParamDTO paramDTO) {
//        1.构建DSL语句
        SearchSourceBuilder searchSourceBuilder = new SearchSourceBuilder();

//        2.模糊匹配、过滤(按照属性、分类、品牌、价格区间、库存)
        BoolQueryBuilder boolQueryBuilder = QueryBuilders.boolQuery();
//          2.1查询检索关键字
        if (!StringUtils.isEmpty(paramDTO.getKeyword())) {
            boolQueryBuilder.must(QueryBuilders.matchQuery("skuTitle", paramDTO.getKeyword()));
        }
//          2.2查询三级分类id
        if (!Objects.isNull(paramDTO.getCatalog3Id())) {
            boolQueryBuilder.filter(QueryBuilders.termQuery("catelogId", paramDTO.getCatalog3Id()));
        }
//          2.3查询品牌id
        if (!CollectionUtils.isEmpty(paramDTO.getBrandId())) {
            for (Long brandId : paramDTO.getBrandId()) {
                boolQueryBuilder.filter(QueryBuilders.termQuery("brandId", brandId));
            }
        }
//          2.4是否有库存,未指定就全部查
        if (!Objects.isNull(paramDTO.getHasStock())) {
            boolQueryBuilder.filter(QueryBuilders.termQuery("hasStock", paramDTO.getHasStock() == 1));
        }

//          2.5按照价格区间查询
        if (!StringUtils.isEmpty(paramDTO.getSkuPrice())) {
            RangeQueryBuilder rangeQueryBuilder = QueryBuilders.rangeQuery("skuPrice");
            String[] prices = paramDTO.getSkuPrice().split("_");
            if (prices.length == 2) {
                rangeQueryBuilder.gte(prices[0]);
                rangeQueryBuilder.lte(prices[1]);
            } else if (prices.length == 1) {
                if (paramDTO.getSkuPrice().startsWith("_")) {
                    rangeQueryBuilder.lte(prices[0]);
                } else {
                    rangeQueryBuilder.gte(prices[0]);
                }

            }
            boolQueryBuilder.filter(rangeQueryBuilder);
        }

//          2.6按照属性进行查询
        if (!CollectionUtils.isEmpty(paramDTO.getAttrs())) {
            for (String attr : paramDTO.getAttrs()) {
                BoolQueryBuilder queryBuilder = new BoolQueryBuilder();
//                attrs=1_5寸:8寸&attrs2_8G:16G
                String[] attrArray = attr.split("_");
                String attrId = attrArray[0];
                String[] attrValues = attrArray[1].split(":");
                queryBuilder.must(QueryBuilders.termQuery("attrs.attrId", attrId));
                queryBuilder.must(QueryBuilders.termQuery("attrs.attrValue", attrValues));
//                2.6.1将nestQuery放入到循环当中是为了每次循环都创建一个NestedQueryBuilder
                NestedQueryBuilder nestedQueryBuilder = QueryBuilders.nestedQuery("attrs", queryBuilder, ScoreMode.None);
                boolQueryBuilder.filter(nestedQueryBuilder);
            }
        }


        searchSourceBuilder.query(boolQueryBuilder);

//        3.排序、分页、高亮
//          3.1排序
        if (!StringUtils.isEmpty(paramDTO.getSort())) {
            String sort = paramDTO.getSort();
//            sort=hotScore_asc/desc
            String[] sortSplit = sort.split("_");
            SortOrder sortOrder = sortSplit[1].equalsIgnoreCase("asc") ? SortOrder.ASC : SortOrder.DESC;
            searchSourceBuilder.sort(sortSplit[0], sortOrder);
        }
//          3.2分页
        searchSourceBuilder.from((paramDTO.getPageNum() - 1) * EsConstants.PRODUCT_PAGESIZE);
        searchSourceBuilder.size(EsConstants.PRODUCT_PAGESIZE);

//          3.3高亮
        if (!StringUtils.isEmpty(paramDTO.getKeyword())) {
            HighlightBuilder highlightBuilder = new HighlightBuilder();
            highlightBuilder
                    .field("skuTitle")
                    .preTags("<b style='color:red'>")
                    .postTags("</b>");
            searchSourceBuilder.highlighter(highlightBuilder);
        }

//        4.聚合查询
//          4.1品牌聚合
        TermsAggregationBuilder brand_agg = AggregationBuilders.terms("brand_agg");
        brand_agg.field("brandId").size(50);
//          4.2品牌聚合的子聚合
        brand_agg.subAggregation(AggregationBuilders.terms("brand_name_agg").field("brandName").size(1));
        brand_agg.subAggregation(AggregationBuilders.terms("brand_img_agg").field("brandImg").size(1));
        searchSourceBuilder.aggregation(brand_agg);

//          4.3分类聚合
        TermsAggregationBuilder catalog_agg = AggregationBuilders.terms("catalog_agg").field("catelogId").size(20);
        catalog_agg.subAggregation(AggregationBuilders.terms("catalog_name_agg").field("catelogName.keyword").size(1));
        searchSourceBuilder.aggregation(catalog_agg);

//          4.4属性聚合
//              4.4.1聚合分析出当前的所有attr分类
        NestedAggregationBuilder attr_agg = AggregationBuilders.nested("attr_agg", "attrs");
//              4.4.2聚合分析出attr_id对应的名字
        TermsAggregationBuilder attr_id_agg = AggregationBuilders.terms("attr_id_agg").field("attrs.attrId");
        attr_id_agg.subAggregation(AggregationBuilders.terms("attr_name_agg").field("attrs.attrName").size(1));
        attr_id_agg.subAggregation(AggregationBuilders.terms("attr_value_agg").field("attrs.attrValue").size(50));
        attr_agg.subAggregation(attr_id_agg);

        searchSourceBuilder.aggregation(attr_agg);


        SearchRequest searchRequest = new SearchRequest(new String[]{EsConstants.PRODUCT_INDEX}, searchSourceBuilder);
        return searchRequest;
    }


    /**
     * 处理响应结果
     *
     * @param searchResponse 搜索响应
     */
    private SearchResponseVO handlerResponse(SearchResponse searchResponse, ParamDTO paramDTO) {
        SearchResponseVO searchResponseVO = new SearchResponseVO();

        SearchHits hits = searchResponse.getHits();
//        1.设置总记录数
        searchResponseVO.setTotal(hits.getTotalHits().value);
//        2.设置总页数
        searchResponseVO.setTotalPages((int) Math.ceil(((double) hits.getTotalHits().value) / EsConstants.PRODUCT_PAGESIZE));
//        3.设置当前页码
        searchResponseVO.setPageNum(paramDTO.getPageNum());
        List<Integer> pageNavs = new ArrayList<>();
        for (int i=1;i<=(int) Math.ceil(((double) hits.getTotalHits().value) / EsConstants.PRODUCT_PAGESIZE);i++){
            pageNavs.add(i);
        }
        searchResponseVO.setPageNavs(pageNavs);

//        4.设置查询到的所有商品信息
        List<SkuInfoES> skuInfoESList = new ArrayList<>();
        if (!CollectionUtils.isEmpty(Arrays.asList(hits.getHits()))) {
            for (SearchHit hit : hits.getHits()) {
                String sourceAsString = hit.getSourceAsString();
                ObjectMapper mapper = new ObjectMapper();
                SkuInfoES skuInfoES = null;
                try {
                    skuInfoES = mapper.readValue(sourceAsString, SkuInfoES.class);
//                    4.1设置高亮
                    if (!StringUtils.isEmpty(paramDTO.getKeyword())) {
                        HighlightField skuTitle = hit.getHighlightFields().get("skuTitle");
                        skuInfoES.setSkuTitle(skuTitle.getFragments()[0].string());
                    }
                } catch (JsonProcessingException e) {
                    e.printStackTrace();
                }
                skuInfoESList.add(skuInfoES);
            }
        }
        searchResponseVO.setProducts(skuInfoESList);

//        5.设置所有商品的所有分类信息
        List<CategoryVO> categoryVOList = new ArrayList<>();
        ParsedLongTerms catalog_agg = searchResponse.getAggregations().get("catalog_agg");
        for (Terms.Bucket bucket : catalog_agg.getBuckets()) {
            CategoryVO categoryVO = new CategoryVO();
            Long catalogId = (Long) bucket.getKey();
//             5.1得到分类id
            categoryVO.setCatalogId(catalogId);
//             5.2查询子聚合得到分类名
            ParsedStringTerms catalog_name_agg = bucket.getAggregations().get("catalog_name_agg");
            String catalogName = catalog_name_agg.getBuckets().get(0).getKeyAsString();
            categoryVO.setCatalogName(catalogName);
            categoryVOList.add(categoryVO);
        }
        searchResponseVO.setCategorys(categoryVOList);

//        6.设置所有商品的所有品牌信息
        List<BrandVO> brandVOList = new ArrayList<>();
        ParsedLongTerms brand_agg = searchResponse.getAggregations().get("brand_agg");
        for (Terms.Bucket bucket : brand_agg.getBuckets()) {
            BrandVO brandVO = new BrandVO();
//             6.1等到品牌名
            String brandName = ((ParsedStringTerms) bucket.getAggregations().get("brand_name_agg")).getBuckets().get(0).getKeyAsString();
//             6.2得到品牌图片
            String brandImg = ((ParsedStringTerms) bucket.getAggregations().get("brand_img_agg")).getBuckets().get(0).getKeyAsString();
//             6.3得到品牌id
            brandVO.setBrandId((Long) bucket.getKey())
                    .setBrandName(brandName)
                    .setBrandImg(brandImg);
            brandVOList.add(brandVO);
        }
        searchResponseVO.setBrands(brandVOList);

//        7.设置所有商品的属性信息
        List<AttrVO> attrVOList = new ArrayList<>();
        ParsedNested attr_agg = searchResponse.getAggregations().get("attr_agg");
        ParsedLongTerms attr_id_agg = attr_agg.getAggregations().get("attr_id_agg");
        for (Terms.Bucket bucket : attr_id_agg.getBuckets()) {
            AttrVO attrVO = new AttrVO();
//            7.1等到属性名
            String attrName = ((ParsedStringTerms) bucket.getAggregations().get("attr_name_agg")).getBuckets().get(0).getKeyAsString();
//            7.2等到属性值集合
            List<String> attrValueList = ((ParsedStringTerms) bucket.getAggregations().get("attr_value_agg")).getBuckets().stream().map(attr -> {
                return attr.getKeyAsString();
            }).collect(Collectors.toList());
            attrVO.setAttrId(bucket.getKeyAsNumber().longValue())
                    .setAttrName(attrName)
                    .setAttrValue(attrValueList);
            attrVOList.add(attrVO);
        }
        searchResponseVO.setAttrs(attrVOList);

        return searchResponseVO;
    }
}
13.16短信服务
13.16.1集成短信服务API
- 购买短信服务
- 查看提供的API
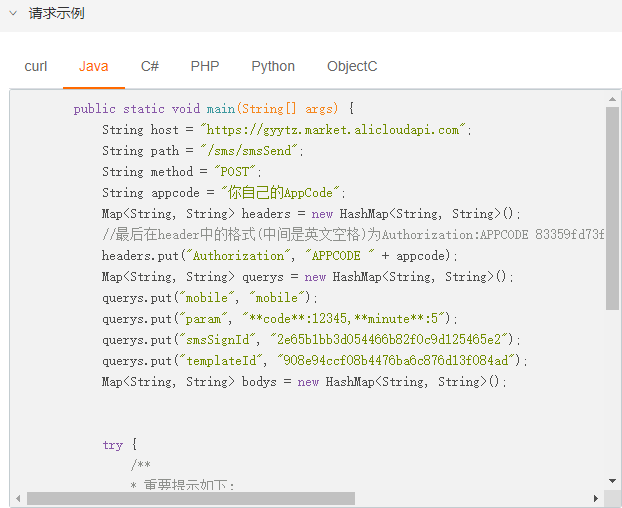
- 在配置文件当中写入配置信息
server:
  port: 30000

spring:
  application:
    name: gulimall-thirdserver
  cloud:
    nacos:
      discovery:
        server-addr: 192.168.26.160:8848
#   OSS对象存储服务
    alicloud:
      access-key:
      secret-key:
      oss:
        endpoint:
        bucket:
        dir: gulimall
#   短信服务
      sms:
        host: https://gyytz.market.alicloudapi.com
        path: /sms/smsSend
        appcode:
        smsSignId:
        templateIdl:
minute: 10- 短信服务提供的发送短信的API
import com.xha.gulimall.thirdserver.util.HttpUtils;
import lombok.Data;
import org.apache.http.HttpResponse;
import org.springframework.boot.context.properties.ConfigurationProperties;
import org.springframework.stereotype.Component;

import java.util.HashMap;
import java.util.Map;

@Data
@Component
@ConfigurationProperties(prefix = "spring.cloud.alicloud.sms")
public class SendMessageComponent {
    private String host;

    private String path;

    private String appcode;

    private String smsSignId;

    private String templateIdl;
    public void sendMessage(String phone,String captcha) {
        String method = "POST";
        Map<String, String> headers = new HashMap<String, String>();
        //最后在header中的格式(中间是英文空格)为Authorization:APPCODE 83359fd73fe94948385f570e3c139105
        headers.put("Authorization", "APPCODE " + appcode);
        Map<String, String> querys = new HashMap<String, String>();
        querys.put("mobile", phone);
        querys.put("param", "**code**:" + captcha +",**minute**:" + minute);
        querys.put("smsSignId", smsSignId);
        querys.put("templateId", templateIdl);
        Map<String, String> bodys = new HashMap<String, String>();


        try {
            /**
             * 重要提示如下:
             * HttpUtils请从
             * https://github.com/aliyun/api-gateway-demo-sign-java/blob/master/src/main/java/com/aliyun/api/gateway/demo/util/HttpUtils.java
             * 下载
             *
             * 相应的依赖请参照
             * https://github.com/aliyun/api-gateway-demo-sign-java/blob/master/pom.xml
             */
            HttpResponse response = HttpUtils.doPost(host, path, method, headers, querys, bodys);
            System.out.println(response.toString());
            //获取response的body
            //System.out.println(EntityUtils.toString(response.getEntity()));
        } catch (Exception e) {
            e.printStackTrace();
        }
    }
}- 根据提示在github获取到HttpUtils
- 引入HttpUtils对应的依赖
<dependency>
          <groupId>org.apache.httpcomponents</groupId>
          <artifactId>httpclient</artifactId>
          <version>4.2.1</version>
      </dependency>
      <dependency>
          <groupId>org.apache.httpcomponents</groupId>
          <artifactId>httpcore</artifactId>
          <version>4.2.1</version>
      </dependency>
13.16.2具体业务实现
验证码业务实现思路:
使用缓存设置超时时间,来实现验证码的超时重发和失效问题:
首先获取到对应key的超时时间,如果为-2(key不存在或key已经失效)就生成验证码存入缓存,并远程调用第三方服务发送验证码。以用户的手机号为key,验证码为value存入缓存,设置超时时间(10min)。
如果expire对应的值不为-2(key存在),就判断当前的时间是否已经过去60s(判断当前秒数是否大于规定的秒数)。
如果大于规定的秒数,发送验证码的频率过大,不能发送。
如果小于规定的秒数,就可以再次发送验证码,超时时间更新为10min
import cn.hutool.core.util.RandomUtil;
import com.xha.gulimall.auth.constants.CacheConstants;
import com.xha.gulimall.auth.constants.NumberConstants;
import com.xha.gulimall.auth.feign.ThirdServerFeign;
import com.xha.gulimall.auth.service.LoginRegisterService;
import com.xha.gulimall.common.enums.HttpCode;
import com.xha.gulimall.common.utils.R;
import org.apache.commons.lang.StringUtils;
import org.springframework.data.redis.core.StringRedisTemplate;
import org.springframework.stereotype.Service;

import javax.annotation.Resource;
import java.util.concurrent.TimeUnit;

@Service
public class LoginRegisterServiceImpl implements LoginRegisterService {

    @Resource
    private ThirdServerFeign thirdServerFeign;

    @Resource
    private StringRedisTemplate stringRedisTemplate;

    /**
     * 发送验证码
     *
     * @param phone 电话
     * @return {@link R}
     */
    @Override
    public R sendCaptcha(String phone) {
//        TODO 接口防刷

        if (StringUtils.isEmpty(phone)) {
            return R.error().put("msg", "手机号不能为空");
        }
//        1.获取到对应缓存的过期时间
        Long expireTime = stringRedisTemplate.opsForValue().getOperations().getExpire(CacheConstants.PHONE_CAPTCHA + phone);
//        2.缓存不存在(即还没有发送验证码)重建缓存
        if (expireTime == NumberConstants.EXPIRE_TIME_STATUS) {
//            2.1生成验证码
            createCaptcha(phone);
        } else {
            if (expireTime >= NumberConstants.EXPIRE_TIME) {
                return R.error(HttpCode.CHPRCHE_EXCEPTION.getCode(), HttpCode.CHPRCHE_EXCEPTION.getMessage());
            } else {
                //            2.1生成验证码
                createCaptcha(phone);
            }
        }
        return null;
    }

    /**
     * 创建验证码
     */
    public void createCaptcha(String phone) {
        String captcha = RandomUtil.randomNumbers(NumberConstants.CAPTCHA_LENGTH);
        stringRedisTemplate.opsForValue().set(CacheConstants.PHONE_CAPTCHA + phone, captcha, 10, TimeUnit.MINUTES);
        thirdServerFeign.sendCaptcha(phone, captcha);
    }
}
13.17拦截器实现浏览器cookie的添加
- 添加拦截器类,实现
HandlerInterceptor接口
import cn.hutool.core.lang.UUID;
import com.xha.gulimall.cart.to.UserInfoTO;
import com.xha.gulimall.common.constants.CommonConstants;
import com.xha.gulimall.cart.constants.CookieConstants;
import com.xha.gulimall.common.to.MemberTO;
import org.apache.commons.lang.StringUtils;
import org.springframework.web.servlet.HandlerInterceptor;
import org.springframework.web.servlet.ModelAndView;

import javax.servlet.http.Cookie;
import javax.servlet.http.HttpServletRequest;
import javax.servlet.http.HttpServletResponse;
import javax.servlet.http.HttpSession;
import java.util.Objects;

/**
 * 在执行目标方法之前,判断用户的登录状态,
 *
 * @author Xu Huaiang
 * @date 2023/02/01
 */

public class CartInterceptor implements HandlerInterceptor {

    public static ThreadLocal<UserInfoTO> threadLocal = new ThreadLocal<UserInfoTO>();

    /**
     * 前处理
     *
     * @param request  请求
     * @param response 响应
     * @param handler  处理程序
     * @return boolean
     * @throws Exception 异常
     */
    @Override
    public boolean preHandle(HttpServletRequest request, HttpServletResponse response, Object handler) throws Exception {
        HttpSession session = request.getSession();
        UserInfoTO userInfoTO = new UserInfoTO();
//        1.从session中获取到当前登录用户
        MemberTO loginUser = (MemberTO) session.getAttribute(CommonConstants.LOGIN_USER);
        if (!Objects.isNull(loginUser)){
//        2.当前有用户登录
            userInfoTO.setUserId(loginUser.getId());
        }
//        3.当前没有用户登录从cookie中获取到临时用户的user-key
        Cookie[] cookies = request.getCookies();
        if (cookies != null && cookies.length > 0){
            for (Cookie cookie : cookies) {
                if (cookie.getName().equals(CommonConstants.LOGIN_USER)){
                    userInfoTO.setUserKey(cookie.getValue());
                    userInfoTO.setTempUser(true);
                }
            }
        }

//        无论用户有没有登录都分配一个临时用户
        if (StringUtils.isEmpty(userInfoTO.getUserKey())){
            String uuid = UUID.randomUUID().toString();
            userInfoTO.setUserKey(uuid);
        }

//        4.向当前线程中存放数据
        threadLocal.set(userInfoTO);
//        5.放行所有
        return true;
    }

    /**
     * 处理后,浏览器保存cookie
     *
     * @param request      请求
     * @param response     响应
     * @param handler      处理程序
     * @param modelAndView 模型和视图
     * @throws Exception 异常
     */
    @Override
    public void postHandle(HttpServletRequest request, HttpServletResponse response, Object handler, ModelAndView modelAndView) throws Exception {
//        1.判断cookie当中是否有user-key
        UserInfoTO userInfoTO = threadLocal.get();
        if (!userInfoTO.isTempUser()){
//        2.浏览器保存cookie
//          2.1创建cookie
            Cookie cookie = new Cookie(CookieConstants.TEMPORARY_USER, threadLocal.get().getUserKey());
//          2.2设置cookie的作用域
            cookie.setDomain(CookieConstants.COOKIE_DOMAIN);
//          2.3设置cookie的过期时间
            cookie.setMaxAge(CookieConstants.COOKIE_EXPIRE_TIME);
            response.addCookie(cookie);
        }

    }
}- 配置拦截器
在实现WebMcvConfig接口的配置类中,使用addInterceptors方法添加上述拦截器,并指定拦截路径。
import com.xha.gulimall.cart.interceptor.CartInterceptor;
import org.springframework.context.annotation.Configuration;
import org.springframework.web.servlet.config.annotation.InterceptorRegistry;
import org.springframework.web.servlet.config.annotation.WebMvcConfigurer;

@Configuration
public class GulimallWebConfig implements WebMvcConfigurer {


    /**
     * 添加拦截器
     *
     * @param registry 注册表
     */
    @Override
    public void addInterceptors(InterceptorRegistry registry) {
        registry.addInterceptor(new CartInterceptor()).addPathPatterns("/**");
    }
}
14.idea设置
14.1批量管理Services
添加Compound

添加要启动的微服务

14.2指定每个微服务所占的最大内存
