SpringBoot2.0

1.Spring的能力(Spring全家桶)
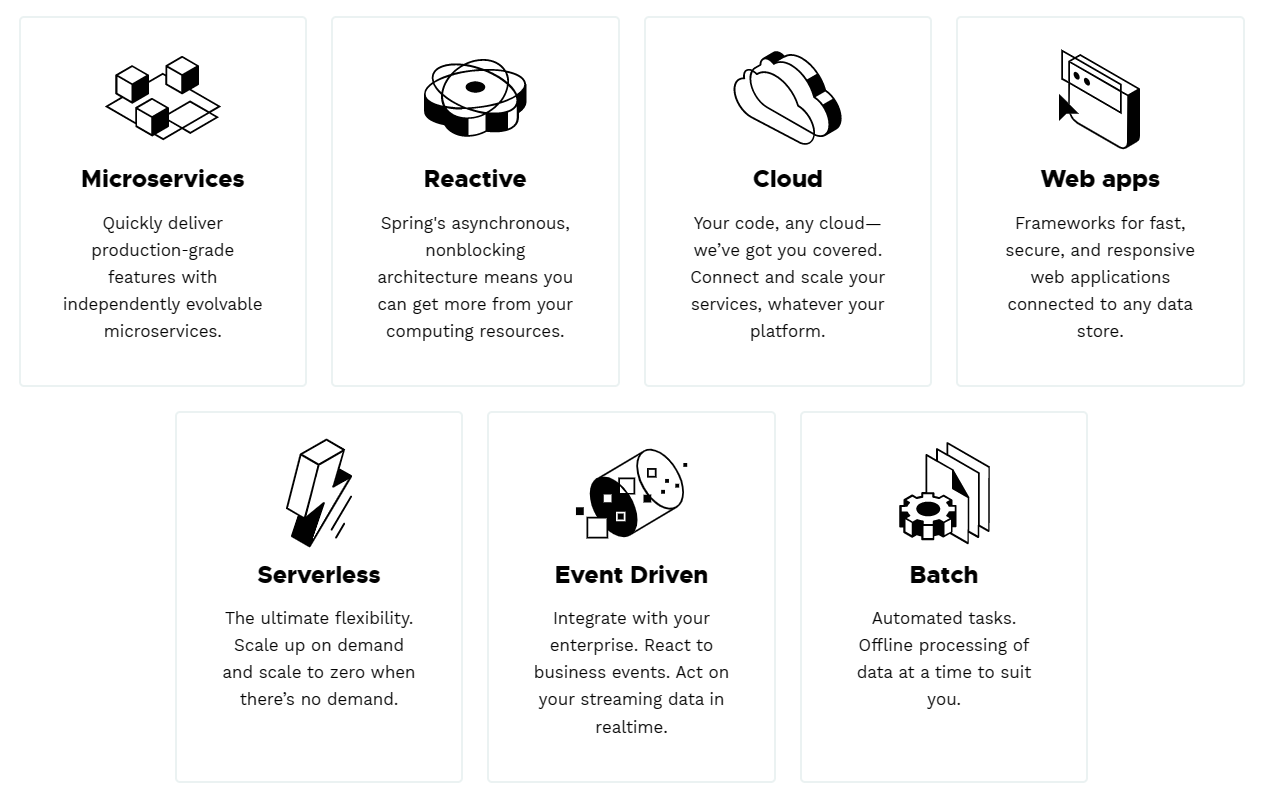
涉及到的领域覆盖了:web开发、数据访问、安全控制、分布式、消息服务、移动开发、批处理
2.SprintBoot概述
SpringBoot是整合Spring技术栈的一站式框架
SpringBoot是简化Spring技术栈的快速开发脚手架
其设计目的是用来简化Spring应用的创建、运行、调试、部署等。使用SpringBoot可以做到专注于Spring应用的开发,而无需过多关注XML的配置。SpringBoot使用“习惯优于配置”的理念,简单来说,它提供了一堆依赖打包,并已经按照使用习惯解决了依赖问题。使用SpringBoot可以不用或者只需要很少的Spring配置就可以让企业项目快速运行起来。
SpringBoot是开发者和Spring 本身框架的中间层,帮助开发者统筹管理应用的配置,提供基于实际开发中常见配置的默认处理(即习惯优于配置),简化应用的开发,简化应用的运维;总的来说,SpringBoot就是为了对Javaweb 的开发进行“简化”和“加快”速度,简化开发过程中引入或启动相关Spring 功能的配置。这样带来的好处就是降低开发人员对于框架的关注点,可以把更多的精力放在自己的业务代码上。
同时随着微服务概念的推广和实践,SpringBoot的精简理念又使其成为Java微服务开发的不二之选,也可以说,SpringBoot其实就是为了微服务而生的Javaweb框架。
微服务是一种允许开发人员独立开发和部署服务的体系结构。每个运行的服务都有自己的流程,这实现了轻量级模型以支持业务应用程序。
3.为什么要用SpringBoot
能快速创建生产级别的Spring应用
4.SpringBoot的优点
- 创建独立Spring应用
- 内嵌web服务器
- 引入starter依赖,简化构建配置
- 自动配置Spring以及第三方功能
- 提供生产级别的监控、健康检查及外部化配置
- 无代码生成、无需编写XML
5.SpringBoot时代背景
5.1微服务
- 微服务是一种架构风格
- 一个应用拆分为一组小型服务
- 每个服务运行在自己的进程内,也就是可独立部署和升级
- 服务之间使用轻量级HTTP交互
- 服务围绕业务功能拆分
- 可以由全自动部署机制独立部署
- 去中心化,服务自治。服务可以使用不同的语言、不同的存储技术
5.2分布式
分布式的困难
- 远程调用
- 服务发现
- 负载均衡
- 服务容错
- 配置管理
- 服务监控
- 链路追踪
- 曰志管理
- 任务调度
分布式的解决方案

5.3云原生
原生应用如何上云。 Cloud Native
- 上云的困难
- 服务自愈
- 弹性伸缩
- 服务隔离
- 自动化部署
- 灰度发布
- 流量治理
6.SpringBoot环境搭建
6.1:修改Maven的配置文件setting.xml
//添加阿里云镜像
<mirror>
	  <id>alimaven</id>
	  <name>aliyun maven</name>
	  <url>http://maven.aliyun.com/nexus/content/groups/public/</url>
	  <mirrorOf>central</mirrorOf>
</mirror>
// 配置Maven的版本
 <profiles>
        <profile>
             <id>jdk-1.8</id>
             <activation>
               <activeByDefault>true</activeByDefault>
               <jdk>1.8</jdk>
             </activation>
             <properties>
               <maven.compiler.source>1.8</maven.compiler.source>
               <maven.compiler.target>1.8</maven.compiler.target>
               <maven.compiler.compilerVersion>1.8</maven.compiler.compilerVersion>
             </properties>
        </profile>
 </profiles>
6.2:创建Maven工程,添加依赖
<!--        所有工程都必须继承spring-boot-starter-parent-->
        <dependency>
            <groupId>org.springframework.boot</groupId>
            <artifactId>spring-boot-starter-parent</artifactId>
            <version>2.5.0</version>
            <type>pom</type>
        </dependency>
<!--        web起步依赖坐标-->
        <dependency>
            <groupId>org.springframework.boot</groupId>
            <artifactId>spring-boot-starter-web</artifactId>
            <version>2.3.4.RELEASE</version>
        </dependency>
6.3:创建SpringBoot主程序类
//添加@SpringBootApplication注解,使之成为一个SpringBoot应用
@SpringBootApplication
public class mainApplication {
    public static void main(String[] args) {
        SpringApplication.run(mainApplication.class,args);
    }
}
6.4控制器方法
@RequestMapping("/hello")
public String test1(){
    return "Hello SpringBoot";
}
6.5:测试
启动主类,进行测试:

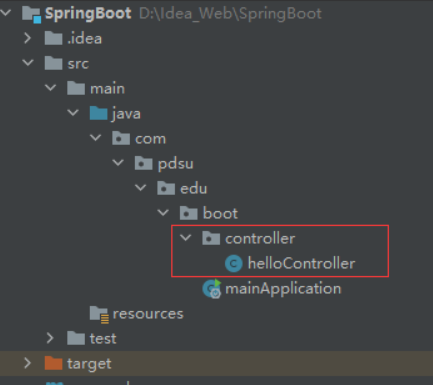
如果出现以下情况,是因为主程序类的位置错误
确保您的主类位于其他类之上的根包的同级目录
测试成功:

7.SpringBoot的配置文件
用于简化配置,所有的配置都可以写到这一个配置文件中

8.SpringBoot简化部署
添加springboot的maven打包插件
<!--    SpringBoot简化部署插件-->
    <build>
        <plugins>
            <plugin>
                <groupId>org.springframework.boot</groupId>
                <artifactId>spring-boot-maven-plugin</artifactId>
                <version>2.3.4.RELEASE</version>
            </plugin>
        </plugins>
    </build>
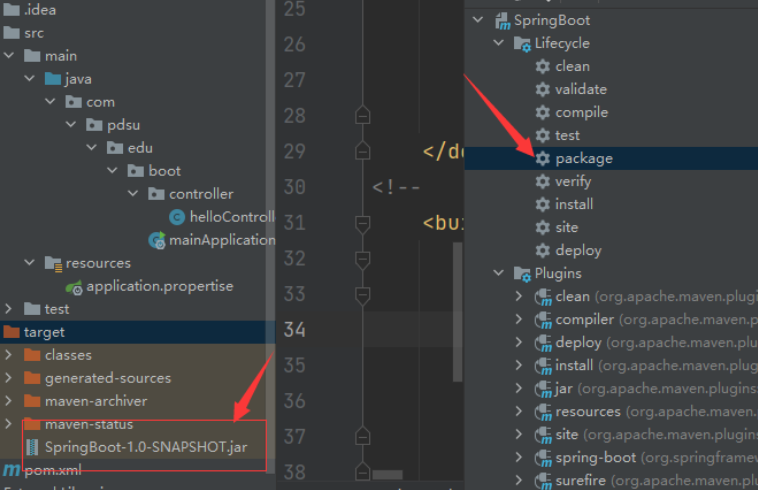
这几行代码的作用就是可以将应用打包成一个可执行的jar,这样我们无需在目标服务器中安装tomcat等就可以运行springboot项目了。
此项目会生成一个jar包
9.SpringBoot自动配置原理
9.1依赖管理
9.1.1父项目依赖管理
<!--        所有工程都必须继承spring-boot-starter-parent父项目-->
        <dependency>
            <groupId>org.springframework.boot</groupId>
            <artifactId>spring-boot-starter-parent</artifactId>
            <version>2.5.0</version>
            <type>pom</type>
        </dependency>
它的父项目为:
<parent>
  <groupId>org.springframework.boot</groupId>
  <artifactId>spring-boot-dependencies</artifactId>
  <version>2.5.0</version>
</parent>
几乎声明了所有开发中常用的依赖的版本号,自动版本仲裁机制
如Mysql的驱动版本在父项目中为

9.1.2开发导入starter项目启动器
1、见到很多 spring-boot-starter-* : *就某种场景
2、只要引入starter,这个场景的所有常规需要的依赖我们都自动引入
3、SpringBoot所有支持的场景
https://docs.spring.io/spring-boot/docs/current/reference/html/using-spring-boot.html#using-boot-starter
4、见到的  *-spring-boot-starter: 第三方为我们提供的简化开发的场景启动器。
5、所有场景启动器最底层的依赖
<dependency>
  <groupId>org.springframework.boot</groupId>
  <artifactId>spring-boot-starter</artifactId>
  <version>2.3.4.RELEASE</version>
  <scope>compile</scope>
</dependency>
9.1.3无需关注版本号
- 引入依赖默认都可以不写版本
- 引入非版本仲裁的jar,要写版本号。
9.2自动配置
9.2.1自动配好Tomcat
引入Tomcat依赖。
配置Tomcat
<dependency>
      <groupId>org.springframework.boot</groupId>
      <artifactId>spring-boot-starter-tomcat</artifactId>
      <version>2.3.4.RELEASE</version>
      <scope>compile</scope>
    </dependency>
9.2.2自动配好SpringMVC
引入SpringMVC全套组件
自动配好SpringMVC常用组件(功能)
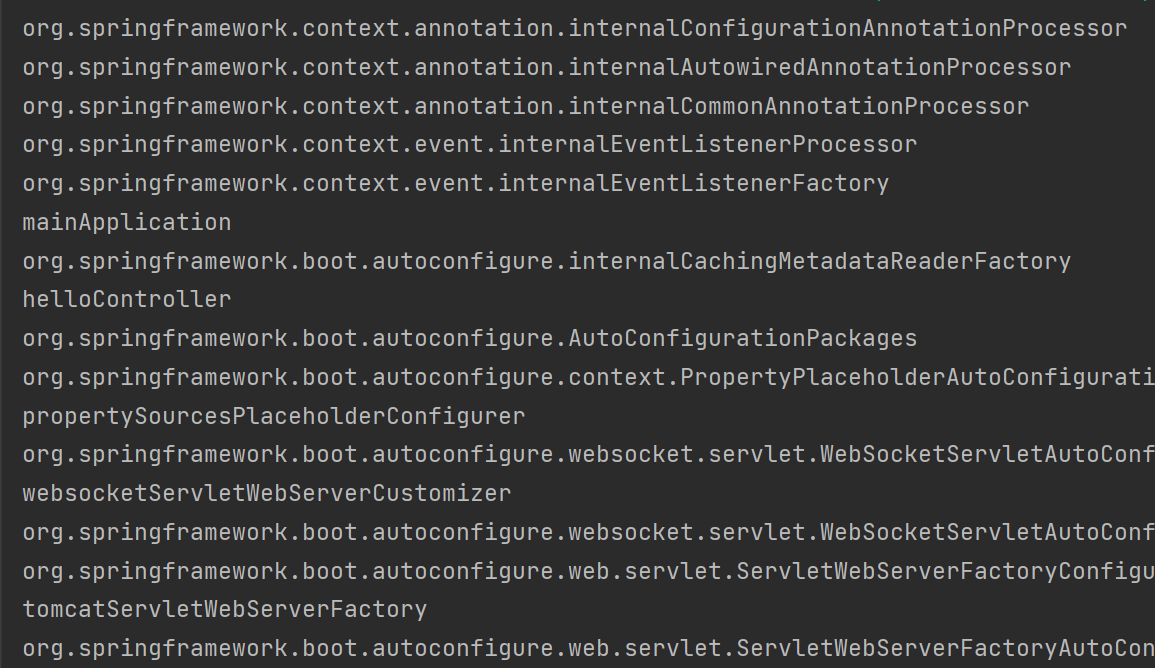
在主程序中打印出所有SpringMVC组件名

9.2.3自动配好Web常见功能,如:字符编码问题
SpringBoot帮我们配置好了所有web开发的常见场景
如文件上传解析器、视图解析器、编码过滤器

9.2.4默认的包结构
主程序所在包及其下面的所有子包里面的组件都会被默认扫描进来
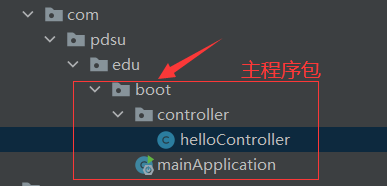
无需以前的包扫描配置
想要改变扫描路径,@SpringBootApplication(scanBasePackages=**"com.xha"**)
9.2.5各种配置拥有默认值
默认配置最终都是映射到某个类上,如:MultipartProperties
配置文件的值最终会绑定每个类上,这个类会在容器中创建对象
9.2.6按需加载所有自动配置项
非常多的starter
引入了哪些场景这个场景的自动配置才会开启
SpringBoot所有的自动配置功能都在 spring-boot-autoconfigure 包里面
<dependency>
  <groupId>org.springframework.boot</groupId>
  <artifactId>spring-boot-autoconfigure</artifactId>
  <version>2.3.4.RELEASE</version>
  <scope>compile</scope>
</dependency>
10.SpringBoot容器管理
10.1添加组件
之前原生的Spring添加组件的方式为在Spring配置文件中添加组件

SpringBoot添加组件的方式如下:
10.1.1@Configuration注解
- 创建配置类,添加
@Configuration注解,将其标识为一个配置类,在此类中可以添加响应实体类的组件。
@Configuration  //告诉SpringBoot这是一个配置类 == 配置文件
public class myConfig {
    @Bean //给容器添加组件,以方法名作为组件id,
    // 返回类型就是组件类型。返回的值就是组件在容器中的实例
    public User user01(){
        return new User("zhangsan","123");
    }
}- 在主程序中查找组件
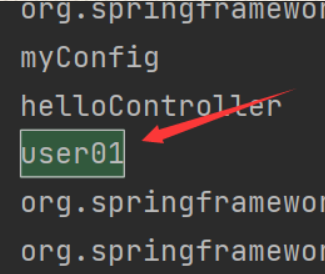
- 在主程序中精确查找组件
public static void main(String[] args) {
    ConfigurableApplicationContext run = SpringApplication.run(mainApplication.class, args);
    User user01 = run.getBean("user01", User.class);
    System.out.println("User组件:"+user01);
}
并且默认情况下一个组件是单实例的,获取到多次都是同一个组件
@Configuration注解属性proxyBeanMethods
proxyBeanMethods属性默认值是true
proxyBeanMethods配置类是用来指定@Bean注解标注的方法是否使用代理(使用代理,容器实例唯一,不使用代理,多次调用多个实例),默认是true使用代理,直接从IOC容器之中取得对象;如果设置为false,也就是不使用代理,每次调用@Bean标注的方法获取到的对象和IOC容器中的都不一样,是一个新的对象,所以我们可以将此属性设置为false来提高性能;
@Configuration(proxyBeanMethods = true)  //告诉SpringBoot这是一个配置类 == 配置文件
public class myConfig {
    @Bean //给容器添加组件,以方法名作为组件id,
    // 返回类型就是组件类型。返回的值就是组件在容器中的实例
    public User user01(){
        return new User("zhangsan","123");
    }
}
@SpringBootApplication
public class mainApplication {
public static void main(String[] args) {
ConfigurableApplicationContext run = SpringApplication.run(mainApplication.class, args);
myConfig bean = run.getBean(myConfig.class);
User user1 = bean.user01();
User user2 = bean.user01();
System.out.println(user1 == user2);
}
}当proxyBeanMethods属性值为 true时,为代理对象,保持对象单实例
当proxyBeanMethods属性值为 false时,不是代理对象,每次获取到的都不是同一个对象实例。
10.1.2import注解
@Import 注解可以用来向 Spring 容器中添加组件。它可以用于导入配置类或普通的组件类。当你在一个配置类上使用 @Import 注解时,你可以指定要导入的类,这些类将被添加到 Spring 容器中。默认组件的名字就是全类名。
//为配置类添加实体类User和Controller组件
@Import({User.class, Controller.class})
@Configuration(proxyBeanMethods = false)  //告诉SpringBoot这是一个配置类 == 配置文件
public class myConfig {
    @Bean //给容器添加组件,以方法名作为组件id,
    // 返回类型就是组件类型。返回的值就是组件在容器中的实例
    public User user01(){
        return new User("zhangsan","123");
    }
}
在主程序中打印相应的组件信息
ConfigurableApplicationContext run = SpringApplication.run(mainApplication.class, args);
String[] user = run.getBeanNamesForType(User.class);
String[] controller = run.getBeanNamesForType(Controller.class);
for (String users : user){
    System.out.println(users);
}
for (String controllers : controller){
    System.out.println(controllers);
}
10.1.3Conditional注解(条件装配)
条件装配:满足Conditional指定的条件,则进行组件注入
Conditional注解及其对应的派生注解
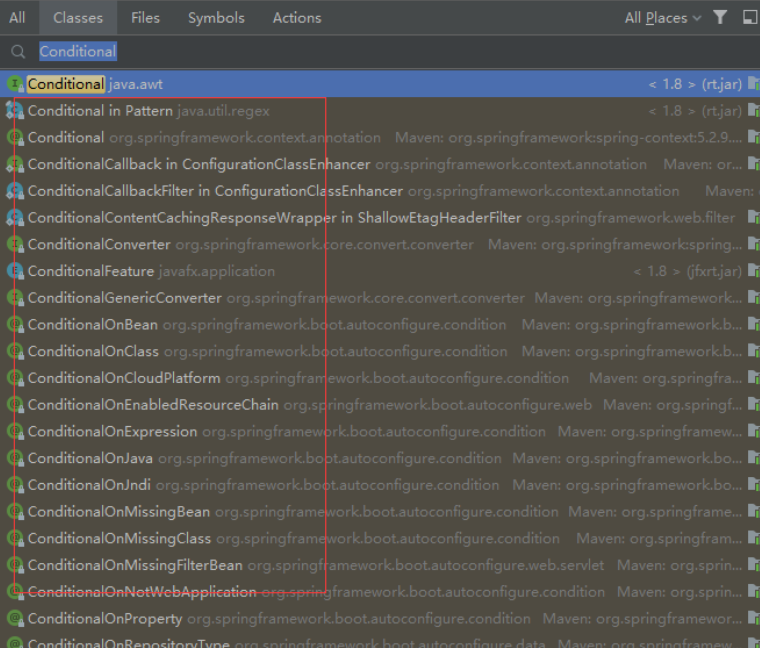
10.1.3.1ConditiontionalOnBean注解
ConditiontionalOnBean注解用于标识一个组件或者配置类,其有属性name,name的值为一个组件名称,其作用是当进行组件扫描时,若含有name的属性值的组件名,就扫描被ConditiontionalOnBean注解标识的组件
例子说明:一个人拥有一种宠物猫,若没有这种宠物猫,就不创建这个人,若有就创建
//    即当含有名controller的组件时,才会扫描这个组件
    @ConditionalOnBean(name = "controller")
    public User user01(){
        return new User("zhangsan","123");
    }

    @Bean
    public Controller controller(){
        return new Controller("01","lisi");
    }

    //测试代码
    boolean user01 = run.containsBean("controller");
    System.out.println(user01);
10.1.3.2ConditionalOnMissingBean注解
其作用与ConditiontionalOnBean注解相反,即当没有指定的条件时才扫描指定的组件
10.2原生配置文件引入
10.2.1@ImportResource注解
@ImportResource注解用于导入Spring的配置文件(就是以前写的springmvc.xml、applicationContext.xml),想让Spring的配置文件生效,加载进来;@ImportResource标注在一个配置类上。

为配置类添加@ImportResource注解,使Spring配置文件生效
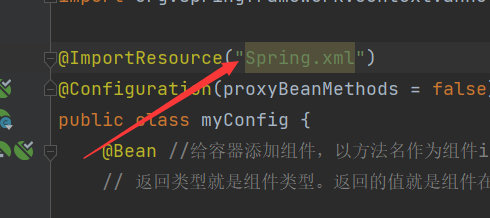
在主程序中获取到相应的组件
boolean user = run.containsBean("user");
System.out.println(user);
10.3配置绑定
如何使用Java读取到properties文件中的内容,并且把它封装到JavaBean(实体类)中,以供随时使用
10.3.1@ConfigurationProperties注解+@Component注解
//@Compoent注解是将实体类实例化到Spring容器当中,
//这样才能使用SpringBoot提供的功能
@Component
//prefix表示配置文件中前缀是什么
@ConfigurationProperties(prefix = "user007")
public class User {
    private String username;
    private String password;

    public User() {
    }

    public User(String username, String password) {
        this.username = username;
        this.password = password;
    }

    public String getUsername() {
        return username;
    }

    public void setUsername(String username) {
        this.username = username;
    }

    public String getPassword() {
        return password;
    }

    public void setPassword(String password) {
        this.password = password;
    }

    @Override
    public String toString() {
        return "User{" +
                "username='" + username + '\'' +
                ", password='" + password + '\'' +
                '}';
    }
}
SpringBoot配置文件
user007.username=zhangsan;
user007.password=123456;
控制器中添加相应实体类的请求映射
@Autowired
 User user;
@RequestMapping("/user")
public User user(){
    return user;
}
10.3.2@EnableConfigurationProperties注解
@EnableConfigurationProperties注解的作用与@ConfigurationPropertise注解的作用相同,都是将配置文件中的内容封装为JavaBean。
@EnableConfigurationProperties注解的位置是在配置类上,且在JavaBean中不需要再添加Component注解将JavaBean实例到Spring容器中。
@EnableConfigurationProperties(User.class)
//1.开启User配置绑定功能
//2.把User自动注册到容器中
@Configuration(proxyBeanMethods = false)  //告诉SpringBoot这是一个配置类 == 配置文件
public class myConfig {
    .......
}
10.3.3配置读取说明
有多个配置文件,如application.proprtties和application.yml文件,ConfigurationProperties注解默认读取哪个?又该如何指定读取哪个?
有多个配置文件,你可以使用 @PropertySource 注解来指定要读取的配置文件。例如:
@Configuration
@PropertySource("file:./config/myconfig.properties")
@ConfigurationProperties(prefix = "my")
public class MyConfig {
    // ...
}
上面的代码中,我们使用了 @PropertySource 注解来指定要读取的配置文件。这样,在应用程序启动时,Spring 容器会自动加载指定的配置文件,并将其中的属性值绑定到配置类的字段上。
11.SpringBoot自动配置原理
11.1SpringBoot自动配置概述
Spring Boot 的自动配置是可以根据应用程序的依赖关系和配置信息,自动配置应用程序所需的 Bean。无需手动配置大量的 Bean。
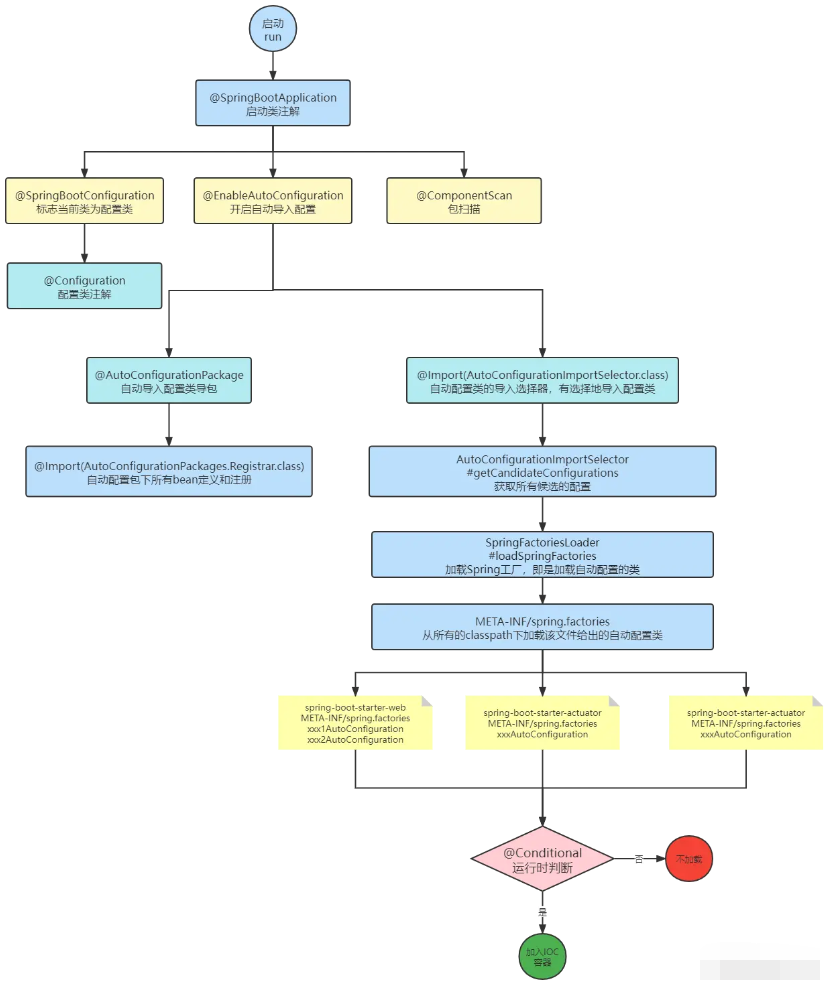
具体来说,Spring Boot 通过 @EnableAutoConfiguration 注解开启自动配置,对 MEAT-INF包下的 spring.factories 文件进行扫描,这个文件中包含了可以进行自动配置的类。当满足 @Conditional 注解指定的条件时,就进行条件装配,将配置类注册到 Spring IoC容器当中。
11.2@SpringBootApplication注解说明
- 查看主类上的
@SpringBootApplication注解,@SpringBootApplication注解是一个复合注解。
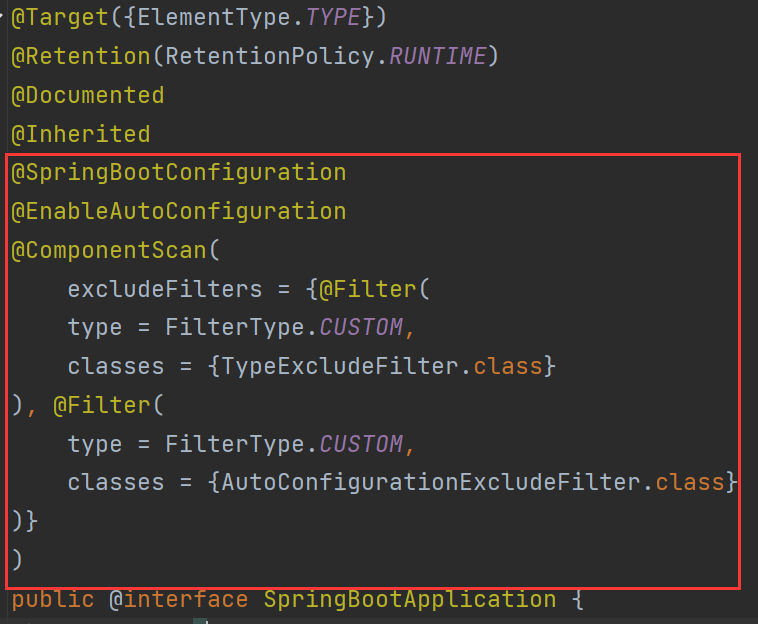
SpringBootApplication可以扩展为以下三个注解:
@SpringBootConfiguration
本质是@Configuration。代表当前是一个配置类
@ComponentScan
指定扫描哪些,Spring注解;
@EnableAutoConfiguration
用于启动自动配置功能
11.3@EnableAutoConfiguration注解自动配置包说明
@EnableAutoConfiguration注解同样是一个复合注解。
@AutoConfigurationPackage注解就是将主启动类所在包及所有子包下的组件到扫描到 spring 容器中@Import(AutoConfigurationImportSelector.class)注解就实现自动配置。
@AutoConfigurationPackage  //自动配置包
@Import(AutoConfigurationImportSelector.class)
public @interface EnableAutoConfiguration {
      ....
    }
11.3.1AutoConfigurationPackage注解
其中@AutoConfigurationPackage注解源码
@Import(AutoConfigurationPackages.Registrar.class)
public @interface AutoConfigurationPackage {
      ....
}采用@Import注解,利用AutoConfigurationPackages的内部类Registrar 执行逻辑来决定是如何导入。
注:Registrar实现了ImportBeanDefinitionRegistrar类,就可以被注解@Import导入到spring容器里。
static class Registrar implements ImportBeanDefinitionRegistrar, DeterminableImports {
    Registrar() {
    }

    public void registerBeanDefinitions(AnnotationMetadata metadata, BeanDefinitionRegistry registry) {
        AutoConfigurationPackages.register(registry, (String[])(new PackageImports(metadata)).getPackageNames().toArray(new String[0]));
    }

    public Set<Object> determineImports(AnnotationMetadata metadata) {
        return Collections.singleton(new PackageImports(metadata));
    }
}
计算查看根据注解的元数据信息获取到包名,获取到的包名就是当前启动类所在的包。
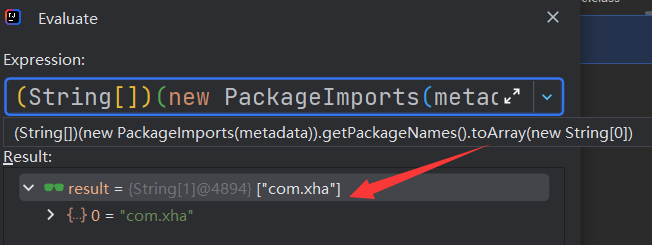
结论:**@AutoConfigurationPackage 就是将主启动类(@SpringBootApplication 标注的类)所在的包下面所有的组件都扫描注冊到 spring 容器中。**
11.3.2@Import(AutoConfigurationImportSelector.class)
@Import注解作用于@EnableAutoConfiguration注解上,作用是将AutoConfigurationImportSelector类作为一个组件添加到Spring容器当中。
AutoConfigurationImportSelector 类的作用是通过 selectImports 方法执行的过程中,会使用内部工具类 SpringFactoriesLoader,查找 classpath 上所有 jar 包中的 META-INF/spring.factories 进行加载配置类。
- 其中的主要方法
selectImports就是选择将若干的bean注入到IoC容器当中:
public String[] selectImports(AnnotationMetadata annotationMetadata) {
    if (!this.isEnabled(annotationMetadata)) {
        return NO_IMPORTS;
    } else {
        AutoConfigurationEntry autoConfigurationEntry = this.getAutoConfigurationEntry(annotationMetadata);
        return StringUtils.toStringArray(autoConfigurationEntry.getConfigurations());
    }
}- 其中调用的主要方法
getAutoConfigurationEntry():根据导入的@Configuration类的AnnotationMetadata返回AutoConfigurationImportSelector.AutoConfigurationEntry
protected AutoConfigurationImportSelector.AutoConfigurationEntry getAutoConfigurationEntry(AnnotationMetadata annotationMetadata) {
    if (!this.isEnabled(annotationMetadata)) {
        return EMPTY_ENTRY;
    } else {
        AnnotationAttributes attributes = this.getAttributes(annotationMetadata);
         // 打断点
        List<String> configurations = this.getCandidateConfigurations(annotationMetadata, attributes);
        //删除重复项
        configurations = this.removeDuplicates(configurations);
        Set<String> exclusions = this.getExclusions(annotationMetadata, attributes);
        //检查
        this.checkExcludedClasses(configurations, exclusions);
        //删除需要排除的依赖
        configurations.removeAll(exclusions);
        configurations = this.getConfigurationClassFilter().filter(configurations);
        this.fireAutoConfigurationImportEvents(configurations, exclusions);
        return new AutoConfigurationImportSelector.AutoConfigurationEntry(configurations, exclusions);
    }
}
configurations数组长度为144,并且文件后缀名都为 **AutoConfiguration
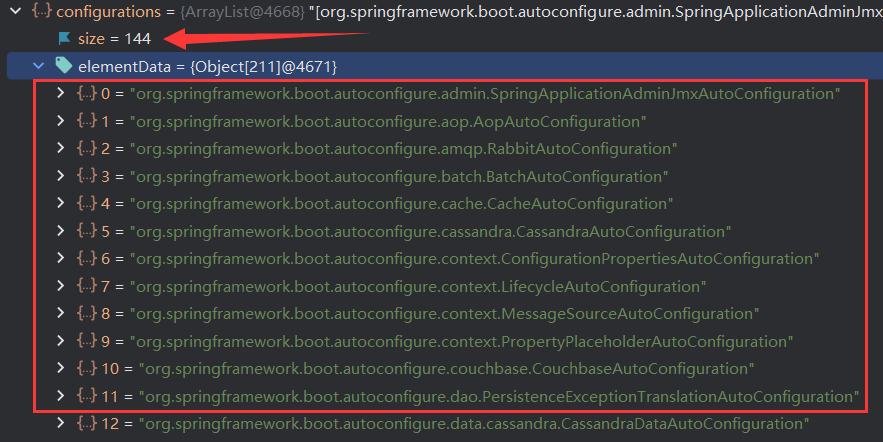
结论: 这些都是候选的配置类,经过去重,去除需要的排除的依赖,最终的组件才是这个环境需要的所有组件。有了自动配置,就不需要我们手写配置的值了,配置类有默认值的。
我们继续往下看看是如何返回需要配置的组件的。
- 调用
getCandidateConfigurations(annotationMetadata, attributes)将所有自动配置类的信息以List的形式返回。这些配置信息会被 Spring 容器作bean来管理。
方法如下:
protected List<String> getCandidateConfigurations(AnnotationMetadata metadata, AnnotationAttributes attributes) {
    List<String> configurations = new ArrayList(SpringFactoriesLoader.loadFactoryNames(this.getSpringFactoriesLoaderFactoryClass(), this.getBeanClassLoader()));
    ImportCandidates.load(AutoConfiguration.class, this.getBeanClassLoader()).forEach(configurations::add);
    Assert.notEmpty(configurations, "No auto configuration classes found in META-INF/spring.factories nor in META-INF/spring/org.springframework.boot.autoconfigure.AutoConfiguration.imports. If you are using a custom packaging, make sure that file is correct.");
    return configurations;
}
这里有句断言: Assert.notEmpty(configurations, “No auto configuration classes found in META-INF/spring.factories. If you are using a custom packaging, make sure that file is correct.”);
意思是:“在 META-INF/spring.factories 中没有找到自动配置类。如果您使用自定义包装,请确保该文件是正确的。“
结论: 即是要loadFactoryNames()方法要找到自动的配置类返回才不会报错。
- SpringFactoriesLoader
SpringFactoriesLoader工厂加载机制是Spring内部提供的一个加载方式,只需要在模块的META-INF/spring.factories文件,这个Properties格式的文件中的key是接口、注解、或抽象类的全名,value是以逗号 , 分隔的实现类,使用SpringFactoriesLoader来实现相应的实现类注入Spirng容器中。
注:会加载所有classpath路径下的META-INF/spring.factories文件,这样文件不止一个。
- loadFactoryNames()
public static List<String> loadFactoryNames(Class<?> factoryType, @Nullable ClassLoader classLoader) {
	ClassLoader classLoaderToUse = classLoader;
	if (classLoaderToUse == null) {
		classLoaderToUse = SpringFactoriesLoader.class.getClassLoader();
	}
	String factoryTypeName = factoryType.getName();
	return loadSpringFactories(classLoaderToUse).getOrDefault(factoryTypeName, Collections.emptyList());
}
先是将 EnableAutoConfiguration.class 传给了 factoryType
然后String factoryTypeName = factoryType.getName();,所以factoryTypeName 值为 org.springframework.boot.autoconfigure.EnableAutoConfiguration
- 接着查看loadSpringFactories方法的作用
该方法作用是加载所有依赖的路径META-INF/spring.factories文件,通过map结构保存,key为文件中定义的一些标识工厂类,value就是能自动配置的一些工厂实现的类,value用list保存并去重。
private static Map<String, List<String>> loadSpringFactories(ClassLoader classLoader) {
    Map<String, List<String>> result = (Map)cache.get(classLoader);
    if (result != null) {
        return result;
    } else {
        Map<String, List<String>> result = new HashMap();

        try {
             //注意这里:META-INF/spring.factories
            Enumeration<URL> urls = classLoader.getResources("META-INF/spring.factories");

            while(urls.hasMoreElements()) {
                URL url = (URL)urls.nextElement();
                UrlResource resource = new UrlResource(url);
                Properties properties = PropertiesLoaderUtils.loadProperties(resource);
                Iterator var6 = properties.entrySet().iterator();

                while(var6.hasNext()) {
                    Map.Entry<?, ?> entry = (Map.Entry)var6.next();
                    String factoryTypeName = ((String)entry.getKey()).trim();
                    String[] factoryImplementationNames = StringUtils.commaDelimitedListToStringArray((String)entry.getValue());
                    String[] var10 = factoryImplementationNames;
                    int var11 = factoryImplementationNames.length;

                    for(int var12 = 0; var12 < var11; ++var12) {
                        String factoryImplementationName = var10[var12];
                        ((List)result.computeIfAbsent(factoryTypeName, (key) -> {
                            return new ArrayList();
                        })).add(factoryImplementationName.trim());
                    }
                }
            }

            result.replaceAll((factoryType, implementations) -> {
                return (List)implementations.stream().distinct().collect(Collectors.collectingAndThen(Collectors.toList(), Collections::unmodifiableList));
            });
            cache.put(classLoader, result);
            return result;
        } catch (IOException var14) {
            throw new IllegalArgumentException("Unable to load factories from location [META-INF/spring.factories]", var14);
        }
    }
}
这里的 FACTORIES_RESOURCE_LOCATION 就是当前类SpringFactoriesLoader的一个常量:META-INF/spring.factories
public final class SpringFactoriesLoader {
    public static final String FACTORIES_RESOURCE_LOCATION = "META-INF/spring.factories";
    ...
}从META-INF/spring.factories加载文件,META-INF/spring.factories文件在哪里? 在所有引入的jar包的当前类路径下的META-INF/spring.factories文件都会被读取,如:
注意:高版本的SpringBoot将自动配置文件移动到了MATA-INT/spring目录下
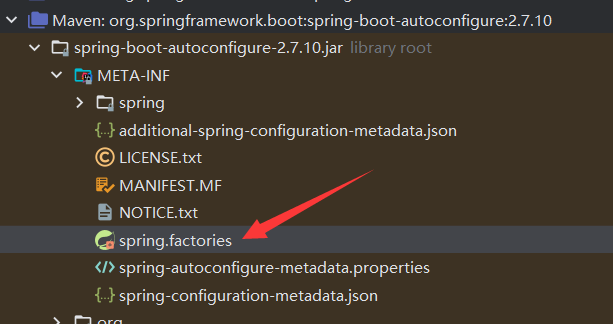
可以发现,自动配置类的数量就是144个

结论:
loadSpringFactories()该方法就是从“META-INF/spring.factories”中加载给定类型的工厂实现的完全限定类名放到map中
loadFactoryNames()是根据SpringBoot的启动生命流程,当需要加载自动配置类时,就会传入org.springframework.boot.autoconfigure.EnableAutoConfiguration参数,从map中查找key为org.springframework.boot.autoconfigure.EnableAutoConfiguration的值,这些值通过反射加到容器中,之后的作用就是用它们来做自动配置,这就是Springboot自动配置开始的地方
只有这些自动配置类进入到容器中以后,接下来这个自动配置类才开始进行启动
11.4按需加载配置类
META-INF/spring.factories 文件中列出了所有可用的自动配置类,但并不是所有这些类都会被加载。Spring Boot 会根据应用程序的依赖关系和配置信息,以及 @Conditional 注解指定的条件,来决定是否加载特定的配置类。
例如,如果应用程序添加了spring-boot-starter-web包,则 Spring Boot 会自动配置应用程序的 Web 相关配置。但是,如果应用程序没有添加spring-boot-starter-web包,则 Spring Boot 不会加载 Web 相关的配置类。
@Conditional其实是spring底层注解,意思就是根据不同的条件,来进行自己不同的条件判断,如果满足指定的条件,那么配置类才会生效。
常用的Conditional注解:
- @ConditionalOnClass : classpath中存在该类时起效
- @ConditionalOnMissingClass : classpath中不存在该类时起效
- @ConditionalOnBean : DI容器中存在该类型Bean时起效
- @ConditionalOnMissingBean : DI容器中不存在该类型Bean时起效
- @ConditionalOnSingleCandidate : DI容器中该类型Bean只有一个或@Primary的只有一个时起效
- @ConditionalOnExpression : SpEL表达式结果为true时
- @ConditionalOnProperty : 参数设置或者值一致时起效
- @ConditionalOnResource : 指定的文件存在时起效
- @ConditionalOnJndi : 指定的JNDI存在时起效
- @ConditionalOnJava : 指定的Java版本存在时起效
- @ConditionalOnWebApplication : Web应用环境下起效
- @ConditionalOnNotWebApplication : 非Web应用环境下起效
举例:
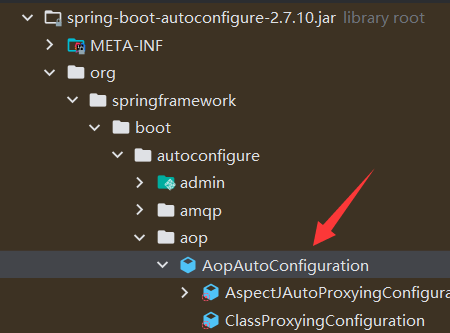
@AutoConfiguration
@ConditionalOnProperty(prefix = "spring.aop", name = "auto", havingValue = "true", matchIfMissing = true)
public class AopAutoConfiguration {
    ...
}上面@ConditionalOnProperty注解的作用就是:当应用程序环境中存在名为 spring.aop.auto 的属性,并且其值为 "true" 时,AopAutoConfiguration 类将被注册到 Spring 应用程序上下文中。如果该属性不存在,则由于 matchIfMissing = true,该类仍将被注册。
11.5自动配置类的属性绑定
在 Spring Boot 中,自动配置会根据应用程序的依赖关系和配置信息来决定是否加载特定的配置类。如果在用户自定义的配置文件(例如 application.properties 或 application.yml)中没有指定对应的配置,那么就会使用默认的配置。这样可以确保应用程序能够快速启动并运行,而无需手动配置所有细节。
如果您在 application.properties 文件中没有指定任何与 Tomcat 或 Spring MVC 相关的配置,那么 Spring Boot 就会使用默认的配置。例如,Tomcat 服务器默认会监听 8080 端口,而 Spring MVC 默认会将静态资源映射到 /static、/public、/resources 和 /META-INF/resources 等路径下。
但是,如果您在 application.properties 文件中指定了与 Tomcat 或 Spring MVC 相关的配置,那么 Spring Boot 就会使用您指定的配置。例如,如果您在 application.properties 文件中添加了以下内容:
server.port=8081那么 Tomcat 服务器就会监听 8081 端口,而不是默认的 8080 端口。
举例:
@AutoConfiguration
@EnableConfigurationProperties(ServerProperties.class)
@ConditionalOnWebApplication(type = ConditionalOnWebApplication.Type.SERVLET)
@ConditionalOnClass(CharacterEncodingFilter.class)
@ConditionalOnProperty(prefix = "server.servlet.encoding", value = "enabled", matchIfMissing = true)
public class HttpEncodingAutoConfiguration {

	private final Encoding properties;

	public HttpEncodingAutoConfiguration(ServerProperties properties) {
		this.properties = properties.getServlet().getEncoding();
	}

	@Bean
	@ConditionalOnMissingBean
	public CharacterEncodingFilter characterEncodingFilter() {
		CharacterEncodingFilter filter = new OrderedCharacterEncodingFilter();
		filter.setEncoding(this.properties.getCharset().name());
		filter.setForceRequestEncoding(this.properties.shouldForce(Encoding.Type.REQUEST));
		filter.setForceResponseEncoding(this.properties.shouldForce(Encoding.Type.RESPONSE));
		return filter;
	}
	...
}
HttpEncodingAutoConfiguration 类定义了一个 characterEncodingFilter Bean,它使用了 @ConditionalOnMissingBean 注解。这意味着,仅当应用程序上下文中不存在类型为 CharacterEncodingFilter 的 Bean 时,才会创建这个 Bean。
在这个 Bean 的定义中,首先创建了一个 OrderedCharacterEncodingFilter 对象,并将其赋值给 filter 变量。然后,调用 filter.setEncoding 方法来设置字符编码。这个方法的参数是通过调用 this.properties.getCharset().name() 来获取的。this.properties 是一个 Encoding 类型的成员变量,它在构造函数中被初始化。
对应的配置文件可能包含以下内容:
server.servlet.encoding.charset=UTF-8
server.servlet.encoding.force-request=true
server.servlet.encoding.force-response=true
这些属性定义了字符编码、请求编码和响应编码的相关配置。它们会被绑定到 ServerProperties 类型的 Bean 上,并在 HttpEncodingAutoConfiguration 类的构造函数中被注入。
11.6自动配置流程图
12.SpringBoot开发技巧
12.1Lombok
Lombok功能:简化JavaBean开发
<!--        引入Lombok依赖-->
        <dependency>
            <groupId>org.projectlombok</groupId>
            <artifactId>lombok</artifactId>
            <version>1.18.20</version>
        </dependency>
在idea中安转Lombok插件

@NoArgsConstructor  //无参构造
@AllArgsConstructor //有参构造
@Data               //set/get方法
@ToString           //toString方法
//@Compoent注解是将实体类实例化到Spring容器当中,这样才能使用SpringBoot提供的功能
//prefix表示配置文件中前缀是什么
@Component
@ConfigurationProperties(prefix = "user")
public class User {
    private String username;
    private String password;
}
12.2 dev-tools
热更新
<!--        引入dev-tools依赖-->
        <dependency>
            <groupId>org.springframework.boot</groupId>
            <artifactId>spring-boot-devtools</artifactId>
            <optional>true</optional>
            <version>2.6.7</version>
        </dependency>
12.3 Spring Initailizr
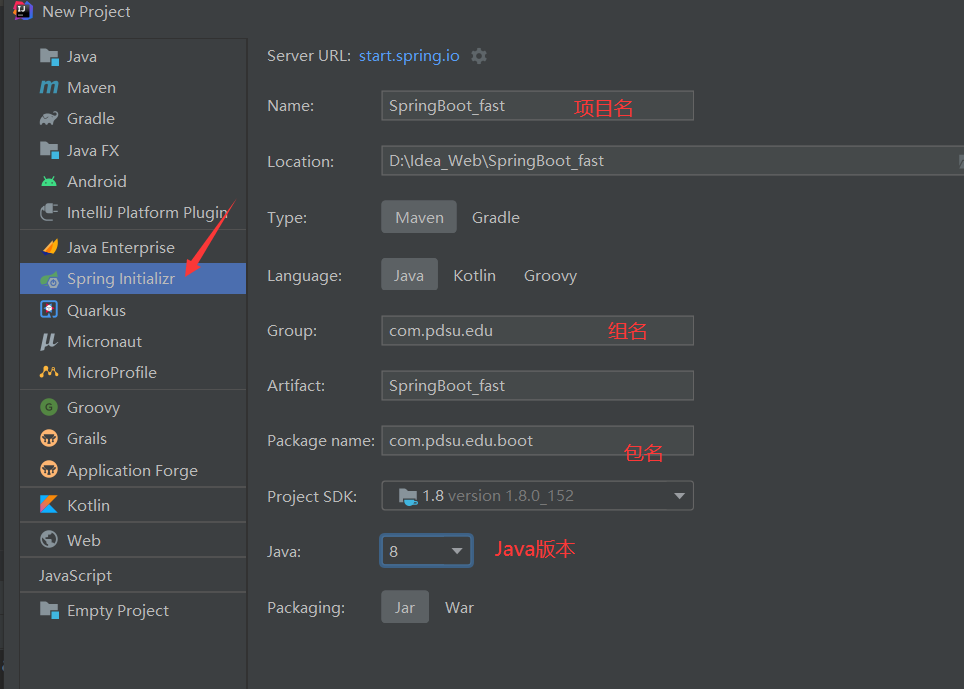
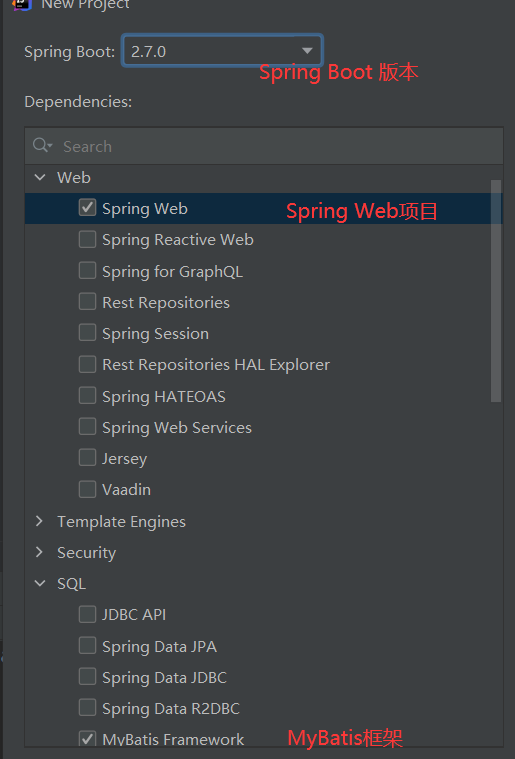
可以使用Spring Initailizr来快速搭建一个SpringBoot环境
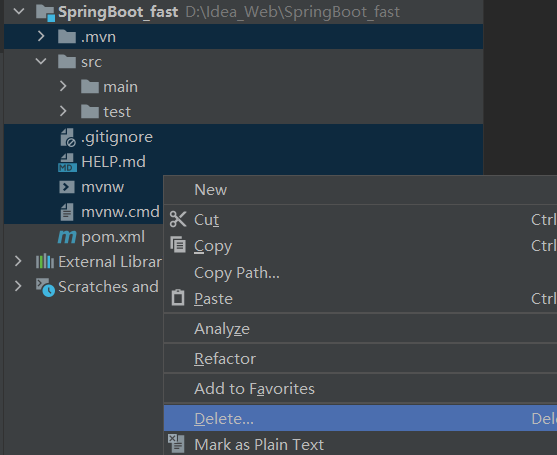
步骤:
删除不必要的文件
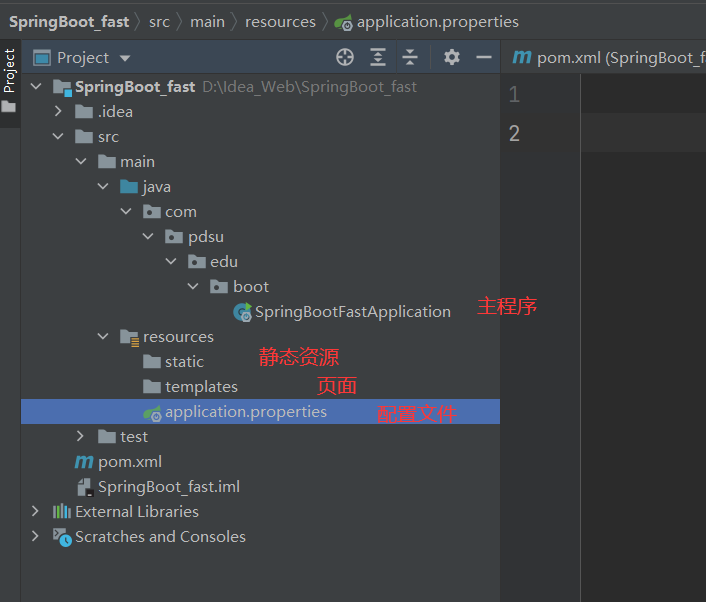
创建成功后的项目目录结构
pom.xml文件(已经自动帮你添加所需依赖)
<!--    父项目-->
    <parent>
        <groupId>org.springframework.boot</groupId>
        <artifactId>spring-boot-starter-parent</artifactId>
        <version>2.7.0</version>
        <relativePath/> <!-- lookup parent from repository -->
    </parent>
    <groupId>com.pdsu.edu</groupId>
    <artifactId>SpringBoot_fast</artifactId>
    <version>0.0.1-SNAPSHOT</version>
    <name>SpringBoot_fast</name>
    <description>Demo project for Spring Boot</description>
    <properties>
        <java.version>1.8</java.version>
    </properties>
    <dependencies>
<!--        Web起步依赖坐标-->
        <dependency>
            <groupId>org.springframework.boot</groupId>
            <artifactId>spring-boot-starter-web</artifactId>
        </dependency>
<!--        MyBatis依赖-->
        <dependency>
            <groupId>org.mybatis.spring.boot</groupId>
            <artifactId>mybatis-spring-boot-starter</artifactId>
            <version>2.2.2</version>
        </dependency>
<!--单元测试-->
        <dependency>
            <groupId>org.springframework.boot</groupId>
            <artifactId>spring-boot-starter-test</artifactId>
            <scope>test</scope>
        </dependency>
    </dependencies>
<!--  打包插件 -->
    <build>
        <plugins>
            <plugin>
                <groupId>org.springframework.boot</groupId>
                <artifactId>spring-boot-maven-plugin</artifactId>
            </plugin>
        </plugins>
    </build>
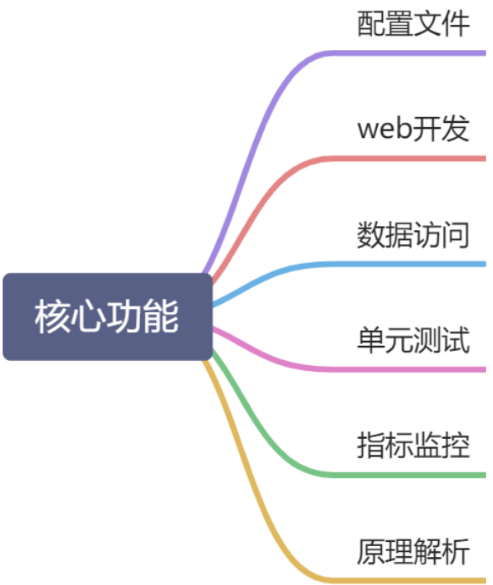
12.SpringBoot核心功能
13.配置文件yaml
YAML 是 “YAML Ain’t Markup LanguageM (YAML 不是一种标记语言)的递归缩写。在开发的这种语言时,YAML 的意思其实是:”Yet Another Markup Language” (仍是一种标记语言)。
yaml非常适合用来做以数据为中心的配置文件
13.1yaml的语法
- key: value; kv之间有空格
- 大小写敏感
- 使用缩进表示层级关系
- 缩进不允许使用tab,只允许空格
- 缩进的空格数不重要,只要相同层级的元素左对齐即可
- ‘#’表示注释
- 字符串无需加引号,如果要加,”与”表示字符串内容会被转义/不转义
13.2yaml的数据类型
**字面量**:单个的、不可再分的值。date、boolean、string、number、null
k: v**对象**:键值对的集合。map、 hash、set、object
行内写法: k: {kl:vl,k2:v2,k3:v3}
#或
k:
kl: vl
k2: v2
k3: v3**数组**:一组按次序排列的值。array、list、queue
行内写法: k: [vl,v2,v3]
#或者
k:
 - vl
 - v2
 - v3
13.3自定义类绑定的配置提示
在yaml配置文件中并没有配置提示功能

解决方案:添加以下依赖
<!--        配置提示功能-->
        <dependency>
            <groupId>org.springframework.boot</groupId>
            <artifactId>spring-boot-configuration-processor</artifactId>
            <optional>true</optional>
        </dependency>
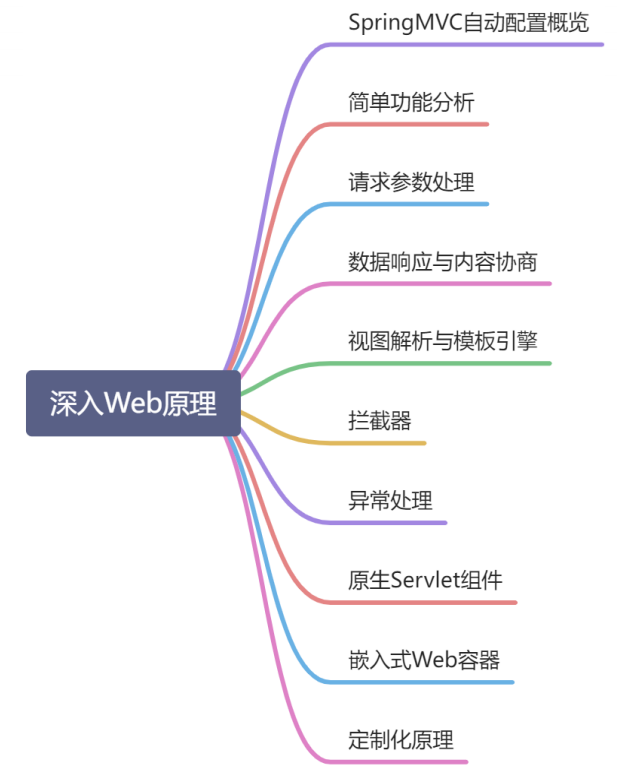
14.Web开发
14.1 静态资源访问
- 静态资源目录
只要静态资源放在类路径下: called /static (or /public or /resources or /META-INF/resources
访问 : 当前项目根路径/ + 静态资源名
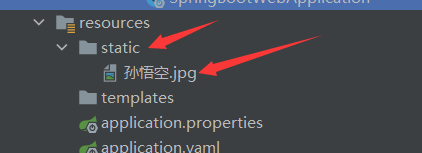

原理: 静态映射广。
请求进来,先去找Controller看能不能处理。不能处理的所有请求又都交给静态资源处理器。静态资源也找不到则响应404页面
- 静态资源访问前缀
默认情况下没有前缀
spring:
  mvc:
    static-path-pattern: /**
可以在yaml配置文件中修改静态资源访问路径
spring:
  mvc:
    static-path-pattern: /res/**
14.2 欢迎页支持
- 静态资源路径下 index.html
只要访问项目根路径,就会跳转到index.html

- controller能处理/index
14.3 favicon功能
favicon.ico 放在静态资源目录下即可。

14.4 普通参数与基本注解
14.4.1@PathVariable注解
@PathVariable注解:将占位符所表示的数据赋值给控制器方法的形参
    @GetMapping("/user/{id}/{username}")
//    @GetMapping是RequestMapping的派生注解,用于处理GET请求
    public Map<String,Object> getUser(@PathVariable("id") int id,@PathVariable("username") String username){
//      @PathVariable注解将占位符所表示的数据赋值给控制器方法的形参
        Map<String,Object> map = new HashMap<>();
        map.put("id",id);
        map.put("username",username);
        return map;
    }
测试:
<a href="/user/201530326/枫原万叶">/user/学号/姓名</a>
14.4.2@RequestHeader注解
@RequestHeader注解:将请求头中变量值映射到控制器的参数中
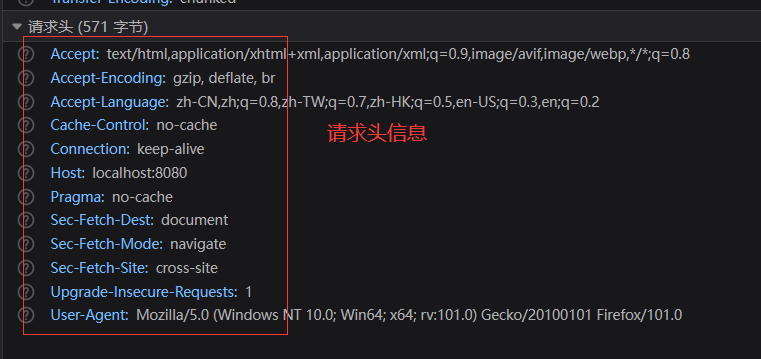
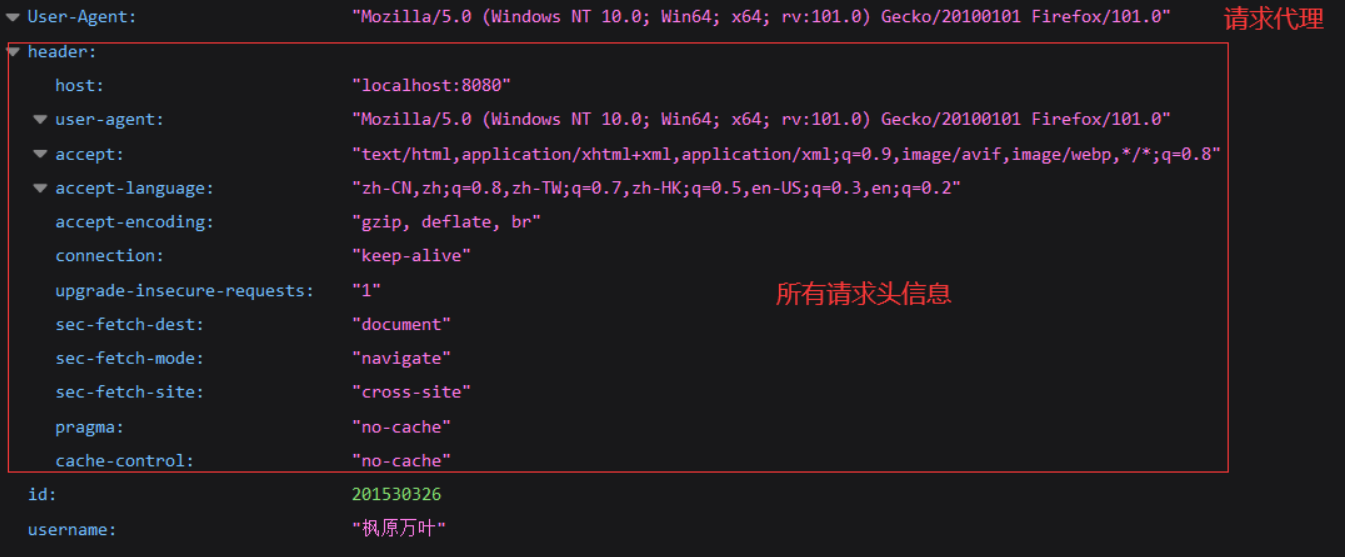
@RequestHeader(“……….”):获取到指定的请求头信息
@RequestHeader():获取到全部的请求头信息
    @GetMapping("/user/{id}/{username}")
//    @GetMapping是RequestMapping的派生注解,用于处理GET请求
    public Map<String,Object> getUser(@PathVariable("id") int id,
                                      @PathVariable("username") String username,
                                      @RequestHeader("User-Agent") String userAgent,
                                      @RequestHeader Map<String,String> reqHeader){
//      @PathVariable注解将占位符所表示的数据赋值给控制器方法的形参
        Map<String,Object> map = new HashMap<>();
        map.put("id",id);
        map.put("username",username);
        map.put("User-Agent",userAgent);
        map.put("header",reqHeader);
        return map;
    }
14.4.3@RequestParam注解
@RequestParam注解:处理请求参数和控制器方法的形参的映射关系
例一:
    @GetMapping("/user")
//    @GetMapping是RequestMapping的派生注解,用于处理GET请求
    public Map<String,Object> getUser(@RequestParam("id") int id,
                                      @RequestParam("username") String username){
//      @PathVariable注解将占位符所表示的数据赋值给控制器方法的形参
        Map<String,Object> map = new HashMap<>();
        map.put("id",id);
        map.put("username",username);
        return map;
    }
测试:
<a href="/user?id=201530326&username=枫原万叶">/user/学号/姓名</a>
例二:
<form action="/user" method="post">
    用户名:<input type="text" name="username">
    密码:<input type="password" name="password">
    <input type="submit" value="提交">
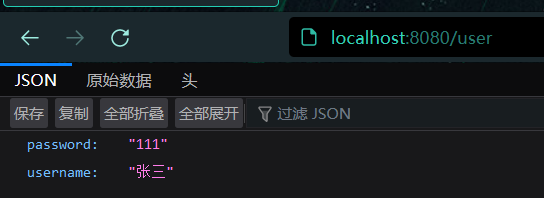
</form>@PostMapping("/user")
public Map<String,Object> getUser(@RequestParam("username") String username,
@RequestParam("password") String password){
Map<String,Object> map = new HashMap<>();
map.put("username",username);
map.put("password",password);
return map;
}
14.4.4@PathVariable注解与@RequestParam注解的异同点
一:不同点
- @PathVariable 是将url中的参数和方法形参绑定
例子:完整的请求url是localhost:8080/teachplan/list/123 ,然后“123”作为参数传入方法中的形参courseId
@GetMapping("/teachplan/list/{courseId}")
public TeachplanNode findTeachPlanList(
            @PathVariable("courseId") String courseId) {
            	return null;
}- @RequestParam 是将参数以k-v形式拼接在url后面
例子:完整的请求url是localhost:8080/getuserext?username=枫原万叶 ,然后“枫原万叶”作为参数传入方法中的形参username;并且注解中设置的是“username”,那么前端传来的参数名必须username
@RequestMapping(value = "/getuserext")
public XcUserExt getUserExt(
        @RequestParam("username") String username) {
        	return null;
}
二:相同点
两个注解都有三个属性
value:指定为形参赋值的请求参数的参数名
required:设置是否必须传输此请求参数,默认值为true,表示必须传输若设置为true时,则当前请求必须传输value所指定的请求参数,若设置为false,则当前请求不是必须传输value所指定的请求参数,若没有传输,则注解所标识的形参的值为null
defaultValue:不管required属性值为true或false,当value所指定的请求参数没有传输或传输的值为null时,则使用默认值为形参赋值
14.4.4@RequestAttribute注解
@RequestAttribute:获取request域中的属性
@Controller
public class requestController {

    @RequestMapping(value = "goto")
    public String gotoPage(HttpServletRequest request) {
        request.setAttribute("msg","成功了!");
//        转发到success请求
        return "forward:/success";
    }
//  将返回值msg作为响应报文的响应体
    @ResponseBody
    @RequestMapping(value = "success")
//    从request域中获取到msg
    public String success(@RequestAttribute("msg") String msg){
        return msg;
    }
}
14.5Thymeleaf模板引擎
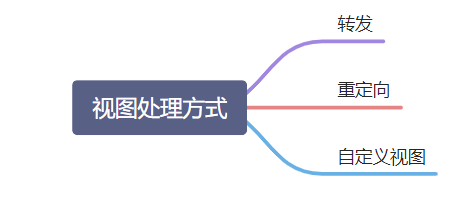
视图解析:SpringBoot默认不支持JSP,需要引入第三方模板引擎技术实现页面渲染
thymeleaf是一款用于渲染XML/XHTML/HTML5内容的模板引擎。类似JSP,Velocity,FreeMaker等, 它也可以轻易的与Spring MVC等Web框架进行集成作为Web应用的模板引擎。与其它模板引擎相比, Thymeleaf最大的特点是能够直接在浏览器中打开并正确显示模板页面,而不需要启动整个Web应用。
一:使用步骤:
引入相应依赖:
<dependency>
    <groupId>org.springframework.boot</groupId>
    <artifactId>spring-boot-starter-thymeleaf</artifactId>
</dependency>
自动配置好了thymeleaf
@Configuration(proxyBeanMethods = false)
@EnableConfigurationProperties(ThymeleafProperties.class)
@ConditionalOnClass({ TemplateMode.class, SpringTemplateEngine.class })
@AutoConfigureAfter({ WebMvcAutoConfiguration.class, WebFluxAutoConfiguration.class })
public class ThymeleafAutoConfiguration { }
自动配好的策略
1、所有thymeleaf的配置值都在 ThymeleafProperties
2、配置好了 SpringTemplateEngine
3、配好了 ThymeleafViewResolver
4、我们只需要直接开发页面
//前缀
public static final String DEFAULT_PREFIX = "classpath:/templates/";
//后缀
public static final String DEFAULT_SUFFIX = ".html";  //xxx.html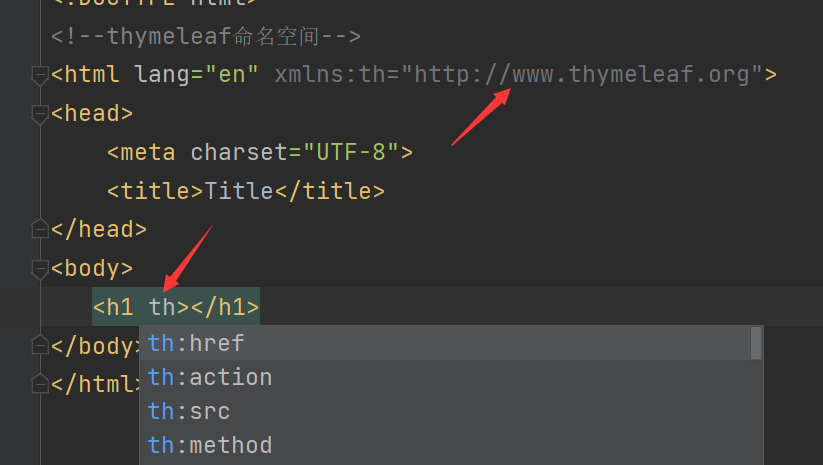
thymeleaf的使用
控制器
@Controller
public class thymeleafController {
    @RequestMapping("/test1")
    public String test1(Model model){
//        Model可以向request域中共享数据
        model.addAttribute("msg","你好!");
        model.addAttribute("link","http://www.bilibili.com");
        return "success";
    }
}
templates目录下:
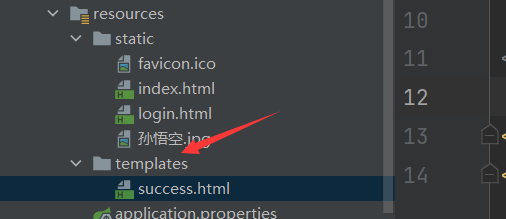
<!DOCTYPE html>
<!--thymeleaf命名空间-->
<html lang="en" xmlns:th="http://www.thymeleaf.org">
<head>
    <meta charset="UTF-8">
    <title>Title</title>
</head>
<body>
<!--    从请求域中获取到msg,并且覆盖文本内容-->
   <h1 th:text="${msg}">哈哈</h1>
<!--    从请求域中获取到超链接地址-->
   <a href="http://www.baidu.com" th:href="${link}">哔哩哔哩</a>
</body>
</html>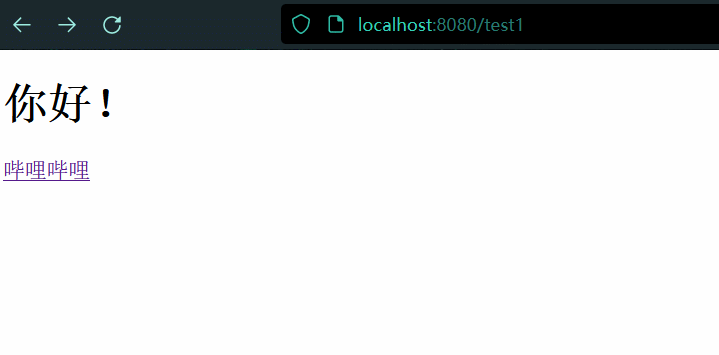
14.6过滤器和拦截器
14.6.1过滤器
14.6.1.1过滤器的概念
过滤器Filter基于Servlet实现,过滤器的主要应用场景是对字符编码、跨域等问题进行过滤。Filter的工作原理是拦截配置好的客户端请求,然后对Request和Response进行处理。Filter过滤器随着web应用的启动而启动,只初始化一次。
Filter的使用比较简单,继承Filter 接口,实现对应的init、doFilter以及destroy方法即可。
14.6.1.2过滤器的实现
- init:在容器(Tomcat)启动时调用初始化方法,只会初始化一次
- doFilter:每次请求都会调用doFilter方法,通过FilterChain 调用后续的方法
- destroy:当容器销毁时,执行destory方法,只会被调用一次。
public class MyFilter implements Filter {
    @Override
    public void init(FilterConfig filterConfig) throws ServletException {
        System.out.println("初始化拦截器");
    }

    @Override
    public void doFilter(ServletRequest request, ServletResponse response, FilterChain chain) throws IOException, ServletException {
        //做一些处理
        chain.doFilter(request,response);
    }

    @Override
    public void destroy() {
        System.out.println("销毁拦截器");
    }
}
14.6.2拦截器
14.6.2.1拦截器的概念
拦截器能够拦截客户请求并做出相应处理。拦截器它是链式调用,一个应用中可以同时存在多个拦截器Interceptor, 一个请求也可以触发多个拦截器 ,而每个拦截器的调用默认会依据它的声明顺序依次执行。
14.6.2.2拦截器的实现
编写一个简单的拦截器处理类,请求的拦截是通过HandlerInterceptor 来实现,看到HandlerInterceptor 接口中也定义了三个方法。
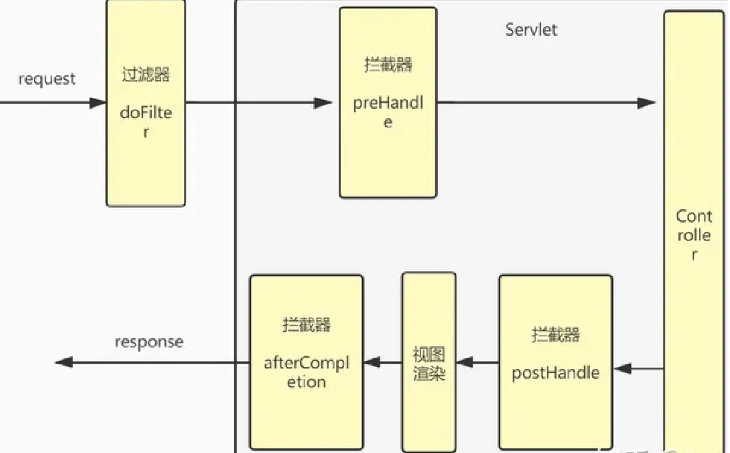
preHandle():这个方法将在请求处理之前进行调用。注意:如果该方法的返回值为false ,将视为当前请求结束,不仅自身的拦截器会失效,还会导致其他的拦截器也不再执行。postHandle():只有在 preHandle() 方法返回值为true 时才会执行。会在Controller 中的方法调用之后,DispatcherServlet 返回渲染视图之前被调用。 有意思的是:postHandle() 方法被调用的顺序跟 preHandle() 是相反的,先声明的拦截器 preHandle() 方法先执行,而postHandle()方法反而会后执行。afterCompletion():只有在 preHandle() 方法返回值为true 时才会执行。在整个请求结束之后, DispatcherServlet 渲染了对应的视图之后执行。
//登录检查
public class loginInterceptor  implements HandlerInterceptor {
//    目标方法执行之前
    @Override
    public boolean preHandle(HttpServletRequest request, HttpServletResponse response, Object handler) throws Exception {
        HttpSession session = request.getSession();
        Object user = session.getAttribute("user");
        if (user != null){
            return true;
        }else{
            request.setAttribute("error","请先登录!");
//            转发到登录页面
            request.getRequestDispatcher("/").forward(request,response);
            return false;
        }
    }

    @Override
    public void postHandle(HttpServletRequest request, HttpServletResponse response, Object handler, ModelAndView modelAndView) throws Exception {
        HandlerInterceptor.super.postHandle(request, response, handler, modelAndView);
    }

    @Override
    public void afterCompletion(HttpServletRequest request, HttpServletResponse response, Object handler, Exception ex) throws Exception {
        HandlerInterceptor.super.afterCompletion(request, response, handler, ex);
    }
}将自定义好的拦截器处理类进行注册,并通过addPathPatterns、excludePathPatterns等属性设置需要拦截或需要排除的 URL。
//实现WebMvcConfigurer接口,实现定制Web功能(此处是自定义拦截器)
public class AdminWebConfig implements WebMvcConfigurer {
    @Override
    public void addInterceptors(InterceptorRegistry registry) {
        registry.addInterceptor(new loginInterceptor())
                //拦截所有请求
                .addPathPatterns("/**")
                //放行资源
           .excludePathPatterns("/","/login","/css/**","/js/**","/fonts/**","/images/**");
    }
}
14.6.3过滤器和拦截器的区别
14.6.3.1实现原理不同
过滤器和拦截器 底层实现方式大不相同,
过滤器是基于函数回调的
拦截器则是基于动态代理实现的
拦截器的执行流程:
查看源码:
/**
 * Process the actual dispatching to the handler.
 * <p>The handler will be obtained by applying the servlet's HandlerMappings in order.
 * The HandlerAdapter will be obtained by querying the servlet's installed HandlerAdapters
 * to find the first that supports the handler class.
 * <p>All HTTP methods are handled by this method. It's up to HandlerAdapters or handlers
 * themselves to decide which methods are acceptable.
 * @param request current HTTP request
 * @param response current HTTP response
 * @throws Exception in case of any kind of processing failure
 */
@SuppressWarnings("deprecation")
protected void doDispatch(HttpServletRequest request, HttpServletResponse response) throws Exception {
	HttpServletRequest processedRequest = request;
	HandlerExecutionChain mappedHandler = null;
	boolean multipartRequestParsed = false;

	WebAsyncManager asyncManager = WebAsyncUtils.getAsyncManager(request);

	try {
		ModelAndView mv = null;
		Exception dispatchException = null;

		try {
			processedRequest = checkMultipart(request);
			multipartRequestParsed = (processedRequest != request);

			// 获取到当前请求的映射处理器
			mappedHandler = getHandler(processedRequest);
			if (mappedHandler == null) {
				noHandlerFound(processedRequest, response);
				return;
			}

			// 获取到当前请求的映射处理器适配器
			HandlerAdapter ha = getHandlerAdapter(mappedHandler.getHandler());

			// Process last-modified header, if supported by the handler.
			String method = request.getMethod();
			boolean isGet = HttpMethod.GET.matches(method);
			if (isGet || HttpMethod.HEAD.matches(method)) {
				long lastModified = ha.getLastModified(request, mappedHandler.getHandler());
				if (new ServletWebRequest(request, response).checkNotModified(lastModified) && isGet) {
					return;
				}
			}

                 //在实际调用处理程序之前,首先调用拦截器的preHandler方法
			if (!mappedHandler.applyPreHandle(processedRequest, response)) {
				return;
			}

			// 实际调用处理程序
			mv = ha.handle(processedRequest, response, mappedHandler.getHandler());

			if (asyncManager.isConcurrentHandlingStarted()) {
				return;
			}

			applyDefaultViewName(processedRequest, mv);
                 //在实际调用处理程序之后,调用拦截器的postHandler方法
			mappedHandler.applyPostHandle(processedRequest, response, mv);
		}
		catch (Exception ex) {
			dispatchException = ex;
		}
		catch (Throwable err) {
			// As of 4.3, we're processing Errors thrown from handler methods as well,
			// making them available for @ExceptionHandler methods and other scenarios.
			dispatchException = new NestedServletException("Handler dispatch failed", err);
		}
		processDispatchResult(processedRequest, response, mappedHandler, mv, dispatchException);
	}
	catch (Exception ex) {
		triggerAfterCompletion(processedRequest, response, mappedHandler, ex);
	}
	catch (Throwable err) {
		triggerAfterCompletion(processedRequest, response, mappedHandler,
				new NestedServletException("Handler processing failed", err));
	}
	finally {
		if (asyncManager.isConcurrentHandlingStarted()) {
			// Instead of postHandle and afterCompletion
			if (mappedHandler != null) {
				mappedHandler.applyAfterConcurrentHandlingStarted(processedRequest, response);
			}
		}
		else {
			// Clean up any resources used by a multipart request.
			if (multipartRequestParsed) {
				cleanupMultipart(processedRequest);
			}
		}
	}
}DispatcherServlet中的doDispatch在获取到映射处理器的同时将过滤器进行封装。
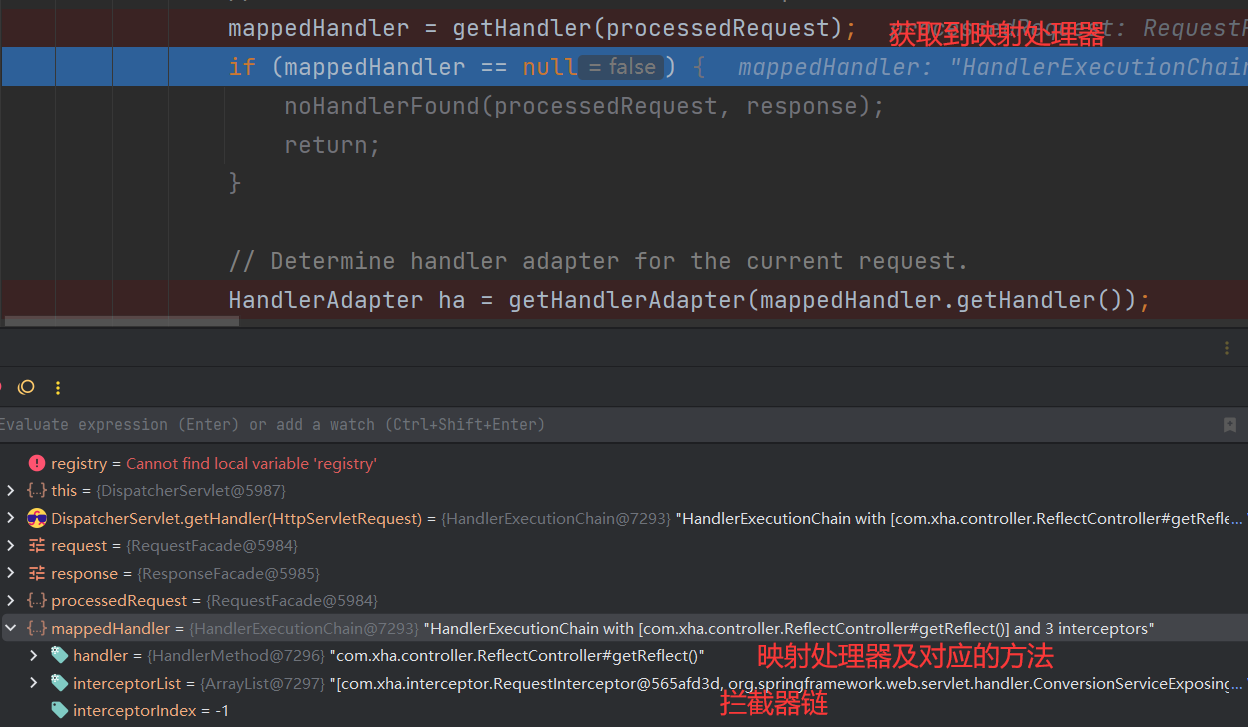
- 调用
applyPreHandle方法,执行拦截器链的preHandle方法
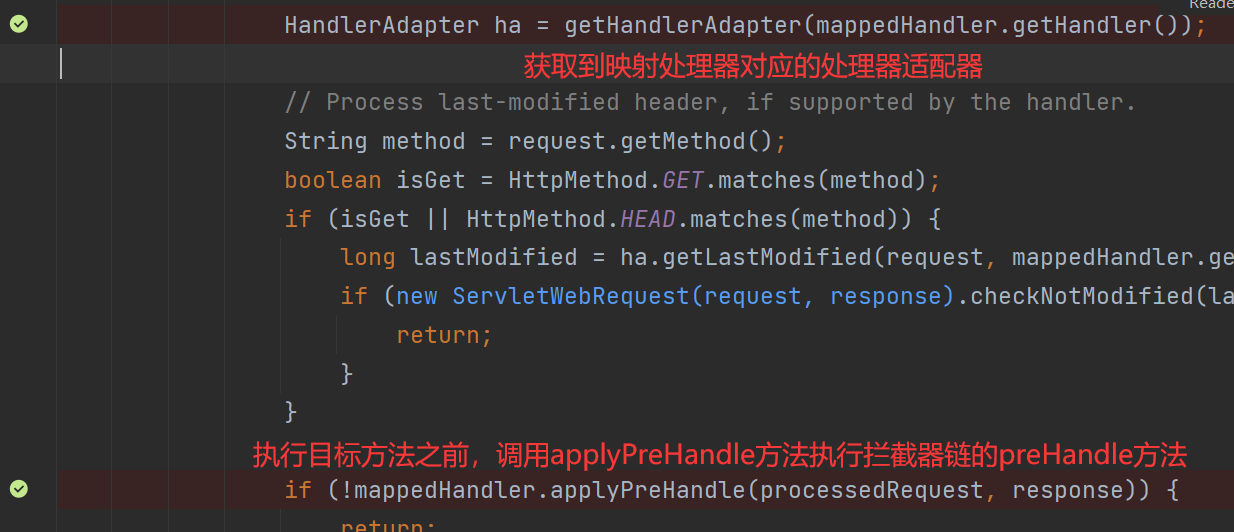
- 进入
applyPreHandle方法,遍历拦截器链,执行每个过拦截链的preHandler方法。
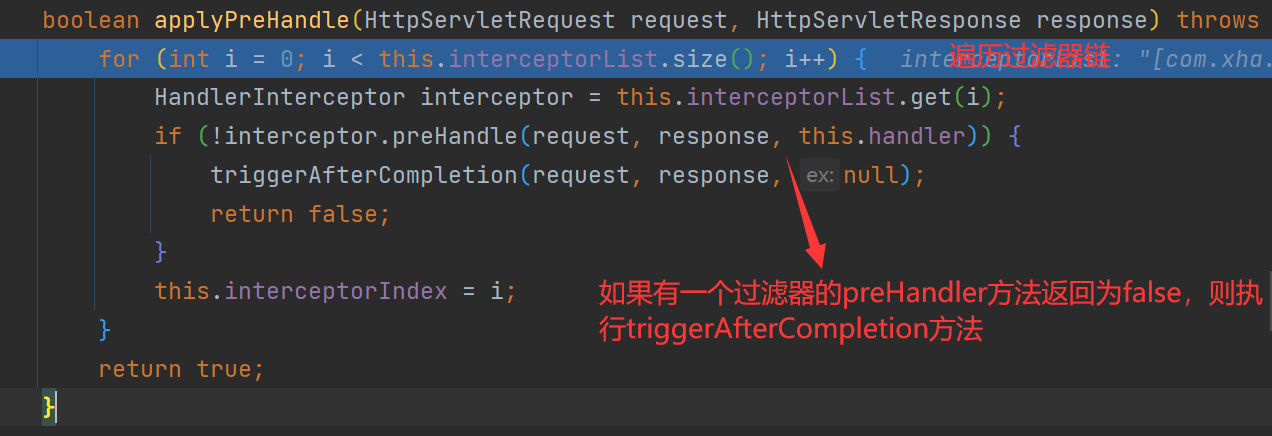
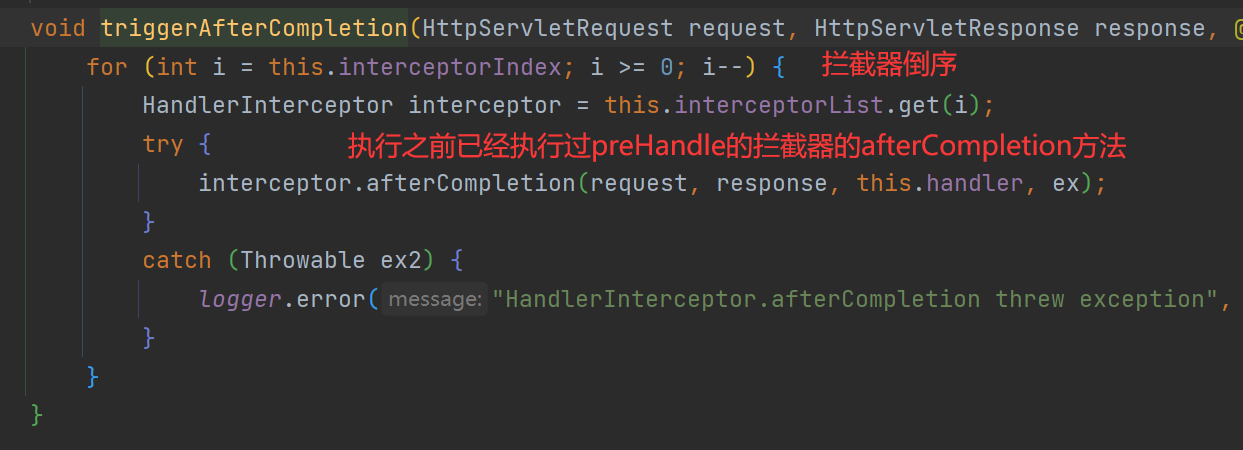
- 如果有一个拦截器的preHandle方法返回为false,进入
triggerAfterCompletion方法,倒序执行已经执行过preHandle方法的拦截器的afterCompletion方法。执行完后直接返回,不执行目标方法和postHandle方法。
- 如果所有拦截器链的
preHandle都返回true,则执行目标方法,目标方法执行完后调用applyPostHandle方法,执行每个拦截器链的postHandle方法

总结
- 拦截器链中的每个过滤器都会执行,当中如果由任何一个拦截器的
preHandle返回flase,则不执行目标方法,直接返回。 - 每个拦截器的
preHandle方法执行完后,就会执行目标方法,执行完目标方法后,再倒序执行每个拦截器的postHandle方法
- 拦截器链中的每个过滤器都会执行,当中如果由任何一个拦截器的
14.6.3.2使用范围不同
- 过滤器实现的是
javax.servlet.Filter接口,而这个接口是在Servlet规范中定义的,也就是说过滤器Filter的使用要依赖于Tomcat等容器,导致它只能在web程序中使用- 拦截器(
Interceptor) 它是一个Spring组件,并由Spring容器管理,并不依赖Tomcat等容器,是可以单独使用的
14.6.3.3触发时机不同
过滤器 和 拦截器的触发时机也不同,我们看下边这张图
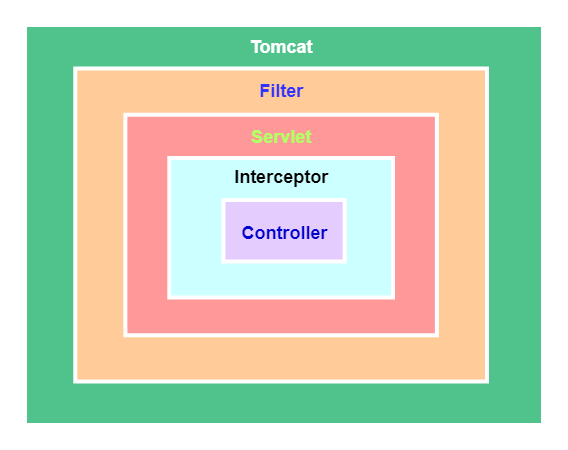
过滤器Filter是在请求进入容器后,但在进入servlet之前进行预处理,请求结束是在servlet处理完以后。
拦截器 Interceptor 是在请求进入servlet后,在进入Controller之前进行预处理的,Controller 中渲染了对应的视图之后请求结束。
14.6.3.4控制执行顺序不同
实际开发过程中,会出现多个过滤器或拦截器同时存在的情况,不过,有时我们希望某个过滤器或拦截器能优先执行,就涉及到它们的执行顺序。
过滤器用@Order注解控制执行顺序,通过@Order控制过滤器的级别,值越小级别越高越先执行。
@Order(Ordered.HIGHEST_PRECEDENCE)
@Component
public class MyFilter2 implements Filter {
    ...
}拦截器默认的执行顺序,就是它的注册顺序,也可以通过Order手动设置控制,值越小越先执行。
@Override
   public void addInterceptors(InterceptorRegistry registry) {
       registry.addInterceptor(new MyInterceptor2()).addPathPatterns("/**").order(2);
       registry.addInterceptor(new MyInterceptor1()).addPathPatterns("/**").order(1);
       registry.addInterceptor(new MyInterceptor()).addPathPatterns("/**").order(3);
   }
看到输出结果发现,先声明的拦截器 preHandle() 方法先执行,而postHandle()方法反而会后执行。
postHandle() 方法被调用的顺序跟 preHandle() 居然是相反的!如果实际开发中严格要求执行顺序,那就需要特别注意这一点。
Interceptor1 前置
Interceptor2 前置
Interceptor 前置
我是controller
Interceptor 处理中
Interceptor2 处理中
Interceptor1 处理中
Interceptor 后置
Interceptor2 处理后
Interceptor1 处理后
14.7文件上传
可以在配置文件中修改上传文件大小限制
#单个文件的最大上线,如果设置成-1代表不做限制
spring.servlet.multipart.max-file-size=10MB
#单个请求的文件总大小上限,如果设置成-1代表不做限制
spring.servlet.multipart.max-request-size=100MB
// MultipartFile 自动封装上传的文件
@PostMapping("/upload")
public String upload(@RequestParam("email") String email,
@RequestParam("username") String username,
@RequestPart("headerImg") MultipartFile headerImg,
@RequestPart("photos") MultipartFile[] photos) {
if (!headerImg.isEmpty()){
try {
//获取到原始文件名
String originalFilename = headerImg.getOriginalFilename();
//transferTo将内存中的文件写入磁盘
//new File中写入具体文件保存路径和
headerImg.transferTo(new File("D:\\photos\\"+originalFilename));
} catch (IOException e) {
e.printStackTrace();
}
}
if (photos.length > 0){
for( MultipartFile photo:photos ){
if (photo != null){
String filename = photo.getOriginalFilename();
try {
photo.transferTo(new File("D:\\photos\\"+filename));
} catch (IOException e) {
e.printStackTrace();
}
}
}
}
return "index";
}14.8异常处理
- 默认规则
默认情况下,Spring Boot提供 /error 处理所有错误的映射
对于机器客户端,它将生成JSON响应,其中包含错误,HTTP状态和异常消息的详细信息。

对于浏览器客户端,响应一个“ whitelabel”错误视图,以HTML格式呈现相同的数据
如当访问的资源不存在时的404页面:

当服务器内部出错时的500页面:
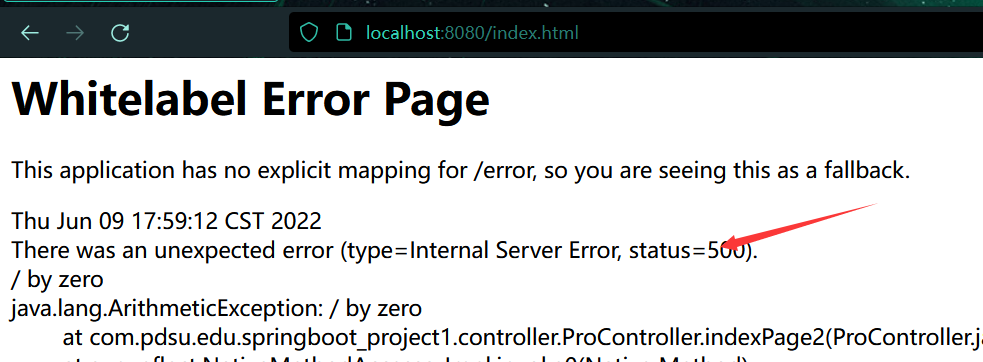
要对其进行自定义,添加 View 解析为 error。
当出现错误页面时,templates下的4xx,5xx页面会自动解析
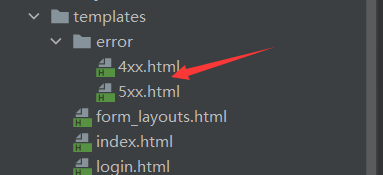
再次出现错误时,错误页面就会自动加载


14.9Web原生组件注入(Servlet、Filter、Listener)
对于原生的Servlet、Filter、Listener,想要在SpringBoot中使用, 就需要在主程序中添加@ServletComponentScan注解
//开启Web原生组件扫描
@ServletComponentScan
@SpringBootApplication
public class SpringBootProject1Application {
    public static void main(String[] args) {
        SpringApplication.run(SpringBootProject1Application.class, args);
    }
}
15.数据访问1(SQL)
15.1数据源的自动配置
- 导入JDBC场景
当导入JDBC场景后,SpringBoot会在容器中存放HikariDataSource数据源,如果没有自定义数据源,那么就会使用默认的HikariDataSource数据源。
<dependency>
    <groupId>org.springframework.boot</groupId>
    <artifactId>spring-boot-starter-jdbc</artifactId>
</dependency>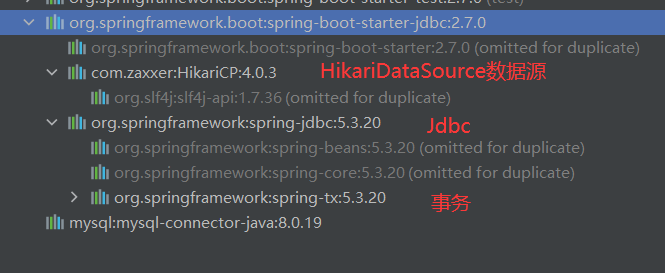
- DataSourceAutoConfiguration :数据源的自动配置
- 修改数据源相关的配置: spring.datasource
- 数据库连接池的配置,是自己容器中没有DataSource才 自动配置的
- 底层配置好的连接池是:
HikariDataSource


- 导入MySQL驱动
<!--        MySql驱动-->
        <dependency>
            <groupId>mysql</groupId>
            <artifactId>mysql-connector-java</artifactId>
        </dependency>
SpringBoot对MySQL驱动进行了版本仲裁,即不用规定 MySQL驱动,SpringBoot默认使用最新版本驱动

15.2在配置文件application.yaml中添加连接数据库配置项
spring:
  datasource:
    driver-class-name: com.mysql.cj.jdbc.Driver
    url: mysql:jdbc://localhost:3306/student
    username: root
    password: root
15.3SpringBoot对JdbcTemplate的自动化配置
SpringBoot容器中含有JdbcTemplate组件
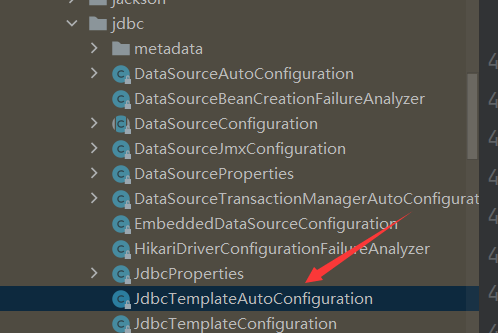

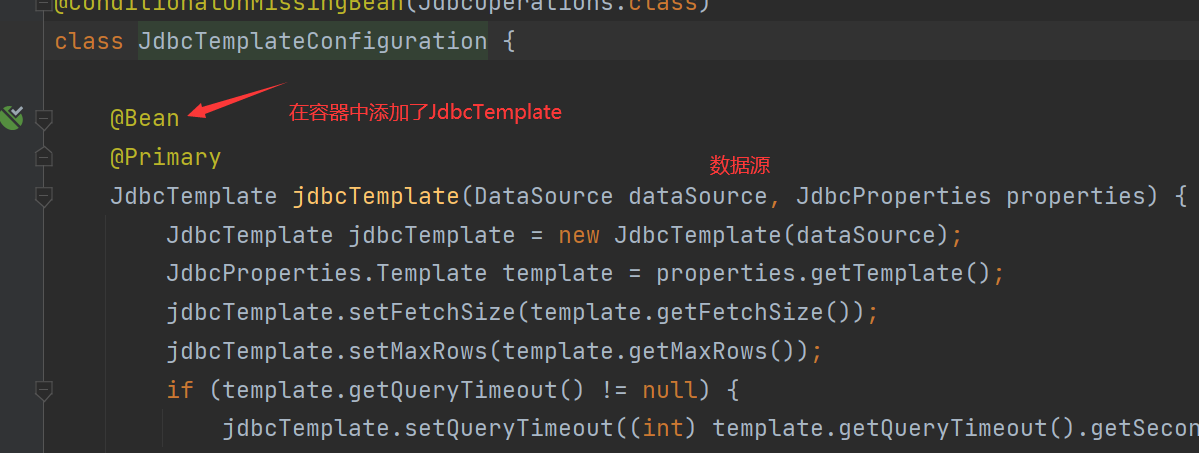
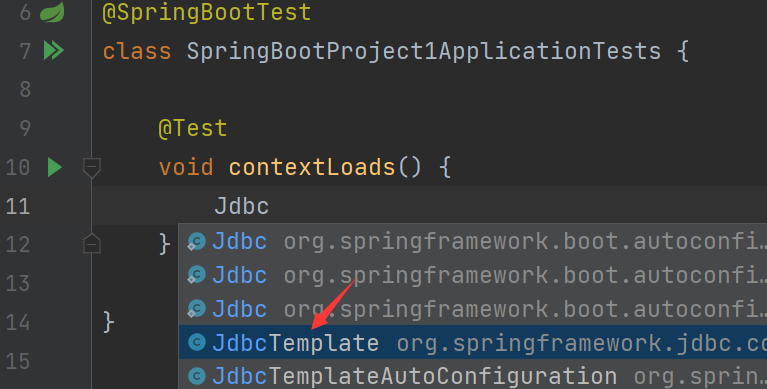
测试:
测试类
@SpringBootTest
class SpringBootProject1ApplicationTests {
//    JdbcTemplate在容器中,自动注入
    @Autowired
    JdbcTemplate jdbcTemplate;

    @Test
    void contextLoads() {
        Integer number = jdbcTemplate.queryForObject("select count(*) from class1", Integer.class);
        System.out.println(number+"----->数据库");
    }
}
15.4自定义方式整合druid数据源
- 引入依赖,创建数据源
<dependency>
    <groupId>com.alibaba</groupId>
    <artifactId>druid</artifactId>
    <version>1.0.9</version>
</dependency>
- 自定义配置类
自定义数据源后,就不会使用默认的JHikariDataSource数据源
@Configuration
public class MyDatasourceConfig {

    @Bean
    public DataSource test1(){
        return new DruidDataSource();
    }
}
测试当前数据源:
@Autowired
DataSource dataSource;
@Test
void contextLoads() {
    System.out.println("配置druid后的数据源类型是:"+dataSource.getClass());
}
可以看到当前数据源是自定义的Druid数据源

- Druid数据源监控
Druid 数据源具有监控的功能,Druid 可以很好的监控 DB 池连接和 SQL 的执行情况,天生就是针对监控而生的 DB 连接池,并提供了一个 web 界面方便用户查看。
15.5SpringBoot的start方式整合druid数据源
- 引入druid场景启动器
<dependency>
    <groupId>com.alibaba</groupId>
    <artifactId>druid-spring-boot-starter</artifactId>
    <version>1.2.9</version>
</dependency>
- Druid数据源的自动配置
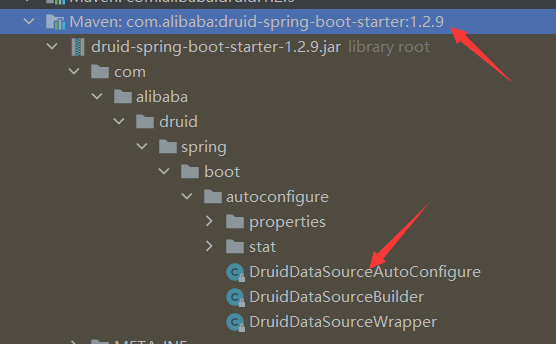
Druid自动化配置类
@Configuration
@ConditionalOnClass({DruidDataSource.class})
@AutoConfigureBefore({DataSourceAutoConfiguration.class})
@EnableConfigurationProperties({DruidStatProperties.class, DataSourceProperties.class})
@Import({DruidSpringAopConfiguration.class,
         DruidStatViewServletConfiguration.class,
         DruidWebStatFilterConfiguration.class,
         DruidFilterConfiguration.class})
public class DruidDataSourceAutoConfigure {
    ......
}
扩展配置项 spring.dataSource.druid
- DruidSpringAopConfiguration.class, 监控SpringBean的配置项:
spring.datasource.druid.aop-patterns

- DruidStatViewServletConfiguration.class, 监控页的配置:spring.datasource.druid.stat-view-servlet;默认开启

- DruidWebStatFilterConfiguration.class, web监控配置;spring.datasource.druid.web-stat-filter;默认开启

- DruidFilterConfiguration.class}) 所有Druid自己filter的配置
private static final String FILTER_STAT_PREFIX = "spring.datasource.druid.filter.stat";
private static final String FILTER_CONFIG_PREFIX = "spring.datasource.druid.filter.config";
private static final String FILTER_ENCODING_PREFIX = "spring.datasource.druid.filter.encoding";
private static final String FILTER_SLF4J_PREFIX = "spring.datasource.druid.filter.slf4j";
private static final String FILTER_LOG4J_PREFIX = "spring.datasource.druid.filter.log4j";
private static final String FILTER_LOG4J2_PREFIX = "spring.datasource.druid.filter.log4j2";
private static final String FILTER_COMMONS_LOG_PREFIX = "spring.datasource.druid.filter.commons-log";
private static final String FILTER_WALL_PREFIX = "spring.datasource.druid.filter.wall";
private static final String FILTER_WALL_CONFIG_PREFIX = "spring.datasource.druid.filter.wall.config";- Druid数据源监控页的实现
与自定义方式整合Druid数据源的方式不同的是,自定义方式整合的Druid数据源采用的是配置类的方式进行配置,而SpringBoot引入druid场景启动器后采用的是yaml配置文件配置的方式。
yaml配置文件
spring:
  datasource:
    driver-class-name: com.mysql.cj.jdbc.Driver
    url: jdbc:mysql://localhost:3306/student
    username: root
    password: root

#监控页配置
    druid:
#     底层开启功能 stat(SQL监控) wall(防火墙)
      filters: stat,wall
#     监控组件范围
      aop-patterns: com.pdsu.edu.*

#     配置监控页功能
      stat-view-servlet:
        enabled: true
        #监控页用户名
        login-username: admin
        #监控页密码
        login-password: 123456
#        重置按钮,不允许重置
        reset-enable: false

#     监控web应用
      web-stat-filter:
        enabled: true
        #需要监控的 url
        url-pattern: /*
        #排除一些静态资源,以提高效率
        exclusions: '*.js,*.gif,*.jpg,*.png,*.css,*.ico,/druid/*'

#     对filters里的功能的详细配置
      filter:
        #sql监控功能
        stat:
          slow-sql-millis: 1000
          log-slow-sql: true
          enabled: true
        #防火墙功能
        wall:
          enabled: true
          config:
            drop-table-allow: false
测试:
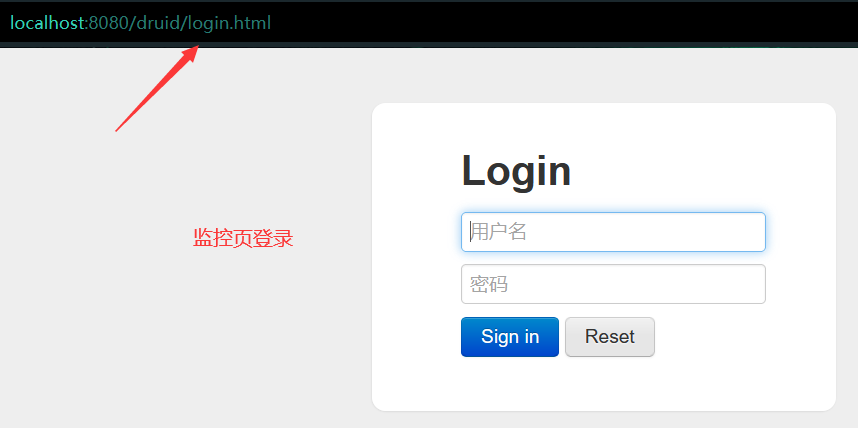
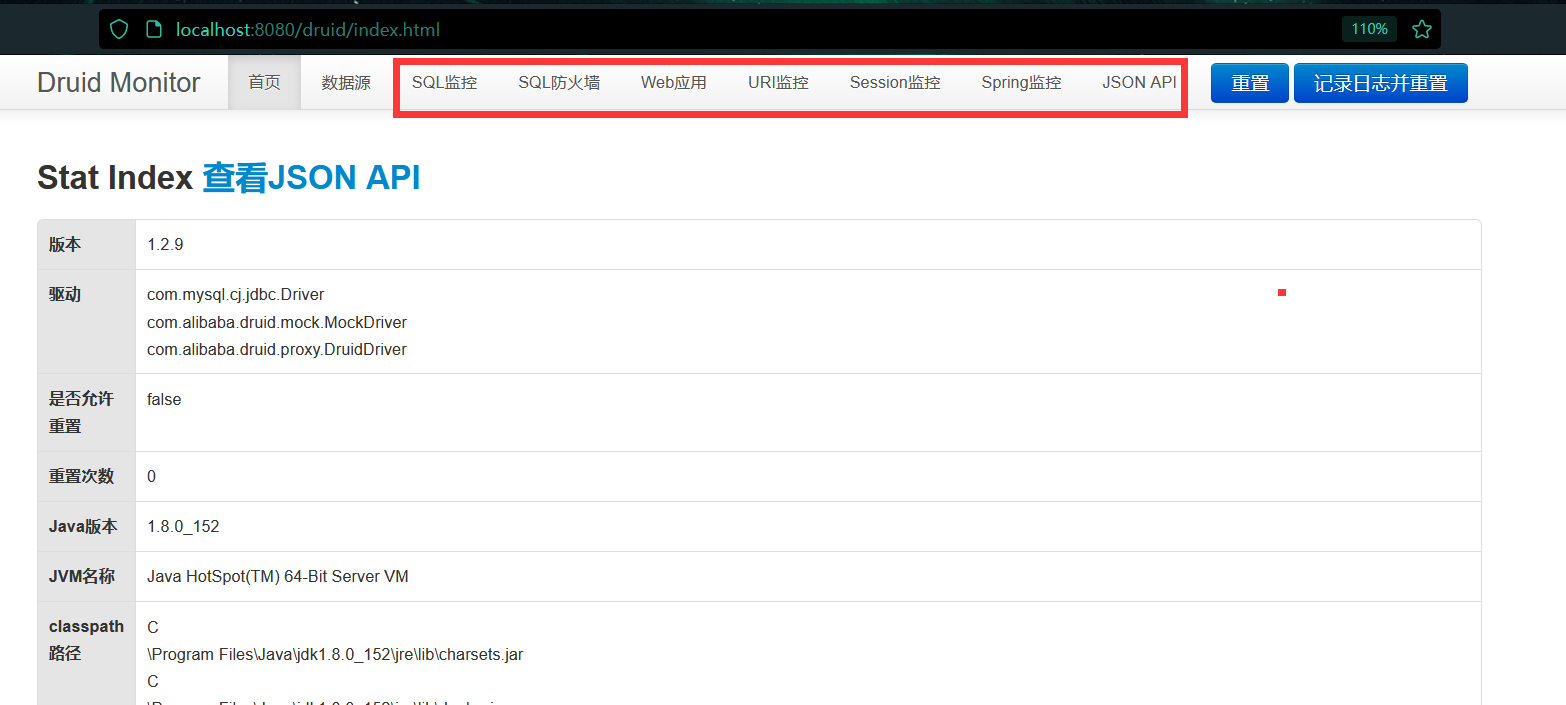
在控制器中设计请求映射,执行SQL语句
@Autowired
JdbcTemplate jdbcTemplate;

@ResponseBody
@RequestMapping("/sql")
public Integer testDruid(){
    Integer number = jdbcTemplate.queryForObject("select count(*) from class1", Integer.class);
    return number;
} 
查看SQL监控

防火墙
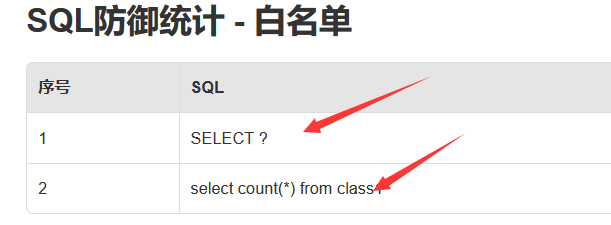
15.6 SpringBoot的整合MyBatis
15.6.1 方式一配置版
- 引入MyBatis场景
<dependency>
    <groupId>org.mybatis.spring.boot</groupId>
    <artifactId>mybatis-spring-boot-starter</artifactId>
    <version>2.2.2</version>
</dependency>
- SpringBoot中MyBatis配置原理
| 原生MyBatis实现的关键配置 | SpringBoot对MyBatis的整合 |
| SqISessionFactory | 自动配置好了 |
| SqISession | 自动配置了 SqISessionTemplate 组合了SqISession |
| @lmport | (AutoConfiguredMapperScannerRegistrar.class) |
| Mapper | 只要我们写的操作MyBatis的接口标准了 @Mapper 就会被自动扫描进来 |
- 在yaml配置文件中配置mybatis规则
# 配置mybatis规则
mybatis:
       #指定mybatis全局配置文件位置
  config-location: classpath:mybatis/mybatis-config.xml
       #指定mybatis sql文件位置
  mapper-locations: classpath:mybatis/mapper/*.xml
当然也可以不写MyBatis的全局配置文件,所有配置文件的配置项都可以在yaml配置文件的configuration中定义
如:在mybatis全局配置文件中开启驼峰原则

可以删除mybatis的全局配置文件,在yaml的configuration中定义,并删除对mybatis全局配置文件的位置绑定
# 配置mybatis规则
mybatis:
    #指定mybatis映射文件位置
  mapper-locations: classpath:mybatis/mapper/*.xml
  configuration:
map-underscore-to-camel-case: true- 创建mapper接口并添加Mapper注解,并在mapper映射文件中进行映射


mapper配置文件:
<?xml version="1.0" encoding="UTF-8" ?>
<!DOCTYPE mapper
        PUBLIC "-//mybatis.org//DTD Mapper 3.0//EN"
        "http://mybatis.org/dtd/mybatis-3-mapper.dtd">
<mapper namespace="com.pdsu.edu.springboot_project1.mapper.class1Mapper">
<!--    public Class1 getClass(int id);-->
    <select id="getClass" resultType="com.pdsu.edu.springboot_project1.bean.Class1">
        select * from class1 where id = #{id}
    </select>


</mapper>
在控制器中设置请求映射,但一般都是Service层调用Mapper,再由控制层调用Service
这种形式就像是dao层、service层、web层,对应关系如下:
| 数据访问层 | dao层 | mapper |
| 业务逻辑层 | service层 | service |
| 控制层 | web层 | controller |
创建service层,并调用mapper接口
@Service
public class class1Service {

    @Autowired(required = false)
    class1Mapper cm;  //调用mapper接口

    public Class1 getClass(int id){
        return cm.getClass(id);
    }
}
在控制层中调用service层,设置请求映射
@Autowired
class1Service cs; //调用service层

@ResponseBody
@RequestMapping("/class")
public Class1 getclass(@RequestParam("id") int id){
    return cs.getClass(id);
}
测试:
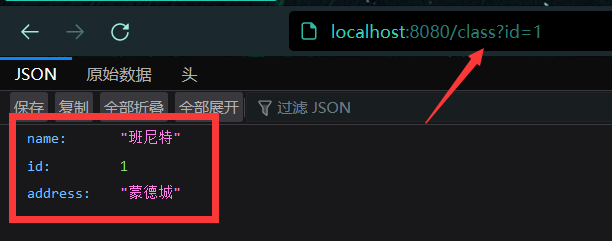
15.6.2 方式二注解版
对Mapper接口,可以不设置对应的映射文件,可以采用注解方式直接在Mapper接口中定义sql,与配置版不同的是,注解版不需要创建Mapper接口的映射文件,其他都相同。
如:查询数据

@Select("select name from class1 where id = #{id}")
public Class1 getName(int id);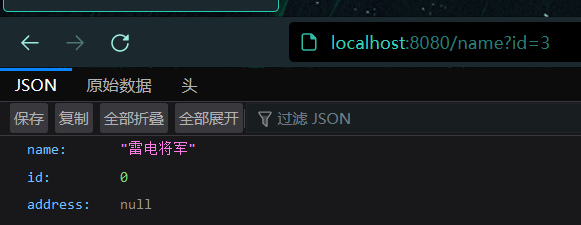
如:插入数据(设置id自增)
@Options注解是@Inser注解的设置项,可以设置主键自增等等

@Insert("insert into class1(name,address) values (#{name},#{address})")
@Options(useGeneratedKeys = true,keyProperty = "id")
public Class1 addClass1(Class1 class1);
15.6.3 方式三配置+注解版
对于简单的SQL,可以采用注解方式,而对于复杂的SQL,如果采用注解方式会有些麻烦,可以采用配置方式,如上面的插入数据操作采用映射文件的方式
<!--        public Class1 addClass1(Class1 class1);-->
<insert id="addClass1" useGeneratedKeys="true" keyProperty="id">
    insert into class1(name,address) values (#{name},#{address})
</insert>
15.7 SpringBoot整合MyBatis-Plus
- 引入MyBatisPlus场景
<dependency>
    <groupId>com.baomidou</groupId>
    <artifactId>mybatis-plus-boot-starter</artifactId>
    <version>3.5.2</version>
</dependency>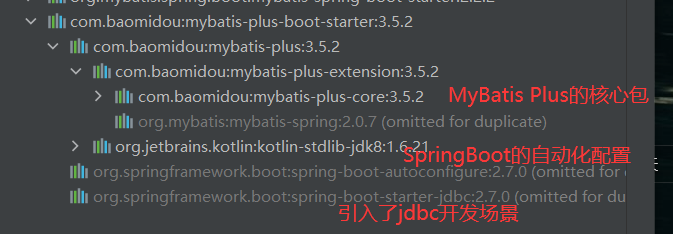
- 自动化配置原理
MybatisPlusAutoConfiguration配置类,MybatisPlusProperties 配置项绑定。mybatis-plus:就是对mybatis-plus的定制SqISessionFactory自动配置好。底层是容器中默认的数据源(先用的Druid数据源)mapperLocations自动配置好的。有默认值。 classpath*:/mapper/**/*.xml;任意包的类路径下的所有mapper文件夹下任意路径下的所有xml都是sql映射文件。 建议以后sql映射文件,放在 mapper下
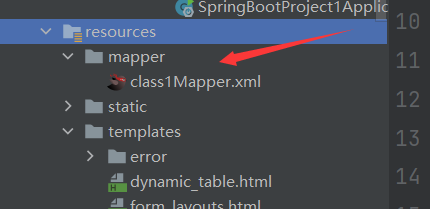
**容器中也自动配置好了 **
SqISessionTemplate@Mapper 标注的接口也会被自动扫描;建议直接 @MapperScan(“com.atguigu.admin.mapper”) 批量扫描就行
- 测试MyBatisPlus
JavaBean
@Data
@NoArgsConstructor
@AllArgsConstructor
@ToString
public class User {
    private int id;
    private String name;
    private int age;
    private String email;
}
Mapper接口
在MyBatis中,Mapper接口继承BaseMapper类(泛型为JavaBean)
public interface userMapper extends BaseMapper<User> {

}
在BaseMapper类中,已经有定义好的增删改查SQL

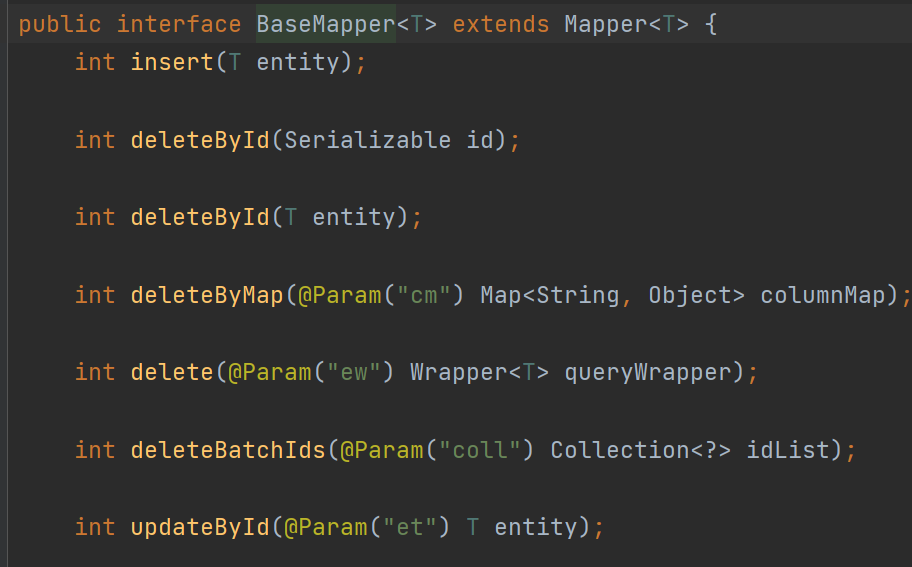
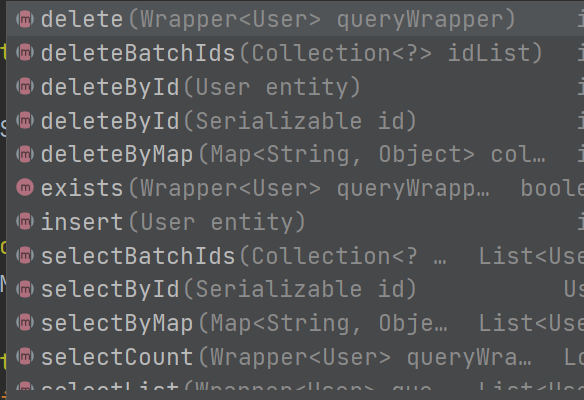
测试方法:
@Test
public void testMyBatisPlus(){
    User user = mp.selectById(1);
    System.out.println(user);
}

16.数据访问2(NoSQL)
16.1NoSQL的概念
NoSQL,泛指非关系型的数据库,NoSQL即Not-Only SQL,它可以作为关系型数据库的良好补充。随着互联网web2.0网站的兴起,非关系型的数据库现在成了一个极其热门的新领域,非关系数据库产品的发展非常迅速。而传统的关系数据库在应付web2.0网站,特别是超大规模和高并发的SNS类型的web2.0纯动态网站已经显得力不从心,暴露了很多难以克服的问题
16.2SpringBoot中redis的自动化配置
一:引入redis的场景依赖
<dependency>
    <groupId>org.springframework.boot</groupId>
    <artifactId>spring-boot-starter-redis</artifactId>
    <version>1.4.7.RELEASE</version>
</dependency>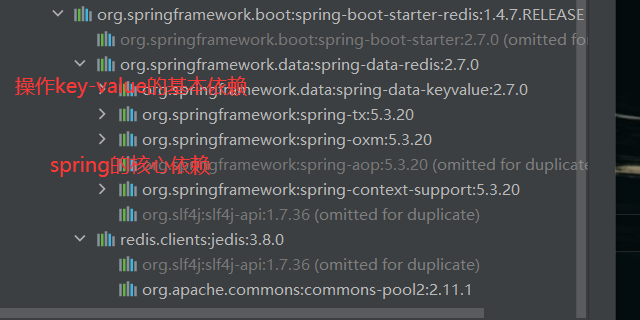
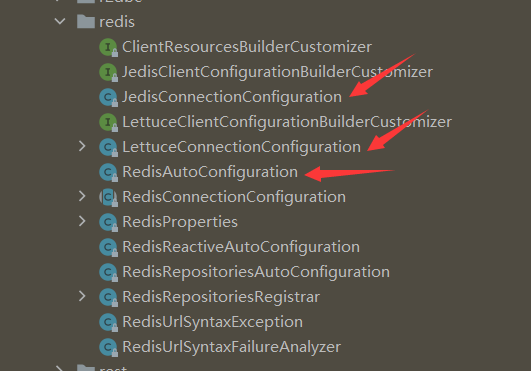
- RedisAutoConfiguration 自动配置类。RedisProperties 属性类**–> spring.redis.xxx是对redis**的配置


连接工厂是准备好的。LettuceConnectionConfiguration、JedisConnectionConfiguration
自动注入了**RedisTemplate<Object, Object**> (类似于JdbcTemplate)封装了对Redis数据库的一些操作。
RedisTemplate中定义了5种数据结构操作
redisTemplate.opsForValue();  //操作字符串
redisTemplate.opsForHash();   //操作hash
redisTemplate.opsForList();   //操作list
redisTemplate.opsForSet();    //操作set
redisTemplate.opsForZSet(); //操作有序set- 自动注入了StringRedisTemplate,StringRedisTemplate继承与RedisTemplate; k: v都是String
两者的使用场景
当你的redis数据库里面本来存的是字符串数据或者你要存取的数据就是字符串类型数据的时候,那么你就使用StringRedisTemplate即可,
但是如果你的数据是复杂的对象类型,而取出的时候又不想做任何的数据转换,直接从Redis里面取出一个对象,那么使用RedisTemplate是更好的选择。
- 底层只要我们使用 StringRedisTemplate、RedisTemplate就可以操作redis
17.单元测试
17.1JUnit5 的变化
Spring Boot 2.2.0 版本开始引入 junit 5 作为单元测试默认库作为最新版本的junit框架,junit5与之前版本的junit框架有很大的不同。由三个不同子项目
的几个不同模块组成。
JUnit 5 = JUnit Platform + JUnit Jupiter + JUnit Vintage

JUnit Platform: Junit Platform是在JVM上启动测试框架的基础,不仅支持Junit自制的测试
引擎,其他测试引擎也都可以接入。
JUnit Jupiter: JUnit jupiter提供了junit5的新的编程模型,是jUnit5新特性的核心。内部包含了一个测试引擎,用于在junit Platform上运行。
JUnit Vintage: 由于juint已经发展多年,为了照顾老的项目,junit Vintage提供了兼容junit4.x,junit3.x的测试引擎。
注意:
SpringBoot 2.4以上版本移除了默认对 Vintage 的依赖。如果需要兼容junit4需要自行引入(不能使用junit4的功能 @Test)
JUnit 5’s Vintage Engine Removed from spring-boot- starter-test,如果需要继续兼容junit4需要自行引入Avintage
<!--        测试场景-->
        <dependency>
            <groupId>org.springframework.boot</groupId>
            <artifactId>spring-boot-starter-test</artifactId>
            <scope>test</scope>
        </dependency>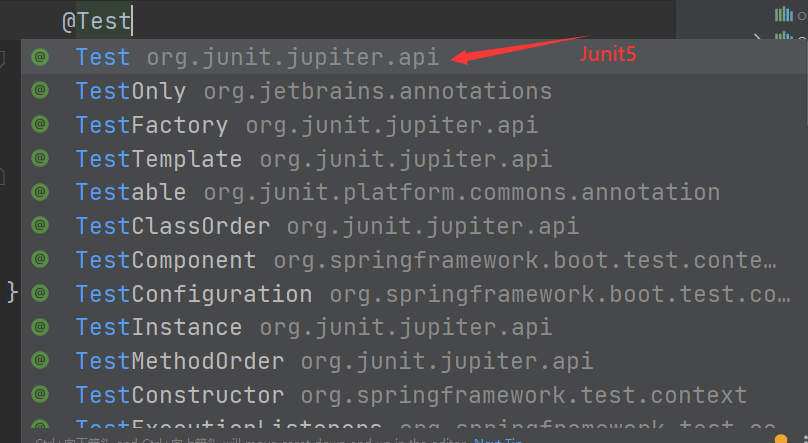
在pom文件中引入junit-vintage-engine来兼容Junit4
<dependency>
    <groupId>org.junit.vintage</groupId>
    <artifactId>junit-vintage-engine</artifactId>
    <scope>test</scope>
    <exclusions>
        <exclusion>
            <groupId>org.hamcrest</groupId>
            <artifactId>hamcrest-core</artifactId>
        </exclusion>
    </exclusions>
</dependency>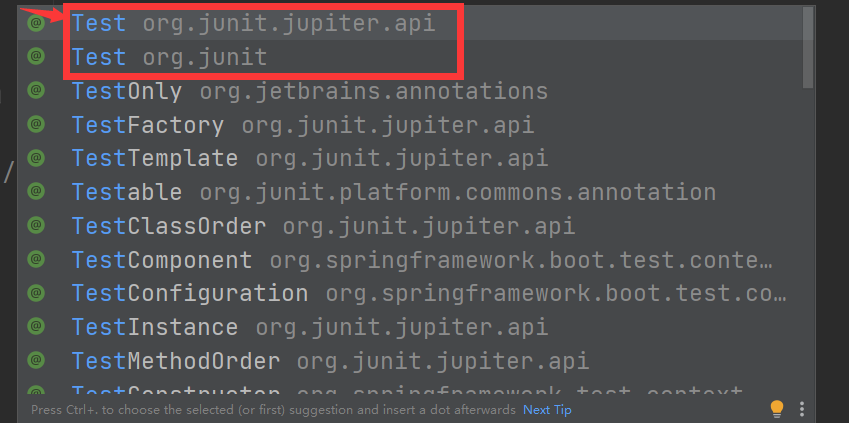
SpringBoot整合junit以后。
编写测试方法:@Test标注(注意需要使用junit5版本的注解)
Junit类具有Spring的功能, @Autowired、比如 @Transactional 标注测试方法,测试完成后自动回滚
@Transactional
@Test
public void testRedis(){
    System.out.println(dataSource);
    System.out.println(cm);
}
17.2 JUnit5 常用注解
@Test:表示方法是测试方法。但是与junit4的@Test不同,他的职责非常单一不能声明任何属性,拓展的测试将会由jupiter提供额外测试
@ParameterizedTest:表示方法是参数化测试,下方会有详细介绍
**@RepeatedTest :**表示方法可重复执行的次数。
@DisplayName:为测试类或者测试方法设置展示名称
@DisplayName("测试displayname注解")
@Test
public void testDisplayName(){
    System.out.println("测试displayname注解");
}@BeforeEach:表示在每个单元测试之前执行
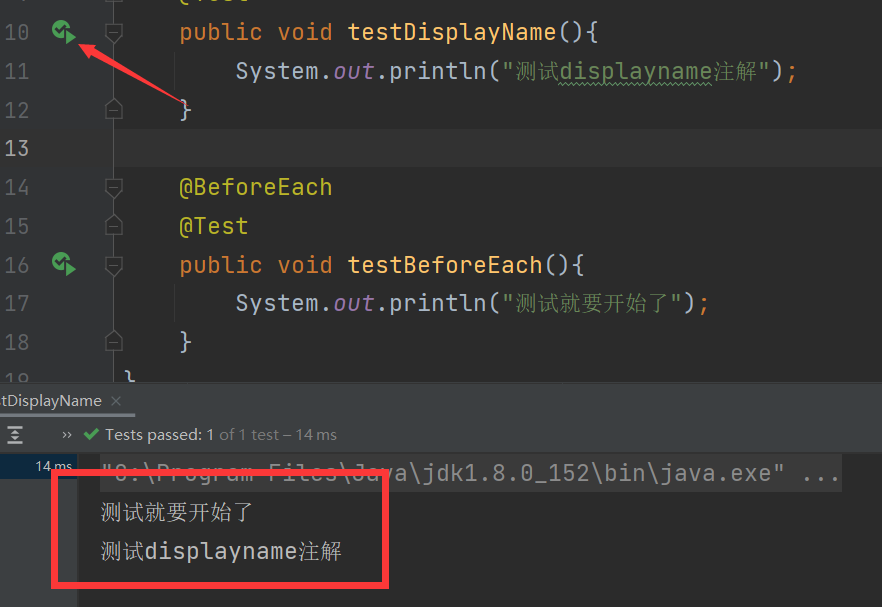
@AfterEach:表示在每个单元测试之后执行
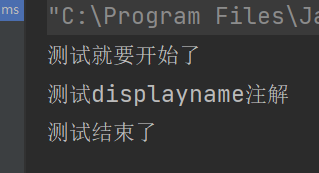
@DisplayName("测试displayname注解")
@Test
public void testDisplayName(){
    System.out.println("测试displayname注解");
}

@BeforeEach
public void testBeforeEach(){
    System.out.println("测试就要开始了");
}

@AfterEach
public void testAfterEach(){
    System.out.println("测试结束了");
}
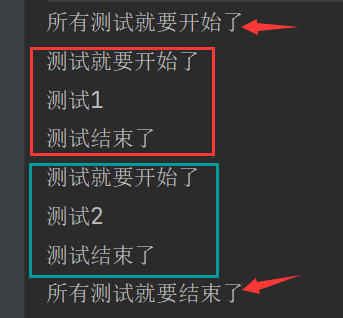
@BeforeAII:表示在所有单元测试之前执行
@AfterAII:表示在所有单元测试之后执行
public class Junit5Test {
    @DisplayName("测试1")
    @Test
    public void test1(){
        System.out.println("测试1");
    }
    @Test
    public void test2(){
        System.out.println("测试2");
    }

    @BeforeEach
    public void testBeforeEach(){
        System.out.println("测试就要开始了");
    }

    @AfterEach
    public void testAfterEach(){
        System.out.println("测试结束了");
    }

    @BeforeAll
    public void testBeforeAll(){
        System.out.println("所有测试就要开始了");
    }

    @AfterAll
    public void testAfterAll(){
        System.out.println("所有测试就要结束了");
    }
}
需要将testBeforeAll()方法和testAfterAll()方法定义为静态方法,使其只执行一次。
java基础知识:
static代码块只执行一次原因:
static代码块只在类加载时执行,类是用类加载器来读取的,类加载器是带有一个缓存区的
@Tag:表示单元测试类别,类似于JUnit4中的@Categories
@Disabled:表示测试类或测试方法不执行,类似于junit4中的@lgnore
@Timeout:表示测试方法运行如果超过了指定时间将会返回错误
@ExtendWith:为测试类或测试方法提供扩展类引用
17.3 断言机制
断言 (assertions) 是测试方法中的核心部分,用来对测试需要满足的条件进行验证。这些断言方法都是 org.junit.jupiter.api.Assertions 的静态方法。JUnit 5 内置的断言可以分成如下几个类别:
17.3.1简单断言
用来对单个值进行简单的验证。如:
| 方法 | 说明 |
|---|---|
| assertEquals | 判断两个对象或两个原始类型是否相等 |
| assertNotEquals | 判断两个对象或两个原始类型是否不相等 |
| assertSame | 判断两个对象引用是否指向同一个对象 |
| assertNotSame | 判断两个对象引用是否指向不同的对象 |
| assertTrue | 判断给定的布尔值是否为true |
| assertFalse | 判断给定的布尔值是否为false |
| assertNull | 判断给定的对象引用是否为null |
| assertNotNull | 判断给定的对象引用是否不为null |
assertEquals方法:
@DisplayName("测试简单断言")
@Test
public void testSimpleAssertions(){
    int add = add(2, 4);
    Assertions.assertEquals(7,add);
}
int add(int a,int b){
    return a+b;
}

17.3.2数组断言
@Test
@DisplayName( "array assertion")
public void array() {
   Assertions.assertArrayEquals(new int[]{1,2},new int[]{1,2},"数组内容不相等");
}
17.3.3组合断言
assertAII 方法接受多个 org.junit.jupiter.api.Executable 函数式接口的实例作为要验证的断言,可以通过 lambda 表达式很容易的提供这些断言
@Test
@DisplayName("组合断言")
public void test(){
    Assertions.assertAll("test",
            ()-> Assertions.assertTrue(1 == 1),
            () -> Assertions.assertEquals(1,2));
}
17.3.4异常断言
在JUnit4时期,想要测试方法的异常情况时,需要用@Rule注解的ExpectedException变量还是比较麻烦的。而JUnit5提供了一种新的断言方式Assertions.assertThrowsO ,配合函数式编程就可以进行使用。
@DisplayName("测试异常断言")
@Test
public void test2(){
    Assertions.assertThrows(ArithmeticException.class,
            ()->{int i = 1/1;},
            "没有出现算数异常");
}
17.3.5超时断言
Junit5还提供了Assertions.assertTimeoutO 为测试方法设置了超时时间
//如果测试方法时间超过is将会异常
Assertions.assertTimeout(Duration.ofMillis(1000),
() - > Thread.sleep(500))
17.4 前置条件
JUnit 5 中的前置条件 (assumptions【假设】) 类似于断言,不同之处在于不满足的断言会使得测试方法失败,而不满足的前置条件只会使得测试方法的执行终止。前置条件可以看成是测试方法执行的前提,当该前提不满足时,就没有继续执行的必要。
@DisplayName("测试前置条件")
@Test
public void testAssuptions(){
    Assumptions.assumeTrue(true,"结果不是true");
    System.out.println("成功打印");
}
Assumptions.assumeTrue(false,"结果不是true");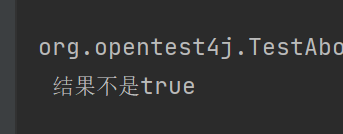
17.5 嵌套测试
JUnit 5 可以通过 java 中的内部类和@Nested 注解实现嵌套测试,从而可以更好的把相关的测试方法组织在一起。在内部类中可以使用@BeforeEach 和@AfterEach 注解,而且嵌套的层次没有限制。
17.6 参数化测试
参数化测试是JUnit5很重要的一个新特性,它使得用不同的参数多次运行测试成为了可能,也为我们的单元测试带来许多便利。
利用**@ValUeSource**等注解,指定入参,我们将可以使用不同的参数进行多次单元测试,而不需要每新增一个参数就新增一个单元测试,省去了很多冗余代码。
@ValueSource: 为参数化测试指定入参来源,支持八大基础类以及String类型,Class类型
@NullSource:表示为参数化测试提供一个null的入参
@EnumSource: 表示为参数化测试提供一个枚举入参
@CsvFileSource:表示读取指定CSV文件内容作为参数化测试入参
@MethodSource: 表示读取指定方法的返回值作为参数化测试入参(注意方法返回需要是一个流)
测试:
@DisplayName("参数化测试")
@ParameterizedTest
@ValueSource(ints = {1,2,3,4,5})
public void testParamter(int i){
    System.out.println(i);
}@DisplayName("参数化测试")
@MethodSource("method")
@ParameterizedTest
public void testMethodSource(String name){
System.out.println(name);
}
static Stream<String> method(){
return Stream.of("枫原万叶","宵宫");
}
18.指标监控
- 简介
未来每一个微服务在云上部署以后,我们都需要对其进行监控、追踪、审计、控制等。SpringBoot就抽取了Actuator场景,使得我们每个微服务快速引用即可获得生产级别的应用监控、审计等功能
引入Actuator场景
<!--        指标监控场景-->
        <dependency>
            <groupId>org.springframework.boot</groupId>
            <artifactId>spring-boot-starter-actuator</artifactId>
        </dependency>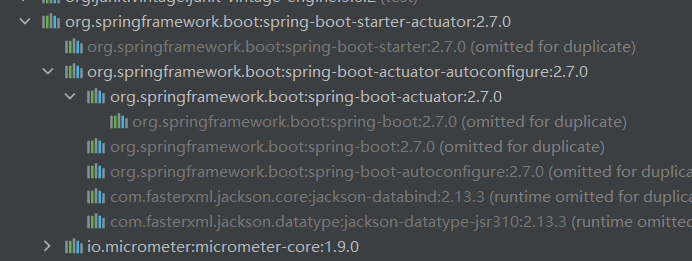
- 如何使用
#    management是所有actuator的配置
management:
  endpoints:
    enabled-by-default: true #默认开启所有端点
    web:
      exposure:
include: '*' #以Web方式暴露所有端点- 测试相应指标
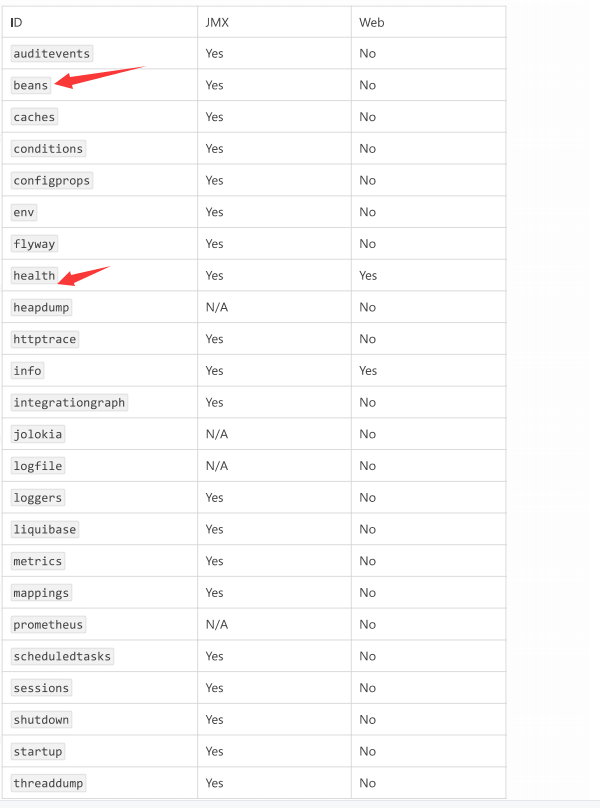

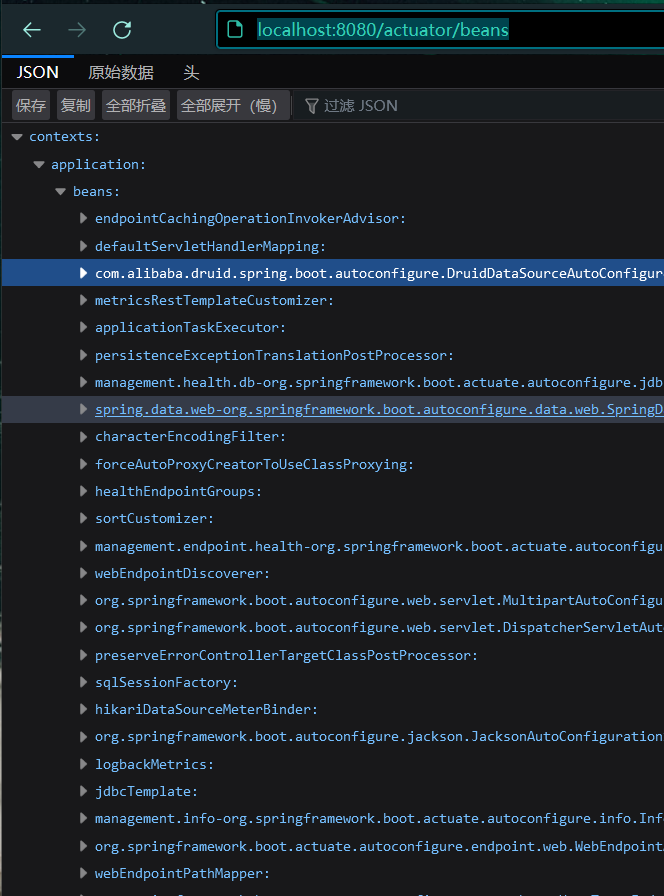
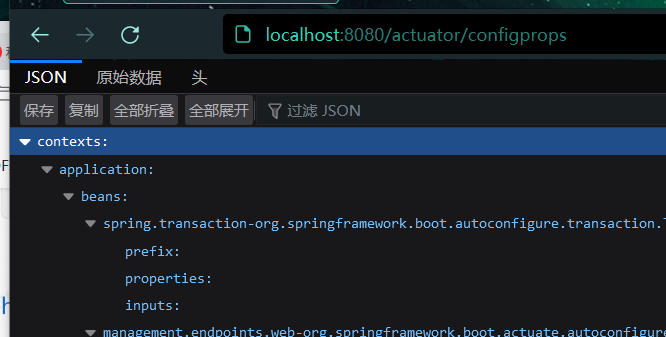
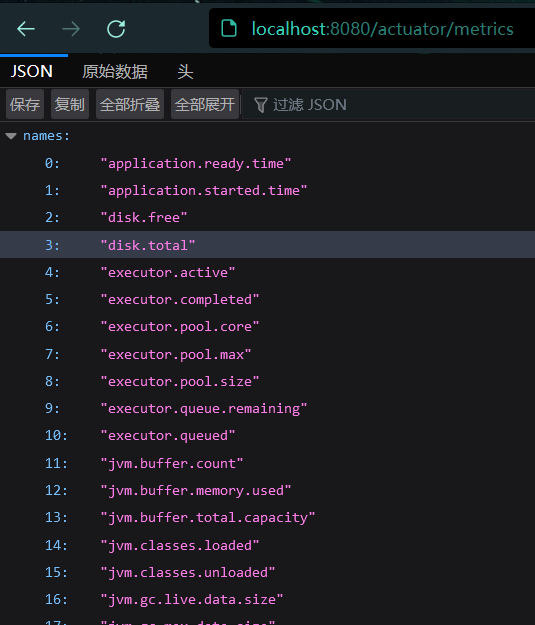
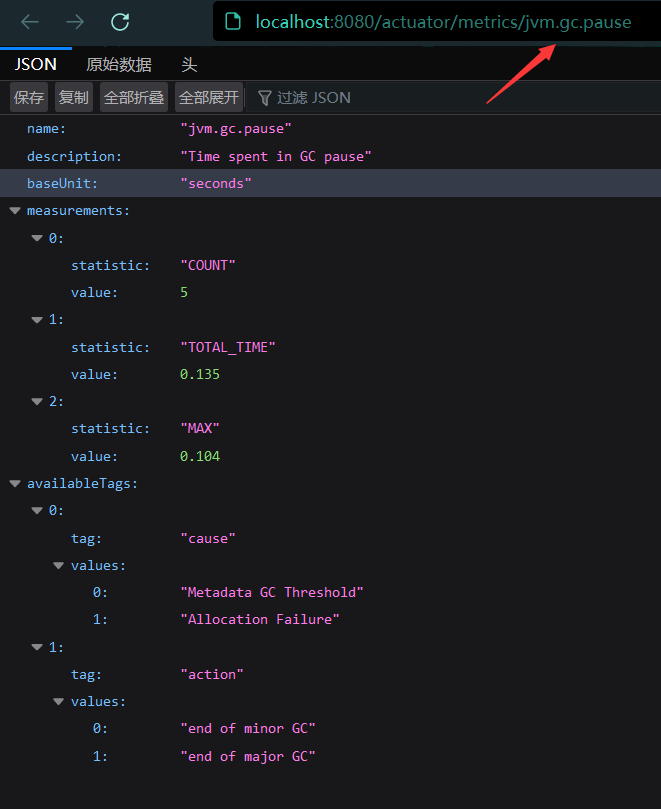
#    management是所有actuator的配置
management:
  endpoints:
    enabled-by-default: true #默认开启所有端点
    web:
      exposure:
        include: '*'  #以Web方式暴露所有端点
#        详细显示健康端点的详细配置
  endpoint:
    health:
      show-details: always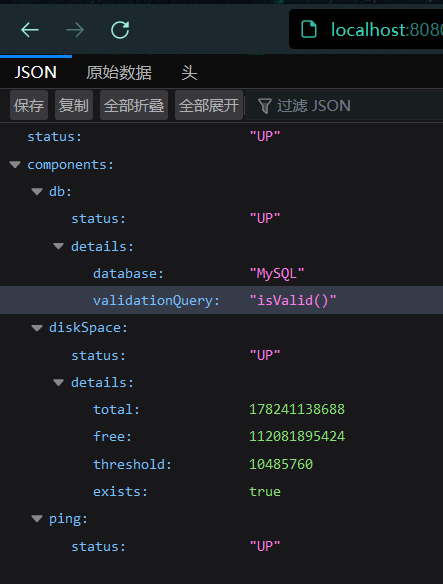
19.指标监控可视化中心(Spring Boot Admin)
- Spring Boot Admin简介
通过Actuator查看spring boot 应用运行的过程中的各项指标,通过图形化界面呈现出来。有点类似于JDK自带的工具jvisualvm,
但是它拥有更加强大丰富的功能。
1.查看JVM、tomcat进程信息。
2.查看应用配置信息,系统属性、系统环境变量等。
3.查看创建的bean信息。
4.查看应用中的运行日志。
5.查看web应用的访问端点。
6.查看http跟踪信息。
- 指标监控可视化中心搭建
一:在客户端添加依赖
<!--        指标监控场景-->
        <dependency>
            <groupId>org.springframework.boot</groupId>
            <artifactId>spring-boot-starter-actuator</artifactId>
        </dependency>
        <!--        引入客户端监控场景-->
        <dependency>
            <groupId>de.codecentric</groupId>
            <artifactId>spring-boot-admin-client</artifactId>
            <version>2.7.0</version>
        </dependency>
二:在客户端配置文件中进行修改
#    management是所有actuator的配置
management:
  endpoints:
    enabled-by-default: true #默认开启所有端点
    web:
      exposure:
        include: '*'  #以Web方式暴露所有端点
#        详细显示健康端点的详细配置
  endpoint:
    health:
      show-details: always

spring
    boot:
      admin:
        client:
          url: http://localhost:8888
三:创建服务器端
在主程序中添加@EnableAdminServer注解来启动admin-server功能
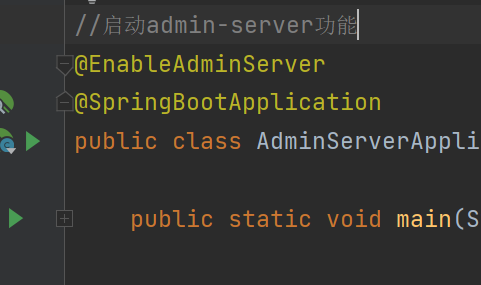
添加监控服务器场景
<!--        引入监控服务器场景-->
        <dependency>
            <groupId>de.codecentric</groupId>
            <artifactId>spring-boot-admin-starter-server</artifactId>
            <version>2.7.0</version>
        </dependency>
在配置文件中修改端口号,因为默认的8080端口号已经被客户端占用

启动监控服务器

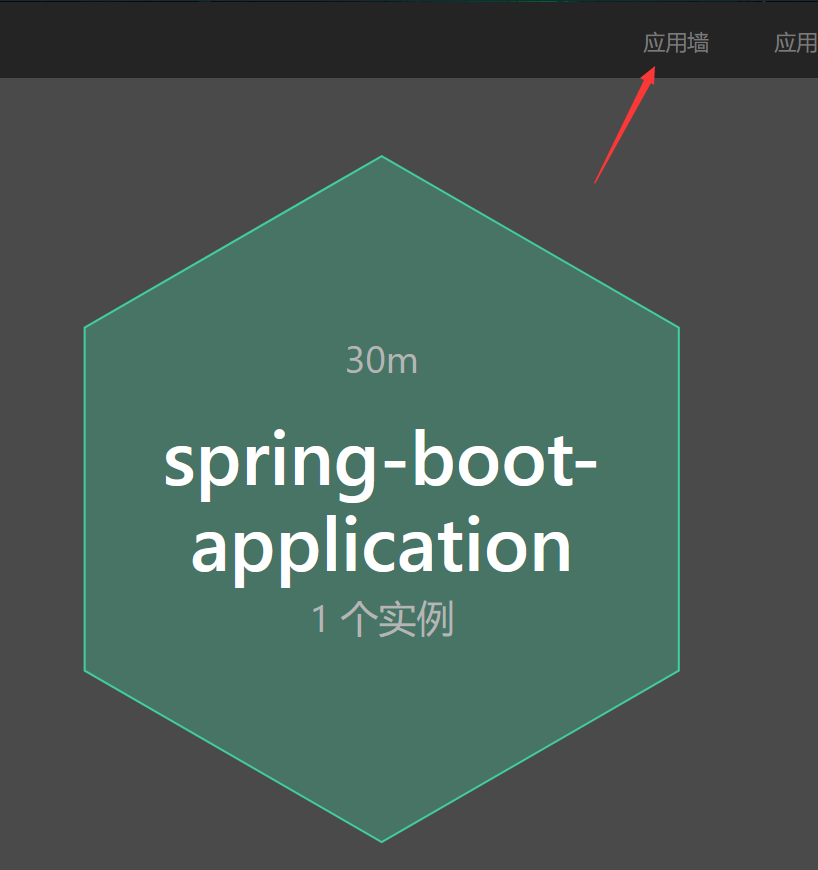
20.SpringBoot高级特性
20.1Profile功能
为了方便多环境适配,springboot简化了profile功能。
20.1.1环境切换
一:application-profile功能
- 默认配置文件 application.yaml; 任何时候都会加载
- 指定环境配置文件 application-{env}.yaml
- 激活指定环境
@RestController
public class controller1 {

    @Value("${person.username:李四}")
    private String username;
    @RequestMapping("/")
    public String test1(){
        return "Hello "+username;
    }
}
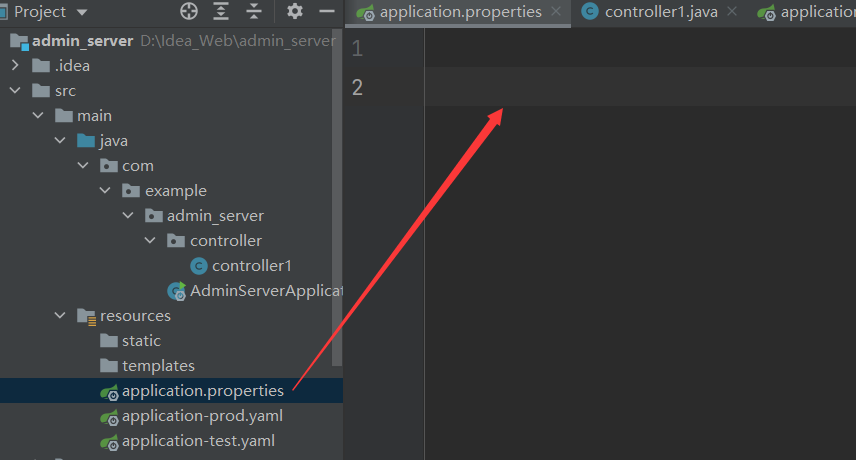
当application.properties配置文件为空时,会打印默认值“李四”

当配置文件中有person.username属性时,会打印配置文件中的值
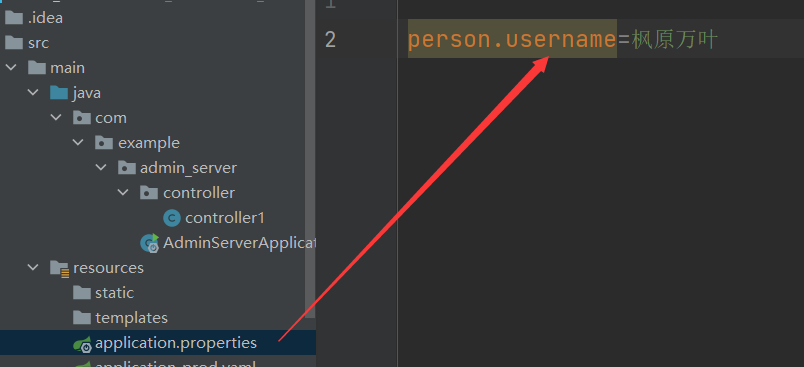
在application.propertise配置文件中指定当前环境配置文件为生产环境


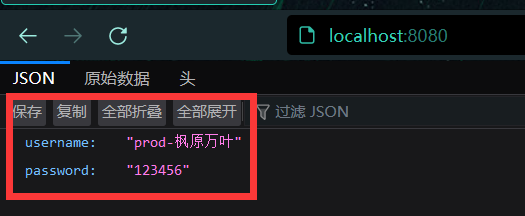
打印出application-prod.yaml配置文件中的值,test配置文件同理

命令行激活:java -jar xxx.jar -spring.profiles.active=prod – person.name=haha
修改配置文件的任意值,命令行优先
默认配置与环境配置同时生效
同名配置项,profile环境配置优先
20.1.2条件装配
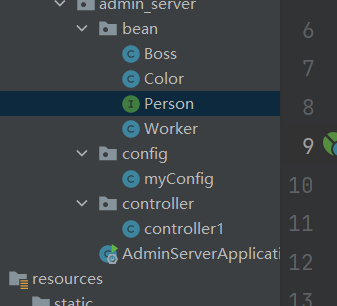
Person接口
public interface Person {
   public String getUsername();
   public String getPassword();
}
Boss类实现Person接口
@Profile("prod") //指定为生产环境
@Component
@ConfigurationProperties("person")
@Data
public class Boss implements Person{
    private String username;
    private String password;

}
Worker类实现Person接口
@Profile("test")
@Component
@ConfigurationProperties("person")
@Data
public class Worker implements Person{
    private String username;
    private String password;
}
Controller
@RestController
public class controller1 {

    @Autowired
    private Person person;

    @RequestMapping("/")
    public String test1(){
        return person.getClass().toString();
    }
}
则当前Person对象为Boss类

更改环境为test环境,则当前Person对象为Worker类

20.1.3 profile分组
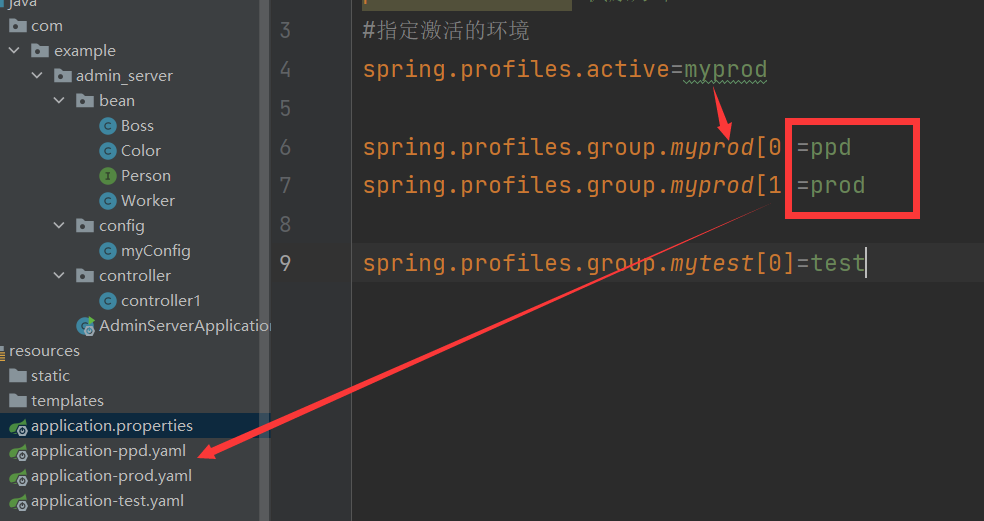
通过配置 spring.profiles.group.分组名 值设置一个配置文件组,然后在spring.profile.active后面加上想激活的组名,那一整个组就启动了。
application.propertise配置文件
指定激活环境为分组“myprod”,并设置myprod分组中有两个值
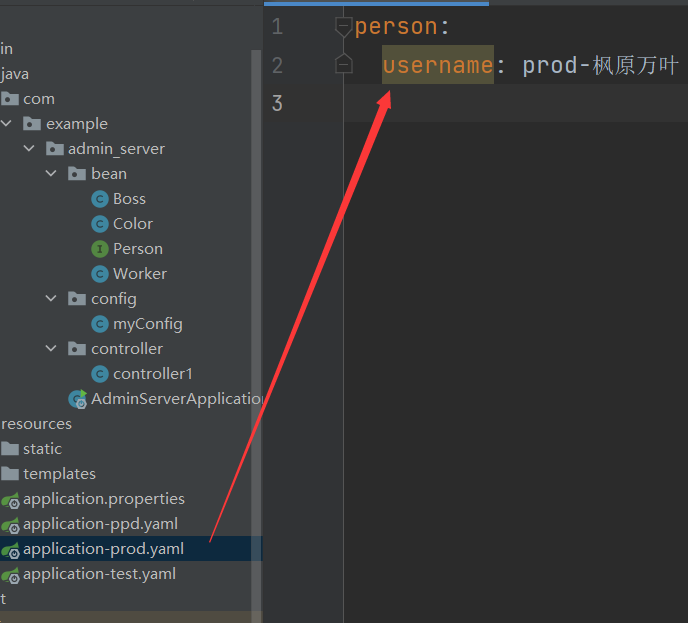
application-prod配置文件中设置person对象的username属性
application-ppd配置文件中设置person对象的password属性

20.2外部化配置
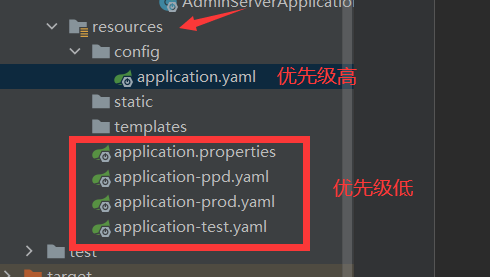
一:配置文件查找位置(优先级逐渐递增)
- classpath 根路径
- classpath 根路径下config目录
- jar包当前目录
- jar包当前目录的config目录
- /config子目录的直接子目录
二:配置文件加载顺序
当前jar包内部的application.properties和application.yml
当前jar包内部的application-{profile}.properties 和 application-{profile}.yml
引用的外部jar包的application.properties和application.yml
引用的外部jar包的application-{profile}.properties 和 application-{profile}.yml
三:指定环境优先,外部优先,后面的可以覆盖前面的同名配置项
20.3自定义Starter
20.3.1为什么要自定义Starter
在我们的日常开发工作中,经常会有一些独立于业务之外的配置模块,我们经常将其放到一个特定的包下,然后如果另一个工程需要复用这块功能的时候,需要将代码硬拷贝到另一个工程,重新集成一遍,麻烦至极。
如果我们将这些可独立于业务代码之外的功配置模块封装成一个个starter,并在starter中设置好默认值,复用的时候只需要将其在pom中引用依赖即可,Spring Boot为我们完成自动装配,做到开箱即用。
20.3.2自定义Starter步骤
20.3.2.1说明
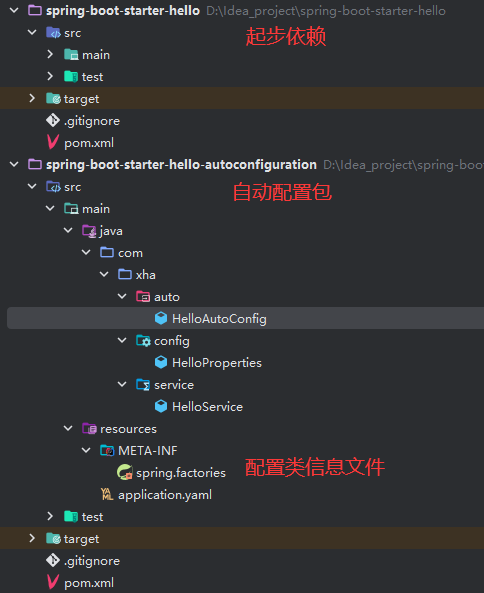
说明:这里使用的起步依赖+自动配置包完成
- 起步依赖:只需要声明要使用哪些依赖即可
- 自动配置包:和SpringBoot的自动配置一样,完成bean的自动配置
20.3.2.2项目结构
20.3.2.3Starter具体实现
20.3.2.3.1自动配置包
- 创建一个JavaBean,它可以从配置文件中读取配置信息
package com.xha.config;

import org.springframework.boot.context.properties.ConfigurationProperties;


/**
 * 这个类的作用是:把配置文件中的 hello 前缀的属性值注入到这个类中
 *
 * @author Xu huaiang
 * @date 2023/08/21
 */
@ConfigurationProperties(prefix = "hello")
public class HelloProperties {
    private String prefix;

    private String suffix;

    public String getPrefix() {
        return prefix;
    }

    public void setPrefix(String prefix) {
        this.prefix = prefix;
    }

    public String getSuffix() {
        return suffix;
    }

    public void setSuffix(String suffix) {
        this.suffix = suffix;
    }
}- 创建一个业务逻辑层的组件,但是它不是直接注入到容器当中,而是按需加载。在这个配置类中,注入
HelloProperties,获取到属性值。
package com.xha.service;

import com.xha.config.HelloProperties;
import org.springframework.beans.factory.annotation.Autowired;

/**
 * 默认不放到容器中
 *
 * @author Xu huaiang
 * @date 2023/08/21
 */
public class HelloService {

    //注入HelloProperties
    @Autowired
    private HelloProperties helloProperties;

    public String sayHello() {
        return helloProperties.getPrefix() + "*******" + helloProperties.getSuffix();
    }
}- 创建一个配置类,主要完成自动配置
package com.xha.auto;

import com.xha.config.HelloProperties;
import com.xha.service.HelloService;
import org.springframework.boot.autoconfigure.condition.ConditionalOnMissingBean;
import org.springframework.boot.context.properties.EnableConfigurationProperties;
import org.springframework.context.annotation.Bean;
import org.springframework.context.annotation.Configuration;

@Configuration
@EnableConfigurationProperties(HelloProperties.class)
/**
 * 这个注解的作用有两个:1.开启属性配置功能,就是使得 @ConfigurationProperties 注解生效
 *                   2.把 HelloProperties 这个类加入到 Spring 容器中
 */
public class HelloAutoConfig {

    /**
     * @ConditionalOnMissingBean 注解的作用是:
     * 如果 Spring 容器中没有 HelloAutoConfig 这个类的实例,
     * 那么就创建这个类的实例并加入到 Spring 容器中
     *
     * @return {@link HelloService}
     */
    @ConditionalOnMissingBean(HelloAutoConfig.class)
    @Bean
    public HelloService helloService() {
        return new HelloService();
    }
}- 自动配置类的属性绑定:配置文件信息,如果如果用户没有在配置文件中自定义属性的话,就会使用默认的配置文件的内容。
hello:
  prefix: "Hello"
suffix: "World"- 在类路径下(
target\classes)创建META-INF\spring.factorizes文件,用于指定配置类的信息- key-value键值对类型,k为全类型,v为具体实现类
org.springframework.boot.autoconfigure.EnableAutoConfiguration=\
com.xha.auto.HelloAutoConfig
20.3.2.3.5起步依赖
在起步依赖中添加自动配置包的依赖
<?xml version="1.0" encoding="UTF-8"?>
<project xmlns="http://maven.apache.org/POM/4.0.0"
         xmlns:xsi="http://www.w3.org/2001/XMLSchema-instance"
         xsi:schemaLocation="http://maven.apache.org/POM/4.0.0 http://maven.apache.org/xsd/maven-4.0.0.xsd">
    <modelVersion>4.0.0</modelVersion>

    <groupId>com.xha</groupId>
    <artifactId>spring-boot-starter-hello</artifactId>
    <version>1.0-SNAPSHOT</version>

    <properties>
        <maven.compiler.source>17</maven.compiler.source>
        <maven.compiler.target>17</maven.compiler.target>
        <project.build.sourceEncoding>UTF-8</project.build.sourceEncoding>
    </properties>

    <dependencies>
        <dependency>
            <groupId>com.xha</groupId>
            <artifactId>spring-boot-starter-hello-autoconfiguration</artifactId>
            <version>1.0-SNAPSHOT</version>
        </dependency>
    </dependencies>

</project>
20.3.2.3打包Starter进Maven仓库
先将自动配置打包,再将起步依赖打包
20.3.2.4测试
创建测试项目进行测试
- 添加进自定义
Starter的依赖
<?xml version="1.0" encoding="UTF-8"?>
<project xmlns="http://maven.apache.org/POM/4.0.0"
         xmlns:xsi="http://www.w3.org/2001/XMLSchema-instance"
         xsi:schemaLocation="http://maven.apache.org/POM/4.0.0 http://maven.apache.org/xsd/maven-4.0.0.xsd">
    <modelVersion>4.0.0</modelVersion>

    <groupId>com.xha</groupId>
    <artifactId>spring-customize-starter-test</artifactId>
    <version>1.0-SNAPSHOT</version>

    <properties>
        <maven.compiler.source>17</maven.compiler.source>
        <maven.compiler.target>17</maven.compiler.target>
        <project.build.sourceEncoding>UTF-8</project.build.sourceEncoding>
    </properties>

    <dependencies>
        <dependency>
            <groupId>com.xha</groupId>
            <artifactId>spring-boot-starter-hello</artifactId>
            <version>1.0-SNAPSHOT</version>
        </dependency>
    </dependencies>

</project>
查看maven信息

- 查看外部库信息

- 创建Controller测试
package com.xha.controller;

import com.xha.service.HelloService;
import org.springframework.beans.factory.annotation.Autowired;
import org.springframework.web.bind.annotation.GetMapping;
import org.springframework.web.bind.annotation.RestController;

@RestController
public class HelloController {

    //注入,不存在,自动配置
    @Autowired
    private HelloService helloService;

    @GetMapping("/hello")
    public String hello() {
        return helloService.sayHello();
    }
}- 测试结果(使用默认的属性绑定)

- 添加配置文件,自定义属性信息
hello:
  prefix: "你好"
suffix: "世界"- 测试结果(使用自定义属性绑定)
