第14章_File类与IO流

1. java.io.File类的使用
1.1 概述
- File类及本章下的各种流,都定义在java.io包下。
- 一个File对象代表硬盘或网络中可能存在的一个文件或者文件目录(俗称文件夹),与平台无关。(体会万事万物皆对象)
- File 能新建、删除、重命名文件和目录,但 File 不能访问文件内容本身。如果需要访问文件内容本身,则需要使用输入/输出流。
- File对象可以作为参数传递给流的构造器。
- 想要在Java程序中表示一个真实存在的文件或目录,那么必须有一个File对象,但是Java程序中的一个File对象,可能没有一个真实存在的文件或目录。
1.2 构造器
public File(String pathname):以pathname为路径创建File对象,可以是绝对路径或者相对路径,如果pathname是相对路径,则默认的当前路径在系统属性user.dir中存储。public File(String parent, String child):以parent为父路径,child为子路径创建File对象。public File(File parent, String child):根据一个父File对象和子文件路径创建File对象
关于路径:
- 绝对路径:从盘符开始的路径,这是一个完整的路径。
- 相对路径:相对于
项目目录的路径,这是一个便捷的路径,开发中经常使用。- IDEA中,main中的文件的相对路径,是相对于”
当前工程“ - IDEA中,单元测试方法中的文件的相对路径,是相对于”
当前module“
- IDEA中,main中的文件的相对路径,是相对于”
举例:
package com.atguigu.file;

import java.io.File;

public class FileObjectTest {
    public static void main(String[] args) {
        // 文件路径名
        String pathname = "D:\\aaa.txt";
        File file1 = new File(pathname);

        // 文件路径名
        String pathname2 = "D:\\aaa\\bbb.txt";
        File file2 = new File(pathname2);

        // 通过父路径和子路径字符串
        String parent = "d:\\aaa";
        String child = "bbb.txt";
        File file3 = new File(parent, child);

        // 通过父级File对象和子路径字符串
        File parentDir = new File("d:\\aaa");
        String childFile = "bbb.txt";
        File file4 = new File(parentDir, childFile);
    }

    @Test
    public void test01() throws IOException{
        File f1 = new File("d:\\atguigu\\javase\\HelloIO.java"); //绝对路径
        System.out.println("文件/目录的名称:" + f1.getName());
        System.out.println("文件/目录的构造路径名:" + f1.getPath());
        System.out.println("文件/目录的绝对路径名:" + f1.getAbsolutePath());
        System.out.println("文件/目录的父目录名:" + f1.getParent());
    }
    @Test
    public void test02()throws IOException{
        File f2 = new File("/HelloIO.java");//绝对路径,从根路径开始
        System.out.println("文件/目录的名称:" + f2.getName());
        System.out.println("文件/目录的构造路径名:" + f2.getPath());
        System.out.println("文件/目录的绝对路径名:" + f2.getAbsolutePath());
        System.out.println("文件/目录的父目录名:" + f2.getParent());
    }

    @Test
    public void test03() throws IOException {
        File f3 = new File("HelloIO.java");//相对路径
        System.out.println("user.dir =" + System.getProperty("user.dir"));
        System.out.println("文件/目录的名称:" + f3.getName());
        System.out.println("文件/目录的构造路径名:" + f3.getPath());
        System.out.println("文件/目录的绝对路径名:" + f3.getAbsolutePath());
        System.out.println("文件/目录的父目录名:" + f3.getParent());
    }
    @Test
    public void test04() throws IOException{
        File f5 = new File("HelloIO.java");//相对路径
        System.out.println("user.dir =" + System.getProperty("user.dir"));
        System.out.println("文件/目录的名称:" + f5.getName());
        System.out.println("文件/目录的构造路径名:" + f5.getPath());
        System.out.println("文件/目录的绝对路径名:" + f5.getAbsolutePath());
        System.out.println("文件/目录的父目录名:" + f5.getParent());
    }
}
注意:
无论该路径下是否存在文件或者目录,都不影响File对象的创建。
window的路径分隔符使用“\”,而Java程序中的“\”表示转义字符,所以在Windows中表示路径,需要用“\”。或者直接使用“/”也可以,Java程序支持将“/”当成平台无关的
路径分隔符。或者直接使用File.separator常量值表示。比如:File file2 = new File(“d:” + File.separator + “atguigu” + File.separator + “info.txt”);
当构造路径是绝对路径时,那么getPath和getAbsolutePath结果一样
当构造路径是相对路径时,那么getAbsolutePath的路径 = user.dir的路径 + 构造路径
1.3 常用方法
1、获取文件和目录基本信息
public String getName():获取名称public String getPath():获取路径public String getAbsolutePath():获取绝对路径public File getAbsoluteFile():获取绝对路径表示的文件public String getParent():获取上层文件目录路径。若无,返回nullpublic long length():获取文件长度(即:字节数)。不能获取目录的长度。public long lastModified():获取最后一次的修改时间,毫秒值
如果File对象代表的文件或目录存在,则File对象实例初始化时,就会用硬盘中对应文件或目录的属性信息(例如,时间、类型等)为File对象的属性赋值,否则除了路径和名称,File对象的其他属性将会保留默认值。

举例:
package com.atguigu.file;

import java.io.File;
import java.time.Instant;
import java.time.LocalDateTime;
import java.time.ZoneId;

public class FileInfoMethod {
    public static void main(String[] args) {
        File f = new File("d:/aaa/bbb.txt");
        System.out.println("文件构造路径:"+f.getPath());
        System.out.println("文件名称:"+f.getName());
        System.out.println("文件长度:"+f.length()+"字节");
        System.out.println("文件最后修改时间:" + LocalDateTime.ofInstant(Instant.ofEpochMilli(f.lastModified()),ZoneId.of("Asia/Shanghai")));

        File f2 = new File("d:/aaa");
        System.out.println("目录构造路径:"+f2.getPath());
        System.out.println("目录名称:"+f2.getName());
        System.out.println("目录长度:"+f2.length()+"字节");
        System.out.println("文件最后修改时间:" + LocalDateTime.ofInstant(Instant.ofEpochMilli(f.lastModified()),ZoneId.of("Asia/Shanghai")));
    }
}
输出结果:
文件构造路径:d:\aaa\bbb.java
文件名称:bbb.java
文件长度:636字节
文件最后修改时间:2022-07-23T22:01:32.065
目录构造路径:d:\aaa
目录名称:aaa
目录长度:4096字节
文件最后修改时间:2022-07-23T22:01:32.0652、列出目录的下一级
- public String[] list() :返回一个String数组,表示该File目录中的所有子文件或目录。
- public File[] listFiles() :返回一个File数组,表示该File目录中的所有的子文件或目录。
package com.atguigu.file;

import org.junit.Test;

import java.io.File;
import java.io.FileFilter;
import java.io.FilenameFilter;

public class DirListFiles {
    @Test
    public void test01() {
        File dir = new File("d:/atguigu");
        String[] subs = dir.list();
        for (String sub : subs) {
            System.out.println(sub);
        }
    }

}
3、File类的重命名功能
- public boolean renameTo(File dest):把文件重命名为指定的文件路径。
4、判断功能的方法
public boolean exists():此File表示的文件或目录是否实际存在。public boolean isDirectory():此File表示的是否为目录。public boolean isFile():此File表示的是否为文件。public boolean canRead():判断是否可读public boolean canWrite():判断是否可写public boolean isHidden():判断是否隐藏
举例:
package com.atguigu.file;

import java.io.File;

public class FileIs {
    public static void main(String[] args) {
        File f = new File("d:\\aaa\\bbb.java");
        File f2 = new File("d:\\aaa");
        // 判断是否存在
        System.out.println("d:\\aaa\\bbb.java 是否存在:"+f.exists());
        System.out.println("d:\\aaa 是否存在:"+f2.exists());
        // 判断是文件还是目录
        System.out.println("d:\\aaa 文件?:"+f2.isFile());
        System.out.println("d:\\aaa 目录?:"+f2.isDirectory());
    }
}
输出结果:
d:\aaa\bbb.java 是否存在:true
d:\aaa 是否存在:true
d:\aaa 文件?:false
d:\aaa 目录?:true如果文件或目录不存在,那么exists()、isFile()和isDirectory()都是返回true
5、创建、删除功能
public boolean createNewFile():创建文件。若文件存在,则不创建,返回false。public boolean mkdir():创建文件目录。如果此文件目录存在,就不创建了。如果此文件目录的上层目录不存在,也不创建。public boolean mkdirs():创建多层 文件目录。如果上层文件目录不存在,一并创建。
public boolean delete():删除文件或者文件夹
删除注意事项:① Java中的删除不走回收站。② 要删除一个文件目录,请注意该文件目录内不能包含文件或者文件目录。
举例:
package com.atguigu.file;

import java.io.File;
import java.io.IOException;

public class FileCreateDelete {
    public static void main(String[] args) throws IOException {
        // 文件的创建
        File f = new File("aaa.txt");
        System.out.println("aaa.txt是否存在:"+f.exists());
        System.out.println("aaa.txt是否创建:"+f.createNewFile());
        System.out.println("aaa.txt是否存在:"+f.exists());

        // 目录的创建
        File f2= new File("newDir");
        System.out.println("newDir是否存在:"+f2.exists());
        System.out.println("newDir是否创建:"+f2.mkdir());
        System.out.println("newDir是否存在:"+f2.exists());

        // 创建一级目录
        File f3= new File("newDira\\newDirb");
        System.out.println("newDira\\newDirb创建:" + f3.mkdir());
        File f4= new File("newDir\\newDirb");
        System.out.println("newDir\\newDirb创建:" + f4.mkdir());
        // 创建多级目录
        File f5= new File("newDira\\newDirb");
        System.out.println("newDira\\newDirb创建:" + f5.mkdirs());

        // 文件的删除
        System.out.println("aaa.txt删除:" + f.delete());

        // 目录的删除
        System.out.println("newDir删除:" + f2.delete());
        System.out.println("newDir\\newDirb删除:" + f4.delete());
    }
}
运行结果:
aaa.txt是否存在:false
aaa.txt是否创建:true
aaa.txt是否存在:true
newDir是否存在:false
newDir是否创建:true
newDir是否存在:true
newDira\newDirb创建:false
newDir\newDirb创建:true
newDira\newDirb创建:true
aaa.txt删除:true
newDir删除:false
newDir\newDirb删除:trueAPI中说明:delete方法,如果此File表示目录,则目录必须为空才能删除。
1.4 练习
练习1:利用File构造器,new 一个文件目录file
1) 在其中创建多个文件和目录
2) 编写方法,实现删除file中指定文件的操作
练习2:判断指定目录下是否有后缀名为.jpg的文件。如果有,就输出该文件名称
public class FindJPGFileTest {
	//方法1:
	@Test
	public void test1(){
		File srcFile = new File("d:\\code");

		String[] fileNames = srcFile.list();
		for(String fileName : fileNames){
			if(fileName.endsWith(".jpg")){
				System.out.println(fileName);
			}
		}
	}
    //方法2:
	@Test
	public void test2(){
		File srcFile = new File("d:\\code");

		File[] listFiles = srcFile.listFiles();
		for(File file : listFiles){
			if(file.getName().endsWith(".jpg")){
				System.out.println(file.getAbsolutePath());
			}
		}
	}
    //方法3:
	/*
	 * File类提供了两个文件过滤器方法
	 * public String[] list(FilenameFilter filter)
	 * public File[] listFiles(FileFilter filter)

	 */
	@Test
	public void test3(){
		File srcFile = new File("d:\\code");

		File[] subFiles = srcFile.listFiles(new FilenameFilter() {

			@Override
			public boolean accept(File dir, String name) {
				return name.endsWith(".jpg");
			}
		});

		for(File file : subFiles){
			System.out.println(file.getAbsolutePath());
		}
	}

}
练习3:遍历指定目录所有文件名称,包括子文件目录中的文件。
拓展1:并计算指定目录占用空间的大小
拓展2:删除指定文件目录及其下的所有文件
public class ListFilesTest {
	//练习3:(方式1)
    public static void printSubFile(File dir) {
        // 打印目录的子文件
        File[] subfiles = dir.listFiles();

        for (File f : subfiles) {
            if (f.isDirectory()) {// 文件目录
                printSubFile(f);
            } else {// 文件
                System.out.println(f.getAbsolutePath());
            }

        }
    }

    // //练习3:(方式2)
    public void listAllSubFiles(File file) {
        if (file.isFile()) {
            System.out.println(file);
        } else {
            File[] all = file.listFiles();
            // 如果all[i]是文件,直接打印
            // 如果all[i]是目录,接着再获取它的下一级
            for (File f : all) {
                listAllSubFiles(f);// 递归调用:自己调用自己就叫递归
            }
        }
    }
    @Test
    public void testListAllFiles(){
        // 1.创建目录对象
        File dir = new File("E:\\teach\\01_javaSE\\_尚硅谷Java编程语言\\3_软件");

        // 2.打印目录的子文件
        printSubFile(dir);
    }

    // 拓展1:求指定目录所在空间的大小
    public long getDirectorySize(File file) {
        // file是文件,那么直接返回file.length()
        // file是目录,把它的下一级的所有file大小加起来就是它的总大小
        long size = 0;
        if (file.isFile()) {
            size = file.length();
        } else {
            File[] all = file.listFiles();// 获取file的下一级
            // 累加all[i]的大小
            for (File f : all) {
                size += getDirectorySize(f);// f的大小;
            }
        }
        return size;
    }

    // 拓展2:删除指定的目录
    public void deleteDirectory(File file) {
        // 如果file是文件,直接delete
        // 如果file是目录,先把它的下一级干掉,然后删除自己
        if (file.isDirectory()) {
            File[] all = file.listFiles();
            // 循环删除的是file的下一级
            for (File f : all) {// f代表file的每一个下级
                deleteDirectory(f);
            }
        }
        // 删除自己
        file.delete();
    }

}
2. IO流原理及流的分类

2.1 Java IO原理
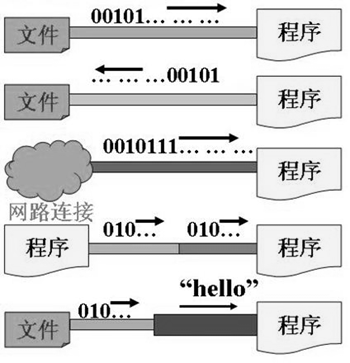
Java程序中,对于数据的输入/输出操作以“
流(stream)” 的方式进行,可以看做是一种数据的流动。
I/O流中的I/O是
Input/Output的缩写, I/O技术是非常实用的技术,用于处理设备之间的数据传输。如读/写文件,网络通讯等。输入input:读取外部数据(磁盘、光盘等存储设备的数据)到程序(内存)中。输出output:将程序(内存)数据输出到磁盘、光盘等存储设备中。
2.2 流的分类
java.io包下提供了各种“流”类和接口,用以获取不同种类的数据,并通过标准的方法输入或输出数据。
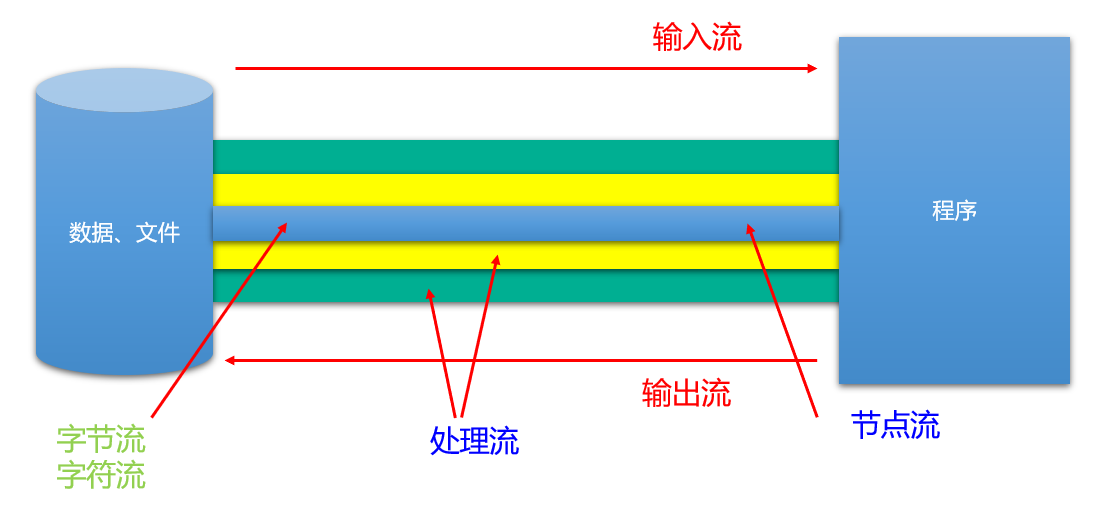
按数据的流向不同分为:输入流和输出流。
- 输入流 :把数据从
其他设备上读取到内存中的流。- 以InputStream、Reader结尾
- 输出流 :把数据从
内存中写出到其他设备上的流。- 以OutputStream、Writer结尾
- 输入流 :把数据从
按操作数据单位的不同分为:字节流(8bit)和字符流(16bit)。
- 字节流 :以字节为单位,读写数据的流。
- 以InputStream、OutputStream结尾
- 字符流 :以字符为单位,读写数据的流。
- 以Reader、Writer结尾
- 字节流 :以字节为单位,读写数据的流。
根据IO流的角色不同分为:节点流和处理流。
节点流:直接从数据源或目的地读写数据

处理流:不直接连接到数据源或目的地,而是“连接”在已存在的流(节点流或处理流)之上,通过对数据的处理为程序提供更为强大的读写功能。

小结:图解
2.3 流的API
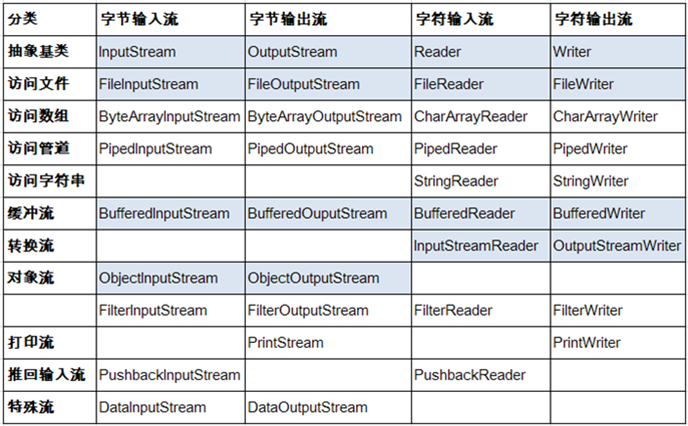
- Java的IO流共涉及40多个类,实际上非常规则,都是从如下4个抽象基类派生的。
| (抽象基类) | 输入流 | 输出流 |
|---|---|---|
| 字节流 | InputStream | OutputStream |
| 字符流 | Reader | Writer |
- 由这四个类派生出来的子类名称都是以其父类名作为子类名后缀。
常用的输入输出流
| 抽象基类 | 4个节点流 | 4个缓冲流 |
|---|---|---|
| Reader | FileReader | BufferedReader |
| Writer | FileWriter | BufferedWriter |
| InputStream | FileInputStream | BufferedInputStream |
| OutputStream | FileOutputStream | BufferedOutputStream |
常用的节点流:
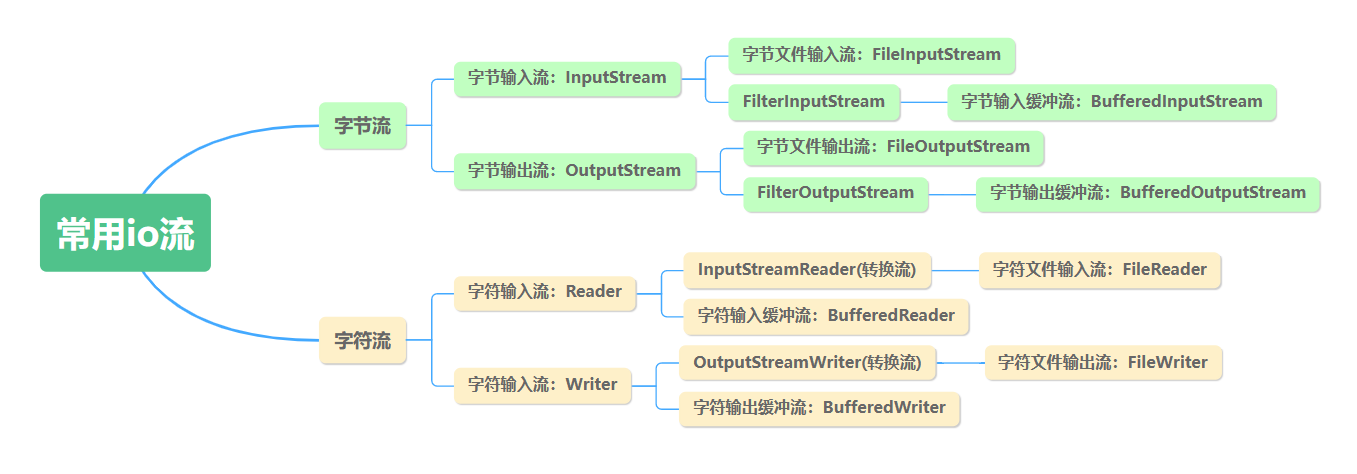
- 文件流: FileInputStream、FileOutputStrean、FileReader、FileWriter
- 字节/字符数组流: ByteArrayInput Stream、ByteArrayOutputStream、CharArrayReader、CharArrayWriter
- 对数组进行处理的节点流(对应的不再是文件,而是内存中的一个数组)。
常用处理流:
- 缓冲流:BufferedInputStream、BufferedOutputStream、BufferedReader、BufferedWriter
- 作用:增加缓冲功能,避免频繁读写硬盘,进而提升读写效率。
- 转换流:InputStreamReader、OutputStreamReader
- 作用:实现字节流和字符流之间的转换。
- 对象流:ObjectInputStream、ObjectOutputStream
- 作用:提供直接读写Java对象功能
3. 节点流之一:FileReader\FileWriter
3.1 Reader与Writer
Java提供一些字符流类,以字符为单位读写数据,专门用于处理文本文件。不能操作图片,视频等非文本文件。
常见的文本文件有如下的格式:.txt、.java、.c、.cpp、.py等
注意:.doc、.xls、.ppt这些都不是文本文件。
3.1.1 字符输入流:Reader
java.io.Reader抽象类是表示用于读取字符流的所有类的父类,可以读取字符信息到内存中。它定义了字符输入流的基本共性功能方法。
public int read(): 从输入流读取一个字符。 虽然读取了一个字符,但是会自动提升为int类型。返回该字符的Unicode编码值。如果已经到达流末尾了,则返回-1。public int read(char[] cbuf): 从输入流中读取一些字符,并将它们存储到字符数组 cbuf中 。每次最多读取cbuf.length个字符。返回实际读取的字符个数。如果已经到达流末尾,没有数据可读,则返回-1。public int read(char[] cbuf,int off,int len):从输入流中读取一些字符,并将它们存储到字符数组 cbuf中,从cbuf[off]开始的位置存储。每次最多读取len个字符。返回实际读取的字符个数。如果已经到达流末尾,没有数据可读,则返回-1。public void close():关闭此流并释放与此流相关联的任何系统资源。
注意:当完成流的操作时,必须调用close()方法,释放系统资源,否则会造成内存泄漏。
3.1.2 字符输出流:Writer
java.io.Writer 抽象类是表示用于写出字符流的所有类的超类,将指定的字符信息写出到目的地。它定义了字节输出流的基本共性功能方法。
public void write(int c):写出单个字符。public void write(char[] cbuf):写出字符数组。public void write(char[] cbuf, int off, int len):写出字符数组的某一部分。off:数组的开始索引;len:写出的字符个数。public void write(String str):写出字符串。public void write(String str, int off, int len):写出字符串的某一部分。off:字符串的开始索引;len:写出的字符个数。public void flush():刷新该流的缓冲。public void close():关闭此流。
注意:当完成流的操作时,必须调用close()方法,释放系统资源,否则会造成内存泄漏。
3.2 FileReader 与 FileWriter
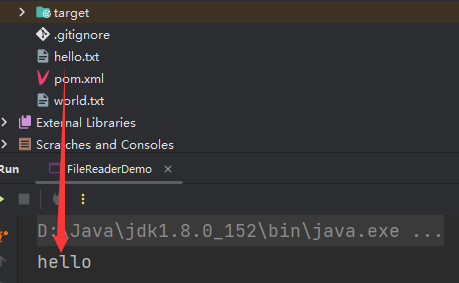
举例:读取hello.txt文件中的字符数据,并显示在控制台上
import java.io.File;
import java.io.FileReader;
import java.io.IOException;

public class FileReaderDemo {
    public static void main(String[] args) {
        fileReader();
    }

    public static void fileReader() {
//        1.创建file对象
        File file = new File("hello.txt");
//        2.创建文件字符输入流
        FileReader fileReader = null;
        try {
            fileReader = new FileReader(file);
//        3.定义char数组,用于存放读取到的字符
            char[] chars = new char[5];
            int len;
//        4.循环读取,并将读取到的字符存放到char数组中
            while ((len = fileReader.read(chars)) != -1) {
                for (int i = 0; i < len; i++) {
                    System.out.print(chars[i]);
                }
            }
        } catch (Exception e) {
            throw new RuntimeException(e);
        } finally {
            try {
                if (fileReader != null) {
                    fileReader.close();
                }
            } catch (IOException e) {
                throw new RuntimeException(e);
            }
        }
    }
}
3.2.2 FileWriter
java.io.FileWriter 类用于写出字符到文件,构造时使用系统默认的字符编码和默认字节缓冲区。
FileWriter(File file): 创建一个新的 FileWriter,给定要读取的File对象。FileWriter(String fileName): 创建一个新的 FileWriter,给定要读取的文件的名称。FileWriter(File file,boolean append): 创建一个新的 FileWriter,指明是否在现有文件末尾追加内容。
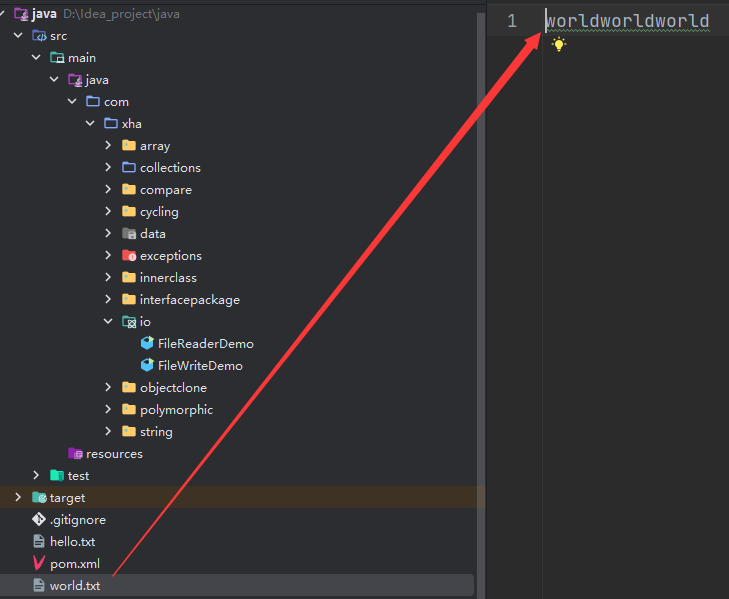
举例:
import java.io.File;
import java.io.FileWriter;
import java.io.IOException;

public class FileWriteDemo {
    public static void main(String[] args) {
        fileWriter();
    }

    public static void fileWriter() {
//        1.创建file对象
        File file = new File("world.txt");
//        2.创建文件字符输出流
        FileWriter fileWriter = null;
        try {
//            3.将字符串写入到文件中,如果文件不存在,则会自动创建,如果文件存在,则会覆盖内容
//            fileWriter = new FileWriter(file);
//            3.将字符串写入到文件中,如果文件不存在,则会自动创建,如果文件存在,则会追加内容
            fileWriter = new FileWriter(file, true);
            fileWriter.write("world");
        } catch (IOException e) {
            throw new RuntimeException(e);
        } finally {
            try {
                if (fileWriter != null) {
                    fileWriter.close();
                }
            } catch (IOException e) {
                throw new RuntimeException(e);
            }
        }
    }
}
3.2.3 小结
①
因为出现流资源的调用,为了避免内存泄漏,需要使用try-catch-finally处理异常

②
对于输入流来说,File类的对象必须在物理磁盘上存在,否则执行就会报FileNotFoundException。如果传入的是一个目录,则会报IOException异常。

对于输出流来说,File类的对象是可以不存在的。
   > 如果File类的对象不存在,则可以在输出的过程中,自动创建File类的对象
   > 如果File类的对象存在,
      > 如果调用FileWriter(File file)或FileWriter(File file,false),输出时会新建File文件覆盖已有的文件
      > 如果调用FileWriter(File file,true)构造器,则在现有的文件末尾追加写出内容。
3.3 关于flush(刷新)
因为内置缓冲区的原因,如果FileWriter不关闭输出流,无法写出字符到文件中。但是关闭的流对象,是无法继续写出数据的。如果我们既想写出数据,又想继续使用流,就需要flush() 方法了。
flush():刷新缓冲区,流对象可以继续使用。close():先刷新缓冲区,然后通知系统释放资源。流对象不可以再被使用了。
注意:即便是flush()方法写出了数据,操作的最后还是要调用close方法,释放系统资源。
举例:
public class FWWriteFlush {
    //注意:应该使用try-catch-finally处理异常。这里出于方便阅读代码,使用了throws的方式
    @Test
    public void test() throws IOException {
        // 使用文件名称创建流对象
        FileWriter fw = new FileWriter("fw.txt");
        // 写出数据,通过flush
        fw.write('刷'); // 写出第1个字符
        fw.flush();
        fw.write('新'); // 继续写出第2个字符,写出成功
        fw.flush();

        // 写出数据,通过close
        fw.write('关'); // 写出第1个字符
        fw.close();
        fw.write('闭'); // 继续写出第2个字符,【报错】java.io.IOException: Stream closed
        fw.close();
    }
}
4. 节点流之二:FileInputStream\FileOutputStream
如果我们读取或写出的数据是非文本文件,则Reader、Writer就无能为力了,必须使用字节流。
4.1 InputStream和OutputStream
4.1.1 字节输入流:InputStream
java.io.InputStream 抽象类是表示字节输入流的所有类的超类,可以读取字节信息到内存中。它定义了字节输入流的基本共性功能方法。
public int read(): 从输入流读取一个字节。返回读取的字节值。虽然读取了一个字节,但是会自动提升为int类型。如果已经到达流末尾,没有数据可读,则返回-1。public int read(byte[] b): 从输入流中读取一些字节数,并将它们存储到字节数组 b中 。每次最多读取b.length个字节。返回实际读取的字节个数。如果已经到达流末尾,没有数据可读,则返回-1。public int read(byte[] b,int off,int len):从输入流中读取一些字节数,并将它们存储到字节数组 b中,从b[off]开始存储,每次最多读取len个字节 。返回实际读取的字节个数。如果已经到达流末尾,没有数据可读,则返回-1。public void close():关闭此输入流并释放与此流相关联的任何系统资源。
说明:close()方法,当完成流的操作时,必须调用此方法,释放系统资源。
4.1.2 字节输出流:OutputStream
java.io.OutputStream 抽象类是表示字节输出流的所有类的超类,将指定的字节信息写出到目的地。它定义了字节输出流的基本共性功能方法。
public void write(int b):将指定的字节输出流。虽然参数为int类型四个字节,但是只会保留一个字节的信息写出。public void write(byte[] b):将 b.length字节从指定的字节数组写入此输出流。public void write(byte[] b, int off, int len):从指定的字节数组写入 len字节,从偏移量 off开始输出到此输出流。public void flush():刷新此输出流并强制任何缓冲的输出字节被写出。public void close():关闭此输出流并释放与此流相关联的任何系统资源。
说明:close()方法,当完成流的操作时,必须调用此方法,释放系统资源。
4.2 FileInputStream 与 FileOutputStream
4.2.1 FileInputStream
java.io.FileInputStream 类是文件输入流,从文件中读取字节。
FileInputStream(File file): 通过打开与实际文件的连接来创建一个 FileInputStream ,该文件由文件系统中的 File对象 file命名。FileInputStream(String name): 通过打开与实际文件的连接来创建一个 FileInputStream ,该文件由文件系统中的路径名 name命名。
举例:
//read.txt文件中的内容如下:
abcde
读取操作
public class FISRead {
    //注意:应该使用try-catch-finally处理异常。这里出于方便阅读代码,使用了throws的方式
    @Test
    public void test() throws IOException {
        // 使用文件名称创建流对象
        FileInputStream fis = new FileInputStream("read.txt");
        // 读取数据,返回一个字节
        int read = fis.read();
        System.out.println((char) read);
        read = fis.read();
        System.out.println((char) read);
        read = fis.read();
        System.out.println((char) read);
        read = fis.read();
        System.out.println((char) read);
        read = fis.read();
        System.out.println((char) read);
        // 读取到末尾,返回-1
        read = fis.read();
        System.out.println(read);
        // 关闭资源
        fis.close();
        /*
        文件内容:abcde
        输出结果:
        a
        b
        c
        d
        e
        -1
         */
    }

    @Test
    public void test02()throws IOException{
        // 使用文件名称创建流对象
        FileInputStream fis = new FileInputStream("read.txt");
        // 定义变量,保存数据
        int b;
        // 循环读取
        while ((b = fis.read())!=-1) {
            System.out.println((char)b);
        }
        // 关闭资源
        fis.close();
    }

    @Test
    public void test03()throws IOException{
        // 使用文件名称创建流对象.
        FileInputStream fis = new FileInputStream("read.txt"); // 文件中为abcde
        // 定义变量,作为有效个数
        int len;
        // 定义字节数组,作为装字节数据的容器
        byte[] b = new byte[2];
        // 循环读取
        while (( len= fis.read(b))!=-1) {
            // 每次读取后,把数组变成字符串打印
            System.out.println(new String(b));
        }
        // 关闭资源
        fis.close();
        /*
        输出结果:
        ab
        cd
        ed
        最后错误数据`d`,是由于最后一次读取时,只读取一个字节`e`,数组中,
        上次读取的数据没有被完全替换,所以要通过`len` ,获取有效的字节
         */
    }

    @Test
    public void test04()throws IOException{
        // 使用文件名称创建流对象.
        FileInputStream fis = new FileInputStream("read.txt"); // 文件中为abcde
        // 定义变量,作为有效个数
        int len;
        // 定义字节数组,作为装字节数据的容器
        byte[] b = new byte[2];
        // 循环读取
        while (( len= fis.read(b))!=-1) {
            // 每次读取后,把数组的有效字节部分,变成字符串打印
            System.out.println(new String(b,0,len));//  len 每次读取的有效字节个数
        }
        // 关闭资源
        fis.close();
        /*
        输出结果:
        ab
        cd
        e
         */
    }
}
4.2.2 FileOutputStream
java.io.FileOutputStream 类是文件输出流,用于将数据写出到文件。
public FileOutputStream(File file):创建文件输出流,写出由指定的 File对象表示的文件。public FileOutputStream(String name): 创建文件输出流,指定的名称为写出文件。public FileOutputStream(File file, boolean append): 创建文件输出流,指明是否在现有文件末尾追加内容。
举例:
package com.atguigu.fileio;

import org.junit.Test;

import java.io.FileOutputStream;
import java.io.IOException;

public class FOSWrite {
    //注意:应该使用try-catch-finally处理异常。这里出于方便阅读代码,使用了throws的方式
    @Test
    public void test01() throws IOException {
        // 使用文件名称创建流对象
        FileOutputStream fos = new FileOutputStream("fos.txt");
        // 写出数据
        fos.write(97); // 写出第1个字节
        fos.write(98); // 写出第2个字节
        fos.write(99); // 写出第3个字节
        // 关闭资源
        fos.close();
      /*  输出结果:abc*/
    }

    @Test
    public void test02()throws IOException {
        // 使用文件名称创建流对象
        FileOutputStream fos = new FileOutputStream("fos.txt");
        // 字符串转换为字节数组
        byte[] b = "abcde".getBytes();
        // 写出从索引2开始,2个字节。索引2是c,两个字节,也就是cd。
        fos.write(b,2,2);
        // 关闭资源
        fos.close();
    }
    //这段程序如果多运行几次,每次都会在原来文件末尾追加abcde
    @Test
    public void test03()throws IOException {
        // 使用文件名称创建流对象
        FileOutputStream fos = new FileOutputStream("fos.txt",true);
        // 字符串转换为字节数组
        byte[] b = "abcde".getBytes();
        fos.write(b);
        // 关闭资源
        fos.close();
    }

    //使用FileInputStream\FileOutputStream,实现对文件的复制
    @Test
    public void test05() {
        FileInputStream fis = null;
        FileOutputStream fos = null;
        try {
            //1. 造文件-造流
            //复制图片:成功
//            fis = new FileInputStream(new File("pony.jpg"));
//            fos = new FileOutputStream(new File("pony_copy1.jpg"));

            //复制文本文件:成功
            fis = new FileInputStream(new File("hello.txt"));
            fos = new FileOutputStream(new File("hello1.txt"));

            //2. 复制操作(读、写)
            byte[] buffer = new byte[1024];
            int len;//每次读入到buffer中字节的个数
            while ((len = fis.read(buffer)) != -1) {
                fos.write(buffer, 0, len);
//                String str = new String(buffer,0,len);
//                System.out.print(str);
            }
            System.out.println("复制成功");
        } catch (IOException e) {
            throw new RuntimeException(e);
        } finally {
            //3. 关闭资源
            try {
                if (fos != null)
                    fos.close();
            } catch (IOException e) {
                throw new RuntimeException(e);
            }
            try {
                if (fis != null)
                    fis.close();
            } catch (IOException e) {
                throw new RuntimeException(e);
            }
        }

    }
}
4.3 练习
练习:实现图片加密操作。
提示:

/**
 * @author 尚硅谷-宋红康
 * @create 8:59
 */
public class FileSecretTest {
    /*
    * 图片的加密
    * */
    @Test
    public void test1(){
        FileInputStream fis = null;
        FileOutputStream fos = null;
        try {
            File file1 = new File("pony.jpg");
            File file2 = new File("pony_secret.jpg");
            fis = new FileInputStream(file1);
            fos = new FileOutputStream(file2);

            //方式1:每次读入一个字节,效率低
//            int data;
//            while((data = fis.read()) != -1){
//                fos.write(data ^ 5);
//            }
            //方式2:每次读入一个字节数组,效率高
            int len;
            byte[] buffer = new byte[1024];
            while((len = fis.read(buffer)) != -1){

                for(int i = 0;i < len;i++){
                    buffer[i] = (byte) (buffer[i] ^ 5);
                }

                fos.write(buffer,0,len);

            }


            System.out.println("加密成功");
        } catch (IOException e) {
            e.printStackTrace();
        } finally {

            try {
                fos.close();
            } catch (IOException e) {
                e.printStackTrace();
            }
            try {
                fis.close();
            } catch (IOException e) {
                e.printStackTrace();
            }
        }
    }

    /*
     * 图片的解密
     * */
    @Test
    public void test2(){
        FileInputStream fis = null;
        FileOutputStream fos = null;
        try {
            File file1 = new File("pony_secret.jpg");
            File file2 = new File("pony_unsecret.jpg");
            fis = new FileInputStream(file1);
            fos = new FileOutputStream(file2);

            //方式1:每次读入一个字节,效率低
//            int data;
//            while((data = fis.read()) != -1){
//                fos.write(data ^ 5);
//            }
            //方式2:每次读入一个字节数组,效率高
            int len;
            byte[] buffer = new byte[1024];
            while((len = fis.read(buffer)) != -1){

                for(int i = 0;i < len;i++){
                    buffer[i] = (byte) (buffer[i] ^ 5);
                }

                fos.write(buffer,0,len);

            }

            System.out.println("解密成功");
        } catch (IOException e) {
            e.printStackTrace();
        } finally {

            try {
                fos.close();
            } catch (IOException e) {
                e.printStackTrace();
            }
            try {
                fis.close();
            } catch (IOException e) {
                e.printStackTrace();
            }
        }
    }
}
5. 处理流之一:缓冲流
为了提高数据读写的速度,Java API提供了带缓冲功能的流类:缓冲流。缓冲流要“套接”在相应的节点流之上,根据数据操作单位可以把缓冲流分为:
- 字节缓冲流:
BufferedInputStream,BufferedOutputStream - 字符缓冲流:
BufferedReader,BufferedWriter
- 字节缓冲流:
缓冲流的基本原理:在创建流对象时,内部会创建一个缓冲区数组(缺省使用
8192个字节(8Kb)的缓冲区),通过缓冲区读写,减少系统IO次数,从而提高读写的效率。

5.1 构造器
public BufferedInputStream(InputStream in):创建一个 新的字节型的缓冲输入流。public BufferedOutputStream(OutputStream out): 创建一个新的字节型的缓冲输出流。
代码举例:
// 创建字节缓冲输入流
BufferedInputStream bis = new BufferedInputStream(new FileInputStream("abc.jpg"));
// 创建字节缓冲输出流
BufferedOutputStream bos = new BufferedOutputStream(new FileOutputStream("abc_copy.jpg"));
public BufferedReader(Reader in):创建一个 新的字符型的缓冲输入流。public BufferedWriter(Writer out): 创建一个新的字符型的缓冲输出流。
代码举例:
// 创建字符缓冲输入流
BufferedReader br = new BufferedReader(new FileReader("br.txt"));
// 创建字符缓冲输出流
BufferedWriter bw = new BufferedWriter(new FileWriter("bw.txt"));
5.2 效率测试
查询API,缓冲流读写方法与基本的流是一致的,我们通过复制大文件(375MB),测试它的效率。
//方法1:使用FileInputStream\FileOutputStream实现非文本文件的复制
public void copyFileWithFileStream(String srcPath,String destPath){
    FileInputStream fis = null;
    FileOutputStream fos = null;
    try {
        //1. 造文件-造流
        fis = new FileInputStream(new File(srcPath));
        fos = new FileOutputStream(new File(destPath));

        //2. 复制操作(读、写)
        byte[] buffer = new byte[100];
        int len;//每次读入到buffer中字节的个数
        while ((len = fis.read(buffer)) != -1) {
            fos.write(buffer, 0, len);
        }
        System.out.println("复制成功");
    } catch (IOException e) {
        throw new RuntimeException(e);
    } finally {
        //3. 关闭资源
        try {
            if (fos != null)
                fos.close();
        } catch (IOException e) {
            throw new RuntimeException(e);
        }
        try {
            if (fis != null)
                fis.close();
        } catch (IOException e) {
            throw new RuntimeException(e);
        }
    }
}

@Test
public void test1(){
    String srcPath = "C:\\Users\\shkstart\\Desktop\\01-复习.mp4";
    String destPath = "C:\\Users\\shkstart\\Desktop\\01-复习2.mp4";

    long start = System.currentTimeMillis();

    copyFileWithFileStream(srcPath,destPath);

    long end = System.currentTimeMillis();

    System.out.println("花费的时间为:" + (end - start));//7677毫秒

}

//方法2:使用BufferedInputStream\BufferedOuputStream实现非文本文件的复制
public void copyFileWithBufferedStream(String srcPath,String destPath){
    FileInputStream fis = null;
    FileOutputStream fos = null;
    BufferedInputStream bis = null;
    BufferedOutputStream bos = null;
    try {
        //1. 造文件
        File srcFile = new File(srcPath);
        File destFile = new File(destPath);
        //2. 造流
        fis = new FileInputStream(srcFile);
        fos = new FileOutputStream(destFile);

        bis = new BufferedInputStream(fis);
        bos = new BufferedOutputStream(fos);

        //3. 读写操作
        int len;
        byte[] buffer = new byte[100];
        while ((len = bis.read(buffer)) != -1) {
            bos.write(buffer, 0, len);
        }
        System.out.println("复制成功");
    } catch (IOException e) {
        e.printStackTrace();
    } finally {
        //4. 关闭资源(如果有多个流,我们需要先关闭外面的流,再关闭内部的流)
        try {
            if (bos != null)
                bos.close();
        } catch (IOException e) {
            throw new RuntimeException(e);
        }
        try {
            if (bis != null)
                bis.close();
        } catch (IOException e) {
            throw new RuntimeException(e);
        }

    }
}
@Test
public void test2(){
    String srcPath = "C:\\Users\\shkstart\\Desktop\\01-复习.mp4";
    String destPath = "C:\\Users\\shkstart\\Desktop\\01-复习2.mp4";

    long start = System.currentTimeMillis();

    copyFileWithBufferedStream(srcPath,destPath);

    long end = System.currentTimeMillis();

    System.out.println("花费的时间为:" + (end - start));//415毫秒

}
5.3 字符缓冲流特有方法
字符缓冲流的基本方法与普通字符流调用方式一致,不再阐述,我们来看它们具备的特有方法。
- BufferedReader:
public String readLine(): 读一行文字。 - BufferedWriter:
public void newLine(): 写一行行分隔符,由系统属性定义符号。
public class BufferedIOLine {
    @Test
    public void testReadLine()throws IOException {
        // 创建流对象
        BufferedReader br = new BufferedReader(new FileReader("in.txt"));
        // 定义字符串,保存读取的一行文字
        String line;
        // 循环读取,读取到最后返回null
        while ((line = br.readLine())!=null) {
            System.out.println(line);
        }
        // 释放资源
        br.close();
    }

    @Test
    public void testNewLine()throws IOException{
        // 创建流对象
        BufferedWriter bw = new BufferedWriter(new FileWriter("out.txt"));
        // 写出数据
        bw.write("尚");
        // 写出换行
        bw.newLine();
        bw.write("硅");
        bw.newLine();
        bw.write("谷");
        bw.newLine();
        // 释放资源
        bw.close();
    }
}
说明:
涉及到嵌套的多个流时,如果都显式关闭的话,需要先关闭外层的流,再关闭内层的流
其实在开发中,只需要关闭最外层的流即可,因为在关闭外层流时,内层的流也会被关闭。
5.4 练习
练习1:分别使用节点流:FileInputStream、FileOutputStream和缓冲流:BufferedInputStream、BufferedOutputStream实现文本文件/图片/视频文件的复制。并比较二者在数据复制方面的效率。
练习2:
姓氏统计:一个文本文件中存储着北京所有高校在校生的姓名,格式如下:
每行一个名字,姓与名以空格分隔:
张 三
李 四
王 小五
现在想统计所有的姓氏在文件中出现的次数,请描述一下你的解决方案。
public static void main(String[] args) {
       HashMap<String, Integer> map = new HashMap<>();
       BufferedReader br = null;
       try {
           br = new BufferedReader(new FileReader(new File("e:/name.txt")));
           String value = null; // 临时接收文件中的字符串变量
           StringBuffer buffer = new StringBuffer();
           flag:
           while ((value = br.readLine()) != null) { // 开始读取文件中的字符
               char[] c = value.toCharArray();
               for (int i = 0; i < c.length; i++) {
                   if (c[i] != ' ') {
                       buffer.append(String.valueOf(c[i]));
                   } else {
                       if (map.containsKey(buffer.toString())) {
                           int count = map.get(buffer.toString());
                           map.put(buffer.toString(), count + 1);
                       } else {
                           map.put(buffer.toString(), 1);
                       }
                       buffer.delete(0, buffer.length());
                       continue flag;
                   }
               }
           }
       } catch (Exception e) {
           e.printStackTrace();
       } finally {
           if (br != null) {
               try {
                   br.close();
               } catch (IOException e) {
                   e.printStackTrace();
               }
           }
       }
       Set<Map.Entry<String, Integer>> set = map.entrySet();
       Iterator<Map.Entry<String, Integer>> it = set.iterator();
       while (it.hasNext()) {
           Map.Entry<String, Integer> end = (Map.Entry<String, Integer>) it.next();
           System.out.println(end);
       }

   }
6. 处理流之二:转换流
6.1 问题引入
引入情况1:
使用FileReader 读取项目中的文本文件。由于IDEA设置中针对项目设置了UTF-8编码,当读取Windows系统中创建的文本文件时,如果Windows系统默认的是GBK编码,则读入内存中会出现乱码。
package com.atguigu.transfer;

import java.io.FileReader;
import java.io.IOException;

public class Problem {
    public static void main(String[] args) throws IOException {
        FileReader fileReader = new FileReader("E:\\File_GBK.txt");
        int data;
        while ((data = fileReader.read()) != -1) {
            System.out.print((char)data);
        }
        fileReader.close();
    }
}

输出结果:
���
那么如何读取GBK编码的文件呢?
引入情况2:
针对文本文件,现在使用一个字节流进行数据的读入,希望将数据显示在控制台上。此时针对包含中文的文本数据,可能会出现乱码。
6.2 转换流的理解
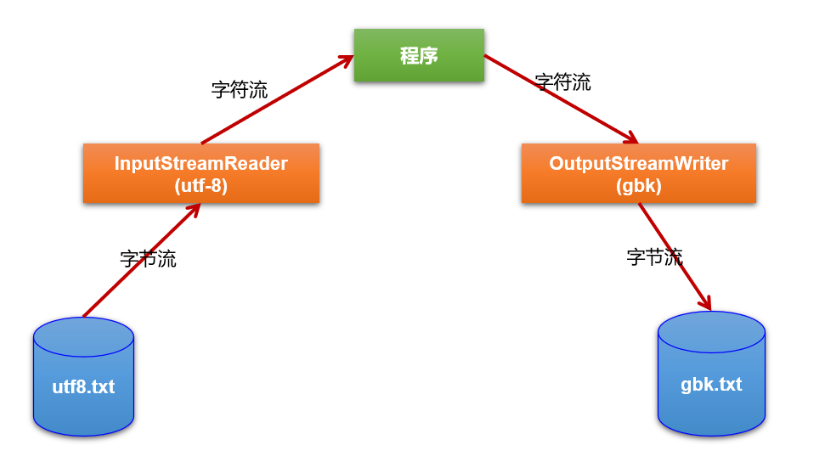
作用:转换流是字节与字符间的桥梁!
具体来说:
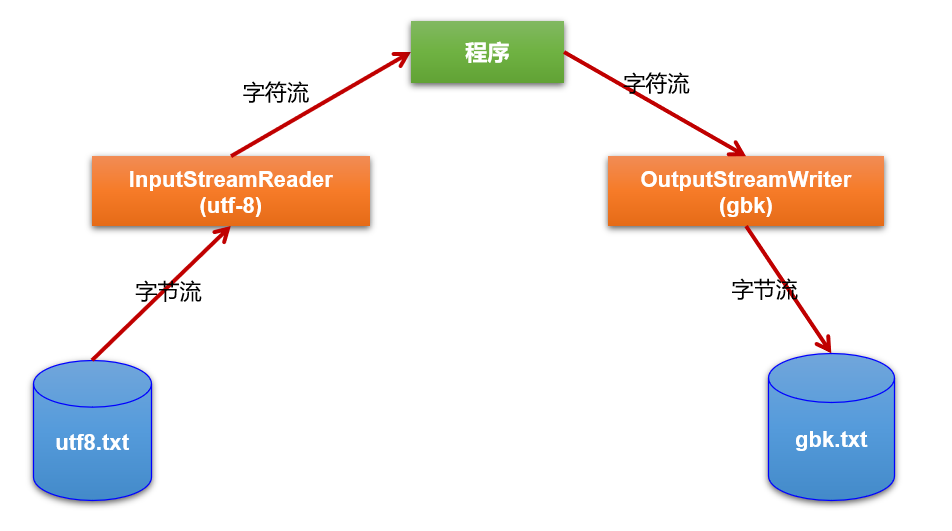
6.3 InputStreamReader 与 OutputStreamWriter
InputStreamReader
转换流
java.io.InputStreamReader,是Reader的子类,是从字节流到字符流的桥梁。它读取字节,并使用指定的字符集将其解码为字符。它的字符集可以由名称指定,也可以接受平台的默认字符集。构造器
InputStreamReader(InputStream in): 创建一个使用默认字符集的字符流。InputStreamReader(InputStream in, String charsetName): 创建一个指定字符集的字符流。
举例
//使用默认字符集
InputStreamReader isr1 = new InputStreamReader(new FileInputStream("in.txt"));
//使用指定字符集
InputStreamReader isr2 = new InputStreamReader(new FileInputStream("in.txt") , "GBK");
示例代码:
package com.atguigu.transfer;

import java.io.FileInputStream;
import java.io.IOException;
import java.io.InputStreamReader;

public class InputStreamReaderDemo {
    public static void main(String[] args) throws IOException {
        // 定义文件路径,文件为gbk编码
        String fileName = "E:\\file_gbk.txt";
        //方式1:
        // 创建流对象,默认UTF8编码
        InputStreamReader isr1 = new InputStreamReader(new FileInputStream(fileName));
        // 定义变量,保存字符
        int charData;
        // 使用默认编码字符流读取,乱码
        while ((charData = isr1.read()) != -1) {
            System.out.print((char)charData); // ��Һ�
        }
        isr1.close();

        //方式2:
        // 创建流对象,指定GBK编码
        InputStreamReader isr2 = new InputStreamReader(new FileInputStream(fileName) , "GBK");
        // 使用指定编码字符流读取,正常解析
        while ((charData = isr2.read()) != -1) {
            System.out.print((char)charData);// 大家好
        }
        isr2.close();
    }
}
OutputStreamWriter
转换流
java.io.OutputStreamWriter,是Writer的子类,是从字符流到字节流的桥梁。使用指定的字符集将字符编码为字节。它的字符集可以由名称指定,也可以接受平台的默认字符集。构造器
OutputStreamWriter(OutputStream in): 创建一个使用默认字符集的字符流。OutputStreamWriter(OutputStream in,String charsetName): 创建一个指定字符集的字符流。
举例:
//使用默认字符集
OutputStreamWriter isr = new OutputStreamWriter(new FileOutputStream("out.txt"));
//使用指定的字符集
OutputStreamWriter isr2 = new OutputStreamWriter(new FileOutputStream("out.txt") , "GBK");
示例代码:
package com.atguigu.transfer;

import java.io.FileOutputStream;
import java.io.IOException;
import java.io.OutputStreamWriter;

public class OutputStreamWriterDemo {
    public static void main(String[] args) throws IOException {
        // 定义文件路径
        String FileName = "E:\\out_utf8.txt";
        // 创建流对象,默认UTF8编码
        OutputStreamWriter osw = new OutputStreamWriter(new FileOutputStream(FileName));
        // 写出数据
        osw.write("你好"); // 保存为6个字节
        osw.close();

        // 定义文件路径
        String FileName2 = "E:\\out_gbk.txt";
        // 创建流对象,指定GBK编码
        OutputStreamWriter osw2 = new OutputStreamWriter(new
                                                FileOutputStream(FileName2),"GBK");
        // 写出数据
        osw2.write("你好");// 保存为4个字节
        osw2.close();
    }
}
6.4 字符编码和字符集
6.4.1 编码与解码
计算机中储存的信息都是用二进制数表示的,而我们在屏幕上看到的数字、英文、标点符号、汉字等字符是二进制数转换之后的结果。按照某种规则,将字符存储到计算机中,称为编码 。反之,将存储在计算机中的二进制数按照某种规则解析显示出来,称为解码 。
字符编码(Character Encoding) : 就是一套自然语言的字符与二进制数之间的对应规则。
编码表:生活中文字和计算机中二进制的对应规则
乱码的情况:按照A规则存储,同样按照A规则解析,那么就能显示正确的文本符号。反之,按照A规则存储,再按照B规则解析,就会导致乱码现象。
编码:字符(人能看懂的)--字节(人看不懂的)

解码:字节(人看不懂的)-->字符(人能看懂的)
6.4.2 字符集
- 字符集Charset:也叫编码表。是一个系统支持的所有字符的集合,包括各国家文字、标点符号、图形符号、数字等。
- 计算机要准确的存储和识别各种字符集符号,需要进行字符编码,一套字符集必然至少有一套字符编码。常见字符集有ASCII字符集、GBK字符集、Unicode字符集等。
可见,当指定了编码,它所对应的字符集自然就指定了,所以编码才是我们最终要关心的。
ASCII字符集 :
- ASCII码(American Standard Code for Information Interchange,美国信息交换标准代码):上个世纪60年代,美国制定了一套字符编码,对
英语字符与二进制位之间的关系,做了统一规定。这被称为ASCII码。 - ASCII码用于显示现代英语,主要包括控制字符(回车键、退格、换行键等)和可显示字符(英文大小写字符、阿拉伯数字和西文符号)。
- 基本的ASCII字符集,使用7位(bits)表示一个字符(最前面的1位统一规定为0),共
128个字符。比如:空格“SPACE”是32(二进制00100000),大写的字母A是65(二进制01000001)。 - 缺点:不能表示所有字符。
- ASCII码(American Standard Code for Information Interchange,美国信息交换标准代码):上个世纪60年代,美国制定了一套字符编码,对
ISO-8859-1字符集:
- 拉丁码表,别名Latin-1,用于显示欧洲使用的语言,包括荷兰语、德语、意大利语、葡萄牙语等
- ISO-8859-1使用单字节编码,兼容ASCII编码。
GBxxx字符集:
- GB就是国标的意思,是为了
显示中文而设计的一套字符集。 - GB2312:简体中文码表。一个小于127的字符的意义与原来相同,即向下兼容ASCII码。但两个大于127的字符连在一起时,就表示一个汉字,这样大约可以组合了包含
7000多个简体汉字,此外数学符号、罗马希腊的字母、日文的假名们都编进去了,这就是常说的”全角”字符,而原来在127号以下的那些符号就叫”半角”字符了。 - GBK:最常用的中文码表。是在GB2312标准基础上的扩展规范,使用了
双字节编码方案,共收录了21003个汉字,完全兼容GB2312标准,同时支持繁体汉字以及日韩汉字等。 - GB18030:最新的中文码表。收录汉字
70244个,采用多字节编码,每个字可以由1个、2个或4个字节组成。支持中国国内少数民族的文字,同时支持繁体汉字以及日韩汉字等。
- GB就是国标的意思,是为了
Unicode字符集 :
- Unicode编码为表达
任意语言的任意字符而设计,也称为统一码、标准万国码。Unicode 将世界上所有的文字用2个字节统一进行编码,为每个字符设定唯一的二进制编码,以满足跨语言、跨平台进行文本处理的要求。
- Unicode 的缺点:这里有三个问题:
- 第一,英文字母只用一个字节表示就够了,如果用更多的字节存储是
极大的浪费。 - 第二,如何才能
区别Unicode和ASCII?计算机怎么知道两个字节表示一个符号,而不是分别表示两个符号呢? - 第三,如果和GBK等双字节编码方式一样,用最高位是1或0表示两个字节和一个字节,就少了很多值无法用于表示字符,
不够表示所有字符。
- 第一,英文字母只用一个字节表示就够了,如果用更多的字节存储是
- Unicode在很长一段时间内无法推广,直到互联网的出现,为解决Unicode如何在网络上传输的问题,于是面向传输的众多 UTF(UCS Transfer Format)标准出现。具体来说,有三种编码方案,UTF-8、UTF-16和UTF-32。
- Unicode编码为表达
UTF-8字符集:
- Unicode是字符集,UTF-8、UTF-16、UTF-32是三种
将数字转换到程序数据的编码方案。顾名思义,UTF-8就是每次8个位传输数据,而UTF-16就是每次16个位。其中,UTF-8 是在互联网上使用最广的一种 Unicode 的实现方式。 - 互联网工程工作小组(IETF)要求所有互联网协议都必须支持UTF-8编码。所以,我们开发Web应用,也要使用UTF-8编码。UTF-8 是一种
变长的编码方式。它使用1-4个字节为每个字符编码,编码规则:- 128个US-ASCII字符,只需一个字节编码。
- 拉丁文等字符,需要二个字节编码。
- 大部分常用字(含中文),使用三个字节编码。
- 其他极少使用的Unicode辅助字符,使用四字节编码。
- Unicode是字符集,UTF-8、UTF-16、UTF-32是三种
- 举例
Unicode符号范围 | UTF-8编码方式
(十六进制)           | (二进制)

————————————————————|—–—–—–—–—–—–—–—–—–—–—–—–—–—–

0000 0000-0000 007F | 0xxxxxxx(兼容原来的ASCII)

0000 0080-0000 07FF | 110xxxxx 10xxxxxx

0000 0800-0000 FFFF | 1110xxxx 10xxxxxx 10xxxxxx

0001 0000-0010 FFFF | 11110xxx 10xxxxxx 10xxxxxx 10xxxxxx- 小结
注意:在中文操作系统上,ANSI(美国国家标准学会、AMERICAN NATIONAL STANDARDS INSTITUTE: ANSI)编码即为GBK;在英文操作系统上,ANSI编码即为ISO-8859-1。
6.5 练习
把当前module下的《康师傅的话.txt》字符编码为GBK,复制到电脑桌面目录下的《寄语.txt》,
字符编码为UTF-8。
在当前module下的文本内容:
六项精进:
(一)付出不亚于任何人的努力
(二)要谦虚,不要骄傲
(三)要每天反省
(四)活着,就要感谢
(五)积善行、思利他
(六)不要有感性的烦恼
代码:
/**
 * @author 尚硅谷-宋红康
 * @create 9:06
 */
public class InputStreamReaderDemo {

    @Test
    public void test() {
        InputStreamReader isr = null;
        OutputStreamWriter osw = null;
        try {
            isr = new InputStreamReader(new FileInputStream("康师傅的话.txt"),"gbk");

            osw = new OutputStreamWriter(new FileOutputStream("C:\\Users\\shkstart\\Desktop\\寄语.txt"),"utf-8");

            char[] cbuf = new char[1024];
            int len;
            while ((len = isr.read(cbuf)) != -1) {
                osw.write(cbuf, 0, len);
                osw.flush();
            }
            System.out.println("文件复制完成");
        } catch (IOException e) {
            e.printStackTrace();
        } finally {
            try {
                if (isr != null)
                    isr.close();
            } catch (IOException e) {
                e.printStackTrace();
            }
            try {
                if (osw != null)
                    osw.close();
            } catch (IOException e) {
                e.printStackTrace();
            }
        }

    }

}
7. 处理流之三/四:数据流、对象流
7.1 数据流与对象流说明
如果需要将内存中定义的变量(包括基本数据类型或引用数据类型)保存在文件中,那怎么办呢?
int age = 300;
char gender = '男';
int energy = 5000;
double price = 75.5;
boolean relive = true;

String name = "巫师";
Student stu = new Student("张三",23,89);
Java提供了数据流和对象流来处理这些类型的数据:
数据流:DataOutputStream、DataInputStream
- DataOutputStream:允许应用程序将基本数据类型、String类型的变量写入输出流中
- DataInputStream:允许应用程序以与机器无关的方式从底层输入流中读取基本数据 类型、String类型的变量。
数据流的弊端:只支持Java基本数据类型和字符串的读写,而不支持其它Java对象的类型。而ObjectOutputStream和ObjectInputStream既支持Java基本数据类型的数据读写,又支持Java对象的读写,所以重点介绍对象流ObjectOutputStream和ObjectInputStream。
对象流:ObjectOutputStream、ObjectInputStream
- ObjectOutputStream:将 Java 基本数据类型和对象写入字节输出流中。通过在流中使用文件可以实现Java各种基本数据类型的数据以及对象的持久存储。
- ObjectInputStream:ObjectInputStream 对以前使用 ObjectOutputStream 写出的基本数据类型的数据和对象进行读入操作,保存在内存中。
说明:对象流的强大之处就是可以把Java中的对象写入到数据源中,也能把对象从数据源中还原回来。
7.2 对象流API
ObjectOutputStream中的构造器:
public ObjectOutputStream(OutputStream out) : 创建一个指定的ObjectOutputStream。
FileOutputStream fos = new FileOutputStream("game.dat");
ObjectOutputStream oos = new ObjectOutputStream(fos);
ObjectOutputStream中的方法:
- public void writeBoolean(boolean val):写出一个 boolean 值。
- public void writeByte(int val):写出一个8位字节
- public void writeShort(int val):写出一个16位的 short 值
- public void writeChar(int val):写出一个16位的 char 值
- public void writeInt(int val):写出一个32位的 int 值
- public void writeLong(long val):写出一个64位的 long 值
- public void writeFloat(float val):写出一个32位的 float 值。
- public void writeDouble(double val):写出一个64位的 double 值
- public void writeUTF(String str):将表示长度信息的两个字节写入输出流,后跟字符串 s 中每个字符的 UTF-8 修改版表示形式。根据字符的值,将字符串 s 中每个字符转换成一个字节、两个字节或三个字节的字节组。注意,将 String 作为基本数据写入流中与将它作为 Object 写入流中明显不同。 如果 s 为 null,则抛出 NullPointerException。
public void writeObject(Object obj):写出一个obj对象- public void close() :关闭此输出流并释放与此流相关联的任何系统资源
ObjectInputStream中的构造器:
public ObjectInputStream(InputStream in) : 创建一个指定的ObjectInputStream。
FileInputStream fis = new FileInputStream("game.dat");
ObjectInputStream ois = new ObjectInputStream(fis);
ObjectInputStream中的方法:
- public boolean readBoolean():读取一个 boolean 值
- public byte readByte():读取一个 8 位的字节
- public short readShort():读取一个 16 位的 short 值
- public char readChar():读取一个 16 位的 char 值
- public int readInt():读取一个 32 位的 int 值
- public long readLong():读取一个 64 位的 long 值
- public float readFloat():读取一个 32 位的 float 值
- public double readDouble():读取一个 64 位的 double 值
- public String readUTF():读取 UTF-8 修改版格式的 String
public void readObject(Object obj):读入一个obj对象- public void close() :关闭此输入流并释放与此流相关联的任何系统资源
7.3 认识对象序列化机制
1、何为对象序列化机制?
对象序列化机制允许把内存中的Java对象转换成平台无关的二进制流,从而允许把这种二进制流持久地保存在磁盘上,或通过网络将这种二进制流传输到另一个网络节点。//当其它程序获取了这种二进制流,就可以恢复成原来的Java对象。
序列化过程:用一个字节序列可以表示一个对象,该字节序列包含该
对象的类型和对象中存储的属性等信息。字节序列写出到文件之后,相当于文件中持久保存了一个对象的信息。反序列化过程:该字节序列还可以从文件中读取回来,重构对象,对它进行
反序列化。对象的数据、对象的类型和对象中存储的数据信息,都可以用来在内存中创建对象。
2、序列化机制的重要性
序列化是 RMI(Remote Method Invoke、远程方法调用)过程的参数和返回值都必须实现的机制,而 RMI 是 JavaEE 的基础。因此序列化机制是 JavaEE 平台的基础。
序列化的好处,在于可将任何实现了Serializable接口的对象转化为字节数据,使其在保存和传输时可被还原。
3、实现原理
序列化:用ObjectOutputStream类保存基本类型数据或对象的机制。方法为:
public final void writeObject (Object obj): 将指定的对象写出。
反序列化:用ObjectInputStream类读取基本类型数据或对象的机制。方法为:
public final Object readObject (): 读取一个对象。

7.4 如何实现序列化反序列化机制
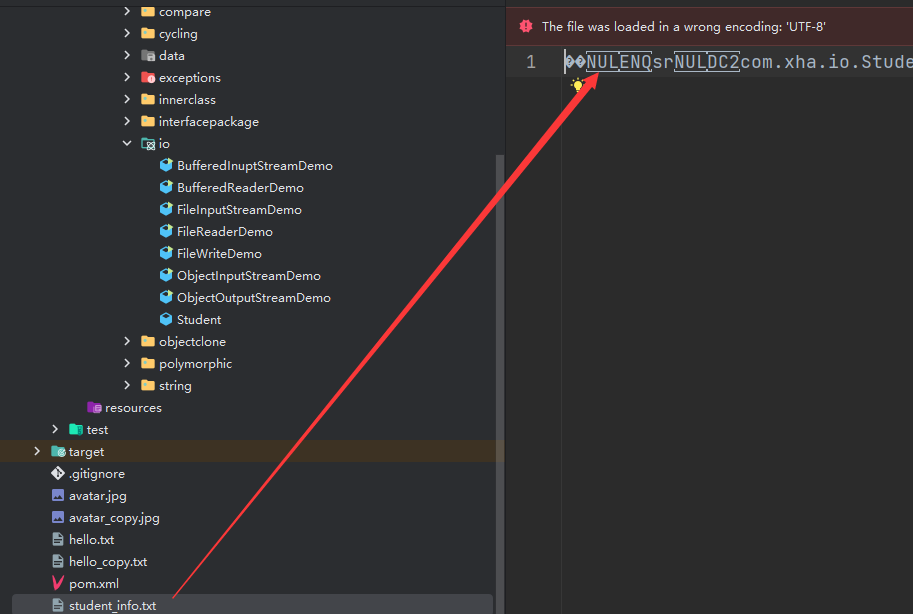
如果需要让某个对象支持序列化机制,则必须让对象所属的类及其属性是可序列化的,为了让某个类是可序列化的,该类必须实现java.io.Serializable 接口。Serializable 是一个标记接口,不实现此接口的类将不会使任何状态序列化或反序列化,会抛出NotSerializableException 。
- 如果对象的某个属性也是引用数据类型,那么如果该属性也要序列化的话,也要实现
Serializable接口 - 该类的所有属性必须是可序列化的。如果有一个属性不需要可序列化的,则该属性必须注明是瞬态的,使用
transient关键字修饰。 静态(static)变量的值不会序列化。因为静态变量的值不属于某个对象。
举例:
- Student类
public class Student implements Serializable {
//    序列化版本号,用于判断是否是同一个类,如果不一致,则会抛出异常,反序列化失败
    private static final long serialVersionUID = 1L;

    private String name;
    private int age;

    public Student() {
    }

    public Student(String name, int age) {
        this.name = name;
        this.age = age;
    }

    public String getName() {
        return name;
    }

    public void setName(String name) {
        this.name = name;
    }

    public int getAge() {
        return age;
    }

    public void setAge(int age) {
        this.age = age;
    }

    @Override
    public String toString() {
        return "Student{" +
                "name='" + name + '\'' +
                ", age=" + age +
                '}';
    }
}- 序列化操作
/**
 * 序列化
 *
 * @author Xu huaiang
 * @date 2023/07/21
 */
public class ObjectOutputStreamDemo {
    public static void main(String[] args) {
//        1.创建文件对象
        File file = new File("student_info.txt");
//        2.创建对象输出流
        ObjectOutputStream objectOutputStream = null;
        try {
            objectOutputStream = new ObjectOutputStream(new FileOutputStream(file));
            objectOutputStream.writeObject(new Student("张三", 23));
        } catch (IOException e) {
            throw new RuntimeException(e);
        } finally {
            try {
                if (objectOutputStream != null) {
                    objectOutputStream.close();
                }
            } catch (IOException e) {
                throw new RuntimeException(e);
            }
        }
    }
}
- 反序列化
/**
 * 反序列化
 *
 * @author Xu huaiang
 * @date 2023/07/21
 */
public class ObjectInputStreamDemo {
    public static void main(String[] args) {
//        1.创建文件对象
        File file = new File("student_info.txt");
//        2.创建对象输入流
        ObjectInputStream objectInputStream = null;
        try {
            objectInputStream = new ObjectInputStream(new FileInputStream(file));
            Student student = (Student) objectInputStream.readObject();
            System.out.println(student);
        } catch (Exception e) {
            throw new RuntimeException(e);
        } finally {
            try {
                if (objectInputStream != null) {
                    objectInputStream.close();
                }
            } catch (IOException e) {
                throw new RuntimeException(e);
            }
        }
    }
}

7.5 反序列化失败问题
问题1:
对于JVM可以反序列化对象,它必须是能够找到class文件的类。如果找不到该类的class文件,则抛出一个 ClassNotFoundException 异常。
问题2:
当JVM反序列化对象时,能找到class文件,但是class文件在序列化对象之后发生了修改,那么反序列化操作也会失败,抛出一个InvalidClassException异常。发生这个异常的原因如下:
- 该类的序列版本号与从流中读取的类描述符的版本号不匹配
- 该类包含未知数据类型
解决办法:
Serializable 接口给需要序列化的类,提供了一个序列版本号:serialVersionUID 。凡是实现 Serializable接口的类都应该有一个表示序列化版本标识符的静态变量:
static final long serialVersionUID = 234242343243L; //它的值由程序员随意指定即可。- serialVersionUID用来表明类的不同版本间的兼容性。简单来说,Java的序列化机制是通过在运行时判断类的serialVersionUID来验证版本一致性的。在进行反序列化时,JVM会把传来的字节流中的serialVersionUID与本地相应实体类的serialVersionUID进行比较,如果相同就认为是一致的,可以进行反序列化,否则就会出现序列化版本不一致的异常(InvalidCastException)。
- 如果类没有显示定义这个静态常量,它的值是Java运行时环境根据类的内部细节
自动生成的。若类的实例变量做了修改,serialVersionUID可能发生变化。因此,建议显式声明。 - 如果声明了serialVersionUID,即使在序列化完成之后修改了类导致类重新编译,则原来的数据也能正常反序列化,只是新增的字段值是默认值而已。
package com.atguigu.object;

import java.io.Serializable;

public class Employee implements Serializable {
    private static final long serialVersionUID = 1324234L; //增加serialVersionUID

    //其它结构:略
}
8. 其他流的使用
8.1 标准输入、输出流
- System.in和System.out分别代表了系统标准的输入和输出设备
- 默认输入设备是:键盘,输出设备是:显示器
- System.in的类型是InputStream
- System.out的类型是PrintStream,其是OutputStream的子类FilterOutputStream 的子类
- 重定向:通过System类的setIn,setOut方法对默认设备进行改变。
- public static void setIn(InputStream in)
- public static void setOut(PrintStream out)
举例:
从键盘输入字符串,要求将读取到的整行字符串转成大写输出。然后继续进行输入操作,直至当输入“e”或者“exit”时,退出程序。
System.out.println("请输入信息(退出输入e或exit):");
// 把"标准"输入流(键盘输入)这个字节流包装成字符流,再包装成缓冲流
BufferedReader br = new BufferedReader(new InputStreamReader(System.in));
String s = null;
try {
    while ((s = br.readLine()) != null) { // 读取用户输入的一行数据 --> 阻塞程序
        if ("e".equalsIgnoreCase(s) || "exit".equalsIgnoreCase(s)) {
            System.out.println("安全退出!!");
            break;
        }
        // 将读取到的整行字符串转成大写输出
        System.out.println("-->:" + s.toUpperCase());
        System.out.println("继续输入信息");
    }
} catch (IOException e) {
    e.printStackTrace();
} finally {
    try {
        if (br != null) {
            br.close(); // 关闭过滤流时,会自动关闭它包装的底层节点流
        }
    } catch (IOException e) {
        e.printStackTrace();
    }
}
拓展:
System类中有三个常量对象:System.out、System.in、System.err
查看System类中这三个常量对象的声明:
public final static InputStream in = null;
public final static PrintStream out = null;
public final static PrintStream err = null;
奇怪的是,
- 这三个常量对象有final声明,但是却初始化为null。final声明的常量一旦赋值就不能修改,那么null不会空指针异常吗?
- 这三个常量对象为什么要小写?final声明的常量按照命名规范不是应该大写吗?
- 这三个常量的对象有set方法?final声明的常量不是不能修改值吗?set方法是如何修改它们的值的?
final声明的常量,表示在Java的语法体系中它们的值是不能修改的,而这三个常量对象的值是由C/C++等系统函数进行初始化和修改值的,所以它们故意没有用大写,也有set方法。public static void setOut(PrintStream out) {
checkIO();
setOut0(out);
}
public static void setErr(PrintStream err) {
checkIO();
setErr0(err);
}
public static void setIn(InputStream in) {
checkIO();
setIn0(in);
}
private static void checkIO() {
SecurityManager sm = getSecurityManager();
if (sm != null) {
sm.checkPermission(new RuntimePermission("setIO"));
}
}
private static native void setIn0(InputStream in);
private static native void setOut0(PrintStream out);
private static native void setErr0(PrintStream err);练习:
Create a program named MyInput.java: Contain the methods for reading int, double, float, boolean, short, byte and String values from the keyboard.

package com.atguigu.java;
// MyInput.java: Contain the methods for reading int, double, float, boolean, short, byte and
// string values from the keyboard

import java.io.*;

public class MyInput {
    // Read a string from the keyboard
    public static String readString() {
        BufferedReader br = new BufferedReader(new InputStreamReader(System.in));

        // Declare and initialize the string
        String string = "";

        // Get the string from the keyboard
        try {
            string = br.readLine();

        } catch (IOException ex) {
            System.out.println(ex);
        }

        // Return the string obtained from the keyboard
        return string;
    }

    // Read an int value from the keyboard
    public static int readInt() {
        return Integer.parseInt(readString());
    }

    // Read a double value from the keyboard
    public static double readDouble() {
        return Double.parseDouble(readString());
    }

    // Read a byte value from the keyboard
    public static double readByte() {
        return Byte.parseByte(readString());
    }

    // Read a short value from the keyboard
    public static double readShort() {
        return Short.parseShort(readString());
    }

    // Read a long value from the keyboard
    public static double readLong() {
        return Long.parseLong(readString());
    }

    // Read a float value from the keyboard
    public static double readFloat() {
        return Float.parseFloat(readString());
    }
}
8.2 打印流
实现将基本数据类型的数据格式转化为字符串输出。
打印流:
PrintStream和PrintWriter提供了一系列重载的print()和println()方法,用于多种数据类型的输出
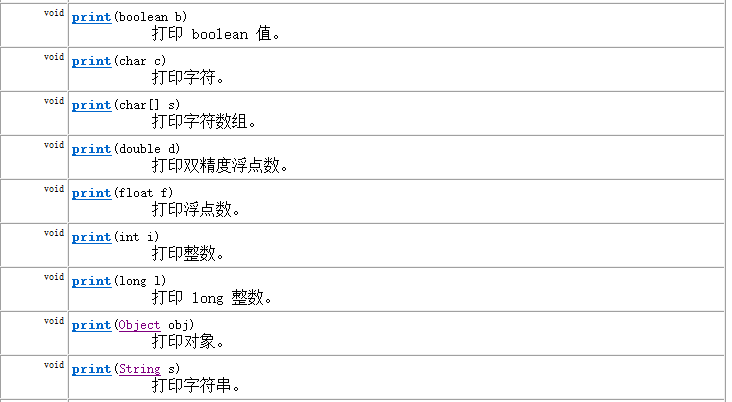
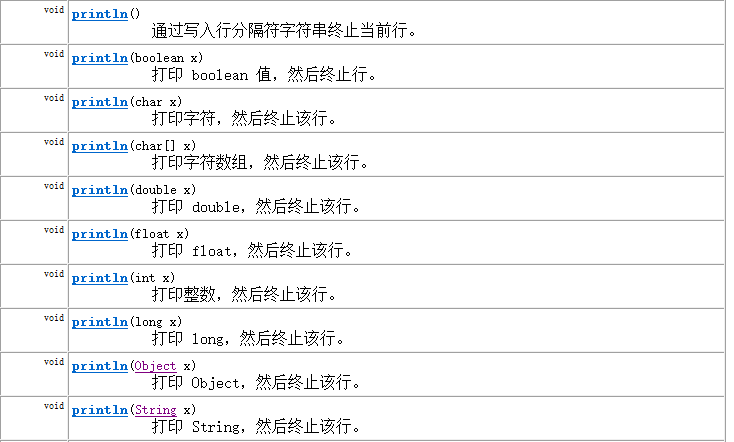
PrintStream和PrintWriter的输出不会抛出IOException异常
PrintStream和PrintWriter有自动flush功能
PrintStream 打印的所有字符都使用平台的默认字符编码转换为字节。在需要写入字符而不是写入字节的情况下,应该使用 PrintWriter 类。
System.out返回的是PrintStream的实例
构造器
- PrintStream(File file) :创建具有指定文件且不带自动行刷新的新打印流。
- PrintStream(File file, String csn):创建具有指定文件名称和字符集且不带自动行刷新的新打印流。
- PrintStream(OutputStream out) :创建新的打印流。
- PrintStream(OutputStream out, boolean autoFlush):创建新的打印流。 autoFlush如果为 true,则每当写入 byte 数组、调用其中一个 println 方法或写入换行符或字节 (‘\n’) 时都会刷新输出缓冲区。
- PrintStream(OutputStream out, boolean autoFlush, String encoding) :创建新的打印流。
- PrintStream(String fileName):创建具有指定文件名称且不带自动行刷新的新打印流。
- PrintStream(String fileName, String csn) :创建具有指定文件名称和字符集且不带自动行刷新的新打印流。
代码举例1
package com.atguigu.systemio;

import java.io.FileNotFoundException;
import java.io.PrintStream;

public class TestPrintStream {
    public static void main(String[] args) throws FileNotFoundException {
        PrintStream ps = new PrintStream("io.txt");
        ps.println("hello");
        ps.println(1);
        ps.println(1.5);
        ps.close();
    }
}
- 代码举例2
PrintStream ps = null;
try {
    FileOutputStream fos = new FileOutputStream(new File("D:\\IO\\text.txt"));
    // 创建打印输出流,设置为自动刷新模式(写入换行符或字节 '\n' 时都会刷新输出缓冲区)
    ps = new PrintStream(fos, true);
    if (ps != null) {// 把标准输出流(控制台输出)改成文件
        System.setOut(ps);
    }
    for (int i = 0; i <= 255; i++) { // 输出ASCII字符
        System.out.print((char) i);
        if (i % 50 == 0) { // 每50个数据一行
            System.out.println(); // 换行
        }
    }
} catch (FileNotFoundException e) {
    e.printStackTrace();
} finally {
    if (ps != null) {
        ps.close();
    }
}
- 代码举例3:自定义一个日志工具
/*
日志工具
 */
public class Logger {
    /*
    记录日志的方法。
     */
    public static void log(String msg) {
        try {
            // 指向一个日志文件
            PrintStream out = new PrintStream(new FileOutputStream("log.txt", true));
            // 改变输出方向
            System.setOut(out);
            // 日期当前时间
            Date nowTime = new Date();
            SimpleDateFormat sdf = new SimpleDateFormat("yyyy-MM-dd HH:mm:ss SSS");
            String strTime = sdf.format(nowTime);

            System.out.println(strTime + ": " + msg);
        } catch (FileNotFoundException e) {
            e.printStackTrace();
        }
    }
}
public class LogTest {
public static void main(String[] args) {
//测试工具类是否好用
Logger.log("调用了System类的gc()方法,建议启动垃圾回收");
Logger.log("调用了TeamView的addMember()方法");
Logger.log("用户尝试进行登录,验证失败");
}
}8.3 Scanner类
构造方法
- Scanner(File source) :构造一个新的 Scanner,它生成的值是从指定文件扫描的。
- Scanner(File source, String charsetName) :构造一个新的 Scanner,它生成的值是从指定文件扫描的。
- Scanner(InputStream source) :构造一个新的 Scanner,它生成的值是从指定的输入流扫描的。
- Scanner(InputStream source, String charsetName) :构造一个新的 Scanner,它生成的值是从指定的输入流扫描的。
常用方法:
- boolean hasNextXxx(): 如果通过使用nextXxx()方法,此扫描器输入信息中的下一个标记可以解释为默认基数中的一个 Xxx 值,则返回 true。
- Xxx nextXxx(): 将输入信息的下一个标记扫描为一个Xxx
package com.atguigu.systemio;

import org.junit.Test;

import java.io.*;
import java.util.Scanner;

public class TestScanner {

    @Test
    public void test01() throws IOException {
        Scanner input = new Scanner(System.in);
        PrintStream ps = new PrintStream("1.txt");
        while(true){
            System.out.print("请输入一个单词:");
            String str = input.nextLine();
            if("stop".equals(str)){
                break;
            }
            ps.println(str);
        }
        input.close();
        ps.close();
    }

    @Test
    public void test2() throws IOException {
        Scanner input = new Scanner(new FileInputStream("1.txt"));
        while(input.hasNextLine()){
            String str = input.nextLine();
            System.out.println(str);
        }
        input.close();
    }
}
9. apache-common包的使用
9.1 介绍
IO技术开发中,代码量很大,而且代码的重复率较高,为此Apache软件基金会,开发了IO技术的工具类commonsIO,大大简化了IO开发。
Apahce软件基金会属于第三方,(Oracle公司第一方,我们自己第二方,其他都是第三方)我们要使用第三方开发好的工具,需要添加jar包。
9.2 导包及举例
- 在导入commons-io-2.5.jar包之后,内部的API都可以使用。

- IOUtils类的使用
- 静态方法:IOUtils.copy(InputStream in,OutputStream out)传递字节流,实现文件复制。
- 静态方法:IOUtils.closeQuietly(任意流对象)悄悄的释放资源,自动处理close()方法抛出的异常。
public class Test01 {
public static void main(String[] args)throws Exception {
//- 静态方法:IOUtils.copy(InputStream in,OutputStream out)传递字节流,实现文件复制。
IOUtils.copy(new FileInputStream("E:\\Idea\\io\\1.jpg"),new FileOutputStream("E:\\Idea\\io\\file\\柳岩.jpg"));
//- 静态方法:IOUtils.closeQuietly(任意流对象)悄悄的释放资源,自动处理close()方法抛出的异常。
/* FileWriter fw = null;
try {
fw = new FileWriter("day21\\io\\writer.txt");
fw.write("hahah");
} catch (IOException e) {
e.printStackTrace();
}finally {
IOUtils.closeQuietly(fw);
}*/
}
}- FileUtils类的使用
- 静态方法:void copyDirectoryToDirectory(File src,File dest):整个目录的复制,自动进行递归遍历
          参数:
          src:要复制的文件夹路径
          dest:要将文件夹粘贴到哪里去

- 静态方法:void writeStringToFile(File file,String content):将内容content写入到file中
- 静态方法:String readFileToString(File file):读取文件内容,并返回一个String
- 静态方法:void copyFile(File srcFile,File destFile):文件复制
public class Test02 {
public static void main(String[] args) {
try {
//- 静态方法:void copyDirectoryToDirectory(File src,File dest);
FileUtils.copyDirectoryToDirectory(new File("E:\\Idea\\io\\aa"),new File("E:\\Idea\\io\\file"));
//- 静态方法:writeStringToFile(File file,String str)
FileUtils.writeStringToFile(new File("day21\\io\\commons.txt"),"柳岩你好");
//- 静态方法:String readFileToString(File file)
String s = FileUtils.readFileToString(new File("day21\\io\\commons.txt"));
System.out.println(s);
//- 静态方法:void copyFile(File srcFile,File destFile)
FileUtils.copyFile(new File("io\\yangm.png"),new File("io\\yangm2.png"));
System.out.println("复制成功");
} catch (IOException e) {
e.printStackTrace();
}
}
}10.随堂复习
1. File类的使用
- File类的一个实例对应着磁盘上的一个文件或文件目录。 —-> “万事万物皆对象”
- (熟悉)File的实例化、常用的方法
- File类中只有新建、删除、获取路径等方法,不包含读写文件的方法。此时需要使用IO流
2. IO流的概述
- IO流的分类
- 流向:输入流、输出流
- 处理数据单位:字节流、字符流
- 流的角色:节点流、处理流
- IO的4个抽象基类:InputStream \ OutputStream \ Reader \ Writer
3. 节点流之:文件流
- FileInputStream \ FileOutputStream \ FileReader \ FileWriter
- (掌握)读写数据的过程。
- 步骤1:创建File类的对象,作为读取或写出数据的端点
- 步骤2:创建相关的流的对象
- 步骤3:读取、写出数据的过程
- 步骤4:关闭流资源
4. 处理流之一:缓冲流
- BufferedInputStream \ BufferedOutputStream \ BufferedReader \ BufferedWriter
- 作用:实现更高效的读写数据的操作
5. 处理流之二:转换流
- 层次1:熟悉转换流的使用
- InputStreamReader、OutputStreamWriter
- 层次2:(掌握)字符的编码和解码的过程、常用的字符集
- 解决相关的问题:读写字符出现乱码!本质问题:使用的解码集与编码集不一致。
6. 处理流之三:对象流
- 层次1:熟悉对象流的使用
- ObjectInputStream:反序列化时需要使用的api
- ObjectOutputStream:序列化时需要使用的api
- 层次2:对象的序列化机制
- 使用场景:不同的进程之间通信、客户端(或浏览器端)与服务器端传输数据
- 自定义类要想实现序列化机制需要满足的要求及注意点。
7. 其它流的使用
- 了解:数据流:DataInputStream 、DataOutputStream
- 了解:标准的输入流、标准的输出流:System.in 、System.out
- 了解:打印流:PrintStream、PrintWriter
11.企业真题
2.1 IO流概述
1. 谈谈Java IO里面的常用类,字节流,字符流(银*数据)
略
2. Java 中有几种类型的流?JDK为每种类型的流提供一些抽象类以供继承,请说出他们分别是哪些类?(上海*厦*联网、极*科技)
InputStream \ OutputStream \ Reader \ Writer
3. 流一般需不需要关闭?如果关闭的话用什么方法?处理流是怎么关闭的?(银*数据)
需要。close()
处理流在关闭过程中,也会关闭内部的流。
4. OutputStream里面的write()是什么意思?(君*科技)
数据写出的意思。
2.2 缓冲流
1. BufferedReader属于哪种流?他主要是用来做什么的?(国*电网)
略
2. 什么是缓冲区?有什么作用?(北京中油**)
内部提供了一个数组,将读取或要写出的数据,现在此数组中缓存。达到一定程度时,集中性的写出。
作用:减少与磁盘的交互,进而提升读写效率。
2.3 转换流
1. 字节流和字符流是什么?怎么转换?(北京蓝*、*海*供应链管理)
2.4 序列化
1. 什么是Java序列化,如何实现(君*科技、上海*厦物联网)
对象序列化机制允许把内存中的Java对象转换成平台无关的二进制流,从而允许把这种二进制流持久地保存在磁盘上,
或通过网络将这种二进制流传输到另一个网络节点。//当其它程序获取了这种二进制流,就可以恢复成原来的Java对象。
2. Java有些类中为什么需要实现Serializable接口?(阿*校招)
便于此类的对象实现序列化操作。